[网络基础]:基于路由器、交换机、vlan、ARP、三层交换机、HSRP、ACL、NAT的综合实验
[网络基础]:基于路由器、交换机、vlan、ARP、三层交换机、HSRP、ACL、NAT的综合实验
通过前面对路由器、交换机、vlan、ARP、三层交换机、HSRP、ACL、NAT、动态路由的学习,我对网络的搭建以及规划有了进一步的认识和学习。今天我将结合前面所学的知识进行汇总,完成这一大型网络的搭建!
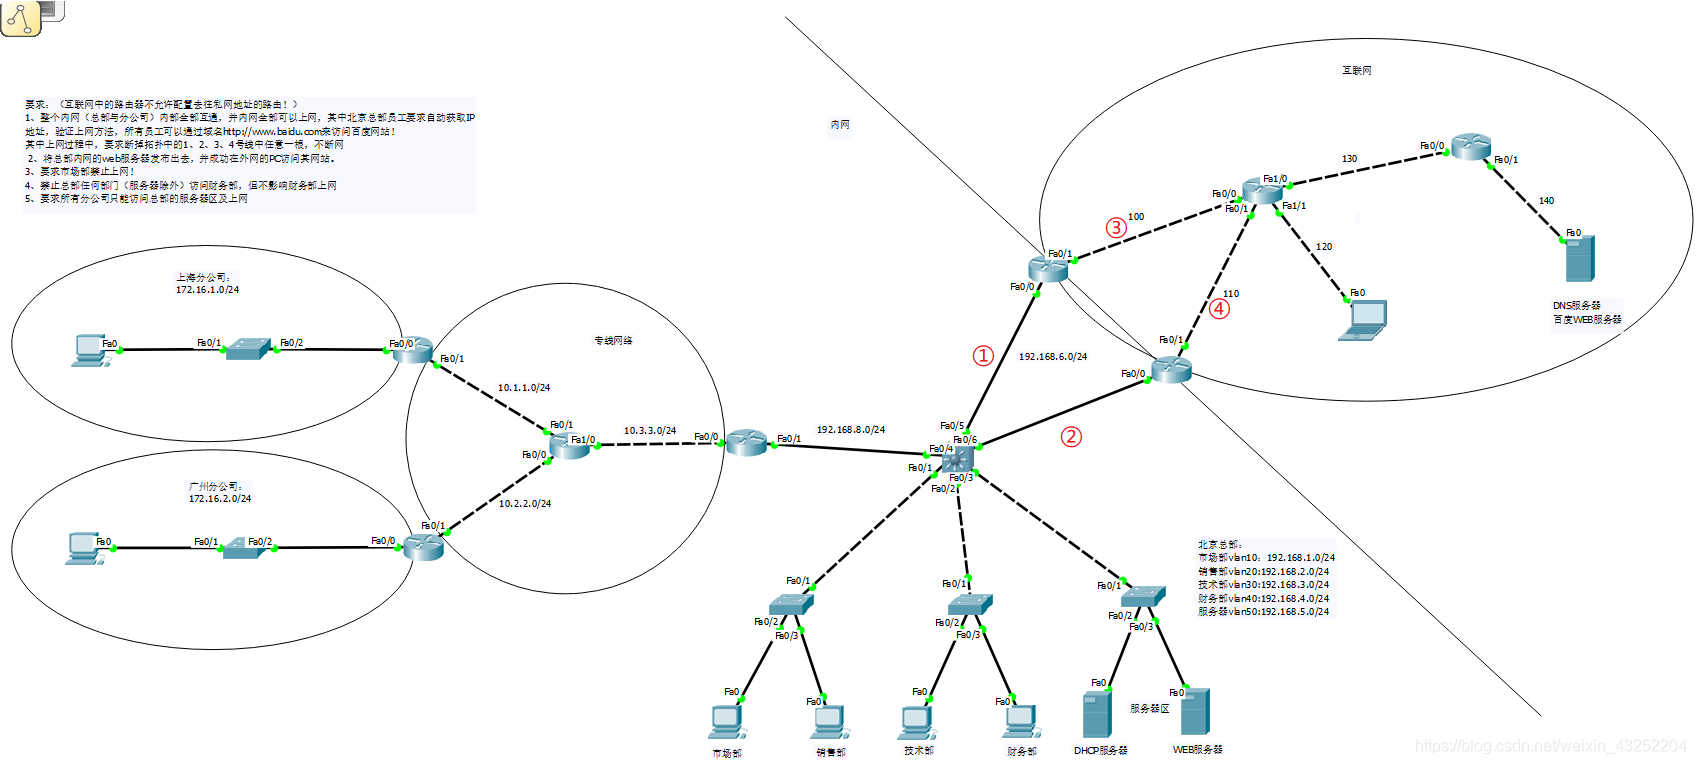
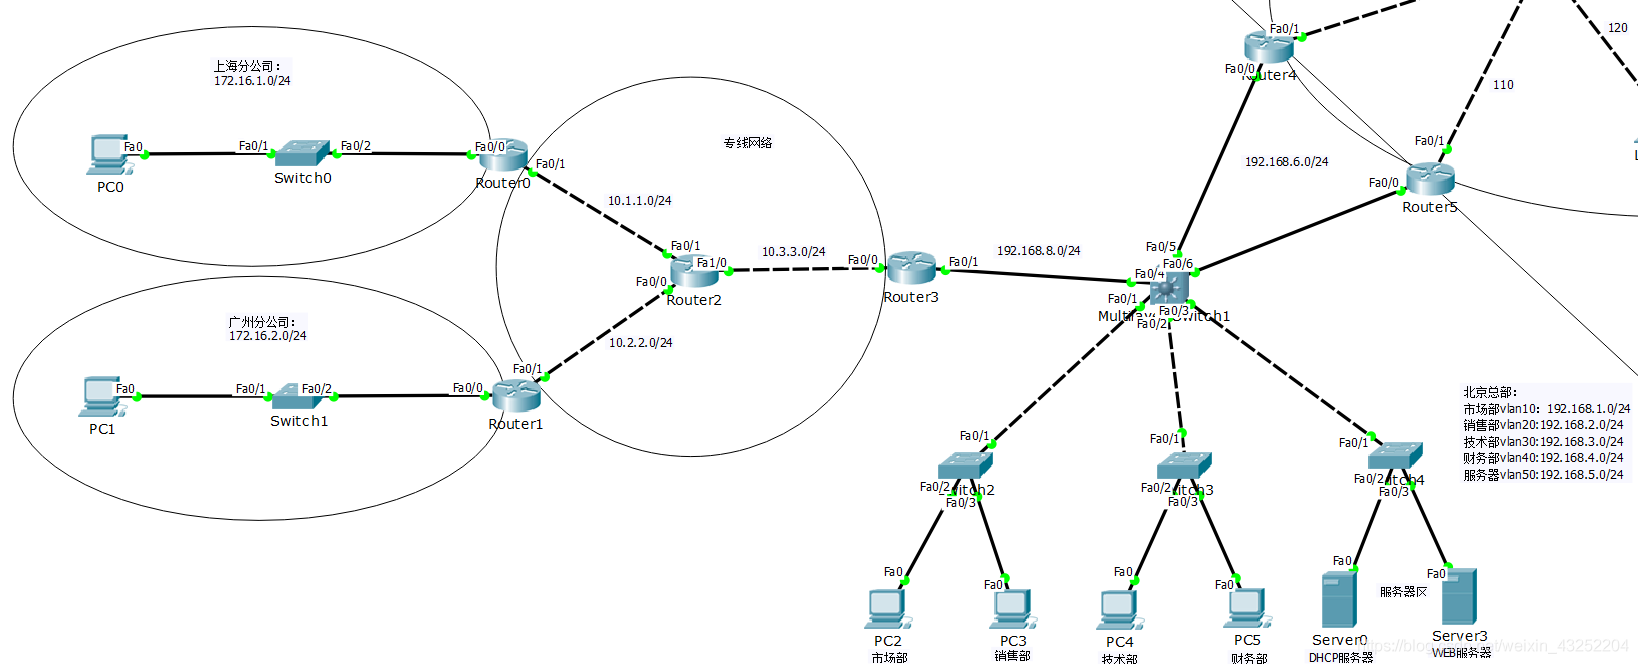
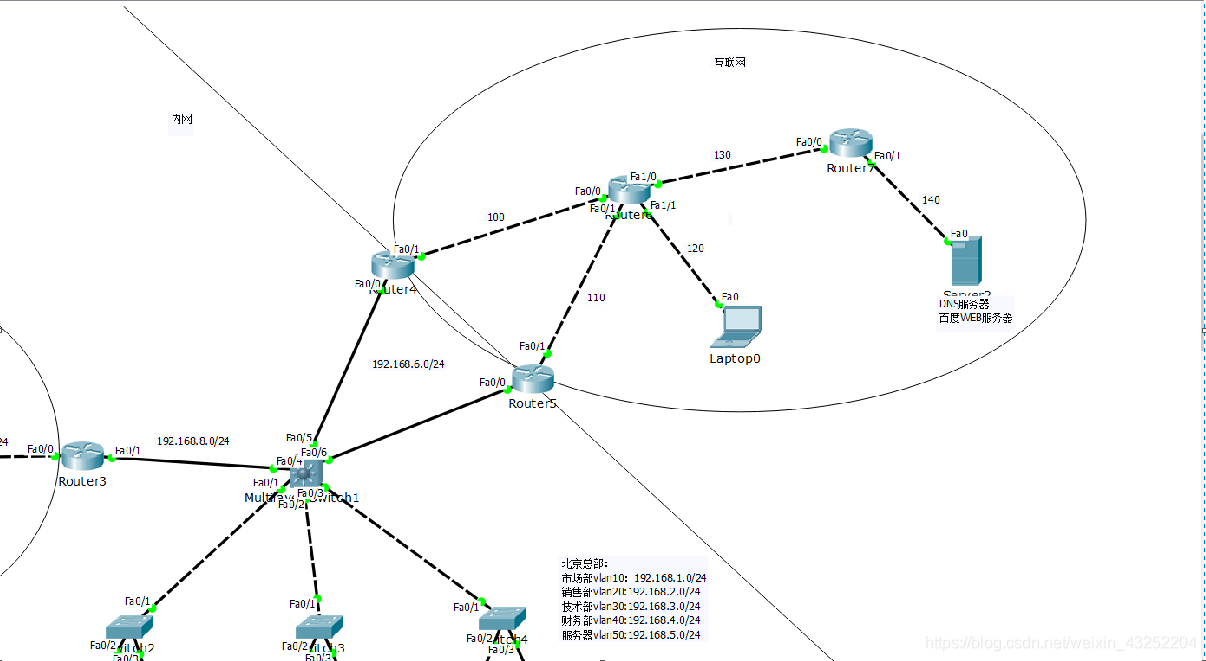
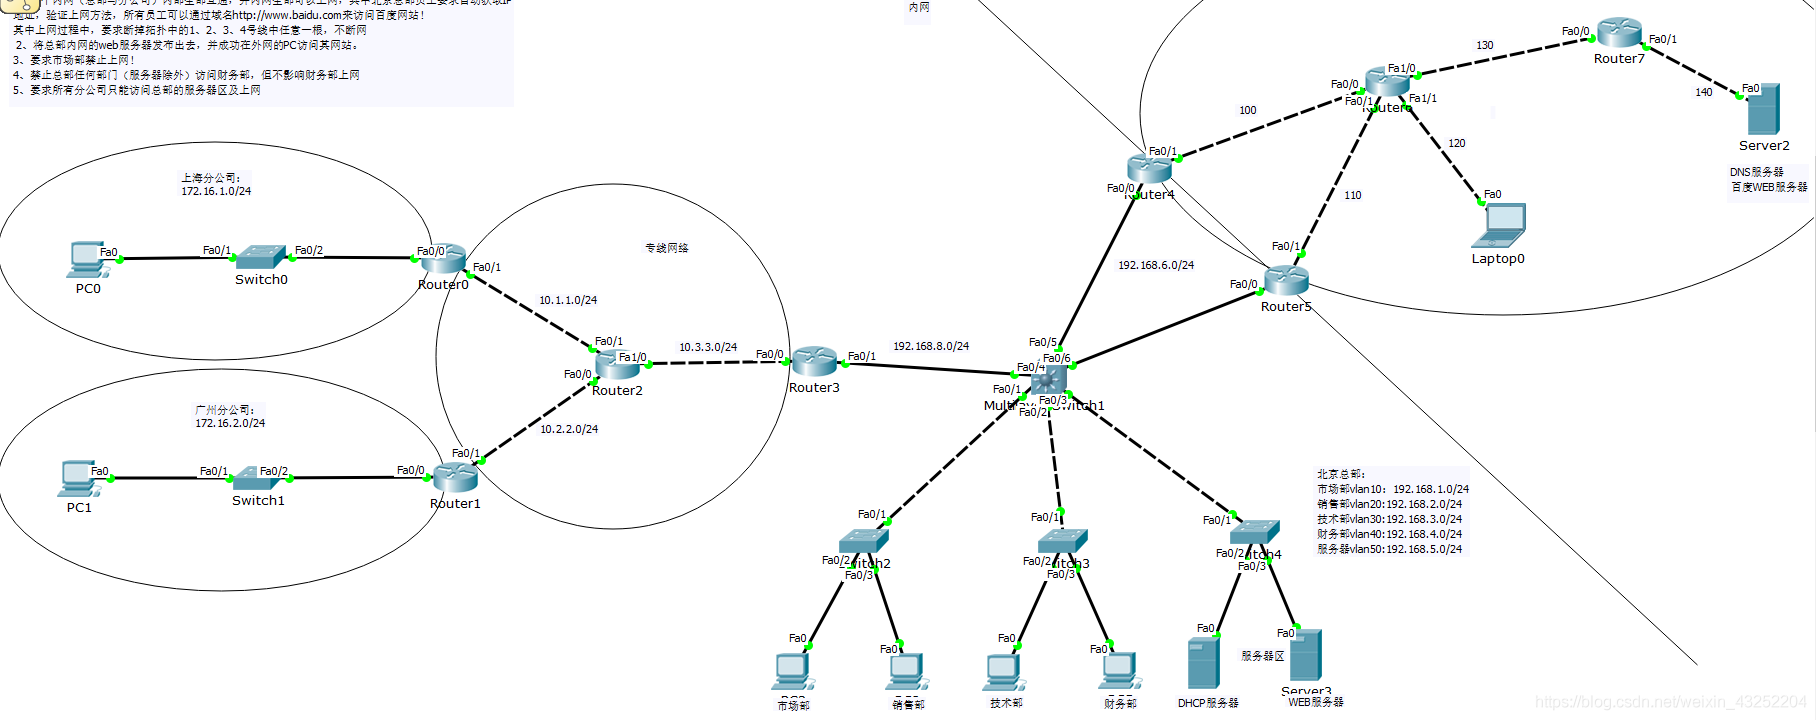
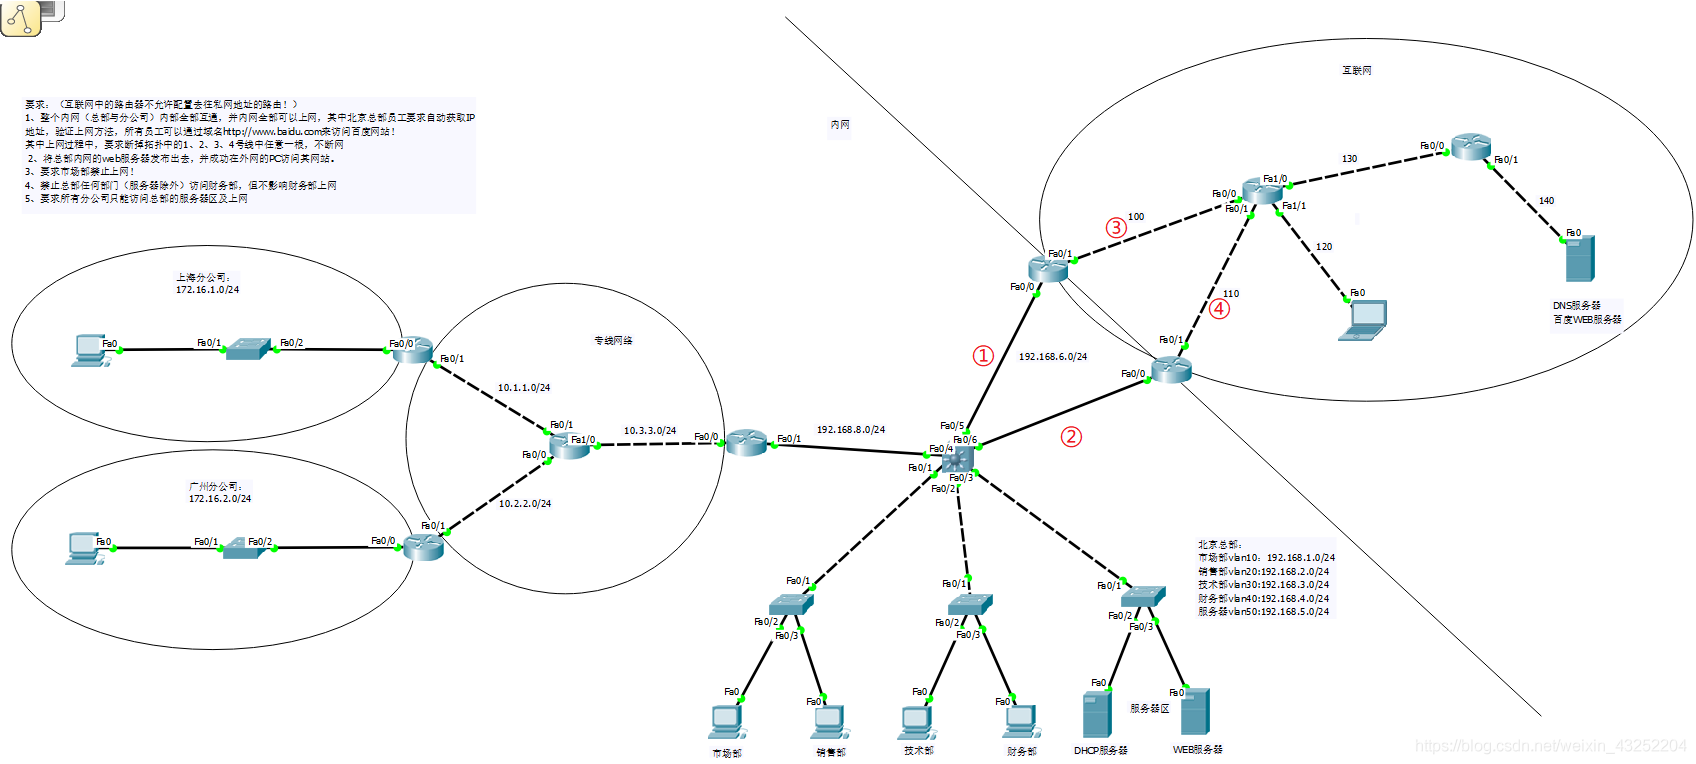
实验拓扑图:
实验环境:

要求:
(互联网中的路由器不允许配置去往私网地址的路由!)
1、整个内网(总部与分公司)内部全部互通,并内网全部可以上网,其中北京总部员工要求自动获取IP
地址,验证上网方法,所有员工可以通过域名http://www.baidu.com来访问百度网站!
其中上网过程中,要求断掉拓扑中的1、2、3、4号线中任意一根,不断网
2、将总部内网的web服务器发布出去,并成功在外网的PC访问其网站。
3、要求市场部禁止上网!
4、禁止总部任何部门(服务器除外)访问财务部,但不影响财务部上网
5、要求所有分公司只能访问总部的服务器区及上网
好了,接下来我们就来配置这个大型的家伙!
1、完成对分公司的网络的配置:
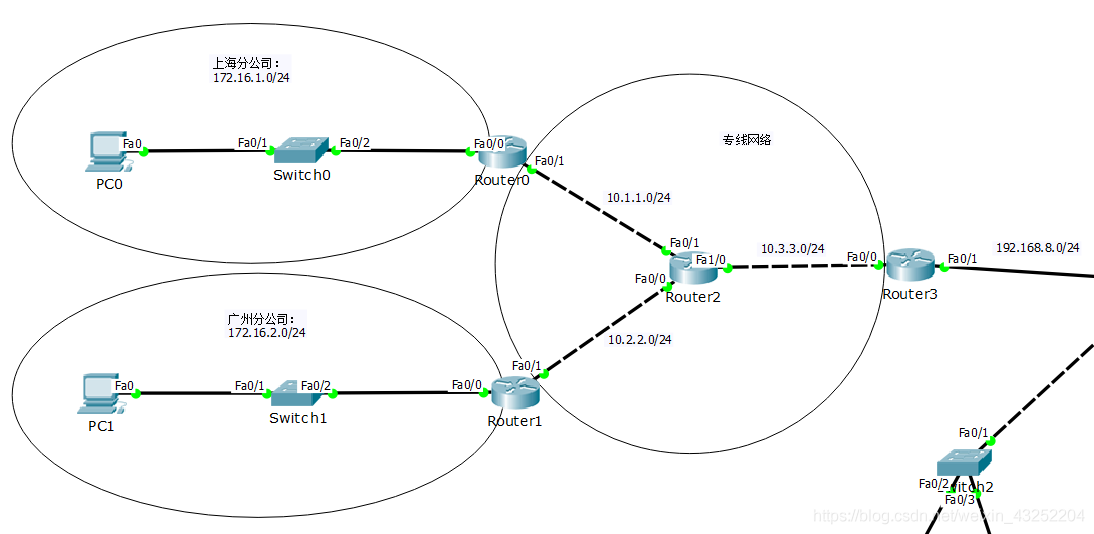
1)配置路由
Router0:
en
conf t
int f0/0
ip add 172.16.1.254 255.255.255.0
no sh
ex
int f0/1
ip add 10.1.1.1 255.255.255.0
no sh
ex
ip route 0.0.0.0 0.0.0.0 10.1.1.2
Router1:
en
conf t
int f0/0
ip add 172.16.2.254 255.255.255.0
no sh
ex
int f0/1
ip add 10.2.2.1 255.255.255.0
no sh
ex
ip route 0.0.0.0 0.0.0.0 10.2.2.2
Router2:
en
conf t
int f0/0
ip add 10.2.2.2 255.255.255.0
no sh
ex
int f0/1
ip add 10.1.1.2 255.255.255.0
no sh
ex
int f1/0
ip add 10.3.3.1 255.255.255.0
no sh
ex
ip route 0.0.0.0 0.0.0.0 10.3.3.2
ip route 172.16.1.0 255.255.255.0 10.1.1.1
ip route 172.16.2.0 255.255.255.0 10.2.2.1
Router3:
en
conf t
int f0/0
ip add 10.3.3.2 255.255.255.0
no sh
ex
int f0/1
ip add 192.168.8.1 255.255.255.0
no sh
ex
ip route 0.0.0.0 0.0.0.0 192.168.8.2
ip route 10.1.1.0 255.255.255.0 10.3.3.1
ip route 10.2.2.0 255.255.255.0 10.3.3.1
ip route 172.16.1.0 255.255.255.0 10.3.3.1
ip route 172.16.2.0 255.255.255.0 10.3.3.1
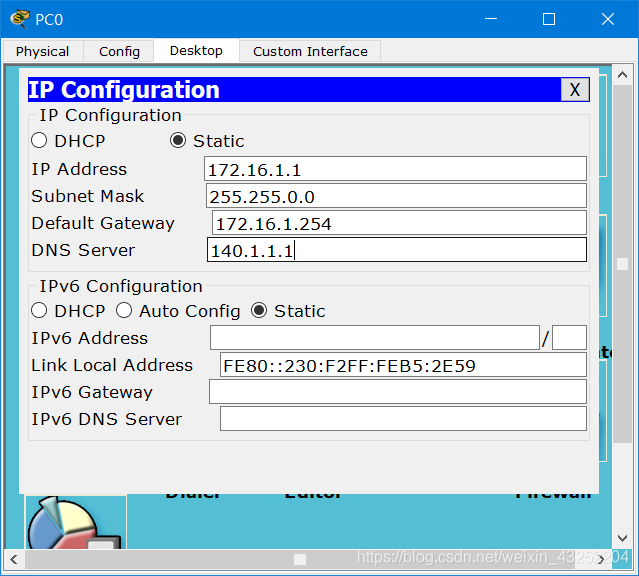
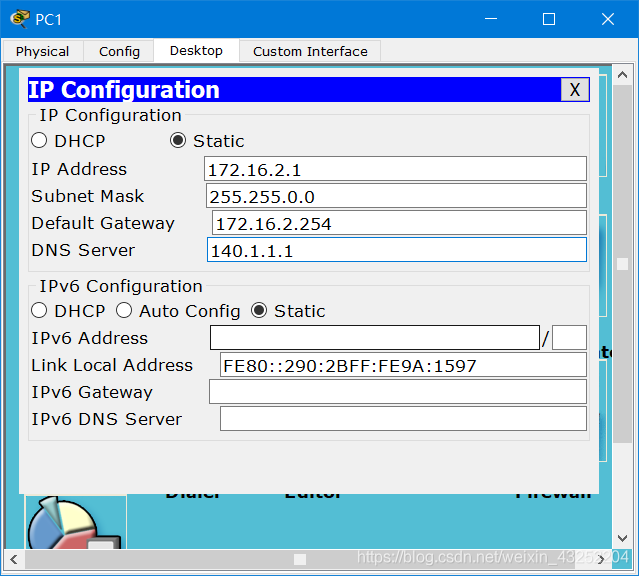
2)给PC0和PC1配置IP
DNS,指向的时外网的DNS服务器,以便将来可以通过域名访问外网的web服务器
测试网络连通性:


已实现全网联通。
2、实现总公司内部网络联通以及与分公司的网络联通
1)trunk
Switch2:
en
conf t
int f0/1
sw m t
Switch3:
en
conf t
int f0/1
sw m t
Switch4:
en
conf t
int f0/1
sw m t
三层交换机:
en
conf t
int range f0/1-3
sw tr en dot
sw m t
ex
2) vtp 与vlan
三层交换机
en
conf t
vtp domain test
vlan 10
vlan 20
vlan 30
vlan 40
vlan 50
ex
int f0/5
sw ac vlan 60
int f0/6
sw ac vlan 60
ex
int vlan 10
ip add 192.168.1.254 255.255.255.0
no sh
int vlan 20
ip add 192.168.2.254 255.255.255.0
no sh
int vlan 30
ip add 192.168.3.254 255.255.255.0
no sh
int vlan 40
ip add 192.168.4.254 255.255.255.0
no sh
int vlan 50
ip add 192.168.5.254 255.255.255.0
no sh
int vlan 60
ip add 192.168.6.254 255.255.255.0
no sh
ex
Switch2:
int f0/2
sw ac vlan 10
ex
int f0/3
sw ac vlan 20
ex
Switch3:
int f0/2
sw ac vlan 30
ex
int f0/3
sw ac vlan 40
ex
Switch4:
int f0/2
sw ac vlan 50
ex
int f0/3
sw ac vlan 50
ex
3)配置路由
三层交换机
en
conf t
ip routing
int f0/4
no sw
ip add 192.168.8.2 255.255.255.0
no sh
ex
ip route 172.16.1.0 255.255.255.0 192.168.8.1
ip route 172.16.2.0 255.255.255.0 192.168.8.1
ip route 10.1.1.0 255.255.255.0 192.168.8.1
ip route 10.2.2.0 255.255.255.0 192.168.8.1
ip route 10.3.3.0 255.255.255.0 192.168.8.1
4)配置DHCP服务器
三层交换机
int vlan 10
ip helper 192.168.5.1
int vlan 20
ip helper 192.168.5.1
int vlan 30
ip helper 192.168.5.1
int vlan 40
ip helper 192.168.5.1
Serrver0:
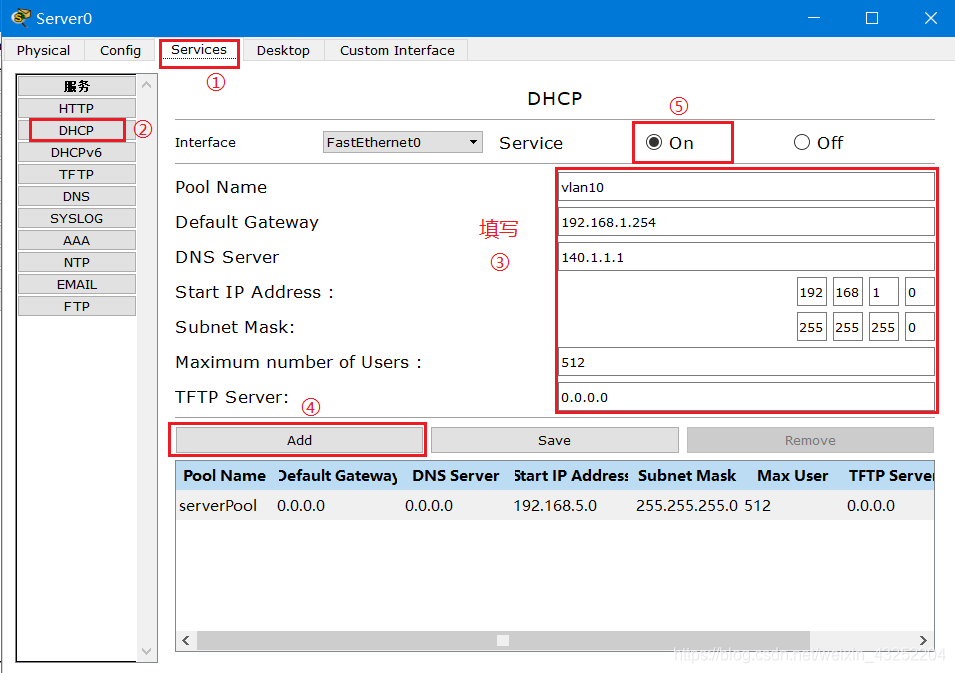
4个van网段都配置好后,点击开启服务。
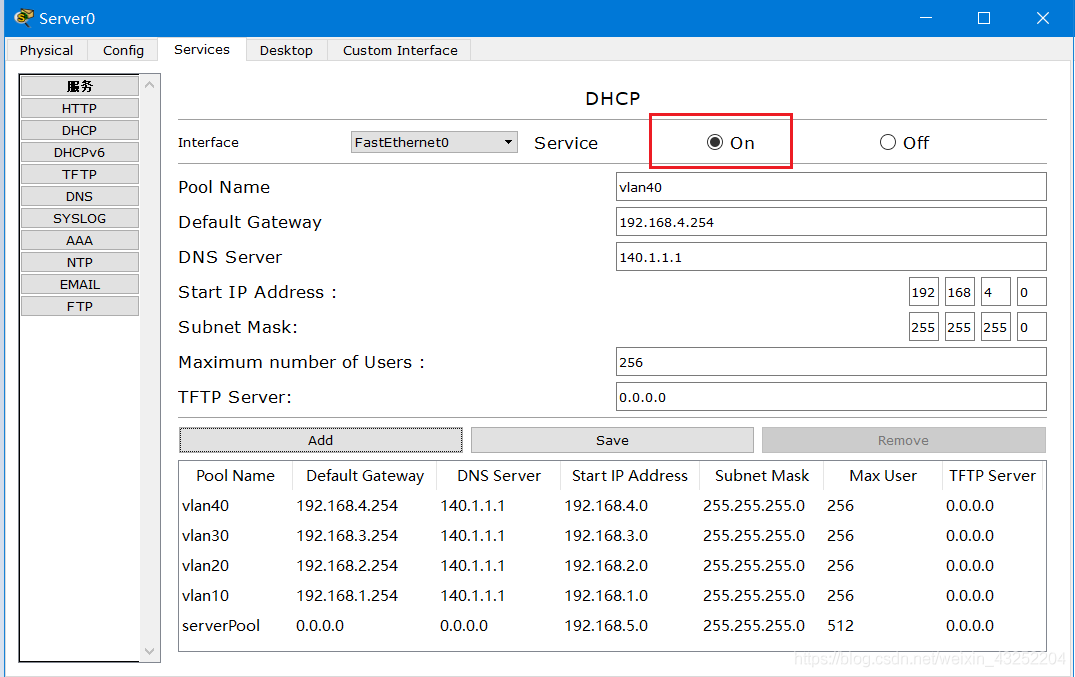
好了,现在我们打开PC,就可以自动获取IP了
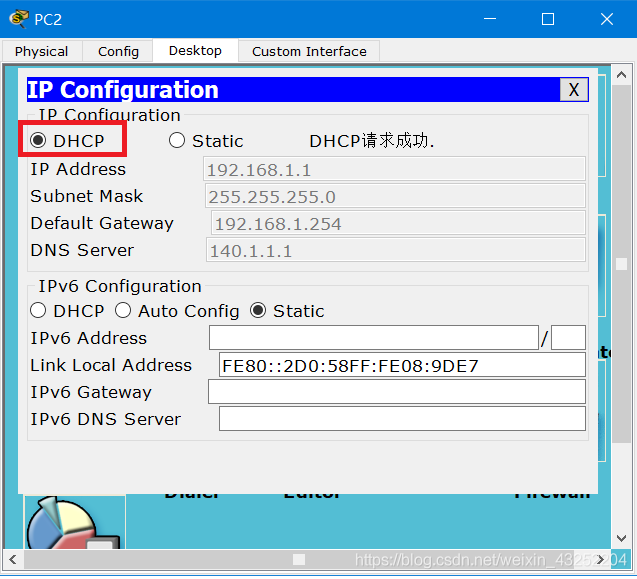
获取到IP后全公司网段就可以互通了
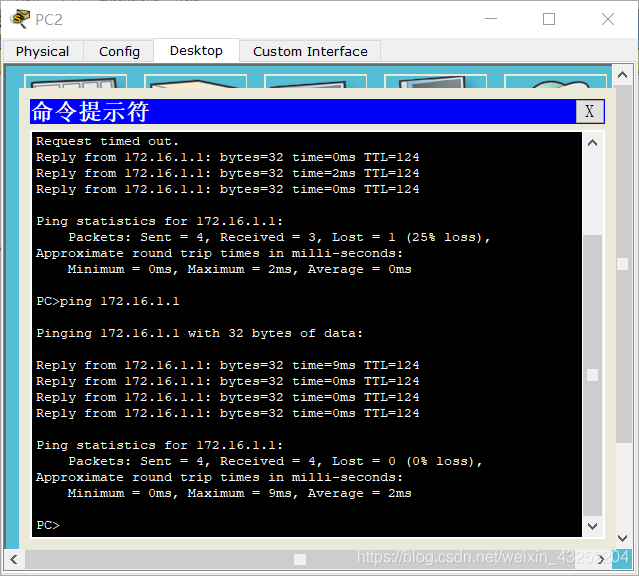
测试:用PC2去ping上海分公司的PC,测试成功!
3)内外网互通
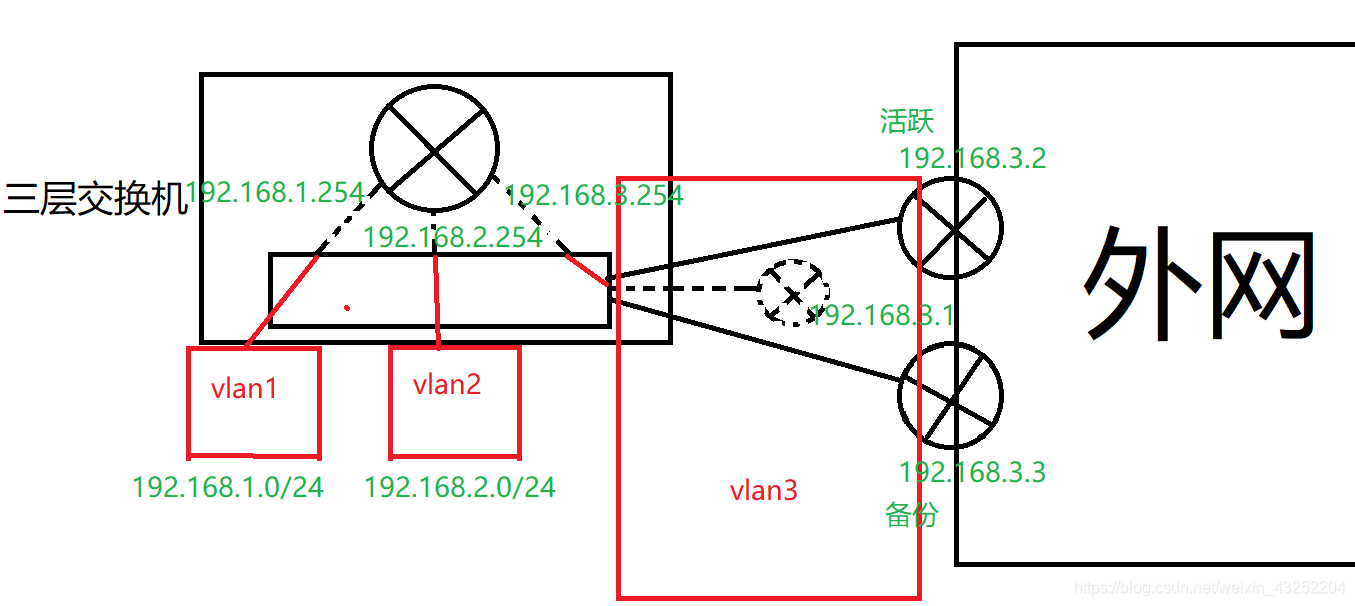
1)配置HSRP(热备份)
这个地方可能优点难理解,给大家画了一张图,希望能对你有所帮助:
Router4:
配置其为活跃路由,自己的IP:192.168.6.252,指向的虚拟路由时192.168.6.250。
走内网的数据路由器的下一条地址:192.168.6.254
en
conf t
int f0/0
ip add 192.168.6.252 255.255.255.0
no sh
standby 1 ip 192.168.6.250
standby 1 pri 200
standby 1 pree
standby 1 tra f0/1
ex
int f0/1
ip add 100.1.1.1 255.255.255.0
no sh
ex
ip route 192.168.1.0 255.255.255.0 192.168.6.254
ip route 192.168.2.0 255.255.255.0 192.168.6.254
ip route 192.168.3.0 255.255.255.0 192.168.6.254
ip route 192.168.4.0 255.255.255.0 192.168.6.254
ip route 192.168.5.0 255.255.255.0 192.168.6.254
ip route 172.16.1.0 255.255.255.0 192.168.6.254
ip route 172.16.2.0 255.255.255.0 192.168.6.254
Router5:
配置其为备份路由,自己的IP:192.168.6.253,指向的虚拟路由时192.168.6.250。
同样走内网的数据路由器的下一条地址:192.168.6.254
en
conf t
int f0/0
ip add 192.168.6.253 255.255.255.0
no sh
standby 1 ip 192.168.6.250
standby 1 pri 195
standby 1 pree
standby 1 tr f0/1
ex
int f0/1
ip add 110.1.1.1 255.255.255.0
no sh
ex
ip route 192.168.1.0 255.255.255.0 192.168.6.254
ip route 192.168.2.0 255.255.255.0 192.168.6.254
ip route 192.168.3.0 255.255.255.0 192.168.6.254
ip route 192.168.4.0 255.255.255.0 192.168.6.254
ip route 192.168.5.0 255.255.255.0 192.168.6.254
ip route 172.16.1.0 255.255.255.0 192.168.6.254
ip route 172.16.2.0 255.255.255.0 192.168.6.254
2)配置路由
三层交换机:
ip route 0.0.0.0 0.0.0.0 192.168.6.250
Router6:
en
conf t
int f0/0
ip add 100.1.1.2 255.255.255.0
no sh
int f0/1
ip add 110.1.1.2 255.255.255.0
no sh
int f01/0
ip add 130.1.1.1 255.255.255.0
no sh
int f1/1
ip add 120.1.1.254 255.255.255.0
no sh
ip route 140.1.1.0 255.255.255.0 130.1.1.2
Router7:
en
conf t
int f0/0
ip add 130.1.1.2 255.255.255.0
no sh
int f0/1
ip add 140.1.1.254 255.255.255.0
no sh
ip route 0.0.0.0 0.0.0.0 130.1.1.1
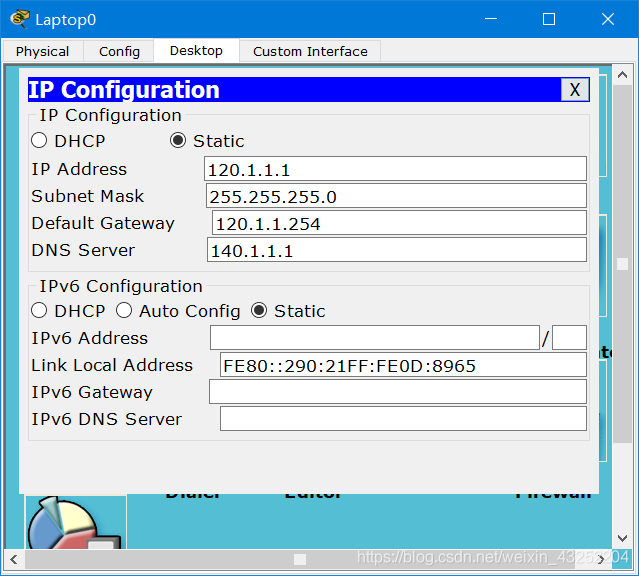
Laptop0:
3)NAT
Router4:
int f0/0
ip nat inside
ex
int f0/1
ip nat outside
ex
acc 1 permit 192.168.0.0 0.0.255.255
acc 1 permit 172.16.1.0 0.255.255.255
acc 1 permit 172.16.2.0 0.255.255.255
ip nat inside sou list 1 int f0/1 overload
Router5:
int f0/0
ip nat inside
ex
int f0/1
ip nat outside
ex
acc 1 permit 192.168.0.0 0.0.255.255
acc 1 permit 172.16.1.0 0.255.255.255
acc 1 permit 172.16.2.0 0.255.255.255
ip nat inside sou list 1 int f0/1 overload
测试:
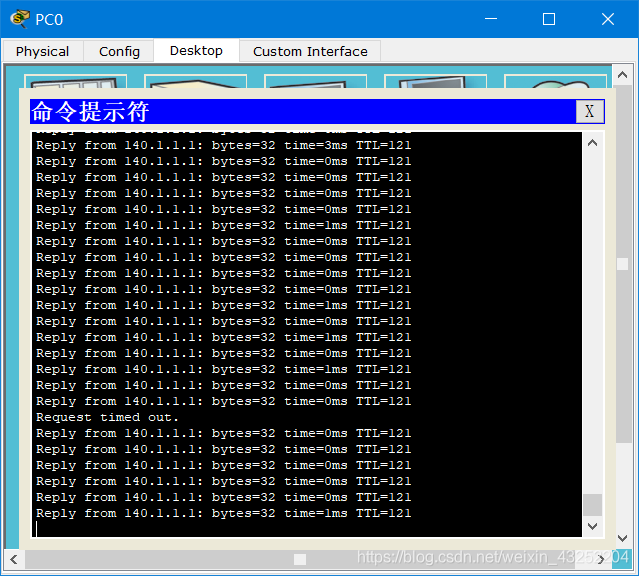
使用分公司的PC ping 140.1.1.1
ping -t 140.1.1.1
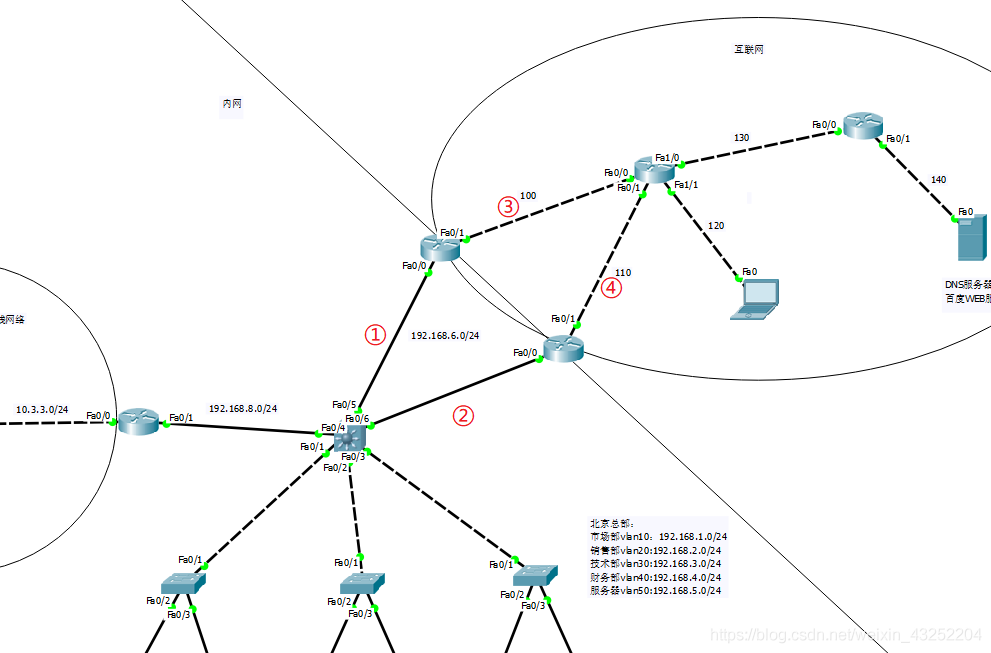
断开①,网络联通:
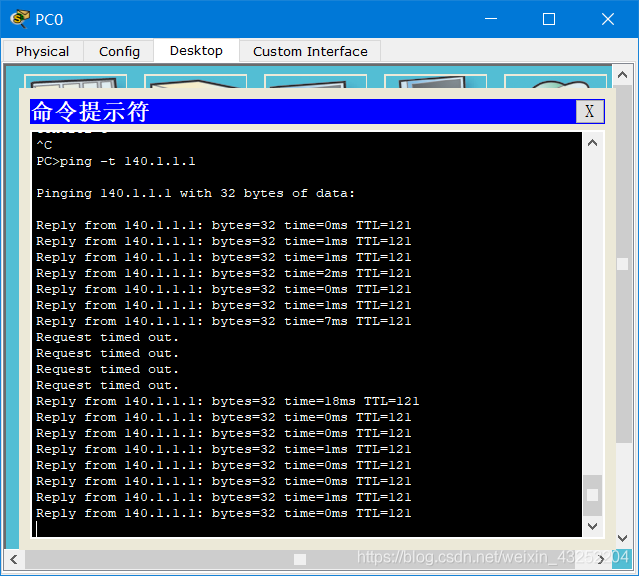
断开②,网络联通:
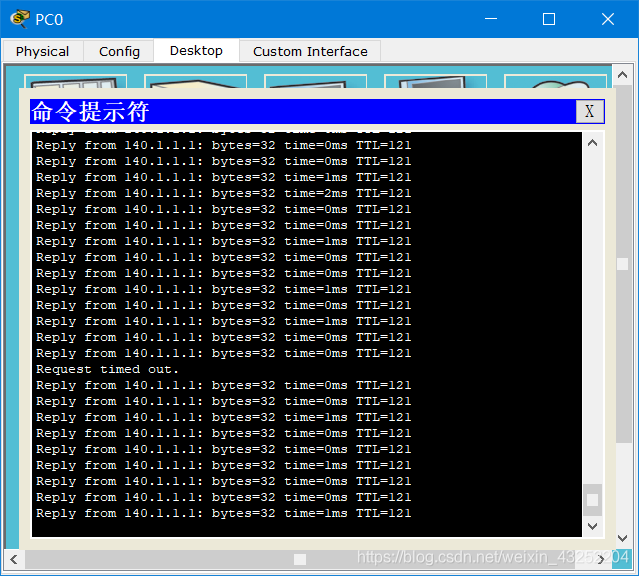
断开③,网络联通:
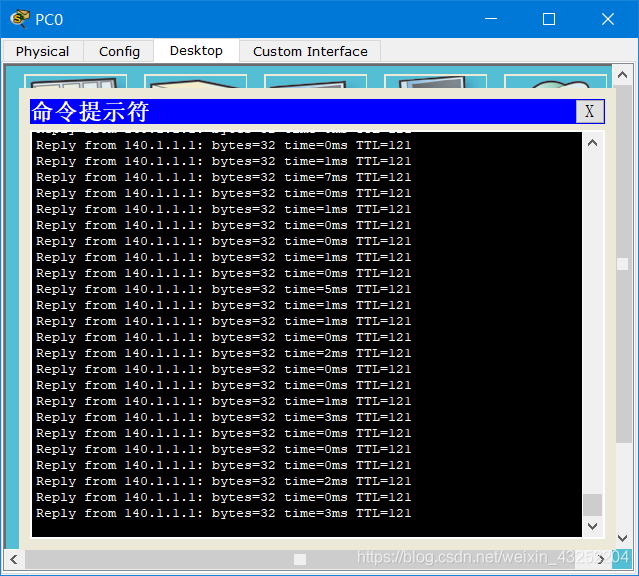
断开④,网络联通:
4、网站发布
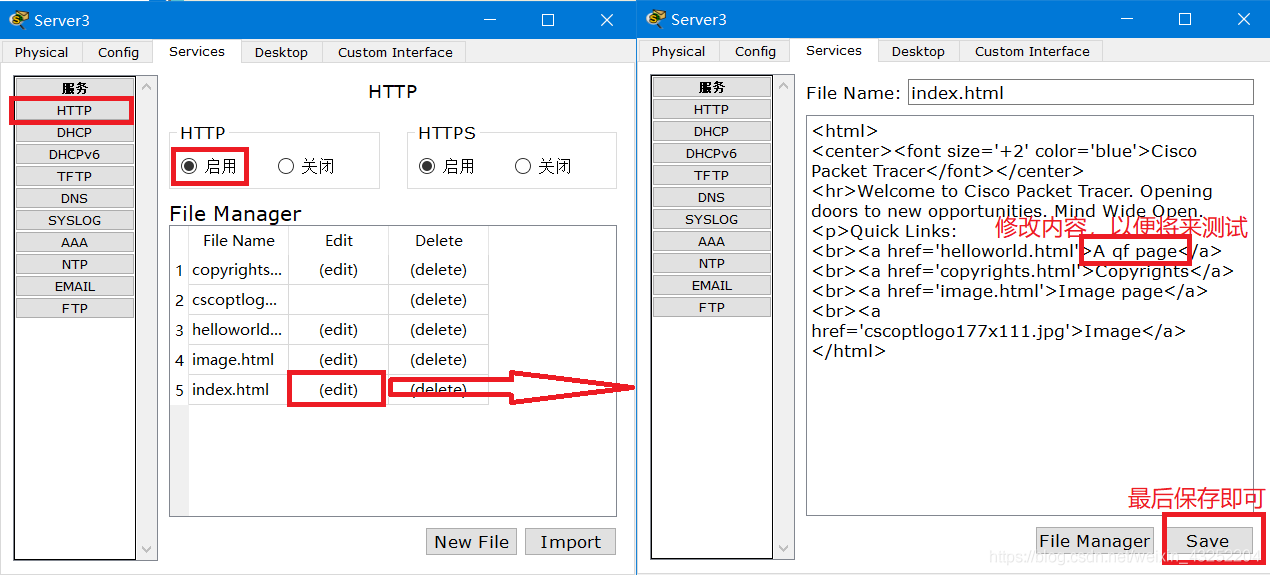
百度web服务器的搭建我就不概述了,这里重点说一下公司内部的网站如何发布出去。
1)搭建公司内部的网站:
1)在控制公司内外网的路由器上做静态NAT,我们选择Router4,新的公网IP为:100.1.1.3,只允许80端口的数据通过
Route4:
ip nat inside source static tcp 192.168.5.2 80 100.1.1.3 80
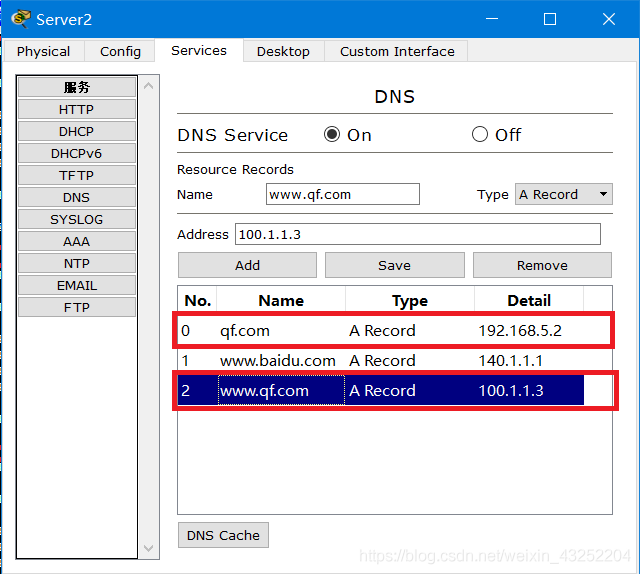
2)配置DNS服务器
百度的DNS服务器:
注:这里会出现一个新的问题:我们公司内部的PC访问公司的网站,我们给公司员工的DNS都指向了140.1.1.1,如果公司的员工输入域名,获取到的ip地址是100.1.1.3,而我们公司的员工又在内网,无法通过NAT转换IP。
以上:是在实验环境下的解决方法,在现实中,一般公司自己有DNS服务器,公司内部所有的员工都指到公司自己的DNS服务器,我们只要把这个DNS服务器设置转发器到外网的DNS服务器。这样就可以解决上述问题了。(自己有的直接发给你,没有的找外网的大哥)
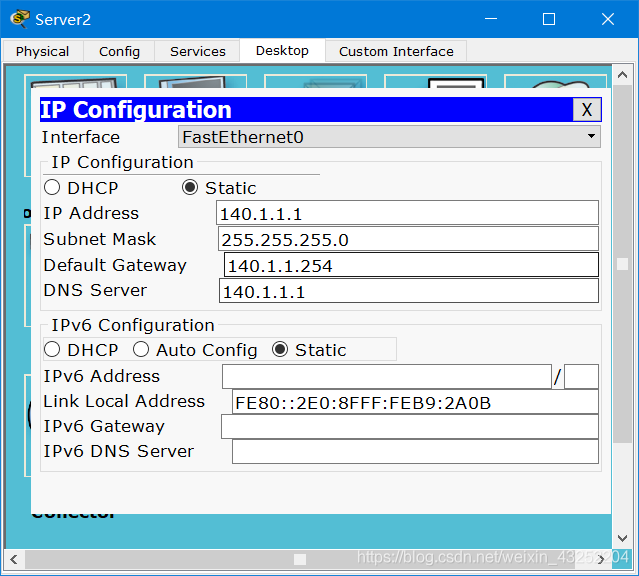
一个地址是百度web服务器IP地址,另外两个是公司的web服务器地址。
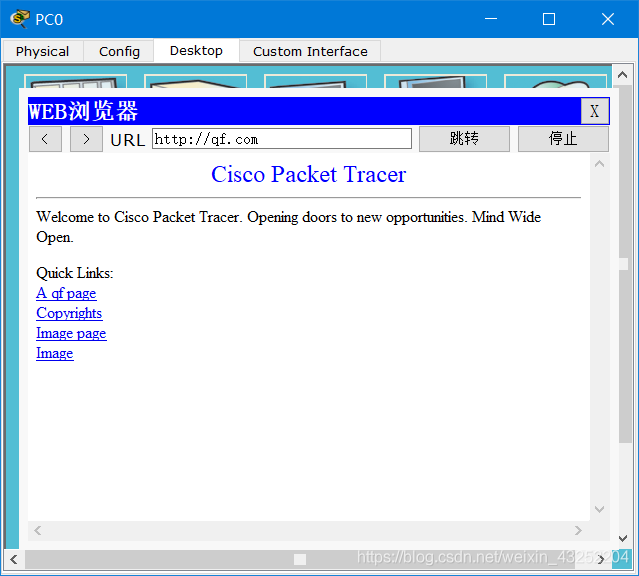
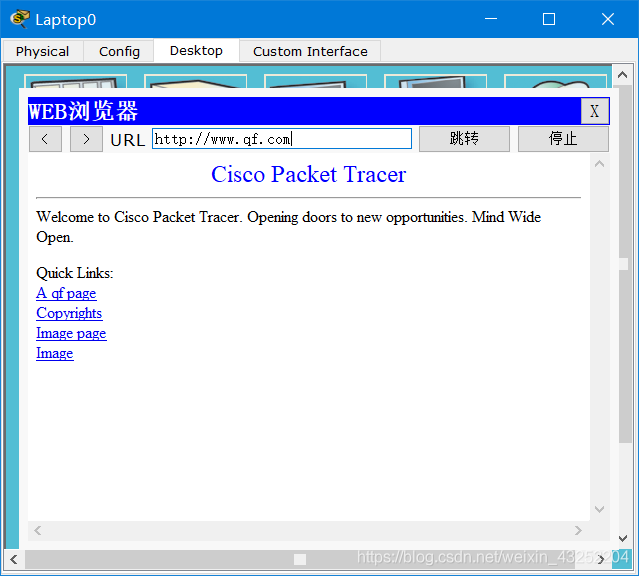
测试:
公司内部PC:
外网PC:
5、通过ACL包过滤技术对网络流量进行控制
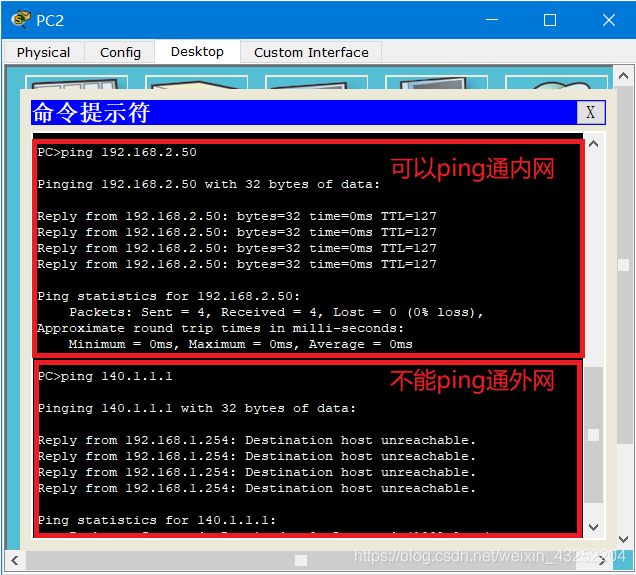
1)要求市场部禁止上网
因为只要求市场部不能上网,也就是不能与外网联通,只需在vlan 60网段编写策略:阻止市场部的流量发出即可
ip acc ex kz-shb
deny ip 192.168.1.0 0.0.0.255 any
permit any any
ex
int vlan 60
ip access-group kz-shb out
通过市场部的PC测试:
2)禁止总部任何部门(服务器除外)访问财务部,但不影响财务部上网
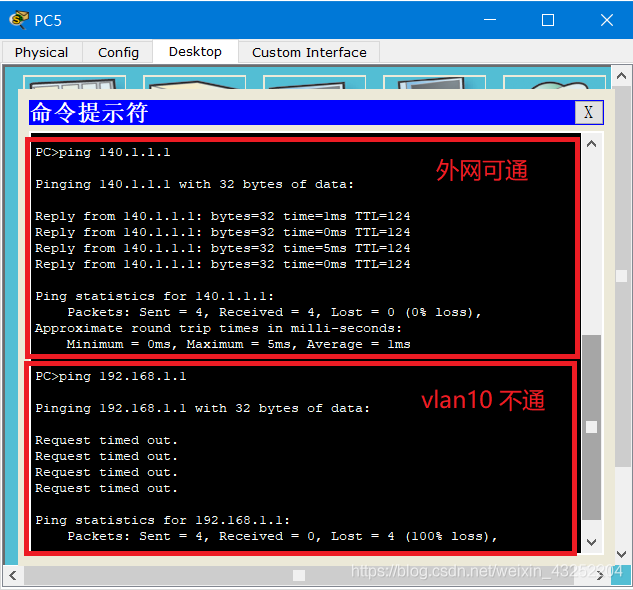
只需在财务部所在的网段也就是vlan40,编写策略:只允许组织vlan10、vlan20、vlan30网段的流量进入 ,最后允许所即可
ip acc ex kz-cwb
deny ip 192.168.1.0 0.0.0.255 192.168.4.0 0.0.0.255
deny ip 192.168.2.0 0.0.0.255 192.168.4.0 0.0.0.255
deny ip 192.168.3.0 0.0.0.255 192.168.4.0 0.0.0.255
permit any any
int vlan 40
ip access-group kz-cwb in
ex
使用财务部的PC测试:
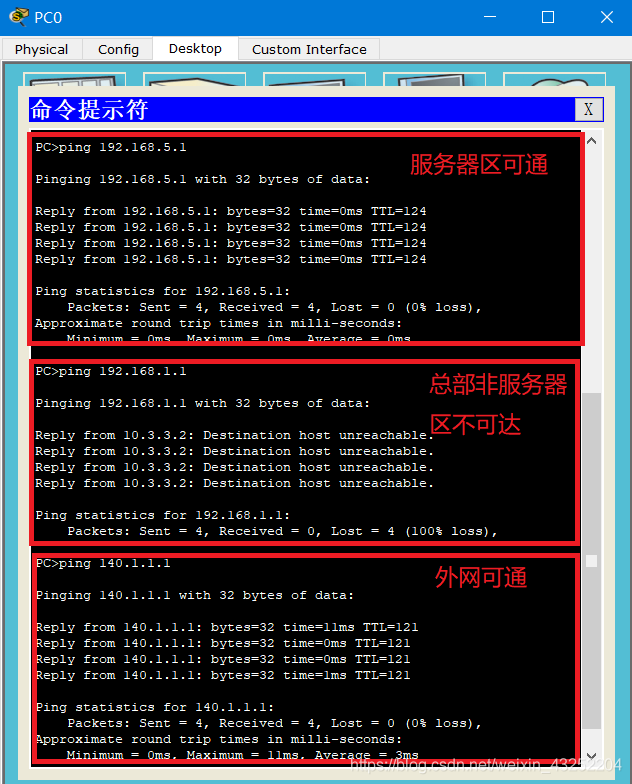
3)要求所有分公司只能访问总部的服务器区及上网
好了,我们的大实验到此终于结束了!


 浙公网安备 33010602011771号