Check/Uncheck all items in a CheckBoxList using ASP.NET and Javascript
The
CheckBoxList control in ASP.NET 2.0 provides a group of checkboxes that
can be dynamically generated by binding it to a data source. In this
article, we will explore how to use a Checkboxlist and use ASP.NET and
Javascript to select or unselect all your checkboxes in your
CheckBoxList.
Using ASP.NET
Step 1:
Open Visual Studio. Create a new website called ‘CheckUncheckAll’. Drag
and drop a CheckBoxList control to the page. Rename it to ‘cblMulti’.
Step 2:
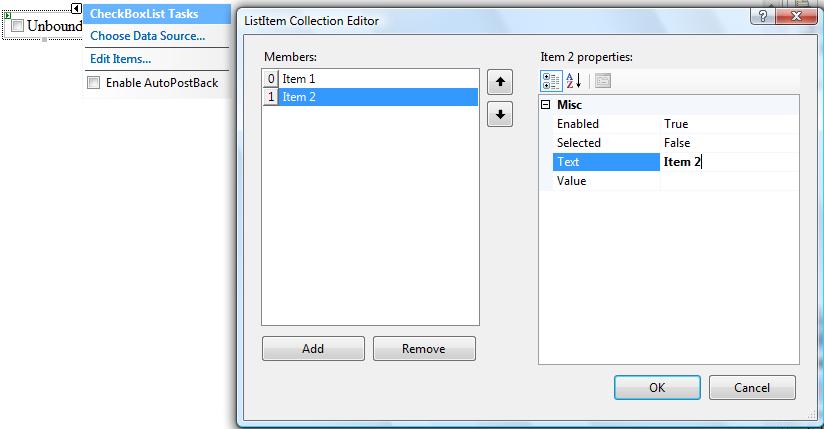
Once the CheckBoxList is added to the page, a smart tag appears which
allows you to specify a datasource or add items manually to the
CheckBoxList. Click on the ‘Edit Items’ to open the ListItem Collection
Editor and add items as shown in the figure below :

Note:
If you do not want to use the editor and want to add items to the
CheckBoxList programmatically, use the following code at the Page load
event :
protected void Page_Load(object sender, EventArgs e)
{
if (!Page.IsPostBack)
{
cblMulti.Items.Add(new ListItem("Items 1", "Items 1"));
cblMulti.Items.Add(new ListItem("Items 2", "Items 2"));
cblMulti.Items.Add(new ListItem("Items 3", "Items 3"));
}
}
However, you can also bind the checkbox list to a datareader as show below :
// Assuming that GetListItems returns a list of customerid and customername items in a sqldatareader
SqlDataReader dr = GetListItems();
cblMulti.DataSource = dr;
cblMulti.DataValueField = "cust_no";
cblMulti.DataTextField = "cust_name";
cblMulti.DataBind();
To keep things simple, we will be adding items programatically by using the cblMulti.Items.Add(new ListItem(text,value)) in our example.
Step 3: Drag and drop two LinkButtons from the toolbox to the page and rename them as ‘lbAll’ and ‘lbNone’ respectively.
The code will look like this :
<asp:LinkButton ID="lbAll" runat="server">Select All</asp:LinkButton>
<asp:LinkButton ID="lbNone" runat="server">Select None</asp:LinkButton>
Step 4:
Double click the two ‘Link Button’ to generate the click events for
them. In the click events of the two Link Buttons(), add the following
code:
// Check All
protected void lbAll_Click(object sender, EventArgs e)
{
foreach (ListItem li in cblMulti.Items)
{
li.Selected = true;
}
}
// Uncheck All
protected void lbNone_Click(object sender, EventArgs e)
{
foreach (ListItem li in cblMulti.Items)
{
li.Selected = false;
}
}
Step 5 :
Run the application and test it. Click on the ‘Select All’ button to
select all the checkboxes at once. Similarly click on the ‘Select None’
button to deselect all the checkboxes at once.
So that was simple.
Using Javascript
We
can do the same using javascript. However for our javascript example,
let us add some complexity into our examples. We will take a master
page example, and will now add two checkboxlist instead of one to our
page. Follow these steps :
Step 1:
Open Visual Studio. Create a new website called ‘CheckUncheckJS’. Drag
and drop two CheckBoxList controls to the page. Rename it to ‘cbl1’ and
‘cbl2’.
<asp:Content ID="Content1" ContentPlaceHolderID="ContentPlaceHolder1" Runat="Server">
<asp:CheckBoxList ID="cbl1" runat="server">
</asp:CheckBoxList><br />
<asp:CheckBoxList ID="cbl2" runat="server">
</asp:CheckBoxList>
</asp:Content>
Step 2: Populate the two checkboxlist controls in the Page_Load()
protected void Page_Load(object sender, EventArgs e)
{
if (!Page.IsPostBack)
{
cbl1.Items.Add(new ListItem("Items 1", "Items 1"));
cbl1.Items.Add(new ListItem("Items 2", "Items 2"));
cbl1.Items.Add(new ListItem("Items 3", "Items 3"));
cbl2.Items.Add(new ListItem("Items 4", "Items 4"));
cbl2.Items.Add(new ListItem("Items 5", "Items 5"));
cbl2.Items.Add(new ListItem("Items 6", "Items 6"));
}
}
Step 3:
It’s time to add the SelectAll/None feature to our page. However before
we go ahead, we need to understand how to pass the controls kept in content pages to the javascript function. When the page is rendered in the browser, the
content and master pages get merged into a single page. This means that
the IDs for the controls get renamed. ASP.NET renames the IDs to
prevent naming conflicts. Now to handle the renamed controls, ASP.NET
provides the ‘Control.ClientID’ and ‘Control.UniqueID’ to get the
renamed ID’s.
Having
understood this, let us now add some controls to our page and then pass
the respective controls to the javascript using the Control.ClientID.
The prototype of our javascript function will be the following :
function CheckBoxListSelect(<pass the control>, <state i.e true or false>)
{
// Our code will come here
}
Step 4: Add two anchor tags beneath each checkboxlist controls in your source. Remember that we are using two checkboxlist controls.
<asp:CheckBoxList ID="cbl1" runat="server"></asp:CheckBoxList><br />
Select <a id="A1" href="#">All</a> | <a id="A2" href="#">None</a>
<asp:CheckBoxList ID="cbl2" runat="server"></asp:CheckBoxList><br />
Select <a id="A3" href="#">All</a> | <a id="A4" href="#">None</a>
Step 5:
Add the onclick event to the anchor tags as shown below. In this event,
we will call the javascript function and pass the respective
checkboxlist controls and the state which will describe ‘true’ or
‘false’ for each checkbox
The code at the end will look like this :
<asp:CheckBoxList ID="cbl1" runat="server"></asp:CheckBoxList><br />
Select <a id="A1" href="#" onclick="javascript: CheckBoxListSelect ('<%= cbl1.ClientID %>',true)">All</a>
| <a id="A2" href="#" onclick="javascript: CheckBoxListSelect ('<%= cbl1.ClientID %>',false)">None</a>
<br />
<br />
<asp:CheckBoxList ID="cbl2" runat="server">
</asp:CheckBoxList>
Select <a id="A3" href="#" onclick="javascript: CheckBoxListSelect ('<%= cbl2.ClientID %>',true)">All</a>
| <a id="A4" href="#" onclick="javascript: CheckBoxListSelect ('<%= cbl2.ClientID %>',false)">None</a>
Step 6: Let us add the javascript function to the content page now.
For this add the <script/> tag in the content page and code our logic into the function as shown below:
<asp:Content ID="Content1" ContentPlaceHolderID="ContentPlaceHolder1" Runat="Server">
<script language="javascript" type="text/javascript">
function CheckBoxListSelect(cbControl, state)
{
var chkBoxList = document.getElementById(cbControl);
var chkBoxCount= chkBoxList.getElementsByTagName("input");
for(var i=0;i<chkBoxCount.length;i++)
{
chkBoxCount[i].checked = state;
}
return false;
}
</script>
// ASP.NET Controls are placed here
</asp:Content>
In
this javascript function, we accept two parameters, the checkboxlist
control and the state (i.e true or false) of each checkbox, that we
would like it to be. Since asp.net renders each checkbox as an input
tag, what we are really doing over here is first getting the
checkboxlist control using document.getElementById(cbControl) and
then counting the number of <input> tags inside that control.
Once we get the count, we use a loop to set the state of each control.
Step 7: Well that’s it. Run the application and select/unselect the checkboxes.
Happy Coding!!


