Why use Excel as a Database?
Most developers know how to use back ends like Microsoft SQL server, Oracle, Microsoft Access or IBM DB2 as database back ends for their applications. Microsoft Excel in the other hand is able to perform many of the services these back ends provide. The unique things about Microsoft Excel if contrasted with these back ends is it's simplicity which directly results in zero DDL effort along with many other advantages. Microsoft Excel is increasingly used as a database replacement as you can have your tables designed and created in zero time and you can start immediately enter data into them, a feature that is hard to obtain in all of the back ends mentioned above. We observe an increasing demand from several application producers (specially small and medium applications) to have Microsoft Excel as their database back end. This way they will have all the analysis / data storage / calculations / formatting free from excel and in the same time they can access every thing in a form of a database table from the applications they build so that they have everything with an affordable cost. This is all not to mention that the availability of Microsoft Excel is much higher if compared to any other database back end. This tutorial will teach you how to use Microsoft Excel table sheets from .NET applications as if they are database tables residing on a database server for example.
Using MS Excel with ADO.NET
.NET Framework supports using Excel as a backend database for .Net applications. You can accomplish this task by using ADO.NET the same way you use it when you need to manipulate other types of backend databases. With ADO.Net you can retrieve data from a Microsoft Excel workbook, modify or add data in an existing workbook, or create a new workbook and work sheets.
In the following sections of our tutorial we will explain - step by step - how to manipulate Excel sheets by giving a real working example.
Different SQL Query with MS Excel
Using ADO.NET with Excel sheets is somehow differing from using it with the other database types in the following issues:
Automatic Code Generation: You have to do the entire job yourself, no automatic data adapters, commands, and datasets generation. You will write all the code yourself.
Connection String: The connection string will have the following syntax:
"Provider=Microsoft.Jet.OLEDB.4.0;Data Source=" _
+ "D:"k"MyBook.xls;Extended Properties=""Excel 8.0;HDR=YES;"""
The "HDR" parameter tells if columns in the accessed worksheet have headers or not. Yes for have, No for have not.
Data Types: There is no direct way to specify the data types for columns in Excel tables. The OLE DB scans a number of columns (you can set it ) to guess the data type for the field.
Table Names: To reference a table in an Excel workbook you have to use one of the following syntaxes:
"Select * From [Products$]"
Or
"Select * From [Products$A1:B10]"
Note that the dollar sign is an indication that the sheet exists. If you are creating a new sheet or table, do not use it.
Manipulate Excel Workbook With .NET Application
Create new Excel Workbook and Datasheet
To create a new Excel datasheet use the "Create Table" SQL command. If the workbook specified in the connection string dose not exists, it will be created too. If it exists then the command will create a datasheet with the specified name.
Open up your MS Visual Studio 2005 and create a new VB.NET application. Add some button controls to "Form1" design surface as shown in the following figure.
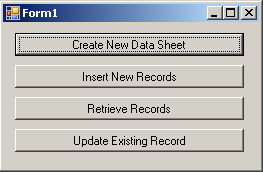
Figure
1 - GUI of the sample application
In the most beginning of "Form1.vb" code file import the following namespace.
Imports System.Data.OleDb
In this example we will create a separate function to build the required connection string as follows:
Private Function CreateConnString(ByVal Str As String) _
As String
Return "Provider=Microsoft.Jet.OLEDB.4.0;Data Source=" _
+ Str + ";Extended Properties=""Excel 8.0;HDR=YES;"""
 //conString="Provider=Mircrosoft.Jet.OLEDB.4.0;Data Source=" + @"c:\haha.xls" + @";Extended Properties=""Excel 8.0;HDR=YES;"""
 //注意在c sharp中最后的部分字符串前面加上@就可以了
 End Function
This function takes a string represents an Excel workbook file path name like "d:"y"Book1.xls" as the data source and returns the connection string that represents that data source.
Now double click the"Create New Datasheet" button to activate its click event handler. Write the following lines of code.
Dim Conn As New OleDbConnection
Dim Comm As New OleDbCommand
Conn.ConnectionString = CreateConnString("D:"k"Book1.xls")
Comm.Connection = Conn
Comm.CommandText = _
"Create Table MySheet (F1 char(255), F2 char(255))"
Try
Conn.Open()
Comm.ExecuteNonQuery()
MsgBox("Created.")
Conn.Close()
Catch ex As Exception
MsgBox("Error.")
Conn.Close()
End Try
As you see in the above code, to create a new workbook or datasheet we have to define an OleDB connection object and an OleDB command object. Then we set the connection string by using the "CreateConnString" described in the previous section. Set the command connection property to the used connection object. Set the command text property to the SQL create table command as shown in the above code. This command will create a new workbook named "Book1.xls" and a new worksheet named "MySheet" that have two columns "F1" and "F2" both of the same data type which is "Char(255)".
Press F5 to run the application, and click the "Create New Data Sheet" button. Now browse to the "D:"K" folder and find the new created "Book1.xls".
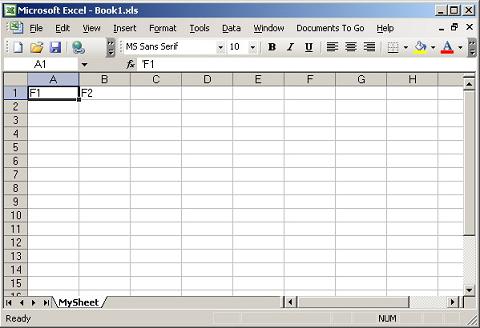
Figure
1 - Book1.xls is created
Insert New Records
To insert new records into an existing data sheet use the "INSERT INTO" SQL command. In our application double click the "Insert New Record" button to activate its click event handler. Write the following lines of code:
Dim Conn As New OleDbConnection
Dim Comm As New OleDbCommand
Conn.ConnectionString = CreateConnString("D:"k"Book1.xls")
Comm.Connection = Conn
Comm.CommandText = _
"Insert INTO [MySheet$] (F1, F2) Values ('1','A')"
Try
Conn.Open()
Comm.ExecuteNonQuery()
MsgBox("Inserted.")
Conn.Close()
Catch ex As Exception
MsgBox("Error.")
Conn.Close()
End Try
Run the application and click the "Insert New Record" button. Browse to the "D:"k"Book1.xls" and open it. You will find the following:
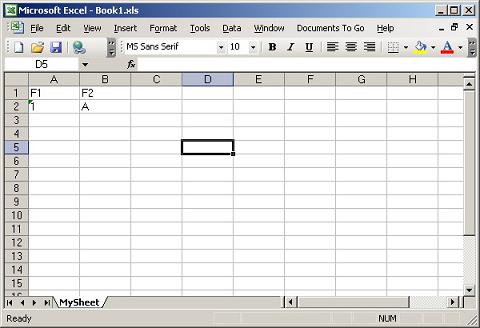
Figure
3 - New Record is inserted into the MySheet
The record is added to "MySheet".
Retrieve Existing Records
To retrieve existing records in an existing excel workbook use one of the two famous ADO.NET techniques. OleDB Data Reader, or OleDB Data Adapters and Data Sets. We will use the first technique in our program sample with a pre created Excel workbook named "MyBook.xls" as shown in the following figure.
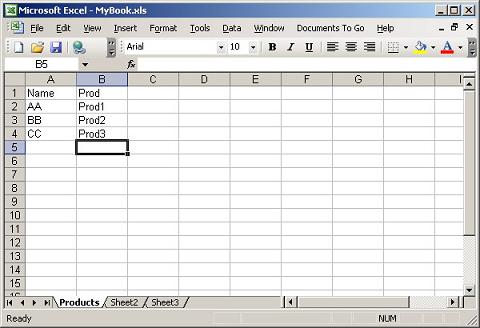
Figure
4 - MyBook.xls
Double click the "Retrieve Records" button to activate its click event handler. Type the following lines of code:
Dim Conn As New OleDbConnection
Dim Comm As New OleDbCommand
Dim DReader As OleDbDataReader
Dim Str As String = ""
Conn.ConnectionString = CreateConnString("D:"k"MyBook.xls")
Comm.Connection = Conn
Comm.CommandText = "Select * From [Products$]"
Try
Conn.Open()
DReader = Comm.ExecuteReader
Do While DReader.Read
Str = Str + vbCrLf + DReader.GetString(0) _
+ " , " + DReader.GetString(1)
Loop
MsgBox(Str)
DReader.Close()
Conn.Close()
Catch ex As Exception
MsgBox("Error.")
Conn.Close()
End Try
In the above code we retrieve all the records in the "Products" datasheet located in the "MyBook.xls" workbook. Run the application, click the "Retrieve Record" button, and note the result.
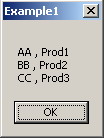
Figure
5 - The retrieved Records
You can use Data Adapter and Data set objects to accomplish the same task, but you need to build all the commands needed in the Data Adapter Fill and Update operations yourself.
Update Existing Record
To update an existing record we will make use of the "Update " SQL command. Double click the "Update Existing Record" button to activate its event handler and type the following lines of code:
Dim Conn As New OleDbConnection
Dim Comm As New OleDbCommand
Conn.ConnectionString = CreateConnString("D:"k"MyBook.xls")
Comm.Connection = Conn
Comm.CommandText = _
"Update [Products$] SET Name = 'ABC' Where Prod = 'Prod1'"
Try
Conn.Open()
Comm.ExecuteNonQuery()
MsgBox("Updated.")
Conn.Close()
Catch ex As Exception
MsgBox("Error.")
Conn.Close()
End Try
In the above code we locate the record where "Prod = 'Prod1'" and change its name to 'ABC' in the "Products" worksheet of the "MyBooks.xls" workbook. Run the application and click the "Update Existing Record" button. Browse to "MyBook.xls" and open it. You will find the following:
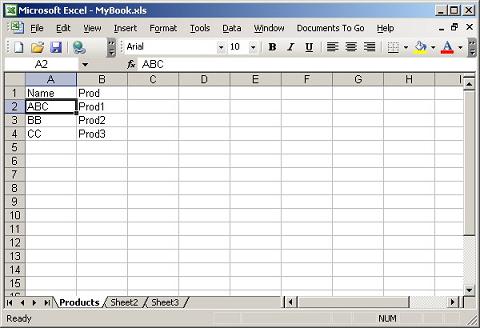
Figure
6 - The " Products" sheet is updated
The First record was updated.
Limitations of Using Excel as a Database System
The following is some limitations when using ADO.NET with Excel:
- You can not delete a record or an entire datasheet using ADO.NET.
- You can not insert formulas in cells using ADO.NET.


