
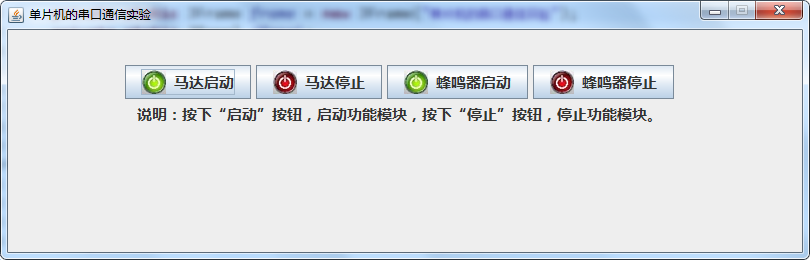
Java-GUI和51单片机交互(控制马达启停以及蜂鸣器启停)
实验:
1、按下“马达启动”,马达开始转动
2、按下“马达停止”,马达停止转动
3、按下“蜂鸣器启动”,蜂鸣器响
4、按下“蜂鸣器停止”,蜂鸣器不响
-------- 以上实验问题:马达和蜂鸣器的按钮出现干扰,可能要通过多线程才能解决此问题(本文并没有解决) -----
Java代码:需添加RXTXcomm.jar

JavaGUI.java:
package com.lvshitech.java51.main;

import java.awt.BorderLayout;
import java.awt.Container;
import java.awt.Font;
import java.awt.Toolkit;
import java.awt.event.ActionEvent;
import java.awt.event.ActionListener;

import javax.swing.ImageIcon;
import javax.swing.JButton;
import javax.swing.JFrame;
import javax.swing.JLabel;
import javax.swing.JPanel;
import javax.swing.border.EmptyBorder;

import com.lvshitech.java51.tool.Tools;

@SuppressWarnings("serial")
public class JavaGUI extends JPanel implements ActionListener {

	private static JFrame frame = new JFrame("单片机的串口通信测试");
	private static JPanel jPanel;
	JLabel jLabel;
	JButton motoStartBtn;
	JButton motoStopBtn;
	JButton buzzerStartBtn;
	JButton buzzerStopBtn;

	JavaGUI() {
		frame.setSize(800, 250);
		frame.setResizable(false);
		jPanel = new JPanel();
		jPanel.setBorder(new EmptyBorder(30, 20, 20, 30));

		// 马达启动按钮
		ImageIcon startIcon = new ImageIcon("images/start.jpg");
		motoStartBtn = new JButton(" 马达启动", startIcon);
		motoStartBtn.setFont(new Font("Microsoft YaHei", 1, 15));
		jPanel.setBorder(new EmptyBorder(30, 20, 20, 30));
		motoStartBtn.setActionCommand("motoStartBtn");
		jPanel.add(motoStartBtn);

		// 马达停止按钮
		ImageIcon stopIcon = new ImageIcon("images/stop.jpg");
		motoStopBtn = new JButton(" 马达停止", stopIcon);
		motoStopBtn.setFont(new Font("Microsoft YaHei", 1, 15));
		motoStopBtn.setActionCommand("motoStopBtn");
		jPanel.add(motoStopBtn);

		// 蜂鸣器启动按钮
		buzzerStartBtn = new JButton(" 蜂鸣器启动", startIcon);
		buzzerStartBtn.setFont(new Font("Microsoft YaHei", 1, 15));
		jPanel.setBorder(new EmptyBorder(30, 20, 20, 30));
		buzzerStartBtn.setActionCommand("buzzerStartBtn");
		jPanel.add(buzzerStartBtn);

		// 蜂鸣器停止按钮
		buzzerStopBtn = new JButton(" 蜂鸣器停止", stopIcon);
		buzzerStopBtn.setFont(new Font("Microsoft YaHei", 1, 15));
		jPanel.setBorder(new EmptyBorder(30, 20, 20, 30));
		buzzerStopBtn.setActionCommand("buzzerStopBtn");
		jPanel.add(buzzerStopBtn);

		// 说明
		jLabel = new JLabel();
		jLabel.setFont(new Font("Microsoft YaHei", 1, 15));
		jLabel.setText("说明:按下“启动”按钮,启动功能模块,按下“停止”按钮,停止功能模块。");
		jPanel.add(jLabel);

		// 事件监听
		motoStartBtn.addActionListener(this);
		motoStopBtn.addActionListener(this);
		buzzerStartBtn.addActionListener(this);
		buzzerStopBtn.addActionListener(this);
	}

	/**
	 * 用于接收操作事件的侦听器接口。
	 * 在发生操作事件时,调用该对象的 actionPerformed 方法
	 * 即在点击按钮时调用ActionListener接口的覆写方法
	 */
	@Override
	public void actionPerformed(ActionEvent e) {
		try {
			/**
			 * 在while循环中实现,如果连续两次按下“启动蜂鸣器”按钮,就会出现BUG,所以这里让蜂鸣器的“启动”和”停止“
			 * 因为在单片机程序中,蜂鸣器是靠不断更替的高低电平来启动蜂鸣器的两个按钮互斥,默认不能连续两次按下同一个按钮,
			 * 而马达在单片机中不需要在循环代码中控制,所以这里不需要让马达的启动和停止按钮互斥,但为了风格统一,这里也互斥了
			 */
			if("motoStartBtn".equals(e.getActionCommand())) {
				motoStartBtn.setEnabled(false);
				Tools.action("1");
				motoStopBtn.setEnabled(true);
			} else if("motoStopBtn".equals(e.getActionCommand())) {
				motoStopBtn.setEnabled(false);
				Tools.action("0");
				motoStartBtn.setEnabled(true);
			} else if("buzzerStartBtn".equals(e.getActionCommand())) {
				buzzerStartBtn.setEnabled(false);
				Tools.action("2");
				buzzerStopBtn.setEnabled(true);
			} else {
				buzzerStopBtn.setEnabled(false);
				Tools.action("3");
				buzzerStartBtn.setEnabled(true);
			}
		} catch (Exception ex) {
			ex.printStackTrace();
		}
	}

	public static void main(String[] args) {
		Container c = frame.getContentPane();
		c.add(new JavaGUI(), BorderLayout.CENTER);
		frame.add(jPanel);

		//获取你的屏幕的宽和高
		int width = Toolkit.getDefaultToolkit().getScreenSize().width;
		int height = Toolkit.getDefaultToolkit().getScreenSize().height;
		//然后设置你编写的窗口的初始位置,也就是在中间,
		frame.setLocation(width/2-300, height/2-250);

		frame.setDefaultCloseOperation(JFrame.EXIT_ON_CLOSE);
		frame.setVisible(true);
	}
}
Tools.java:
package com.lvshitech.java51.tool;

import gnu.io.CommPort;
import gnu.io.CommPortIdentifier;
import gnu.io.NoSuchPortException;
import gnu.io.PortInUseException;
import gnu.io.SerialPort;
import gnu.io.UnsupportedCommOperationException;

import java.io.IOException;
import java.io.InputStream;
import java.io.OutputStream;
import java.util.ArrayList;
import java.util.Enumeration;

public class Tools {

	public static SerialPort serialPort=null;

	/*类方法 不可改变 不接受继承
	 * 扫描获取可用的串口
	 * 将可用串口添加至list并保存至list
	 */
	@SuppressWarnings({ "rawtypes", "unchecked" })
	public static final ArrayList<String> uartPortUseAblefind() {
		//获取当前所有可用串口
		//由CommPortIdentifier类提供方法
		Enumeration<CommPortIdentifier> portList=CommPortIdentifier.getPortIdentifiers();
		ArrayList<String> portNameList=new ArrayList();
		//添加并返回ArrayList
		while(portList.hasMoreElements()) {
			String portName=portList.nextElement().getName();
			portNameList.add(portName);
		}
		return portNameList;
	}

	/*
	 * 串口常见设置
	 * 1)打开串口
	 * 2)设置波特率 根据单板机的需求可以设置为57600 ...
	 * 3)判断端口设备是否为串口设备
	 * 4)端口是否占用
	 * 5)对以上条件进行check以后返回一个串口设置对象new UARTParameterSetup()
	 * 6)return:返回一个SerialPort一个实例对象,若判定该com口是串口则进行参数配置
	 *   若不是则返回SerialPort对象为null
	 */
	public static final SerialPort portParameterOpen(String portName,int baudrate) {
		try {  //通过端口名识别串口
			CommPortIdentifier portIdentifier = CommPortIdentifier.getPortIdentifier(portName);
			//打开端口并设置端口名字 serialPort和超时时间 2000ms
			CommPort commPort=portIdentifier.open(portName,1000);
			//进一步判断comm端口是否是串口 instanceof
			if(commPort instanceof SerialPort) {
				System.out.println("该COM端口是串口!串口名称是:" + portName);
				//进一步强制类型转换
				serialPort=(SerialPort)commPort;
				//设置baudrate 此处需要注意:波特率只能允许是int型 对于57600足够
				//8位数据位
				//1位停止位
				//无奇偶校验
				serialPort.setSerialPortParams(baudrate, SerialPort.DATABITS_8,SerialPort.STOPBITS_1, SerialPort.PARITY_NONE);
				//串口配制完成 log
				System.out.println("串口参数设置已完成,波特率为"+baudrate+",数据位8bits,停止位1位,无奇偶校验");
			} else {	//不是串口
				System.out.println("该com端口不是串口,请检查设备!");
				//将com端口设置为null 默认是null不需要操作
			}

		} catch (NoSuchPortException e) {
			e.printStackTrace();
		} catch (PortInUseException e) {
			e.printStackTrace();
		} catch (UnsupportedCommOperationException e) {
			e.printStackTrace();
		}

		return serialPort;
	}

	/*
	 * 串口数据发送以及数据传输作为一个类
	 * 该类做主要实现对数据包的传输至下单板机
	 */

	/*
	 * 上位机往单板机通过串口发送数据
	 * 串口对象 seriesPort
	 * 数据帧:dataPackage
	 * 发送的标志:数据未发送成功抛出一个异常
	 */
	public static void uartSendDatatoSerialPort(SerialPort serialPort,byte[] dataPackage) {
		OutputStream out=null;
		try {
			out=serialPort.getOutputStream();
			out.write(dataPackage);
			out.flush();
		} catch (IOException e) {
			e.printStackTrace();
		} finally {
			//关闭输出流
			if(out!=null) {
				try {
					out.close();
					out=null;
					//System.out.println("数据已发送完毕!");
				} catch (IOException e) {
					e.printStackTrace();
				}
			}
		}
	}

	/*
	 * 上位机接收数据
	 * 串口对象seriesPort
	 * 接收数据buffer
	 * 返回一个byte数组
	 */
	public  static  byte[] uartReceiveDatafromSingleChipMachine(SerialPort serialPort) {
		byte[] receiveDataPackage=null;
		InputStream in=null;
		try {
			in=serialPort.getInputStream();
			// 获取data buffer数据长度
			int bufferLength=in.available();
			while(bufferLength!=0) {
				receiveDataPackage=new byte[bufferLength];
				in.read(receiveDataPackage);
				bufferLength=in.available();
			}
		} catch (IOException e) {
			e.printStackTrace();
		}
		return receiveDataPackage;
	}

	public static void action(String parameter) throws Exception {
		// 打开串口,这个波特率要根据51程序中TH1和TL1的值来确定
		SerialPort serialPort = portParameterOpen("COM4", 4800);
		// 要发送的数据
		String dataSend = parameter;

		int i=1;
		// 发送数据到单片机
		byte []datByte = dataSend.getBytes();
		uartSendDatatoSerialPort(serialPort, datByte);
		System.out.println((i++) + ". 发送到串口的数据:" + dataSend);

		// 在上位机向下位机发送数据和上位机向下位机接收数据过程中要有一个缓冲,不然接收不到数据
		Thread.sleep(300);

		// 从单片机接收到的数据
		byte[] dat = uartReceiveDatafromSingleChipMachine(serialPort);
		if(dat != null && dat.length > 0) {
			String dataReceive = new String(dat, "GB2312");
			System.out.println((i++) + ". 从串口接收的数据:" + dataReceive);
		} else {
			System.out.println("通信失败:接收不到下位机的数据!");
		}
		System.out.println("-------------------------------------------------------");
		closePort();
	}

    /**
     * 关闭串口
     * @param serialport 待关闭的串口对象
     */
    public static void closePort() {
        if (serialPort != null) {
            serialPort.close();
            serialPort = null;
        }
    }
}
Keil代码:
/*
串口通信:
1、由PC机通过串行口向单片机发送数据,这个数据是存放在单片机的接收缓冲器SBUF中的;
2、单片机将串行口中的数据存放在一个临时变量中;
3、单片机将存放在临时变量中的数据发送到发送缓冲器SBUF中,在PC机上显示。
*/

#include <reg52.h>

#define u16 unsigned int
#define u8 unsigned char

// 电机开关管脚
sbit moto = P1^0;
u16 k;

// 蜂鸣器的引脚(查看原理图可知,其引脚为P1.5)
sbit buzzer = P1^5;

// 延迟函数
void delay(u16 time)
{
    while(time--);      // 大概延迟10us
}

// 串行口通信初始化函数
void StartInit()
{
    /*
    1、确定T1的工作方式(编程TMOD寄存器):因为串行口中断是由定时器T1决定的,
    所以,低四位全部为0,高四位中,GATE=0,C/T非=0,选择工作方式1(8位的自动重装载),即M1M0=10
    所以是:00100000,转成十六进制数是:0x20
    */
    TMOD=0x20;

    /*
    2、计算T1的初值,装载TH1、TL1:使用工具生成,设置参数,定时器方式:方式2;晶振频率:12Mhz;
    波特率:4800;SMOD:波特率倍增位,1,即增加1倍;计算结果是:F3H
    所以TH1=0xF3,TL1=0xF3,自动重装载
    */
    TH1=0xF3;
    TL1=0xF3;

    /*
    PCON:与串行口工作相关的参数,只有一位SMOD(最高位),在串行口方式1、方式2、方式3时,
    波特率与SMOD有关,当SMOD=1时,波特率提高一倍。复位时,SMOD=0,
    这里波特率提高一倍,所以SMOD=1,即10000000,转成十六进制数字是:0x80
    */
    PCON=0x80;

    /*
    4、启动T1(编程TCON中的TR1位):TR1=1时,定时器T1才开始启动
    */
    TR1=1;

    /*
    5、确定串行口控制(编程SCON寄存器):选择工作方式1(10位异步收发器,8位数据,1位起始位,1位停止位),
    所以SM0=0,SM1=1;不需要RB8控制RI的激活(就是为了简单),设置SM2=0(SM2是多机通信控制位);
    REN,允许串行接收位,启动串行口接收数据,REN=1;
    TB8,RB8,TI,RI均为0(看资料),所以是:01010000,转成十六进制数是:0x50
    */
    SCON=0x50;

    /*
    6、中断位的开启,总中断允许位EA=1;串行口中断允许位ES=1
    */
    EA=1;
    ES=1;
}

// ========================================= 1. 电机模块
// 延迟函数,1ms
void delay1ms(void)   //误差 0us
{
    unsigned char a,b,c;
    for(c=1;c>0;c--)
        for(b=142;b>0;b--)
            for(a=2;a>0;a--);
}

// 电机启动
void motoOnXs()
{
	 moto=1;
}

// 电机停止
void motoOffXs()
{
    moto=0;
}

// ========================================= 2. 蜂鸣器模块
void buzzering()
{
	// 一开始点的是“停止”按钮,则直接停止蜂鸣器
	if(SBUF=='3')
	{
		buzzer=1;
	}
	while(SBUF=='2')
	{
		// 强行停止
		if(SBUF=='3')
		{
			buzzer=1;
			break;
		}
		// 蜂鸣器响
		buzzer=~buzzer;		// 取反,或者buzzer = !buzzer;
		delay(200);			// 设置信号改变周期,即频率,蜂鸣器的频率在1.5-2.5KHZ
	}
}

// 主函数
void main()
{
	StartInit(); 		// 串行口通信初始化
    while(1);      		// 等待数据的发送和接收
}

// 发送或接收完一帧数据引起中断,串行口中断函数
void Start() interrupt 4
{
    u8 receiveData;     // 用一个变量存放数据
    receiveData=SBUF;   // 从单片机的接收缓冲器中获取数据

	RI=0;   			// 当数据接收完成后,由内部硬件将RI置1,所以这里需要把RI置0,等待下一次继续接收数据
    SBUF=receiveData;   // 把变量中的数据放到发送缓冲器中,向PC机发送数据
    while(!TI);			// 当数据发送完成后(即串行口在发送停止位时,由内部硬件将TI置1,所以数据发送完成时TI=1)
    TI=0;   			// 数据发送完成时,要将TI置0,等待下一次继续发送数据

	// 马达
	if(receiveData=='1')
	{
		motoOnXs();		// 启动马达
	}
	else if(receiveData=='0')
	{
		motoOffXs();	// 停止马达
	}
	else
	{
		buzzering();	// 蜂鸣器
	}
}
接线:
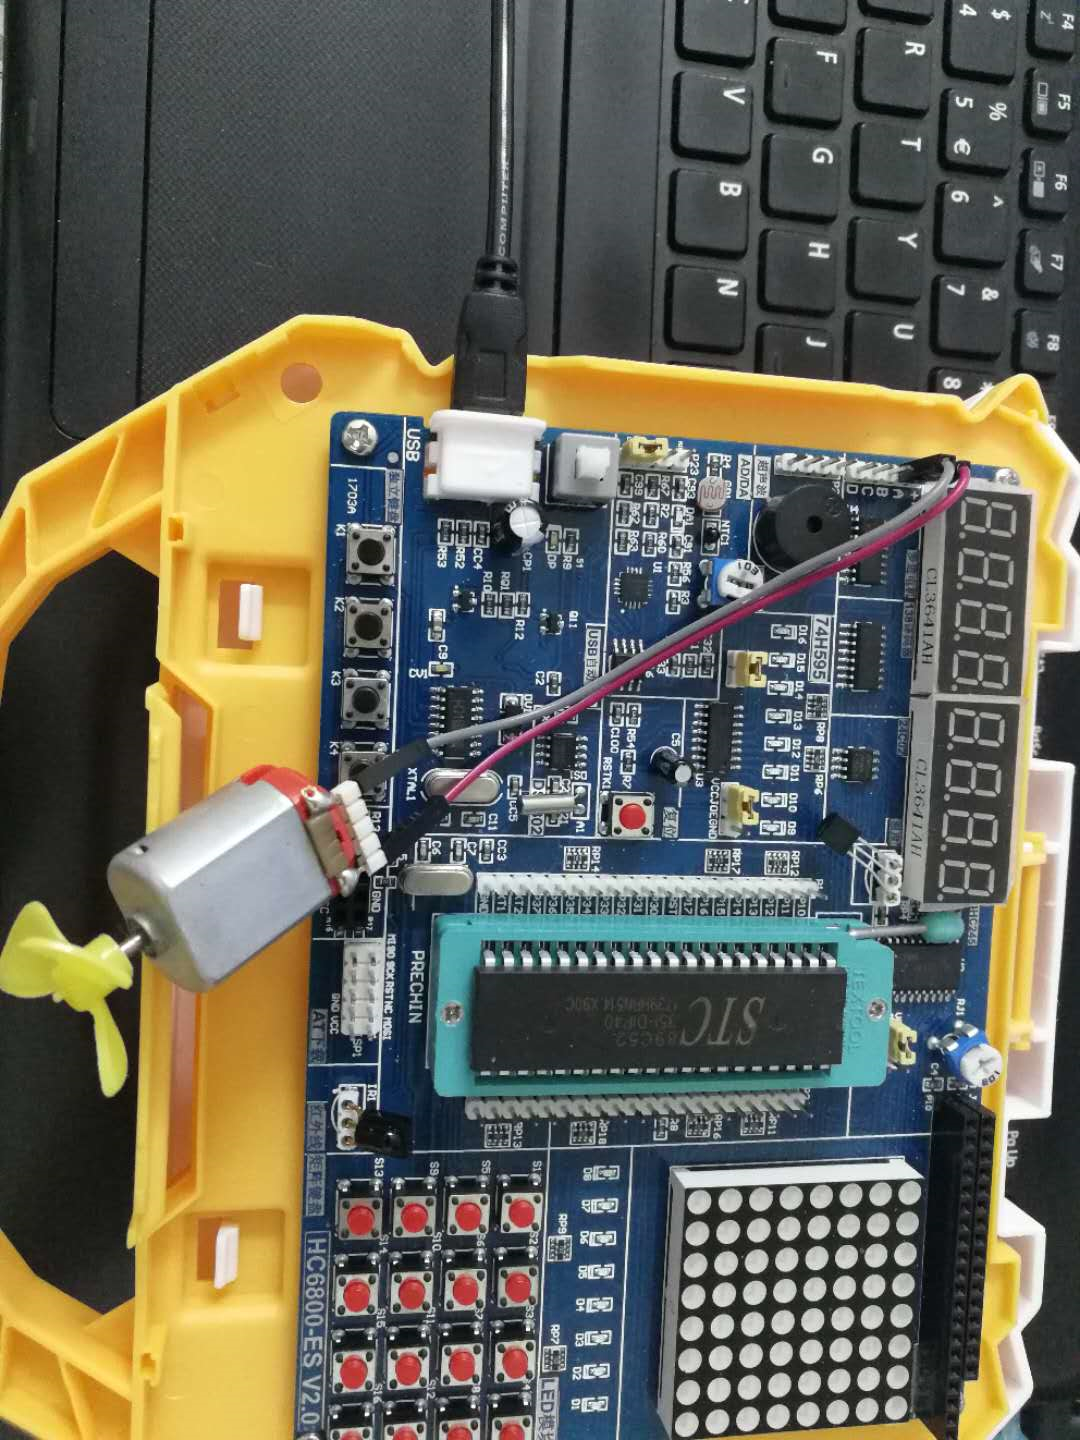
以上实验基本能实现效果,但还需改善

 浙公网安备 33010602011771号