Android DevArt5:如何在Android中创建多线程?
本篇内容:
- 如何在Android中创建多进程?查看进程的三种方式有哪些?
- 多进程模式的运行机制?- 演示了多进程出现问题中的两种情况:
- 静态成员失效
- Application多次创建
- IPC基础概念介绍
1.如何在Android中创建多进程?
AndroidManifes.xml
 <!-- Chapter 2 IPC机制 -->
 <activity android:name=".Chapter2.Chapter2"></activity>
 <activity
     android:name=".Chapter2.SecondActivity"
     android:process=":remote" />
 <activity
     android:name=".Chapter2.ThirdActivity"
     android:process="com.art.exploration.remote" />
入口MainActivity没有指定android:process ,它运行在默认进程中,默认进程的进程名是包名。
Chapter2.java
public class Chapter2 extends AppCompatActivity {

    @Override
    protected void onCreate(Bundle savedInstanceState) {
        super.onCreate(savedInstanceState);
        setContentView(R.layout.activity_chapter2);
    }

    public void goSecondActivity(View view) {
        startActivity(new Intent(this, SecondActivity.class));
    }

    public void goThirdActivity(View view) {
        startActivity(new Intent(this, ThirdActivity.class));
    }
}
SecondActivity和ThirdActivity均为新建的EmptyActivity,里面只有onCreate方法。
准备好了材料,我们开始做菜。。。
启动流程:通过MainActivity启动Chapter2,在Chapter2(Activity)中分别启动Second和Third ,然后观察系统中的进程:
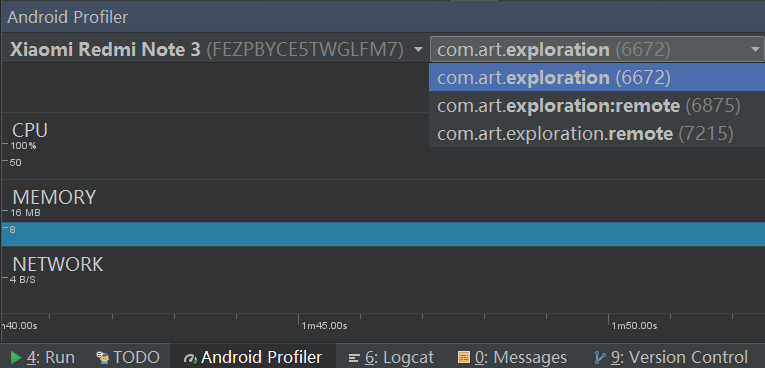
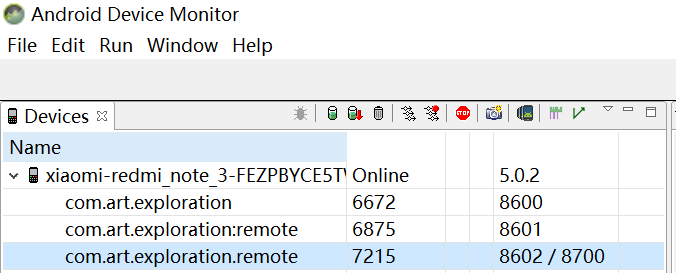
这里给出了查看系统进程的 三种方式 :
1. 在Android Profiler中查看:

2. DDMS中查看(推荐):

3. 通过adb shell :
查看全部 → adb shell ps
Linux → adb shell ps | grep com.art.exploration
Windows → adb shell "ps|grep com.art.exploration"    多了个双引号

由此可见,通过在清单文件中为四大组件(Activity,Service,Receiver,ContentProvider)配置android:process属性,在该应用中开启多线程。
 注意:SecondActivity对应的是进程 com.art.exploration:remote
    ThirdActivity对应的是进程 com.art.exploration.remote
Tips1:SecondActivity和ThirdActivity的android:process属性分别为 ":remote" 和 "com.art.exploration.remote",两者的区别有两方面:
一、":" 是一种简单的写法,包名+进程名;"com.art.exploration.remote"是完整的命名方式,不需要加入包名;
二、":" 是当前应用的私有进程,其他应用的组件不可以和它跑在同一进程里;
"com.art.exploration.remote"是全局进程,其他应用通过ShareUID方式可以和它跑在同一进程里。
ShareUID

2. 多线程模式的运行机制?
-
静态成员变化?
我们先新建一个UserManager类:
public class UserManager {
    public static int sUserId = 5;
}
我们知道,静态变量是共享的,并且一处修改处处同步。根据该特性,我们做如下演示:
在Chapter2中添加代码:

SecondActivity & ThirdActivity

Demo Process : MainActivity→Chapter2→SecondActivity→backpress→ThirdActivity:
三个进程:

日志信息:

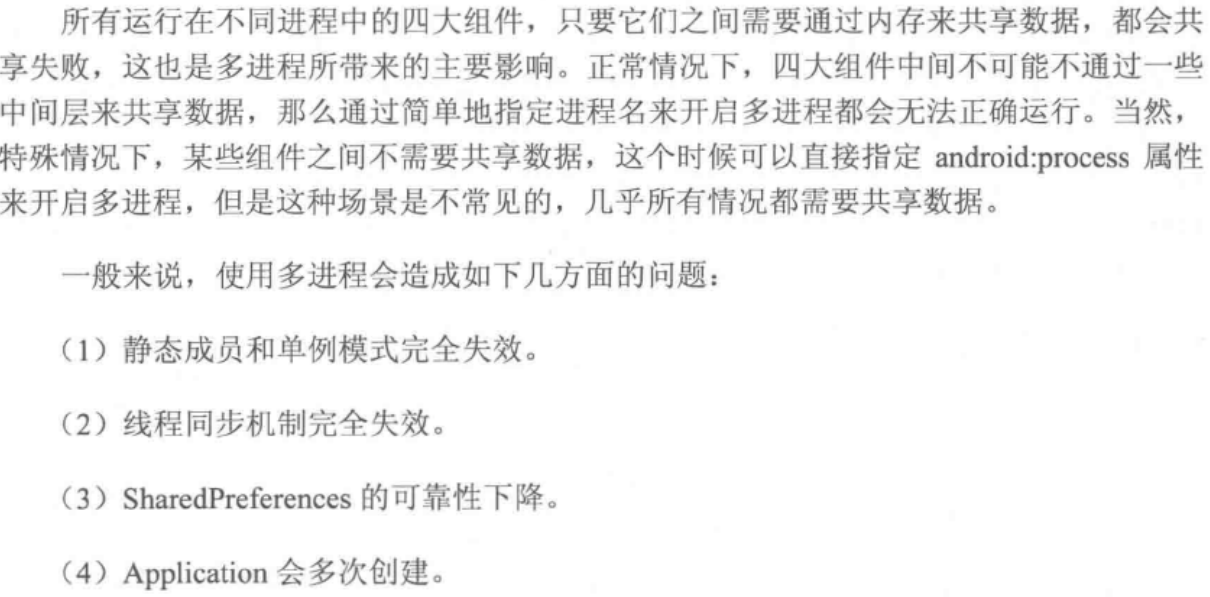
看到这里,大家应该明白了多线程所带来的问题,绝不是简简单单指定一个android:process属性那么简单。
原因分析:Android为每一个应用分配了一个独立的虚拟机,或者说为每一个进程分配了一个独立的虚拟机。
不同的虚拟机在内存分配上有不同的地址空间,这就导致在不同的虚拟机中访问同一个类的对象会产生多份副本。
拿我们这个例子来说, Chapter2中在默认进程中,修改sUserId只会影响当前的进程,对其他进程不会产生任何影响 ;
而SecondActivity在进程“com.art.exploration:remote”中,使用的是该进程中的UserManager对象副本,并不受Chapter2中的干扰,故sUserId为5,ThirdActivity同理。
总结:

-
下面我们演示Application多次创建的情况:
Demo Process :MainActivity→Chapter2→SecondActivity→backpress→ThirdActivity:
MyApplication.java
public class MyApplication extends Application {
    @Override
    public void onCreate() {
        super.onCreate();
        String processName = getProccessNameByPID(getApplicationContext(), Process.myPid());
        System.out.println("MyApplication processName = " + processName);
    }

    /**
     * 获取进程ID
     *
     * @return
     */
    public static int getProcessPID() {
        return android.os.Process.myPid();
    }

    /**
     * 通过进程id 获取进程名字
     *
     * @param context
     * @param pid
     * @return
     */
    @TargetApi(Build.VERSION_CODES.N)
    public static String getProccessNameByPID(Context context, int pid) {
        ActivityManager am = (ActivityManager) context.getSystemService(Context.ACTIVITY_SERVICE);
        List<ActivityManager.RunningAppProcessInfo> runningApps = am.getRunningAppProcesses();
        if (runningApps == null) return null;
        for (ActivityManager.RunningAppProcessInfo procInfo : runningApps) {
            if (procInfo.pid == pid) {
                return procInfo.processName;
            }
        }
        return null;
    }
}
log日志:
可见,Application的onCreate方法执行了三次,创建了三个Application,并且每个进程名和进程id都不一样。它们的进程名和我们为Activity指定的android:process属性一致。
这也就证明了在多进程模式中,不同进程的组件的确会拥有独立的虚拟机、内存空间以及Application。
Tips:跨进程通信的方式有:通过Intent来传递数据,共享文件和SharedPreferences,基于Binder的Messenger和AIDL,Socket等。
3. IPC基础概念介绍
-
三方面内容
Serializable接口、Parcelable接口以及Binder。
-
Serializable接口
注意的东西:1.静态成员变量属于类,不属于对象,不参与序列化过程;
2.使用transient关键字标记的成员变量不参与序列化过程。
-
Parcelable接口
我们先看个实现P接口的User:
public class User implements Parcelable {

    public int userId;
    public String userName;
    public boolean isMale;

    public Book book;

    @Override
    public int describeContents() {
        return 0;
    }

    @Override
    public void writeToParcel(Parcel dest, int flags) {
        dest.writeInt(this.userId);
        dest.writeString(this.userName);
        dest.writeByte(this.isMale ? (byte) 1 : (byte) 0);
        dest.writeParcelable(this.book, flags);
    }

    public User() {
    }

    protected User(Parcel in) {
        this.userId = in.readInt();
        this.userName = in.readString();
        this.isMale = in.readByte() != 0;
        this.book = in.readParcelable(Book.class.getClassLoader());
        // or
//        this.book = in.readParcelable(Thread.currentThread().getContextClassLoader());
    }

    public static final Parcelable.Creator<User> CREATOR = new Parcelable.Creator<User>() {
        @Override
        public User createFromParcel(Parcel source) {
            return new User(source);
        }

        @Override
        public User[] newArray(int size) {
            return new User[size];
        }
    };
}
Parcel:Parcel内部包装了可序列化的数据,可以再Binder中自由传输;
writeToParcel:序列化过程由writeToParcel方法负责完成,最终是通过Parcel中的一系列的write方法来完成的;
CREATOR:反序列化功能是由CREATOR来完成,其内部标明了如何创建序列化对象和数组,并通过Parcel的一系列read方法来完成反序列化功能。
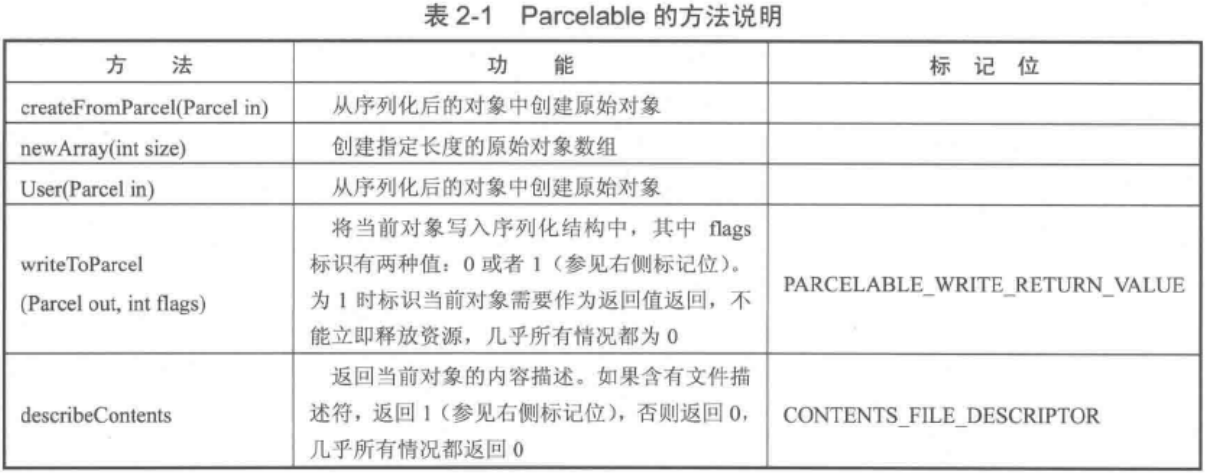
describeContents:内容描述功能。“几乎在所有情况下这个方法都应该返回0”,仅当当前对象存在文件描述符时,此方法返回1 。
附:Parcelable的详细方法说明:
注:系统已经为我们提供了一些实现了Parcelable接口的类,它们都是可以直接序列化的,比如Intent、Bundle、Bitmap等,同时List和Map也可以序列化,前提是它们里面的每个元素都是可序列化的。


 浙公网安备 33010602011771号