SpringMVC笔记
SpringMVC概述
- Spring MVC属于SpringFrameWork的后续产品
- Spring 框架提供了构建 Web 应用程序的全功能 MVC 模块
- 使用 Spring 可插入的 MVC 架构,从而在使用Spring进行WEB开发时,
- 可以选择使用Spring的SpringMVC框架或集成其他MVC开发框架
- Spring web mvc和Struts2都属于表现层的框架
流程图

入门程序
- 创建 maven web工程
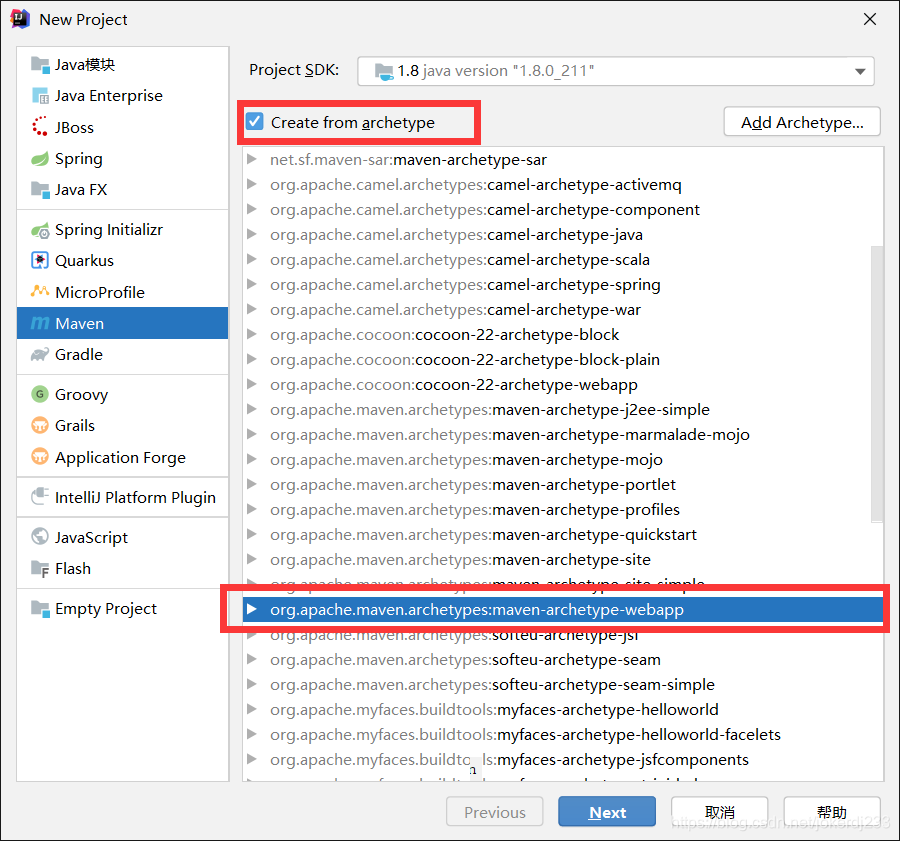
- 导入jar包

<dependencies>
    <dependency>
      <groupId>junit</groupId>
      <artifactId>junit</artifactId>
      <version>4.11</version>
      <scope>test</scope>
    </dependency>

    <!--c3p0-->
    <dependency>
      <groupId>com.mchange</groupId>
      <artifactId>c3p0</artifactId>
      <version>0.9.5.2</version>
    </dependency>
    <!-- aopalliance -->
    <dependency>
      <groupId>org.aopalliance</groupId>
      <artifactId>com.springsource.org.aopalliance</artifactId>
      <version>1.0.0</version>
    </dependency>
    <!-- dbcp-->
    <dependency>
      <groupId>commons-dbcp</groupId>
      <artifactId>commons-dbcp</artifactId>
      <version>1.4</version>
    </dependency>

    <!-- fileupload -->
    <dependency>
      <groupId>commons-fileupload</groupId>
      <artifactId>commons-fileupload</artifactId>
      <version>1.3.3</version>
    </dependency>
    <!-- commons-io -->
    <dependency>
      <groupId>commons-io</groupId>
      <artifactId>commons-io</artifactId>
      <version>2.4</version>
    </dependency>
    <!-- commons-logging -->
    <dependency>
      <groupId>commons-logging</groupId>
      <artifactId>commons-logging</artifactId>
      <version>1.2</version>
    </dependency>
    <!-- commons-pool -->
    <dependency>
      <groupId>commons-pool</groupId>
      <artifactId>commons-pool</artifactId>
      <version>1.6</version>
    </dependency>
    <!-- log4j -->
    <dependency>
      <groupId>log4j</groupId>
      <artifactId>log4j</artifactId>
      <version>1.2.17</version>
    </dependency>
    <!--aspectj.weaver -->
    <dependency>
      <groupId>org.aspectj</groupId>
      <artifactId>com.springsource.org.aspectj.weaver</artifactId>
      <version>1.6.4.RELEASE</version>
    </dependency>
    <!-- spring-aop -->
    <dependency>
      <groupId>org.springframework</groupId>
      <artifactId>spring-aop</artifactId>
      <version>5.2.5.RELEASE</version>
    </dependency>
    <!-- spring-aspects -->
    <dependency>
      <groupId>org.springframework</groupId>
      <artifactId>spring-aspects</artifactId>
      <version>5.2.2.RELEASE</version>
    </dependency>
    <!-- spring-beans -->
    <dependency>
      <groupId>org.springframework</groupId>
      <artifactId>spring-beans</artifactId>
      <version>5.2.5.RELEASE</version>
    </dependency>
    <!-- spring-context -->
    <dependency>
      <groupId>org.springframework</groupId>
      <artifactId>spring-context</artifactId>
      <version>5.2.5.RELEASE</version>
    </dependency>

    <!-- spring-core -->
    <dependency>
      <groupId>org.springframework</groupId>
      <artifactId>spring-core</artifactId>
      <version>5.2.5.RELEASE</version>
    </dependency>
    <!--spring-expression -->
    <dependency>
      <groupId>org.springframework</groupId>
      <artifactId>spring-expression</artifactId>
      <version>5.2.5.RELEASE</version>
    </dependency>
    <!-- spring-jdbc -->
    <dependency>
      <groupId>org.springframework</groupId>
      <artifactId>spring-jdbc</artifactId>
      <version>5.2.5.RELEASE</version>
    </dependency>
    <!-- spring-test -->
    <dependency>
      <groupId>org.springframework</groupId>
      <artifactId>spring-test</artifactId>
      <version>5.2.3.RELEASE</version>
      <scope>test</scope>
    </dependency>
    <!-- spring-test -->
    <dependency>
      <groupId>org.springframework</groupId>
      <artifactId>spring-test</artifactId>
      <version>5.2.3.RELEASE</version>
      <scope>test</scope>
    </dependency>
    <!--spring-web -->
    <dependency>
      <groupId>org.springframework</groupId>
      <artifactId>spring-web</artifactId>
      <version>5.2.5.RELEASE</version>
    </dependency>
    <!-- spring-webmvc -->
    <dependency>
      <groupId>org.springframework</groupId>
      <artifactId>spring-webmvc</artifactId>
      <version>5.2.5.RELEASE</version>
    </dependency>


  </dependencies>
- 在resources目录添加配置文件 SpringMVC.xml

<?xml version="1.0" encoding="UTF-8"?>
<beans xmlns="http://www.springframework.org/schema/beans"
       xmlns:xsi="http://www.w3.org/2001/XMLSchema-instance"
       xmlns:context="http://www.springframework.org/schema/context"
       xmlns:mvc="http://www.springframework.org/schema/mvc"
       xmlns:aop="http://www.springframework.org/schema/aop"
       xmlns:tx="http://www.springframework.org/schema/tx"
       xsi:schemaLocation="http://www.springframework.org/schema/beans
	http://www.springframework.org/schema/beans/spring-beans.xsd
	http://www.springframework.org/schema/context
	http://www.springframework.org/schema/context/spring-context.xsd
	http://www.springframework.org/schema/aop
	http://www.springframework.org/schema/aop/spring-aop.xsd
	http://www.springframework.org/schema/mvc
    http://www.springframework.org/schema/mvc/spring-mvc-4.0.xsd
	http://www.springframework.org/schema/tx
	http://www.springframework.org/schema/tx/spring-tx.xsd">


</beans>
- 配置前端控制器
在web.xml当中配置前端控制器

<?xml version="1.0" encoding="UTF-8"?>
<web-app version="2.5" xmlns="http://java.sun.com/xml/ns/javaee"
         xmlns:xsi="http://www.w3.org/2001/XMLSchema-instance"
         xsi:schemaLocation="http://java.sun.com/xml/ns/javaee
http://java.sun.com/xml/ns/javaee/web-app_2_5.xsd">
  <!-- 配置SpringMVC前端控制器 -->
  <servlet>
    <servlet-name>mySpringMVC</servlet-name>
    <servlet-class>org.springframework.web.servlet.DispatcherServlet</servlet-class>
    <!-- 指定SpringMVC配置文件 -->
    <!-- SpringMVC的配置文件的默认路径是/WEB-INF/${servlet-name}-servlet.xml -->
    <init-param>
      <param-name>contextConfigLocation</param-name>
      <param-value>classpath:springmvc.xml</param-value>
    </init-param>
    <!--服务器启动加载spring控制器-->
    <load-on-startup>1</load-on-startup>

  </servlet>
  <servlet-mapping>
    <servlet-name>mySpringMVC</servlet-name>
    <!-- 设置所有以action结尾的请求进入SpringMVC -->
    <url-pattern>*.action</url-pattern>
  </servlet-mapping>
</web-app>
- 创建控制器

/**
 * @author joker_dj
 * @create 2020-04-21日 22:15
 */
@Controller
public class FirstController {

    @RequestMapping("/first.action")
    public ModelAndView show(){
        ModelAndView modelAndView = new ModelAndView();
        modelAndView.addObject("name","joker_dj");
        modelAndView.setViewName("/first.jsp");
        return modelAndView;
    }
}
- 在springmvc.xml添加注解扫描

<!--注解扫描-->
    <context:component-scan base-package="com.dj.controller"/>
- 创建jsp文件

<%@ page isELIgnored="false" %>
<%@ page contentType="text/html;charset=UTF-8" language="java" %>
<html>
<head>
    <title>Title</title>
</head>
<body>
跳转 <a href="${pageContext.request.contextPath}/first.action">点击</a>
controller的数据:${name}

</body>
</html>
- 配置Tomcat

运行启动
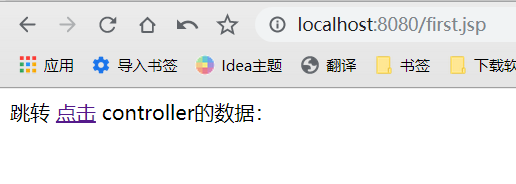
点击超链接

详细执行流程
架构流程
- 用户发送请求至前端控制器DispatcherServlet
- DispatcherServlet收到请求调用HandlerMapping处理器映射器。
- 处理器映射器根据请求url找到具体的处理器,生成处理器对象及处理器拦截器(如果有则生成)一并返回给DispatcherServlet。
- DispatcherServlet通过HandlerAdapter处理器适配器调用处理器
执行处理器(Controller,也叫后端控制器)。 - Controller执行完成返回ModelAndView
- HandlerAdapter将controller执行结果ModelAndView返回给DispatcherServlet
- DispatcherServlet将ModelAndView传给ViewReslover视图解析器
ViewReslover解析后返回具体View - DispatcherServlet对View进行渲染视图(即将模型数据填充至视图中)。
- DispatcherServlet响应用户
流程图

组件说明
- DispatcherServlet
前端控制器
用户请求到达前端控制器,它就相当于mvc模式中的C dispatcherServlet是整个流程控制的中心由它调用其它组件处理用户的请求 dispatcherServlet的存在降低了组件之间的耦合性
- HandlerMapping
处理器映射器
HandlerMapping负责根据用户请求url找到Handler处理器
springmvc提供了不同的映射器实现不同的映射方式 HandlerMapping会把找到映射返回给前端控制器
- Handler
后端控制器
在DispatcherServlet的控制下Handler对具体的用户请求进行处理。
- HandlAdapter
通过HandlerAdapter对处理器进行执行 处理器适配器
- ViewResolver
视图解析器
View Resolver负责将处理结果生成View视图
- View
springmvc框架提供了很多的View视图类型的支持,
包括:jstlView、freemarkerView、pdfView等。我们最常用的视图就是jsp。
默认加载组件
1. 处理器映射器
- @RequestMapping:定义请求url到处理器功能方法的映射
- 注解式处理器映射器,对类中标记了@ResquestMapping的方法进行映射。
- 根据@ResquestMapping定义的url匹配@ResquestMapping标记的方法
- 匹配成功返回HandlerMethod对象给前端控制器。
- HandlerMethod对象中封装url对应的方法Method。
2. 处理器适配器
- 对标记@ResquestMapping的方法进行适配
- 解析对应的方法
3. 视图解析器
- 视图解析器使用SpringMVC框架默认的InternalResourceViewResolver
- 这个视图解析器支持JSP视图解析
配置视图解析器
当一个页面存放目录结构比较多时,就可以配置目录
在springmvc.xmll中添加

请求转发与重定向
转发:

重定向:

接收参数
-
使用传统request对象接收参数


Springmvc框架会自动把Request对象传递给方法。 -
不使用request接收简单类型参数
当请求的参数名称和处理器形参名称一致时会将请求参数与形参进行绑定。

@RequestParam
形参的类型与绑定的类型不一致时,可以使用@RequestParam进行匹配
- value:请求参数名字
- required:是否必须,默认是true,表示请求中一定要有相应的参数,否则将报错
- defaultValue:默认值,表示如果请求中没有同名参数时的默认值

以一个javaBean对象接收
要求对象当中的属性要和表单当中的名称一致


List集合接收数据


自定义参数绑定
根据业务需求自定义数据显示格式
需求:
修改商品日期
由于日期数据有很多种格式,springmvc没办法把字符串转换成日期类型。所以需要自定义参数绑定。
分析:
- 前端控制器接收到请求后,找到注解形式的处理器适配器
- 对RequestMapping标记的方法进行适配,并对方法中的形参进行参数绑定。
- 内部已经定义了很多的转换器,比如可以直接使用int类型来接收字符串
- 日期类型与字符串比较特殊,字符串的日期格式,有很多种.可以自己来定义是哪种格式的转换
- 可以在springmvc处理器适配器上自定义转换器Converter进行参数绑定。
-
把发布时间对象的字符串转换成日期接收


-
创建转换器

-
在springMVC核心配置文件当中自定义转换器

post请求中文参数乱码
当发送post请求时,带有中文的参数会发生乱码

<!-- 解决post乱码问题 -->
    <filter>
        <filter-name>encoding</filter-name>
        <filter-class>org.springframework.web.filter.CharacterEncodingFilter</filter-class>
        <!-- 设置编码参是UTF8 -->
        <init-param>
            <param-name>encoding</param-name>
            <param-value>UTF-8</param-value>
        </init-param>
    </filter>
    <filter-mapping>
        <filter-name>encoding</filter-name>
        <url-pattern>/*</url-pattern>
    </filter-mapping>
@RequestMapping相关属性
- Value属性
- 用来设置请求路径
- 值是一个字符串数组
- 可以设置多个路径共同访问对应方法
- method属性
- 用来设置映射的请求方式
- 值是RequestMethod类型的数组
- 如果没有写,则没有限制,post与get都可以请求到对应的方法
- 如果指定了请求类型,则必须得是相应的请求才能访问到对应的方法
- params属性
必须设置对应的请求参数和请求值才能访问到对应的内容
- headers属性
发送的请求头必须要与设置的请求相同时,才能够访问到对应的方法
- ant风格地址
- Ant风格:请求路径的一种匹配方法
- 通配符:
1. ?:一个?匹配一个字符


2. *:匹配任意字符


3. **:匹配多重路径


@PathVariable
- rest风格
资源定位及资源操作的风格
不是协议,可以遵循,也可以不遵循
- REST风格请求
- REST 即 Representational State Transfer (资源)表现层状态转化
- 用URL定位资源,用HTTP描述操作
- 是目前最流行的一种互联网软件架构
- 它结构清晰、符合标准、易于理解、扩展方便,所以正得到越来越多网站的采用
- 使用POST, DELETE, PUT, GET 分别对应 CRUD
- Spring3.0 开始支持 REST 风格的请求
- 传统的操作资源
http://localhost:8080/get.action?id=10 查询 get
http://localhost:8080/add.action 新增 post
http://localhost:8080/update.action 修改 post
http://localhost:8080/delete.action?id=10 删除 post
- restful操作资源
http://localhost:8080/goods/1 查询GET
http://localhost:8080/goods 新增POST
http://localhost:8080/goods 更新PUT
http://localhost:8080/goods/1 删除DELETE
使用@PathVariable接收RestFul风格参数
- 发送put与delete请求
- 默认情况下Form表单是不支持PUT请求和DELETE请求的
- spring3.0添加了一个过滤器HiddenHttpMethodFilter
- 可以将post请求转换为PUT或DELETE请求
配置过滤器 web.xml

发送请求

服务器接收处理

注意事项
- 从tomcat8开始,如果直接返回jsp页面,会报405错误 JSPs only permit GET POST or HEAD
- 使用重定向的形式跳转到对应jsp
- 或者是直接把对应jsp的 isErrorPage="true"
- 过滤器HiddenHttpMethodFilter源码分析 (了解)


@RequestHeader
作用:在方法中接收请求头当中的信息

@CookieValue
作用:用来接收浏览发送过来的cookes值

传值方式
1. ModelMap
- ModelMap对象主要用于传递控制方法处理数据到结果页面
- 也就是说我们把结果页面上需要的数据放到ModelMap对象中即可
- request对象的setAttribute方法的作用: 用来在一个请求过程中传递处理的数据。
- 使用方法与model一样
2. Model
- Model 和 ModelMap 的实例都是spirng mvc框架来自动创建并作为控制器方法参数传入,用户无需自己创建
- 可以简单地将model的实现类理解成一个Map
- Request级别的模型数据
- Model 是一个接口, 其实现类为ExtendedModelMap,继承了ModelMap类
方法介绍:
1. Model addAttribute(String attributeName, Object attributeValue);
添加键值属性对
2. Map<String, Object> asMap();
将当前的model转换成Map
3. Model addAllAttributes(Map<String, ?> attributes);
将attributes中的内容复制到当前的model中
如果当前model存在相同内容,会被覆盖
4. Model addAllAttributes(Collection<?> attributeValues);
以集合中数据的类型做为key,
将所提供的Collection中的所有属性复制到这个Map中,
如果有同类型会存在覆盖现象
5. Model mergeAttributes(Map<String, ?> attributes);
将attributes中的内容复制到当前的model中
如果当前model存在相同内容,不会被覆盖
6. boolean containsAttribute(String attributeName);
3. ModelAndView
- 需要自己创建
- 既包含模型也包含视图
4. @SessionAttributes注解
将模型中的某个属性暂存到 HttpSession 中,以便多个请求之间可以共享这个属性
- value:通过指定key将model数据放到session域当中
原来存入session:

通过注解

获取session
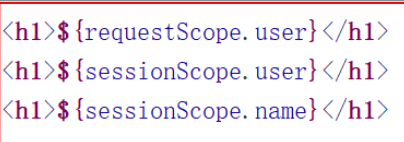
- type:把指定类型的模型数据放到session域当中

5. @SessionAttribute注解
使用@SessionAttribute来访问预先存在的全局会话属性


6. @ModelAttribute
作用:
- 修改处理方法的参数时,自动把该参数放到model当中


在方法定义上使用 @ModelAttribute 注解,Spring MVC 在调用目标处理方法前,
会先逐个调用在方法级上标注了@ModelAttribute 的方法。
mvc:view-controller
当我们发送一个请求时,如果没有找到对应的mapping
则会对配置文件当中匹配mvc:view-controller
注意点:使用时要添加后面的内容
mvc:annotation-driven/
<mvc:annotation-driven />
<mvc:annotation-driven /> 是一种简写形式
会自动注册三个Bean:
- RequestMappingHandlerMapping、
- RequestMappingHandlerAdapter
- ExceptionHandlerExceptionResolver
并提供了 数据绑定支持,
@NumberFormatannotation支持,
@DateTimeFormat支持,
@Valid支持,读写XML的支持(JAXB),
读写JSON的支持(Jackson)。
form标签
简介
在使用SpringMVC的时候我们可以使用Spring封装的一系列表单标签,这些标签都可以访问到ModelMap中的内容
作用
- 第一是它会自动的绑定来自Model中的一个属性值到当前form对应的实体对象
- 第二是它支持我们在提交表单的时候使用除GET和POST之外的其他方法进行提交,包括DELETE和PUT等
使用场景
- 当编辑时, 跳转到form表单页,传统模式要在跳转前先到数据库查询数据,然后进行表单数据回显
- 使用form之前一定要保证有对应的bean,没有对应的bean时, 会自动以command为key到request域中查询,当找不到的时候, 会报异常
使用方式
- 引入标签库
<%@taglib uri="http://www.springframework.org/tags/form" prefix="fm" %>
- 创建表表单

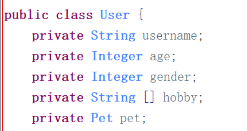
处理请求


页面处理

服务器表单校验
为什么后端要做表单的校验
如果只使用前端校验的话 如果浏览器把JS给禁用掉,就弯度子啦
JSR
JSR 303 是 Java 为 Bean 数据合法性校验提供的标准框架,它已经包含在 JavaEE 6.0 中 JSR 303 通过在 Bean 属性上标注类似于 @NotNull、@Max 等标准的注解 指定校验规则,并通过标准的验证接口对 Bean 进行验证
Hibernate Validator
是 JSR 303 的一个参考实现, 除支持所有标准的校验注解外,它还支持以下的扩展注解
常用校验规则
-
Bean Validation 中内置的约束
1. @Null 被注释的元素必须为 null
2. @NotNull 被注释的元素必须不为 null
3. @AssertTrue 被注释的元素必须为 true
3. @AssertFalse 被注释的元素必须为 false
4. @Min(value) 被注释的元素必须是一个数字,其值必须大于等于指定的最小值
5. @Max(value) 被注释的元素必须是一个数字,其值必须小于等于指定的最大值
6. @DecimalMin(value) 被注释的元素必须是一个数字,其值必须大于 等于指定的最小值
7. @DecimalMax(value) 被注释的元素必须是一个数字,其值必须小于等于指定的最大值
8. @Size(max=, min=) 被注释的元素的大小必须在指定的范围内
9. @Digits (integer, fraction) 被注释的元素必须是一个数字,其值必须在可接受的范围内
10. @Past 被注释的元素必须是一个过去的日期
11. @Future 被注释的元素必须是一个将来的日期
12. @Pattern(regex=,flag=) 被注释的元素必须符合指定的正则表达式 -
Hibernate Validator 附加的约束
- @NotBlank(message =) 验证字符串非null,且长度必须大于0
- @Email 被注释的元素必须是电子邮箱地址
- @Length(min=,max=) 被注释的字符串的大小必须在指定的范围内
- @NotEmpty 被注释的字符串的必须非空
- @Range(min=,max=,message=) 被注释的元素必须在合适的范围内
使用Hibernate-Validator导入jar包

- 在配置文件当中写上
<mvc:annotation-driven/>
-
在模型当中添加对应的校验规则

-
在处理器方法的入参标记@valid注解即可

-
错误信息页面回显
使用原始表单错误信息写到Model中


使用form标签
<fm:error path="username"></fm:error>
访问静态资源
概述
在进行Spring MVC的配置时,通常我们会配置一个dispatcher servlet用于处理对应的URL
在设置url-pattern时可以设置三种形式
- /*:拦截所有 jsp js png .css 真的全拦截.不建议使用
- /:拦截所有,不包括jsp,包含.js .png.css 建议使用
- *.action *.do:拦截以do action 结尾的请求
url-pattern为/时访问静态资源
方式1-
<mvc:default-servlet-handler/>
方式2- 采用spring自带方法
<mvc:resources>
配置
 <mvc:annotation-driven />
 <mvc:resources location="/img/" mapping="/img/**"/>
 <mvc:resources location="/js/" mapping="/js/**"/>
 <mvc:resources location="/css/" mapping="/css/**"/>
描述
location元素表示webapp目录下的static包下的所有文件;
mapping元素表示以/static开头的所有请求路径,如/static/a 或者/static/a/b;
该配置的作用是:DispatcherServlet不会拦截以/static开头的所有请求路径,并当作静态资源 交由Servlet处理。
Json处理
概述
当前端使用Ajax发送请求时,服务器要以JSON的数据格式响应给浏览器
使用方式
@ResponseBody来实现;注解方式
@ResponseBody**
- 添加json处理相关jar包

- 在配置文件当中写上
<mvc:annotation-driven/>
- 设置映射方法的返回值为@ResponseBody
-
方式1-直接返回一个对象

-
方式2-返回一个List集合

-
方式3-返回一个Map集合

-
表单序列化
序列化方式
<form id="myform">
    user:<input type="text" name="username"><br>
    age:<input type="text" name="age" ><br>
    爱好:<input type="checkbox" name="hobby" value="篮球"> 篮球
    <input type="checkbox" name="hobby" value="乒乓球"> 乒乓球
    <input type="checkbox" name="hobby" value="足球"> 足球
  </form>
  <input type="button" id="formbtn" value="发送form">
序列化转Json
(function($){
          $.fn.serializeJson=function(){
              var serializeObj={};
              var array=this.serializeArray();
              var str=this.serialize();
              $(array).each(function(){
                  if(serializeObj[this.name]){
                      if($.isArray(serializeObj[this.name])){
                          serializeObj[this.name].push(this.value);
                      }else{
                          serializeObj[this.name]=[serializeObj[this.name],this.value];
                      }
                  }else{
                      serializeObj[this.name]=this.value;
                  }
              });
              return serializeObj;
          };
      })(jQuery);
@RequestBody
作用
- 默认情况下我们发送的都是Content-Type: 不是application/x-www-form-urlencoded
- 直接使用@RequestParam接收参数
- 如果不是Content-Type: 不是application/x-www-form-urlencoded编码的内容,例如application/json,
application/xml等;- 使用@RequestBody接收
使用
发送Json参数


发送二进制流


视图解析器
视图解析器
- 请求处理方法执行完成后,最终返回一个 ModelAndView 对象
- 对于那些返回 String,View 或 ModeMap 等类型的处理方法
- Spring MVC 也会在内部将它们装配成一个 ModelAndView 对象 它包含了逻辑名和模型对象的视图
- Spring MVC 借助视图解析器(ViewResolver)得到最终的视图对象(View),最终的视图可以是 JSP
视图
- 视图的作用是渲染模型数据,将模型里的数据以某种形式呈现给客户
- 视图对象由视图解析器负责实例化
- 在org.springframework.web.servlet 包中定义了一个高度抽象的 View 接口
常见实现类
InternalResourceView
将JSP或其它资源封装成一个视图 是InternalResourceViewResoler默认使用的实现类
文件下载

文件上传
概述
- Spring MVC 为文件上传提供了直接的支持
- 是通过即插即用的 MultipartResolver 实现的
- MultipartResolver是一个接口
- Spring MVC 上下文中默认没有装配 MultipartResovler
- 如果想使用 Spring 的文件上传功能
- 就必须得要自己下载相关jar包
- 自己到配置文件当中装配到springMVC当中
上传步骤
- 导入相关jar包

- 在springmvc配置文件当中装配MultipartResovler

- 实现上传代码

多文件上传
WebUploader是由Baidu WebFE(FEX)团队开发的一个简单的以HTML5为主,FLASH为辅的现代文件上传组件
异常
概述
- Spring MVC 通过 HandlerExceptionResolver 处理程序的异常,包括 Handler 映射、数据绑定以及目标方法执行时发生的异常。
- SpringMVC 提供的 HandlerExceptionResolver 的实现类
异常处理
处理 Handler 中用 @ExceptionHandler 注解定义的方法。
@ExceptionHandler优先级
根据继承关系 找继承关系比较近的那一个 
@ControllerAdvice
如果在当前类中没有找到@ExceptionHanler
则会到@ControllerAdvice 中的@ExceptionHandler 注解方法

国际化
概述
- SpringMVC 根据 Accept-Language 参数判断客户端的本地化类型
- 当接受到请求时,SpringMVC 会在上下文中查找一个本地化解析器(LocalResolver),
- 找到后使用它获取请求所对应的本地化类型信息。
默认实现过程
-
要先创建国际化的资源文件


-
添加配置文件

-
添加JSTL jar包
-
在页面当中编写标签

原理
如果没有显式定义本地化解析器
SpringMVC 会使用 AcceptHeaderLocaleResolver:根据 HTTP 请求头的 Accept-Language 参数确定本地化类型

切换中英文切换
- 默认情况是通过AccepHeaderLocaleResolver来从浏览器当中获取语言信息
- 可以从请求参数中获取本次请求对应的本地化类型。
- 获取到本地类型后, 给写入到session当中
实现
- 配置文件

- 属性文件

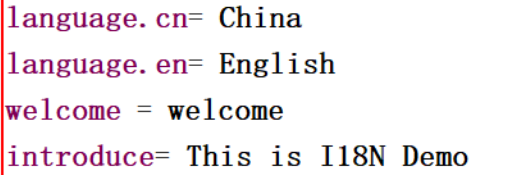
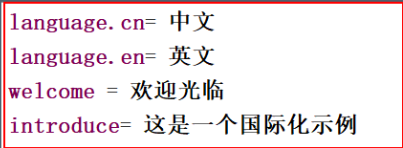
- 页面信息

拦截器
概述
- Java 里的拦截器是动态拦截 action 调用的对象。
- 可以Controller中的方法执行之前与执行之后, 及页面显示完毕后, 执行指定的方法
- 自定义的拦截器必须实现HandlerInterceptor接口
方法介绍
preHandle(): 在业务处理器处理请求之前被调用
postHandle: 在业务处理器处理完请求后
afterCompletion: 在 DispatcherServlet 完全处理完请求后被调用
SpringMVC拦截器使用
- 拦截所有请求
创建一个类实现HandlerInterceptor接口

配置文件当中添加拦截器

- 拦截指定请求


