JS中常用方法
数组
splice:
splice() 方法的第一个参数是起始索引,第二个参数是要删除的元素数量(可以为0),然后可以传递更多的参数作为要插入的新元素。
限制删除的数量:
const arr = [1, 2, 3, 4, 5];
const removed = arr.splice(0, 3);
console.log(arr);     // Output: [4, 5]
console.log(removed); // Output: [1, 2, 3]
------------------------------------------
删除所有元素:
const arr = [1, 2, 3, 4, 5];
const removed = arr.splice(0);
console.log(arr);     // Output: []
console.log(removed); // Output: [1, 2, 3, 4, 5]
------------------------------------------
从末尾删除元素:
const arr = [1, 2, 3, 4, 5];
const removed = arr.splice(-2);
console.log(arr);     // Output: [1, 2, 3]
console.log(removed); // Output: [4, 5]
------------------------------------------
删除并插入元素:
const arr = [1, 2, 3, 4, 5];
const removed = arr.splice(1, 2, 'a', 'b', 'c');//在index是1的位置删除2个元素,并添加'a','b','c'
console.log(arr);     // Output: [1, 'a', 'b', 'c', 4, 5]
console.log(removed); // Output: [2, 3]
------------------------------------------
替换元素:
const arr = [1, 2, 4, 5];
const replaced = arr.splice(2, 1, 'a', 'b');
console.log(arr);      // Output: [1, 2, 'a', 'b', 5]
console.log(replaced); // Output: [4]
------------------------------------------
插入元素:
const arr = [1, 2, 4, 5];
arr.splice(2, 0, 3);//在index为2的位置,删除0个元素,并添加3
console.log(arr); // Output: [1, 2, 3, 4, 5]
------------------------------------------
删除元素:
const arr = [1, 2, 3, 4, 5];
const removed = arr.splice(2, 1);
console.log(arr);     // Output: [1, 2, 4, 5]
console.log(removed); // Output: [3]
pop(), push(), shift(), unshift()
const arr = [1, 2, 3];
arr.pop();
console.log(arr); // Output: [1, 2]

arr.push(4);
console.log(arr); // Output: [1, 2, 4]

arr.shift();
console.log(arr); // Output: [2, 4]

arr.unshift(0);
console.log(arr); // Output: [0, 2, 4]
copyWithin()
copyWithin() 方法在数组内部进行浅拷贝,并将指定位置的元素复制到其他位置。它接受两个参数:目标索引(target)和源索引(start)以及可选的结束索引(end)。该方法会修改原始数组,不会创建新的数组。下面是对 copyWithin() 方法的详细解释以及相应的示例代码:
copyWithin() 方法的语法如下:
arr.copyWithin(target, start, end)
target(必需):要复制到的目标索引位置。
start(可选):要复制的源起始索引位置。
end(可选):要复制的源结束索引位置(不包含该索引)。
const arr = [1, 2, 3, 4, 5];
arr.copyWithin(0, 3); // 将索引3及之后的元素复制到索引0及之后的位置
console.log(arr); // Output: [4, 5, 3, 4, 5]
在上面的示例中,我们将索引为3的元素(4, 5)复制到索引为0的位置开始,结果是原始数组被修改为 [4, 5, 3, 4, 5]。
复制特定范围内的元素:
const arr = [1, 2, 3, 4, 5];
arr.copyWithin(1, 2, 4);
console.log(arr); // Output: [1, 3, 4, 4, 5]
复制到末尾:
const arr = [1, 2, 3, 4, 5];
arr.copyWithin(2, 0);
console.log(arr); // Output: [1, 2, 1, 2, 3]
在上面的示例中,我们从索引为0的位置开始复制,将复制的元素粘贴到索引为2的位置,直到末尾。结果是原始数组被修改为 [1, 2, 1, 2, 3]。
fill()
fill() 方法用于将数组中的元素替换为静态值,从指定的起始索引位置开始,到指定的结束索引位置结束(不包括结束索引位置)。它会修改原始数组,不会创建新的数组。下面是对 fill() 方法的详细解释以及相应的示例代码:
arr.fill(value, start, end)
参数说明:
value(必需):用于替换数组元素的静态值。
start(可选):替换开始的起始索引位置,默认为 0。
end(可选):替换结束的索引位置(不包括该位置),默认为数组长度。
const arr = [1, 2, 3, 4, 5];
arr.fill(0);
console.log(arr); // Output: [0, 0, 0, 0, 0]
替换特定范围内的元素:
const arr = [1, 2, 3, 4, 5];
arr.fill('a', 1, 4);
console.log(arr); // Output: [1, 'a', 'a', 'a', 5]
在上面的示例中,我们从索引为1的位置开始,替换到索引为4的位置结束(不包括索引4)。结果是原始数组被修改为 [1, 'a', 'a', 'a', 5]。
替换从末尾开始的元素:
const arr = [1, 2, 3, 4, 5];
arr.fill('b', -3);
console.log(arr); // Output: [1, 2, 'b', 'b', 'b']
在上面的示例中,我们从倒数第三个元素开始,将之后的所有元素替换为静态值 'b'。结果是原始数组被修改为 [1, 2, 'b', 'b', 'b']。
reverse()
const arr = [1, 2, 3];
arr.reverse();
console.log(arr); // Output: [3, 2, 1]
sort()
const arr = [3, 2, 1];
arr.sort();
console.log(arr); // Output: [1, 2, 3]
join()
const arr = ['Hello', 'World'];
const joined = arr.join(' ');
console.log(joined); // Output: "Hello World"
forEach()
const arr = [1, 2, 3];
arr.forEach(item => {
  console.log(item);
});
// Output:
// 1
// 2
// 3
map()
const arr = [1, 2, 3];
const doubled = arr.map(item => item * 2);
console.log(doubled); // Output: [2, 4, 6]
filter()
const arr = [1, 2, 3, 4, 5];
const evenNumbers = arr.filter(item => item % 2 === 0);
console.log(evenNumbers); // Output: [2, 4]
indexOf()
const arr = [1, 2, 3, 4, 5];
const index = arr.indexOf(3);
console.log(index); // Output: 2
lastIndexOf()
const arr = [1, 2, 3, 4, 3, 5];
const lastIndex = arr.lastIndexOf(3);
console.log(lastIndex); // Output: 4
reduce(),reduceRight()
reduce() 方法和 reduceRight() 方法都是用于数组的迭代方法,它们可以通过对数组中的元素进行累积计算来返回一个最终的值。它们的差异在于迭代的方向不同。下面是对 reduce() 和 reduceRight() 方法的详细解释以及相应的示例代码:
reduce() 方法:
reduce() 方法从数组的左侧开始迭代元素,依次将每个元素和累加器进行操作。
它接受两个参数:回调函数和可选的初始值。
回调函数接受四个参数:累加器(accumulator),当前元素(current value),当前索引(index),原始数组(array)。
回调函数返回的值将作为下一次迭代的累加器的值。
const numbers = [1, 2, 3, 4, 5];
const sum = numbers.reduce((accumulator, currentValue) => accumulator + currentValue, 0);
console.log(sum); // Output: 15
在上面的示例中,我们使用 reduce() 方法对数组中的元素进行累加计算,并将初始值设置为 0。最终的结果是所有元素的和,即 15。
reduceRight() 方法:
reduceRight() 方法从数组的右侧开始迭代元素,依次将每个元素和累加器进行操作。
它接受两个参数:回调函数和可选的初始值。
回调函数接受四个参数:累加器(accumulator),当前元素(current value),当前索引(index),原始数组(array)。
回调函数返回的值将作为下一次迭代的累加器的值。
const numbers = [1, 2, 3, 4, 5];
const concatenated = numbers.reduceRight((accumulator, currentValue) => accumulator + currentValue, '');
console.log(concatenated); // Output: '54321'
在上面的示例中,我们使用 reduceRight() 方法将数组中的元素从右侧开始拼接成一个字符串,并将初始值设置为空字符串。最终的结果是逆序拼接的字符串,即 '54321'。
无论是 reduce() 还是 reduceRight() 方法,你可以根据需求选择合适的方法来实现对数组的累积计算。在回调函数中,你可以根据需要对累加器和当前元素进行任意操作,并返回下一次迭代的累加器的值。
在 reduce() 方法中,可选的第二个参数是初始值(initial value),它指定了累加器的初始值。如果不提供初始值,则默认使用数组的第一个元素作为初始值,并从数组的第二个元素开始迭代。
const numbers = [1, 2, 3, 4, 5];
const sum = numbers.reduce((accumulator, currentValue) => accumulator + currentValue);
console.log(sum); // Output: 15
在上面的示例中,我们没有提供初始值,因此 reduce() 方法会将数组的第一个元素(1)作为初始值,并从数组的第二个元素(2)开始进行累加计算。
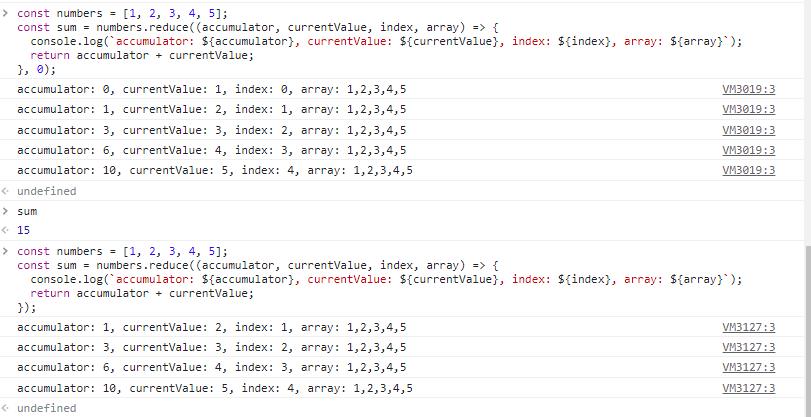
现在,让我们给出一个使用回调函数接受四个参数的示例:
const numbers = [1, 2, 3, 4, 5];
const sum = numbers.reduce((accumulator, currentValue, index, array) => {
  console.log(`accumulator: ${accumulator}, currentValue: ${currentValue}, index: ${index}, array: ${array}`);
  return accumulator + currentValue;
}, 0);
console.log(sum); // Output: 15
对象常用方法示例
keys()
const obj = { a: 1, b: 2, c: 3 };
const keys = Object.keys(obj);
console.log(keys); // Output: ["a", "b", "c"]
values()
const obj = { a: 1, b: 2, c: 3 };
const values = Object.values(obj);
console.log(values); // Output: [1, 2, 3]
entries()
const obj = { a: 1, b: 2, c: 3 };
const entries = Object.entries(obj);
console.log(entries); // Output: [["a", 1], ["b", 2], ["c", 3]]
hasOwnProperty()
const obj = { a: 1, b: 2 };
console.log(obj.hasOwnProperty('a')); // Output: true
console.log(obj.hasOwnProperty('c')); // Output: false
defineProperty()
Object.defineProperty() 是 JavaScript 中用于定义或修改对象属性的方法。它允许我们精确地定义属性的特性,如可写性(writable)、可枚举性(enumerable)、可配置性(configurable)和获取或设置属性值的方法。
Object.defineProperty(object, propertyName, descriptor)
参数解释:
object: 要定义或修改属性的对象。
propertyName: 要定义或修改的属性名。
descriptor: 描述符对象,包含要定义或修改的属性的特性。
描述符对象 descriptor 可以包含以下属性:
value: 设置属性的值。可以是任何有效的 JavaScript 数据类型。默认为 undefined。
writable: 布尔值,指示属性是否可写。如果为 true,则属性的值可以被修改。默认为 false。
enumerable: 布尔值,指示属性是否可枚举。如果为 true,则该属性可以在 for...in 循环中被枚举。默认为 false。
configurable: 布尔值,指示属性是否可配置。如果为 true,则该属性的描述符可以被修改,属性可以被删除。默认为 false。
get: 一个函数,用于获取属性的值。当访问该属性时,该函数会被调用,并返回属性的值。默认为 undefined。
set: 一个函数,用于设置属性的值。当修改该属性的值时,该函数会被调用。默认为 undefined。
const person = {};

Object.defineProperty(person, 'name', {
  value: 'John',
  writable: false,
  enumerable: true,
  configurable: false
});

console.log(person.name); // 输出: John
person.name = 'Jane'; // 不会修改成功,因为 writable 被设置为 false
console.log(person.name); // 输出: John

// 尝试删除属性,但因为 configurable 被设置为 false,所以删除操作无效
delete person.name;
console.log(person.name); // 输出: John
Object.defineProperty() 是一种强大的工具,可以用于在 JavaScript 对象中创建高度控制的属性。这在创建不可修改的常量、定义隐藏属性或实现数据绑定等场景中非常有用。值得注意的是,在 ES6 中引入了更简洁的 class 和 get、set 语法,它们可以更方便地实现类似的功能。

 浙公网安备 33010602011771号