[nginx] 基于Docker安装Nginx
0 序
- 环境信息
OS: CENTOS 7.9Docker: 25.0.4Nginx: 1.24.0
1 安装步骤
Step0 安装 docker
略。可参见:
Step1 下载nginx镜像
- 下载 nginx镜像
docker pull nginx:1.24.0

或:在指定仓库下拉取目标镜像 : docker pull demo-myregistry.com:5000/nginx:1.24.0
  如: docker pull docker.1ms.run/nginx:1.24.0
问题现象: 因法规政策原因,
docker.io网站被禁用,导致拉取nginx的docker镜像失败,报:"Error response from daemon: Get "https://registry-1.docker.io/v2/": net/http: request canceled while waiting for connection (Client.Timeout exceeded while awaiting headers)"错误。
解决方法:
- step1 配置可用的镜像源
vim /etc/docker/daemon.json
{
	"registry-mirrors": [
		"https://mirror.iscas.ac.cn",
		"https://docker.jsdelivr.fyi",
		"https://dockertest.jsdelivr.fyi",
		"https://mirror.baidubce.com",
		"https://docker.m.daocloud.io",
        "https://docker.1ms.run",
        "https://docker.xuanyuan.me",
        "https://dislabaiot.xyz"
	]
}
- step2 重启 docker
systemctl daemon-reload
systemctl restart docker
- 查看下载的镜像
docker images
Step2 基于宿主机创建Nginx配置文件
- 创建挂载目录
启动前需要先创建Nginx外部挂载的配置文件(
/data/nginx/conf/nginx.conf)
之所以要先创建 , 是因为Nginx本身容器只存在/etc/nginx目录 , 本身就不创建nginx.conf文件
当服务器和容器都不存在nginx.conf文件时, 执行启动命令的时候 docker 会将nginx.conf作为目录创建 , 这并不是我们想要的结果 。
mkdir -p /data/nginx/
# [x] mkdir -p /data/nginx/conf
  注: /data/nginx/conf 目录,由下一步骤的 cp + mv 的方式创建
# [x] mkdir -p /data/nginx/conf/conf.d
  注: /data/nginx/conf/conf.d 目录,由下一步骤的 cp + mv 的方式创建
# [x] mkdir -p /data/nginx/html
  注: /data/nginx/html 目录,由下一步骤的 cp 的方式创建
# [x] mkdir -p /data/nginx/log
  注: /data/nginx/log 目录,由下一步骤的 cp + mv 的方式创建

- 将样例容器中的nginx.conf文件和conf.d文件夹复制到宿主机
# 生成DEMO容器 (后面步骤中可删除之)
docker run --name demo-nginx -p 18080:80 -d nginx:1.24.0

# 将容器/etc/nginx下的文件
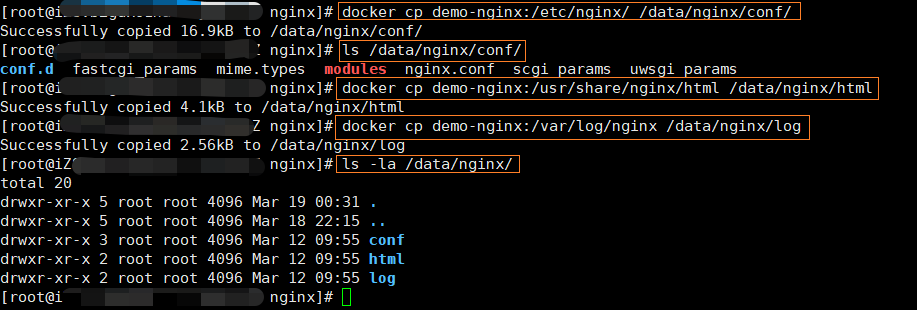
docker cp demo-nginx:/etc/nginx/ /data/nginx/
mkdir -p /data/nginx/conf
mv /data/nginx/* /data/nginx/conf
ls -la /data/nginx/conf/
### nginx.conf文件复制到宿主机
### [无需执行] docker cp demo-nginx:/etc/nginx/nginx.conf /data/nginx/conf/nginx.conf
### 将容器conf.d文件夹下内容复制到宿主机
### [无需执行] docker cp demo-nginx:/etc/nginx/conf.d /data/nginx/conf/conf.d
### 将容器mime.types文件下内容复制到宿主机
### [无需执行] docker cp demo-nginx:/etc/nginx/mime.types /data/nginx/conf/mime.types

# 将容器中的html文件夹复制到宿主机
docker cp demo-nginx:/usr/share/nginx/html /data/nginx/
 # 注: 目标目录 /data/nginx/html

# 将容器中的日志文件夹复制到宿主机
docker cp demo-nginx:/var/log/nginx /data/nginx/
mv /data/nginx/nginx /data/nginx/log

# 停止 DEMO Nginx 容器
docker stop demo-nginx
# 删除  DEMO Nginx 容器
docker rm -f demo-nginx

Step3 创建Nginx容器、并运行
- 创建、并启动 nginx 容器
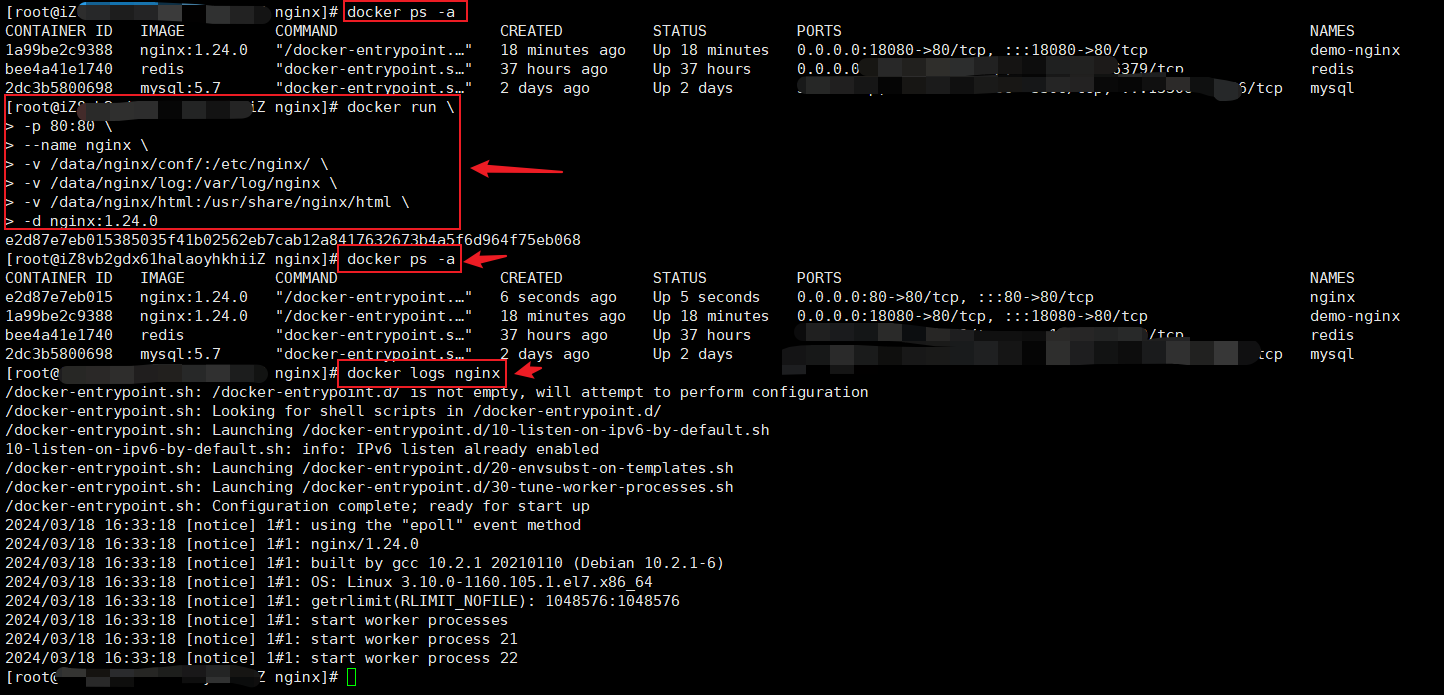
docker run \
-p 80:80 \
-p 443:443 \
-p 81:81 \
--add-host host.docker.internal:host-gateway \
--name nginx \
-v /data/nginx/conf/:/etc/nginx/ \
-v /data/nginx/log:/var/log/nginx \
-v /data/nginx/html:/usr/share/nginx/html \
-d nginx:1.24.0
-p 80:80: 第1个 80 端口:是指宿主机的映射端口 ; 第2个 80 端口:是指容器的被映射端口-p 81:81: 暴露多个端口的Demo。-d: 后台运行--add-host:host.docker.internal:host-gateway: 【可选参数】 标志启用主机的默认名称host.docker.internal。使用此标志启动容器以公开主机字符串。 `
--add-host标志向容器的/etc/hosts文件添加一个条目。上面显示的值将host.docker.internal映射到容器的主机网关,这与真实的 localhost 值相匹配。如果您愿意,可以用您的主机真实名称替换 host.docker.internal 。
此做法主要用于解决: 在 nginx 容器中访问/代理宿主机的Web服务:
upstream xxxx_api_server {
	ip_hash;
	# server 127.0.0.1:8770 weight=1;
	# host.docker.internal : docker 中代指 宿主机本机的IP
	server host.docker.internal:8770 weight=1;
	# server {{apiserver_host}}:{{apiserver_port}} weight=1;
}

location /xxxx/api {
    // ...
    proxy_pass http://xxxx_official_site_api_server/xxxx/api;
    // ...
}

docker logs nginx

docker ps -a
- nginx 容器的基本使用与管理
# 查看容器进程、查找nginx对应的容器ID
docker ps -a

# 关闭该容器
docker stop nginx

# 删除该容器
docker rm nginx

# 删除正在运行的nginx容器
docker rm -f nginx

# 查看 nginx 容器的 运行日志
docker logs nginx

# 进入 nginx 容器内部
docker exec -it nginx bash
> ...

# 在 nginx 容器内部执行shell命令
> docker exec -it nginx sh -c "ls -la /var/log/nginx"
total 8
drwxr-xr-x 2 root root 4096 Apr 10  2024 .
drwxr-xr-x 1 root root 4096 Apr 10  2024 ..
lrwxrwxrwx 1 root root   11 Apr 10  2024 access.log -> /dev/stdout
lrwxrwxrwx 1 root root   11 Apr 10  2024 error.log -> /dev/stderr
//查看容器内 nginx 的安装目录
> docker exec -it nginx sh -c "whereis nginx"
nginx: /usr/sbin/nginx /usr/lib/nginx /etc/nginx /usr/share/nginx
//查看版本信息和编译安装的内置模块
> docker exec -it nginx sh -c "nginx -V"
nginx version: nginx/1.24.0
built by gcc 10.2.1 20210110 (Debian 10.2.1-6)
built with OpenSSL 1.1.1n  15 Mar 2022 (running with OpenSSL 1.1.1w  11 Sep 2023)
TLS SNI support enabled
configure arguments: --prefix=/etc/nginx --sbin-path=/usr/sbin/nginx --modules-path=/usr/lib/nginx/modules --conf-path=/etc/nginx/nginx.conf --error-log-path=/var/log/nginx/error.log --http-log-path=/var/log/nginx/access.log --pid-path=/var/run/nginx.pid --lock-path=/var/run/nginx.lock --http-client-body-temp-path=/var/cache/nginx/client_temp --http-proxy-temp-path=/var/cache/nginx/proxy_temp --http-fastcgi-temp-path=/var/cache/nginx/fastcgi_temp --http-uwsgi-temp-path=/var/cache/nginx/uwsgi_temp --http-scgi-temp-path=/var/cache/nginx/scgi_temp --user=nginx --group=nginx --with-compat --with-file-aio --with-threads --with-http_addition_module --with-http_auth_request_module --with-http_dav_module --with-http_flv_module --with-http_gunzip_module --with-http_gzip_static_module --with-http_mp4_module --with-http_random_index_module --with-http_realip_module --with-http_secure_link_module --with-http_slice_module --with-http_ssl_module --with-http_stub_status_module --with-http_sub_module --with-http_v2_module --with-mail --with-mail_ssl_module --with-stream --with-stream_realip_module --with-stream_ssl_module --with-stream_ssl_preread_module --with-cc-opt='-g -O2 -ffile-prefix-map=/data/builder/debuild/nginx-1.24.0/debian/debuild-base/nginx-1.24.0=. -fstack-protector-strong -Wformat -Werror=format-security -Wp,-D_FORTIFY_SOURCE=2 -fPIC' --with-ld-opt='-Wl,-z,relro -Wl,-z,now -Wl,--as-needed -pie'

//查看 Linux 内核信息 和镜像内的操作系统(Debian,包管理器: apt)
> docker exec -it nginx sh -c "uname -a"
Linux cac19930e79d 3.10.0-1160.119.1.el7.x86_64 #1 SMP Tue Jun 4 14:43:51 UTC 2024 x86_64 GNU/Linux
> docker exec -it nginx sh -c "cat /etc/os-release"
PRETTY_NAME="Debian GNU/Linux 11 (bullseye)"
NAME="Debian GNU/Linux"
VERSION_ID="11"
VERSION="11 (bullseye)"
VERSION_CODENAME=bullseye
ID=debian
HOME_URL="https://www.debian.org/"
SUPPORT_URL="https://www.debian.org/support"
BUG_REPORT_URL="https://bugs.debian.org/"

//查看镜像内默认支持的命令
> docker exec -it nginx sh -c "ls /usr/bin"
...(略)
//在镜像内安装新命令
> docker exec -it nginx sh -c "apt-get install curl"


Step4 测验:访问宿主机
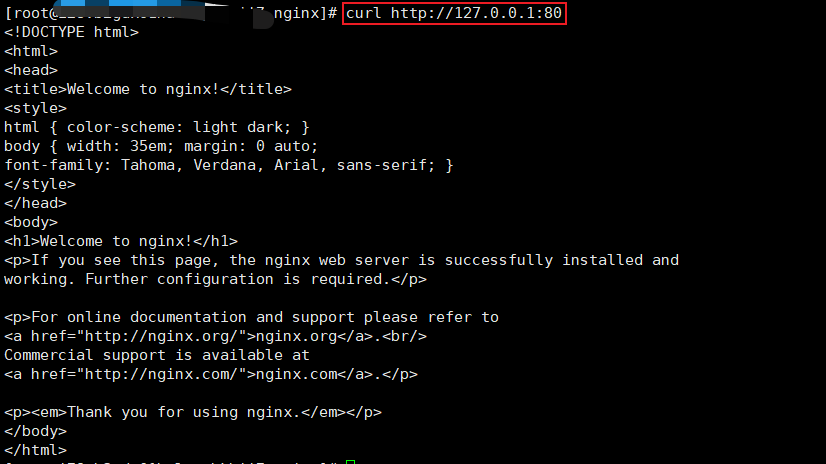
curl http://127.0.0.1:80

使用浏览器打开 http://127.0.0.1:80 看到如下页面即表示部署成功:

2 卸载步骤
- 停止运行容器
docker stop nginx
- 删除该容器
docker rm nginx
3 附件:nginx container启用http协议/ssl认证(福利)
# 上传 SSL 证书
# mkdir -p /data/nginx/conf/cert
# unzip /www/packages/xxxx-web/12788873_xxxx.com.cn_nginx.zip -d /data/nginx/conf/cert/
#	// /data/nginx/conf/cert/xxxx.com.cn.pem
#	// /data/nginx/conf/cert/xxxx.com.cn.key


# 将 http/80 端口的所有流量重定向至 https/443 端口
vi /data/nginx/conf/conf.d/default.conf
	# [x] 1. 修改默认监听的 80 端口 为 81 端口
	# 2. 注释如下代码片段:
  # location / {
  #    root   /usr/share/nginx/html;
  #    index  index.html index.htm;
  #}
  # 3. 更新如下配置项:
  #server_name  localhost;
  #server_name www.example1.com example1.com;
  server_name xxxx.com.cn;
  # 4. 新增如下配置项:
  # Redirect all HTTP traffic to HTTPS
  return 301 https://$server_name$request_uri;

touch /data/nginx/conf/conf.d/xxxx.com.cn.conf

vi /data/nginx/conf/conf.d/xxxx.com.cn.conf
编辑内容如下:
server {
	listen       443 ssl;
	# listen       80;
	server_name  localhost;

	# ssl_certificate      /data/nginx/conf/cert/xxxx.com.cn.pem;
	# ssl_certificate_key  /data/nginx/conf/cert/xxxx.com.cn.key;
	ssl_certificate      /etc/nginx/cert/xxxx.com.cn.pem;
	ssl_certificate_key  /etc/nginx/cert/xxxx.com.cn.key;

	ssl_session_cache    shared:SSL:1m;
	ssl_session_timeout  5m;

	ssl_ciphers  HIGH:!aNULL:!MD5;
	ssl_prefer_server_ciphers  on;

	location / {
	    # root /www/nginx/html/yyyy-web/;
        root /usr/share/nginx/html;
		# root   /www/wwwroot/love_connect/;
		# index  index.html index.htm;
	}

	# 引入相关配置
	# include /data/nginx/conf/conf.d/xxxx.com.cn.locations/*.conf;
	include /etc/nginx/conf.d/xxxx.com.cn.locations/*.conf;
}

upstream yyyy_official_site_api_server {
	ip_hash;
	# server 127.0.0.1:8770 weight=1;
	# host.docker.internal : docker 中代指 宿主机本机的IP
	server host.docker.internal:8770 weight=1;
	# server {{apiserver_host}}:{{apiserver_port}} weight=1;
}
mkdir -p /data/nginx/conf/conf.d/xxxx.com.cn.locations/

touch /data/nginx/conf/conf.d/xxxx.com.cn.locations/

vi /data/nginx/conf/conf.d/xxxx.com.cn.locations/yyyy-official-site-api.conf
编辑内容如下:
#PROXY-START/
location /yyyy/api {
    proxy_pass http://yyyy_official_site_api_server/yyyy/api;
    proxy_set_header Host $host;
    proxy_set_header X-Real-IP $remote_addr;
    proxy_set_header X-Forwarded-For $proxy_add_x_forwarded_for;
    proxy_set_header REMOTE-HOST $remote_addr;
    proxy_set_header Upgrade $http_upgrade;
    #proxy_set_header Connection $connection_upgrade;
    proxy_http_version 1.1;
    # proxy_hide_header Upgrade;

    add_header X-Cache $upstream_cache_status;
    #Set Nginx Cache

    set $static_fileymjeWjlG 0;
    if ( $uri ~* "\.(gif|png|jpg|css|js|woff|woff2)$" )
    {
        set $static_fileymjeWjlG 1;
        expires 1m;
    }
    if ( $static_fileymjeWjlG = 0 )
    {
        add_header Cache-Control no-cache;
    }
}
#PROXY-END/
docker stop nginx

docker rm nginx

docker run \
-p 80:80 \
-p 443:443 \
--add-host host.docker.internal:host-gateway \
--name nginx \
-v /data/nginx/conf/:/etc/nginx/ \
-v /data/nginx/log:/var/log/nginx \
-v /data/nginx/html:/usr/share/nginx/html \
-d nginx:1.24.0

# docker start nginx

docker ps

docker logs -f --tail 20 nginx
4 附件:利用/rootHtml/index.html重定向至目标路径(福利)
/data/nginx/html/index.html
<!DOCTYPE html>
<html>
    <head>
        <meta charset="utf-8">
        <title>xxxx</title>
        <style>
            html { color-scheme: light dark; }
        </style>
    </head>
<body>

</body>
<script type="text/javascript" charset="utf-8" >
  window.location.href = "https://xxxx.com.cn/xxxx";
</script>
</html>
5 附件:生成自签发的SSL证书
# 总思路: 生成自签发的SSL证书(私钥 server.key + 公钥 server.crt + 合成证书 server.pem )
mkdir -p /root/nginx-certs
cd /root/nginx-certs

## step1 创建一个名为server.key的2048位RSA私钥文件
openssl genrsa -out server.key 2048

## step2 生成证书签名请求(CSR) | 系统会提示你输入一些信息,如国家代码、地区、组织名称,密码等。这些信息将用于生成证书(也可不设置密码)
openssl req -new -key server.key -out server.csr

## step3 使用CSR文件和私钥文件生成自签名证书(server.crt) | 创建一个有效期为365天的自签名证书,并将其保存为server.crt
openssl x509 -req -days 3650 -in server.csr -signkey server.key -out server.crt

## step4 直接将证书和私钥合并到server.pem
cat server.key server.crt > server.pem
- server.key : 私钥文件,通常只包含服务器的私有密钥,需严格保护
- server.pem : 通常包含服务器的公钥证书和私钥,有时甚至包括CA颁发的中间证书。这种格式的文件用于方便地在配置Web服务器(如Nginx或Apache)时一次性提供证书和私钥。
- server.pem : 可以被看作是一个包含了server.crt(证书)和server.key(私钥)的合并文件。
- server.crt : 通常是指一个公钥证书(Public Key Certificate),也称为SSL证书或数字证书。这个文件包含了服务器的公钥信息,以及由证书颁发机构(CA)签发的证书,它用于在SSL/TLS握手过程中验证服务器的身份,并确保服务器的公钥是可信的。
U 附件:免费申请SSL证书的渠道
申请免费SSL证书的途径和步骤:
-
JoySSL:访问JoySSL官网,注册账户时填写特定的注册码(如230916)以获取免费证书的使用权限。登录后,选择适合需求的免费SSL证书类型,填写相关信息,包括IP地址、域名信息和联系信息等。验证域名所有权后提交申请,审核通过后即可下载并安装证书。
-
阿里云 :阿里云提供免费型的DV SSL证书,用户可以通过阿里云控制台申请。每个账户可申请的数量及有效期有限制,目前可以申请3个月的免费SSL证书。
-
百度云 :百度云与全球知名的第三方数字证书认证和服务机构联合提供SSL证书申请与管理一站式服务。
-
腾讯云 :腾讯云提供域名型(DV SSL)证书,支持自动CSR生成和域名身份DNS自动验证。从2024年4月起,不再提供有效期为一年的免费证书,改为免费3个月。
-
Let's Encrypt:这是一个由Linux基金会托管的公共免费SSL项目,旨在向网站自动签发和管理免费证书。
https://letsencrypt.org/zh-cn/getting-started/
申请免费SSL证书的注意事项包括 :
- 确保域名或IP地址有效 :在申请免费SSL证书之前,需确保拥有一个有效的域名或IP地址,并已将其解析至服务器上。
- 服务器支持HTTPS :服务器应支持HTTPS协议,并配置正确。常见的Web服务器有Apache、Nginx、IIS等,均需进行相应的SSL配置。
- 定期续签 :免费SSL证书的有效期通常较短,需定期续签以保持证书的有效性。可以设置定期续签任务或使用自动化工具来管理证书的续签过程。
通过以上途径和步骤,用户可以成功申请并安装免费的SSL证书,为网站或服务器提供安全的HTTPS连接。
K 基于Dockerfile构建Nginx镜像
基于 docker ningx 官方 Dockerfile 构建(旨在添加在nginx镜像中添加所需的第三方模块)
Step1 下载基础镜像: Debian
#docker pull debian:bullseye-slim
docker pull docker.1ms.run/debian:bullseye-slim

docker images
Step2 编辑 Dockerfile
mkdir -p /opt/docker-nginx/
cd /opt/docker-nginx/

wget https://github.com/nginxinc/docker-nginx/blob/1.24.0/stable/debian/10-listen-on-ipv6-by-default.sh
wget https://github.com/nginxinc/docker-nginx/blob/1.24.0/stable/debian/20-envsubst-on-templates.sh
wget https://github.com/nginxinc/docker-nginx/blob/1.24.0/stable/debian/30-tune-worker-processes.sh
wget https://github.com/nginxinc/docker-nginx/blob/1.24.0/stable/debian/Dockerfile
wget https://github.com/nginxinc/docker-nginx/blob/1.24.0/stable/debian/docker-entrypoint.sh
- 编辑/修改
Dockerfile
//TODO
Step3 基于Dockerfile构建Nginx镜像
# docker build -t nginx:1.24.0-self https://github.com/nginxinc/docker-nginx/blob/1.24.0/stable/debian/Dockerfile

cd /opt/docker-nginx
docker build -t nginx:1.24.0-self -f /opt/docker-nginx/Dockerfile .
X 参考文献
- docker
- nginx
- debian
- 历往教程
- 其他

本文链接: https://www.cnblogs.com/johnnyzen
关于博文:评论和私信会在第一时间回复,或直接私信我。
版权声明:本博客所有文章除特别声明外,均采用 BY-NC-SA 许可协议。转载请注明出处!
日常交流:大数据与软件开发-QQ交流群: 774386015 【入群二维码】参见左下角。您的支持、鼓励是博主技术写作的重要动力!

