[Linux/Bash/Shell] curl & wget
1 参考文献

概述:curl
简述
curl(Client URL, Command Line URL Viewer) : 常用的命令行工具,用来请求 Web 服务器(发出网络请求,然后得到和提取数据)
它的名字就是客户端(client)的 URL 工具的意思。
它的功能非常强大,命令行参数多达几十种。
如果熟练的话,完全可以取代 Postman 这一类的图形界面工具。
- curl是一种命令行工具,用于传输使用URL语法指定的数据.是一个非常强大的工具,支持多种协议。这里就不过得介绍了,详情请看官网介绍
- 官网地址:https://curl.haxx.se/
- GitHub地址:https://github.com/curl/curl
参数释义
查看 curl 的帮助文档:curl -h or curl --help
[root@fi3 client]# curl -h
Usage: curl [options...] <url>
Options: (H) means HTTP/HTTPS only, (F) means FTP only

-a/--append 上传文件时,附加到目标文件
 -A/--user-agent <string>  设置用户代理发送给服务器
 - anyauth   可以使用“任何”身份验证方法
 -b/--cookie <name=string/file> cookie字符串或文件读取位置
 - basic 使用HTTP基本验证
 -B/--use-ascii 使用ASCII /文本传输
 -c/--cookie-jar <file> 操作结束后把cookie写入到这个文件中
 -C/--continue-at <offset>  断点续转
 -d/--data <data>   HTTP POST方式传送数据
 --data-ascii <data>  以ascii的方式post数据
 --data-binary <data> 以二进制的方式post数据
 --negotiate     使用HTTP身份验证
 --digest        使用数字身份验证
 --disable-eprt  禁止使用EPRT或LPRT
 --disable-epsv  禁止使用EPSV
 -D/--dump-header <file> 把header信息写入到该文件中
 --egd-file <file> 为随机数据(SSL)设置EGD socket路径
 --tcp-nodelay   使用TCP_NODELAY选项
 -e/--referer 来源网址
 -E/--cert <cert[:passwd]> 客户端证书文件和密码 (SSL)
 --cert-type <type> 证书文件类型 (DER/PEM/ENG) (SSL)
 --key <key>     私钥文件名 (SSL)
 --key-type <type> 私钥文件类型 (DER/PEM/ENG) (SSL)
 --pass  <pass>  私钥密码 (SSL)
 --engine <eng>  加密引擎使用 (SSL). "--engine list" for list
 --cacert <file> CA证书 (SSL)
 --capath <directory> CA目录 (made using c_rehash) to verify peer against (SSL)
 --ciphers <list>  SSL密码
 --compressed    要求返回是压缩的形势 (using deflate or gzip)
 --connect-timeout <seconds> 设置最大请求时间
 --create-dirs   建立本地目录的目录层次结构
 --crlf          上传是把LF转变成CRLF
 -f/--fail          连接失败时不显示http错误
 --ftp-create-dirs 如果远程目录不存在,创建远程目录
 --ftp-method [multicwd/nocwd/singlecwd] 控制CWD的使用
 --ftp-pasv      使用 PASV/EPSV 代替端口
 --ftp-skip-pasv-ip 使用PASV的时候,忽略该IP地址
 --ftp-ssl       尝试用 SSL/TLS 来进行ftp数据传输
 --ftp-ssl-reqd  要求用 SSL/TLS 来进行ftp数据传输
 -F/--form <name=content> 模拟http表单提交数据
 -form-string <name=string> 模拟http表单提交数据
 -g/--globoff 禁用网址序列和范围使用{}和[]
 -G/--get 以get的方式来发送数据
 -h/--help 帮助
 -H/--header <line>自定义头信息传递给服务器
 --ignore-content-length  忽略的HTTP头信息的长度
 -i/--include 输出时包括protocol头信息
 -I/--head  只显示文档信息
 从文件中读取-j/--junk-session-cookies忽略会话Cookie
 - 界面<interface>指定网络接口/地址使用
 - krb4 <级别>启用与指定的安全级别krb4
 -j/--junk-session-cookies 读取文件进忽略session cookie
 --interface <interface> 使用指定网络接口/地址
 --krb4 <level>  使用指定安全级别的krb4
 -k/--insecure 允许不使用证书到SSL站点
 -K/--config  指定的配置文件读取
 -l/--list-only 列出ftp目录下的文件名称
 --limit-rate <rate> 设置传输速度
 --local-port<NUM> 强制使用本地端口号
 -m/--max-time <seconds> 设置最大传输时间
 --max-redirs <num> 设置最大读取的目录数
 --max-filesize <bytes> 设置最大下载的文件总量
 -M/--manual  显示全手动
 -n/--netrc 从netrc文件中读取用户名和密码
 --netrc-optional 使用 .netrc 或者 URL来覆盖-n
 --ntlm          使用 HTTP NTLM 身份验证
 -N/--no-buffer 禁用缓冲输出
 -o/--output 把输出写到该文件中
 -O/--remote-name 把输出写到该文件中,保留远程文件的文件名
 -p/--proxytunnel   使用HTTP代理
 --proxy-anyauth 选择任一代理身份验证方法
 --proxy-basic   在代理上使用基本身份验证
 --proxy-digest  在代理上使用数字身份验证
 --proxy-ntlm    在代理上使用ntlm身份验证
 -P/--ftp-port <address> 使用端口地址,而不是使用PASV
 -Q/--quote <cmd>文件传输前,发送命令到服务器
 -r/--range <range>检索来自HTTP/1.1或FTP服务器字节范围
 --range-file 读取(SSL)的随机文件
 -R/--remote-time   在本地生成文件时,保留远程文件时间
 --retry <num>   传输出现问题时,重试的次数
 --retry-delay <seconds>  传输出现问题时,设置重试间隔时间
 --retry-max-time <seconds> 传输出现问题时,设置最大重试时间
 -s/--silent静音模式。不输出任何东西
 -S/--show-error   显示错误
 --socks4 <host[:port]> 用socks4代理给定主机和端口
 --socks5 <host[:port]> 用socks5代理给定主机和端口
 --stderr <file>
 -t/--telnet-option <OPT=val> Telnet选项设置
 --trace <file>  对指定文件进行debug
 --trace-ascii <file> Like --跟踪但没有hex输出
 --trace-time    跟踪/详细输出时,添加时间戳
 -T/--upload-file <file> 上传文件
 --url <URL>     Spet URL to work with
 -u/--user <user[:password]>设置服务器的用户和密码
 -U/--proxy-user <user[:password]>设置代理用户名和密码
 -v/--verbose
 -V/--version 显示版本信息
 -w/--write-out [format]什么输出完成后
 -x/--proxy <host[:port]>在给定的端口上使用HTTP代理
 -X/--request <command>指定什么命令
 -y/--speed-time 放弃限速所要的时间。默认为30
 -Y/--speed-limit 停止传输速度的限制,速度时间'秒
 -z/--time-cond  传送时间设置
 -0/--http1.0  使用HTTP 1.0
 -1/--tlsv1  使用TLSv1(SSL)
 -2/--sslv2 使用SSLv2的(SSL)
 -3/--sslv3         使用的SSLv3(SSL)
 --3p-quote      like -Q for the source URL for 3rd party transfer
 --3p-url        使用url,进行第三方传送
 --3p-user       使用用户名和密码,进行第三方传送
 -4/--ipv4   使用IP4
 -6/--ipv6   使用IP6
 -#/--progress-bar 用进度条显示当前的传送状态
特色功能
HTTP动词
curl默认的HTTP动词是GET,使用-X参数可以支持其他动词。
root# curl -X POST www.example.com

root# curl -X DELETE www.example.com
文件上传
- 案例1
假定文件上传的表单是下面这样:
<form method="POST" enctype='multipart/form-data' action="upload.cgi">
      <input type=file name=upload>
      <input type=submit name=btn value="OK">
</form>
你可以用curl这样上传文件:
root# curl --form upload=@localfilename --form btn=OK [URL]
- 案例2
curl -v POST "http://127.0.0.1:8080/platform/api/file-center/resource/upload-resource" --header "content-type: multipart/form-data" --header "Authorization: Bearer eyJhbGciOiJIUzUxMiJ9.eyJsb2dpbl91c2VyX2tleSI6IjA3YjRiYWI4LWY3NzEtNGFkNC04MzljLTE2ZDRkODgyZTQ2MCJ9.eznxJYdm4HJ8QYZlIi3kXDsiso_BFxl9nUZCf0oDlbZ8RGN53UgW_lpFleI56AHo5hXhm8nzYzea3E90oOzztQ" --form "uploadFile=@C:\\Users\\jack\Desktop\\my-logo.jpg" --form "fileOrder=1" --form "fileResourceType=\"USER_LOGO\"" --form "allowReplace=false"
- 案例3
curl  -i -X POST -H "Content-Type: multipart/form-data" \
      -F "file=@/home/johnny/123.zip" \
      -F "parentPath=/网盘Root路径" \
      -F "loginName=superUser" \
      http://10.yy.xx.zz/appName/networkDisk/uploadFile.json
Referer字段
有时你需要在http request头信息中,提供一个referer字段,表示你是从哪里跳转过来的。
root# curl --referer http://www.example.com http://www.example.com
使用案例
查看/下载 网页源码(-O)
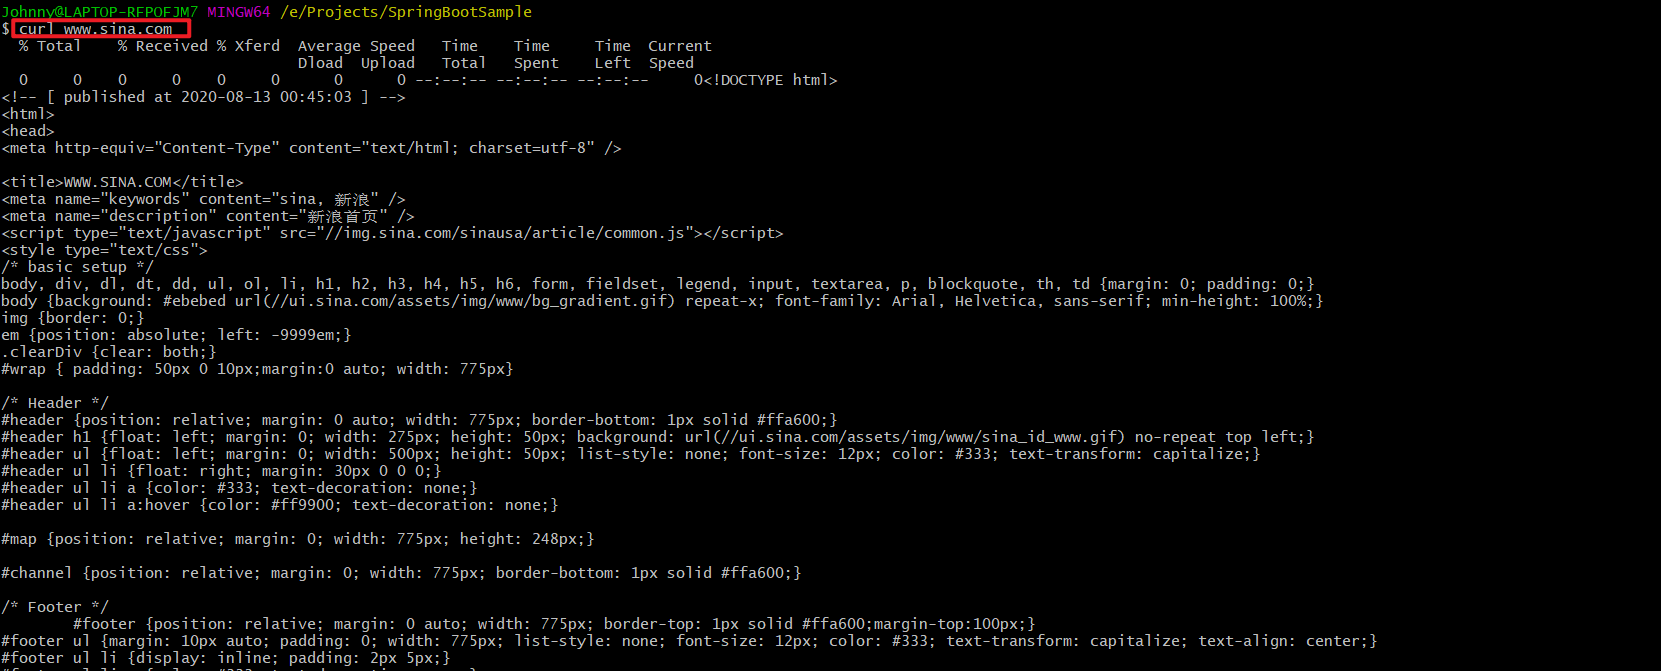
- 查阅 网页原文内容 on Command
root# curl www.sina.com
- 保存/下载 指定URL的网页 on FileSystem/Disk
如果要把这个网页保存下来,可以使用-o参数(output),这就相当于使用wget命令了。
不带文件路径值时,默认下载到当前窗口所在的本地路径。
root# curl -o [Dir/文件名] www.sina.com

若想显示下载进度条,带上参数-#
root# curl -# -O [Dir/文件名] http://cdn.51yip.com/wp-content/uploads/2010/09/compare_varnish.jpg
若下格式化JSON输出,利用管道和json_pp工具
root# curl http://127.0.0.1:8080/monitor/metrics | json_pp
自动跳转(-L)
有的网址是自动跳转的。使用-L参数,curl就会跳转到新的网址。
root# curl -L www.sina.com
键入上面的命令,结果就自动跳转为www.sina.com.cn。
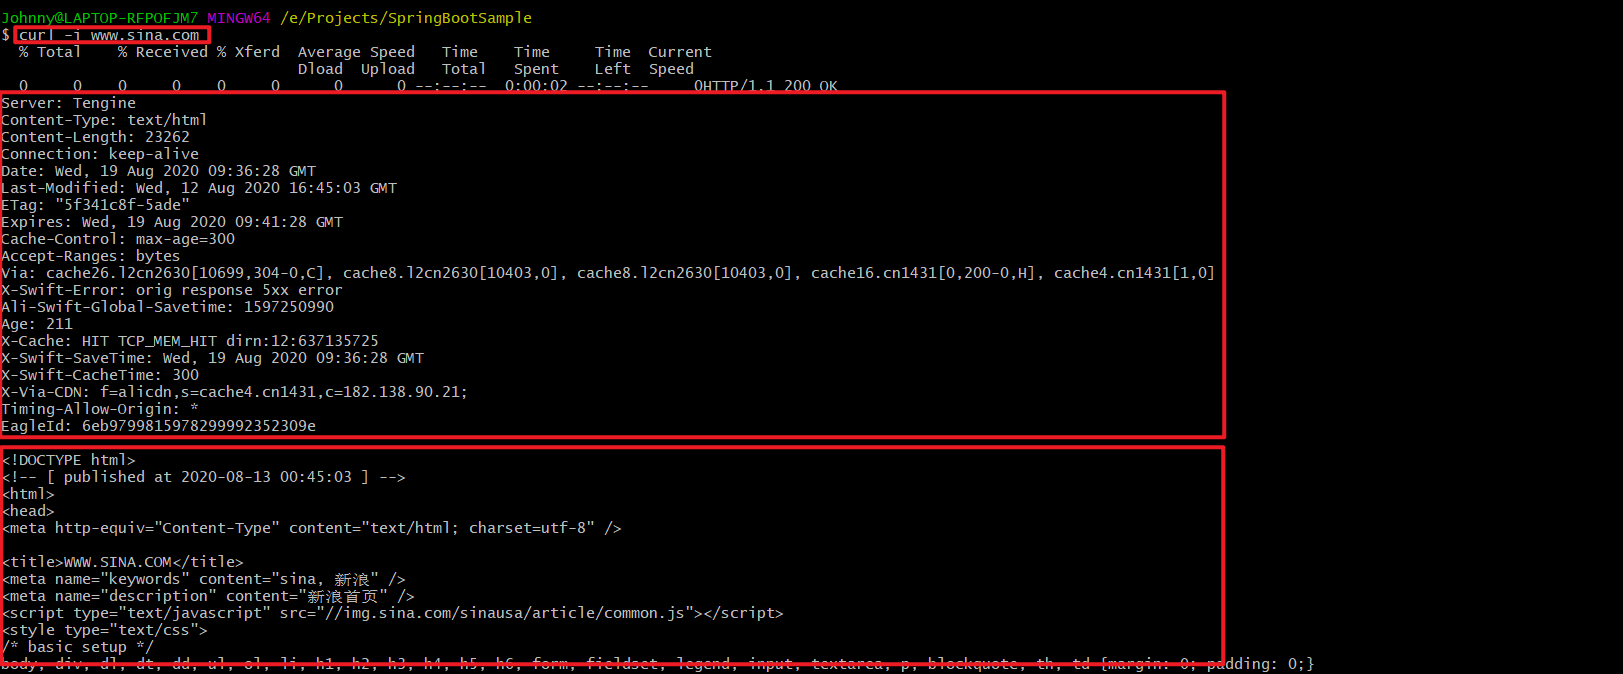
显示头信息(-I)
-i参数可以显示http response的头信息,连同网页代码一起。
root# curl -i www.sina.com
显示通信过程(-v/--trace-ascii)
-v参数可以显示一次http通信的整个过程,包括端口连接和http request头信息。
root# curl -v www.sina.com

如果觉得上面的信息还不够,那么下面的命令可以查看更详细的通信过程。
root# curl --trace output.txt www.sina.com
或者
root# curl --trace-ascii output.txt www.sina.com
运行后,请打开output.txt文件查看。
网络代理(-x)
- 案例:
开启科学奔浪神器后,用命令行请求 google.com
//错误示范(无代理)
C:\Users\xxxxxx>curl -v -I  https://www.google.com
* Host www.google.com:443 was resolved.
* IPv6: 2001::1
* IPv4: 199.59.148.20
*   Trying 199.59.148.20:443...
*   Trying [2001::1]:443...
^C


//正确示范(有代理)
[root@node-d ~]# curl -v -I  https://www.google.com -x http://127.0.0.1:20171
或: C:\Users\xxxxxx>curl -v -I  https://www.google.com -x http://127.0.0.1:10809
*   Trying 127.0.0.1:10809...
* Connected to 127.0.0.1 (127.0.0.1) port 10809
* CONNECT tunnel: HTTP/1.1 negotiated
* allocate connect buffer
* Establish HTTP proxy tunnel to www.google.com:443
> CONNECT www.google.com:443 HTTP/1.1
> Host: www.google.com:443
> User-Agent: curl/8.7.1
> Proxy-Connection: Keep-Alive
>
< HTTP/1.1 200 Connection established
HTTP/1.1 200 Connection established
<

* CONNECT phase completed
* CONNECT tunnel established, response 200
* schannel: disabled automatic use of client certificate
* ALPN: curl offers http/1.1
* ALPN: server accepted http/1.1
* using HTTP/1.x
> HEAD / HTTP/1.1
> Host: www.google.com
> User-Agent: curl/8.7.1
> Accept: */*
>
* Request completely sent off
< HTTP/1.1 200 OK
HTTP/1.1 200 OK
< Content-Type: text/html; charset=ISO-8859-1
Content-Type: text/html; charset=ISO-8859-1
< Content-Security-Policy-Report-Only: object-src 'none';base-uri 'self';script-src 'nonce-uaNnEHfzxxxxc3zGq-KXSA' 'strict-dynamic' 'report-sample' 'unsafe-eval' 'unsafe-inline' https: http:;report-uri https://csp.withgoogle.com/csp/gws/other-hp
Content-Security-Policy-Report-Only: object-src 'none';base-uri 'self';script-src 'nonce-uaNnEHfzLsxxxxzGq-KXSA' 'strict-dynamic' 'report-sample' 'unsafe-eval' 'unsafe-inline' https: http:;report-uri https://csp.withgoogle.com/csp/gws/other-hp
< Accept-CH: Sec-CH-Prefers-Color-Scheme
Accept-CH: Sec-CH-Prefers-Color-Scheme
< P3P: CP="This is not a P3P policy! See g.co/p3phelp for more info."
P3P: CP="This is not a P3P policy! See g.co/p3phelp for more info."
< Date: Sun, 23 Feb 2025 04:19:02 GMT
Date: Sun, 23 Feb 2025 04:19:02 GMT
< Server: gws
Server: gws
< X-XSS-Protection: 0
X-XSS-Protection: 0
< X-Frame-Options: SAMEORIGIN
X-Frame-Options: SAMEORIGIN
< Transfer-Encoding: chunked
Transfer-Encoding: chunked
< Expires: Sun, 23 Feb 2025 04:19:02 GMT
Expires: Sun, 23 Feb 2025 04:19:02 GMT
< Cache-Control: private
Cache-Control: private
< Set-Cookie: AEC=AxxxxxxxxxxxxxxxxxxxxxxxxxxxxxxxxxxxxxxxxxxA; expires=Fri, 22-Aug-2025 04:19:02 GMT; path=/; domain=.google.com; Secure; HttpOnly; SameSite=lax
Set-Cookie: AEC=AVcxxxxxxxxxxxxxxxxxxxxxxxxxxxxxxxxxxxxyA; expires=Fri, 22-Aug-2025 04:19:02 GMT; path=/; domain=.google.com; Secure; HttpOnly; SameSite=lax
< Set-Cookie: NID=521=h6X_NHxxxxxxxxxxxxxxxxxxxxxxxxxxxxxxxxxxTMNXxxxxxxxFK6igVLRaxO-lnnf_yfsxxxxxxxxxxxdYcA_fD_Sm0gmLxxxxxxxxxxxxxxxxxxxxxxxxxtyHicocJrQlcH9olpAjGixw75coil6_UVwgIAce0g61zJv18st_n6_F7w; expires=Mon, 25-Aug-2025 04:19:02 GMT; path=/; domain=.google.com; HttpOnly
Set-Cookie: NID=521=h6X_NHcxxxxxxxxxxxxxxxxx7eN0sks2qkjTMNXzFcatFK6igVxxxxxxxxxxxxxxxxQHcdYcA_fD_Sm0gmxxxxxxxxxxDaK-PxxxxxXI-wpOqfVtyHxxxxxxxxxxxxxxil6_UVwgIAce0g61zJv18st_n6_F7w; expires=Mon, 25-Aug-2025 04:19:02 GMT; path=/; domain=.google.com; HttpOnly
< Alt-Svc: h3=":443"; ma=2592000,h3-29=":443"; ma=2592000
Alt-Svc: h3=":443"; ma=2592000,h3-29=":443"; ma=2592000
<

* Connection #0 to host 127.0.0.1 left intact
发送表单信息(-X)
发送表单信息有GET和POST两种方法。GET方法相对简单,只要把数据附在网址后面就行。
GET | -X GET
GET(Content-Type: application/x-www-form-urlencoded)
root# curl example.com/form.json?user=xxx&passwd=yyyy
GET(Content-Type: application/json) | -H + --data/-d
curl -XGET http://10.yy.xx.zz:57086/sdc_asset_data-resources/_search?pretty -H 'Content-Type: application/json; charset=UTF-8' -d '{
    "query": {
        "term": {
             "smallType":"WPS"
}
    },
   "from": 0,
   "size": 10
}'

POST
POST(Content-Type: multipart/form-data) | -H + -F
上传文件
curl  -i -X POST -H "Content-Type: multipart/form-data" \
      -F "file=@/home/johnny/123.zip" \
      -F "parentPath=/网盘Root路径" \
      -F "loginName=superUser" \
      http://10.yy.xx.zz/appName/networkDisk/uploadFile.json
POST (Content-Type: application/x-www-form-urlencoded) | --data/-d / --data-urlencode
POST方法必须把数据和网址分开,curl就要用到--data/-d参数
root# curl -X POST --data "user=xxx&passwd=yyyy" example.com/form.json
如果你的数据没有经过表单编码,还可以让curl为你编码,参数是--data-urlencode。
root# curl -X POST --data-urlencode "user=xxx&passwd=yyyy" example.com/form.json
例如,请求xxl-job-admin的/xxl-job-admin/jobinfo/pageListAPI:
curl -X POST http://1270.0.1:8080/xxl-job-admin/jobinfo/pageList \
-H 'Cookie: XXL_JOB_LOGIN_IDENTITY=7b226964223a312c227573657261111d65223a2261646d696e222c2270617373776f7264223a226666326362383530303730646137643834663865386561663932653136396166222c22726f6c65223a312c227065726d697373696f6e223a6e756c6c7d' \
-H 'Content-Type: application/x-www-form-urlencoded; charset=UTF-8' \
--data 'jobGroup=2&triggerStatus=-1&jobDesc=&executorHandler=&author=&start=0&length=10'
补充:wget方式
wget -d --header='Content-Type: application/x-www-form-urlencoded'  \
     --header='Accept: */*' \
     --post-data="parentPath=$path&loginName=$user_name&fileTypes=$file_types&fileNames=$file_names" \
     --output-document $file_name   \
     http://10.yy.xx.zz/appName/networkDisk/downLoadFileDir.json
案例讲解2
CASE GET/POST请求
- GET请求API
# GET 请求
curl --location 'https://gateway.xxx.cn/xxx-service/v0/internal/file/download/cdhhjj4b-8e41-4659-90d2-efc240f3232f' \
--header 'agentCode: Baidu'
- POST请求API
# POST 请求
curl --location 'https://gateway.xxx.cn/bdp/public/api/V2/data2api/xxx-digitalTwin-deviceLastetCollectTime/v1.0' \
--header 'Content-Type: application/json' \
--header 'agentCode: Baidu' \
--data '{
    "params": {
        "deviceList": ["efc240f3232f4353"],
        "startTime": 1605223749685,
        "endTime": 1705223749685
    }
}'
- 补充
curl
-A "Mozilla/4.0 (compatible; MSIE 6.0; Windows NT 5.0)"
-e "http://post.html"
-d "2880[]=105&pid=2880&p=最佳&count=1&receipt=1&poll=投票" http://post.php
- -A=--user-agent : User-Agent
- -e=--referer : 来源网址
- -d=--data : HTTP POST方式 传送数据
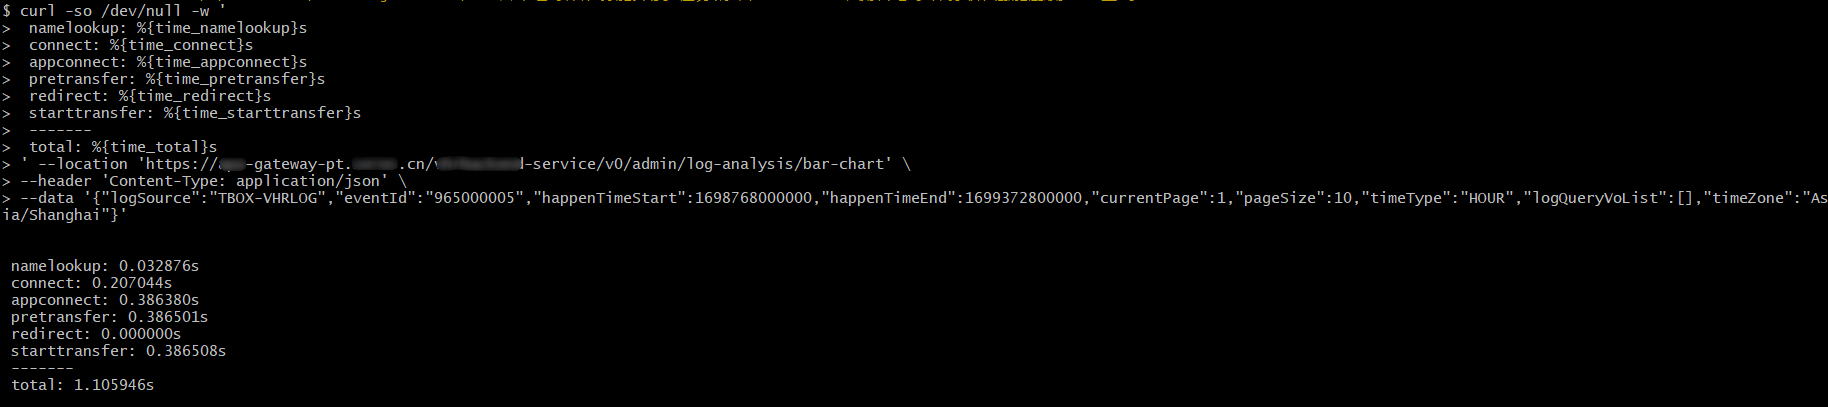
CASE 通过curl在Linux服务器上对网页资源测速
curl -so /dev/null -w '
 namelookup: %{time_namelookup}s
 connect: %{time_connect}s
 appconnect: %{time_appconnect}s
 pretransfer: %{time_pretransfer}s
 redirect: %{time_redirect}s
 starttransfer: %{time_starttransfer}s
 -------
 total: %{time_total}s
' https://www.baidu.com/ \
-d 'a=b'
- namelookup : DNS 服务器域名解析的时间
- connect : client 发出请求,到 c/s 建立TCP 的时间;里面包括 DNS 解析的时间
- starttransfer : client 发出请求;到 server 响应发出第1个字节开始的时间;包括前面的2个时间
- time_total : 请求发起到链接关闭总耗时
curl -so /tmp/sdc-tmp-data/tmpfile.json -w ' namelookup: %{time_namelookup}
 connect: %{time_connect}
 appconnect: %{time_appconnect}
 pretransfer: %{time_pretransfer}
 redirect: %{time_redirect}
 starttransfer: %{time_starttransfer}
 -------
 total: %{time_total}
' https://xx.yy.bb.mm:24425/lang/zh_CN.json

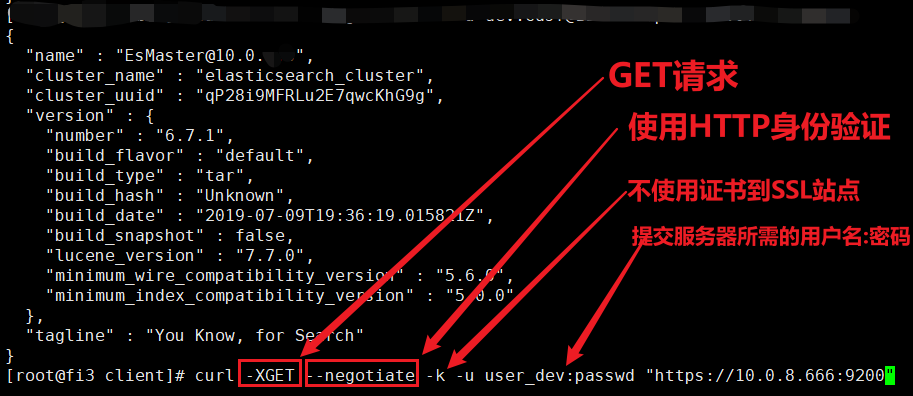
CASE HTTPS+用户名/密码 连接 HUAWEI ES数据库
完整的 HTTP 身份认证协议
http[s]://username:password@git.coding.net
- 使用HTTP协议身份认证
可能出现: 401 unauthorized
curl -XGET --negotiate -k -u user_dev:passwd "https://10.0.8.666:9200"
--negotiate: 使用HTTP身份验证-k: 忽略SSL验证。要使curl在进行HTTPS请求时忽略SSL证书验证,可以使用--insecure或-k选项。这将使curl在访问HTTPS网址时不检查服务器的SSL证书是否可信。
- 使用HTTPS协议身份认证
可解决 401 unauthorized的问题
curl --insecure --anyauth -u admin:password -X GET https://xxx.bb.com

- 使用Postman调用(含用户密码认证)
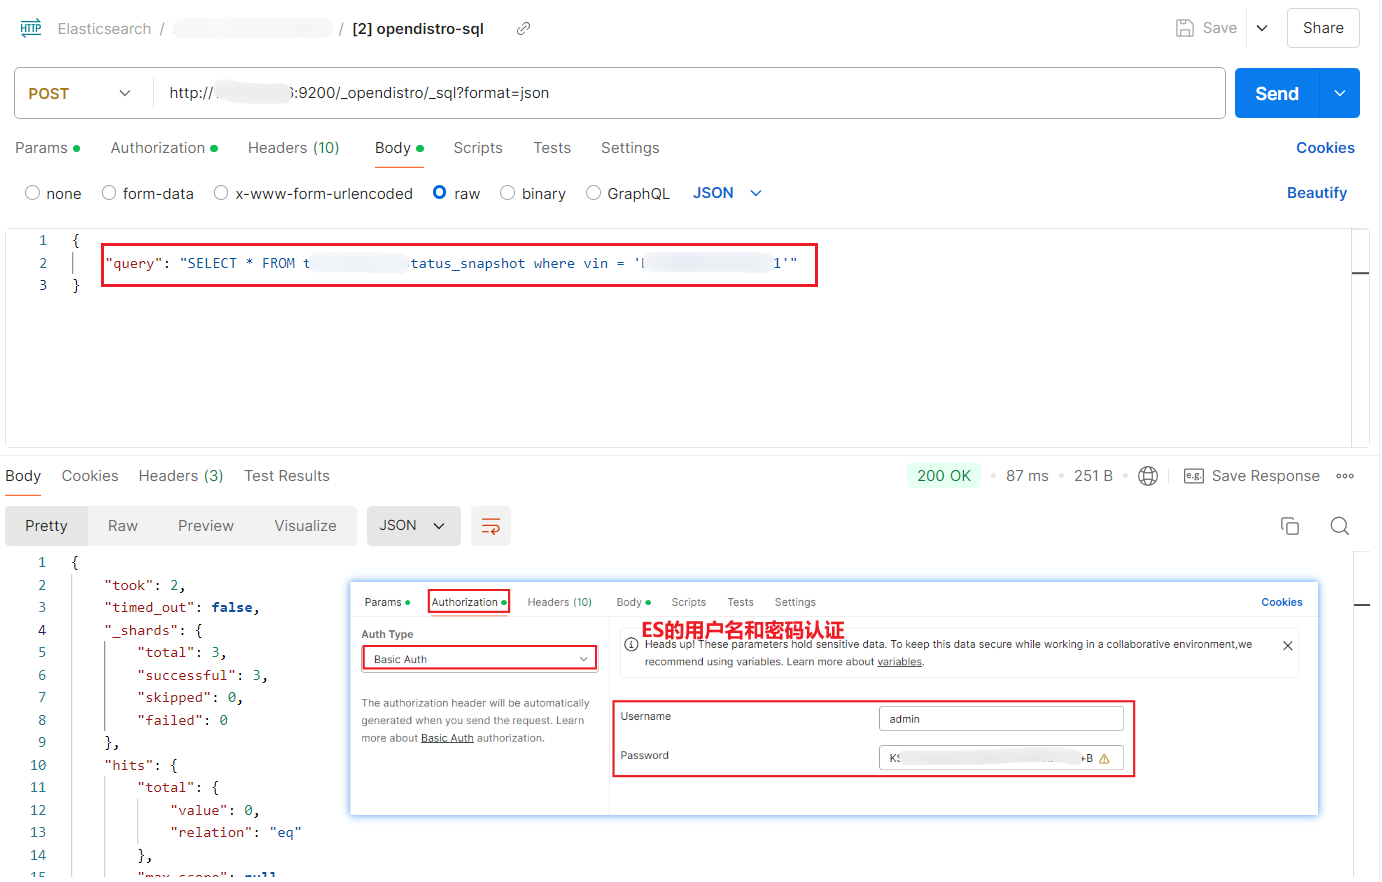
含:ES的用户密码认证
Postman 提供的 Curl Shell
curl --location 'http://xx.yy.xx.hh:9200/_opendistro/_sql?format=json' \
--header 'Content-Type: application/json' \
--header 'Authorization: Basic dGVzdDpwYXNzd29yZA==' \
--data '{
    "query": "SELECT * FROM xxxxxx_status_snapshot where deviceId = '\''5464343543255'\''"
}'
- header['Authorization'] BASIC 的值格式
Authorization: Basic base64('username:password')
例如,用户名=test,密码=password,则:Authorization: Basic dGVzdDpwYXNzd29yZA==
CASE 携带Cookie
curl -X GET "http://xx.yy.zz.kk:port/web-api/_init-service2es" -H "Request-Origion:SwaggerBootstrapUi" -H "accept:*/*" --cookie "X-Request-Auth=43645743625141421;username=admin"

2 wget
2.1 wget的安装
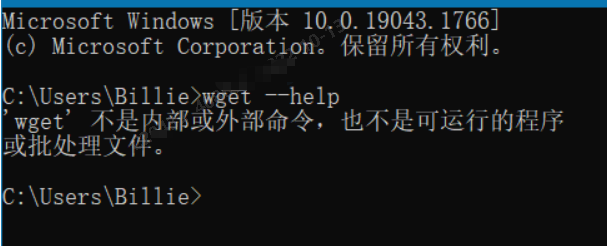
2.1.1 windows 下 安装 wget
step0 问题描述
此时应该会出现以下问题:
尝试了一些方法:
cd到这个位置运行命令也不行
cd C:\Windows\System32
step1 下载安装包
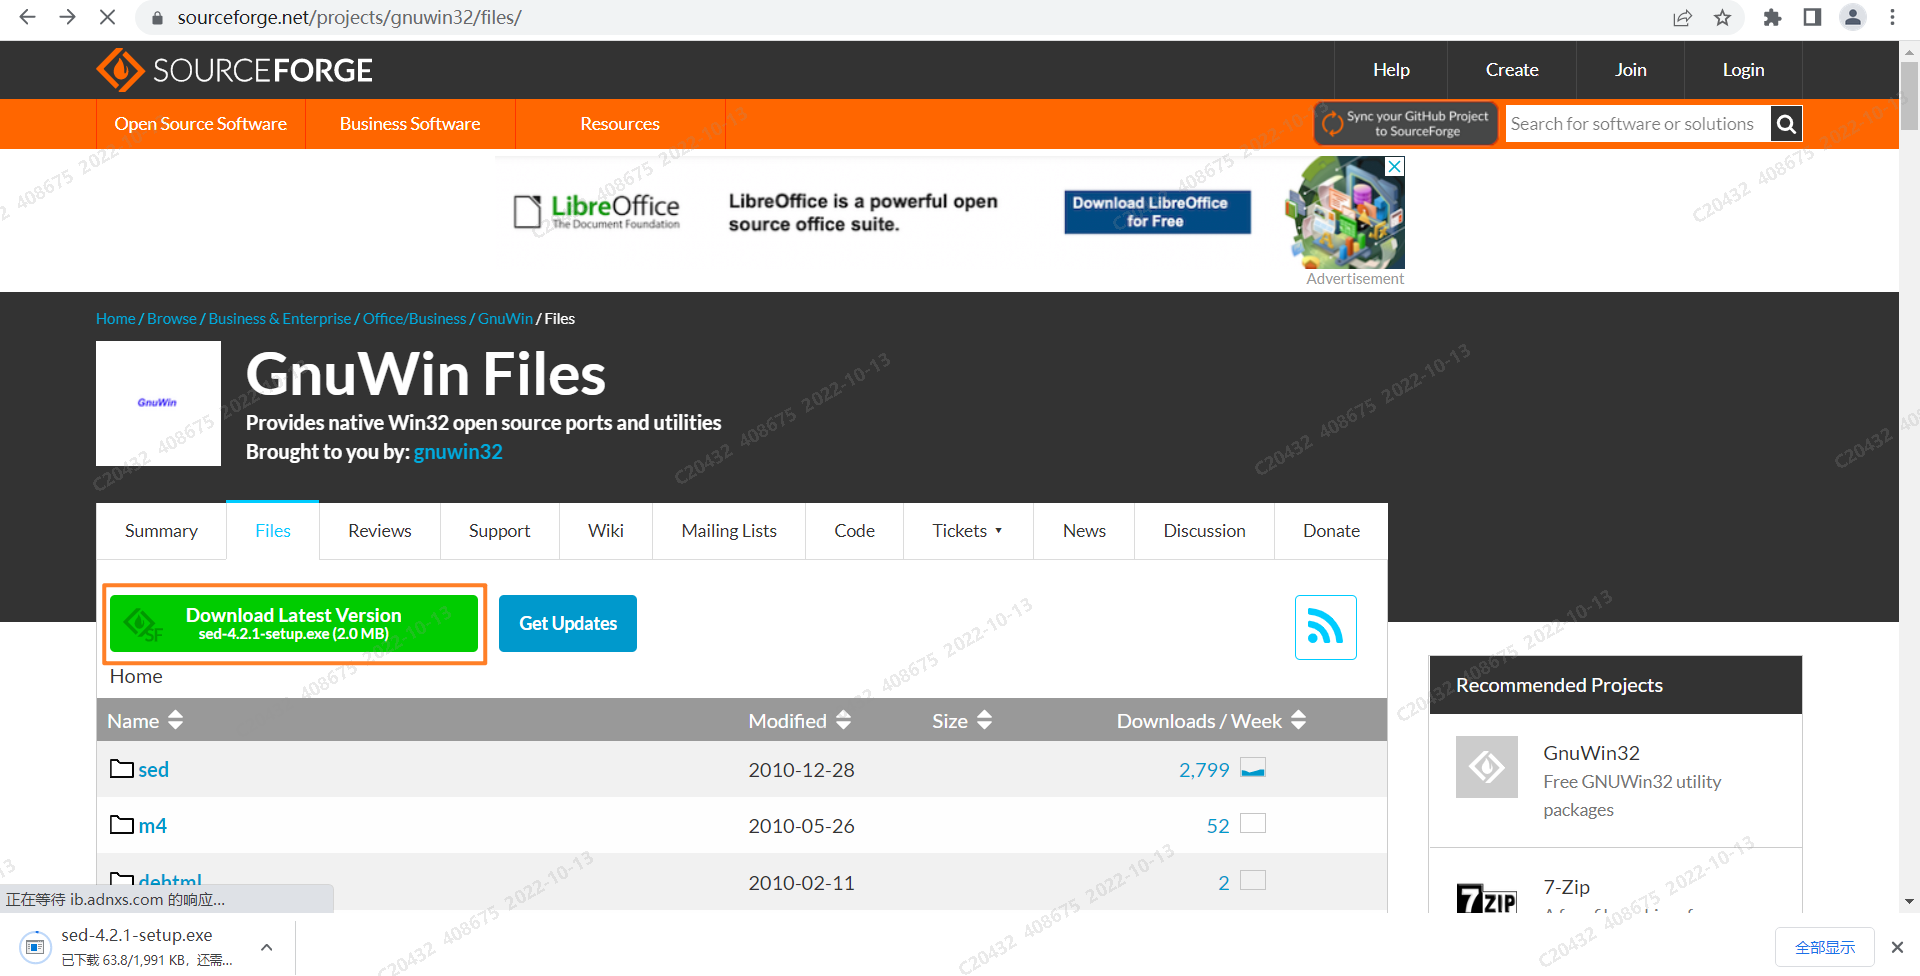
- step1.1 wget 安装包下载URL:Wget for Windows (sourceforge.net)
进入页面后,点击这个链接下载 wget
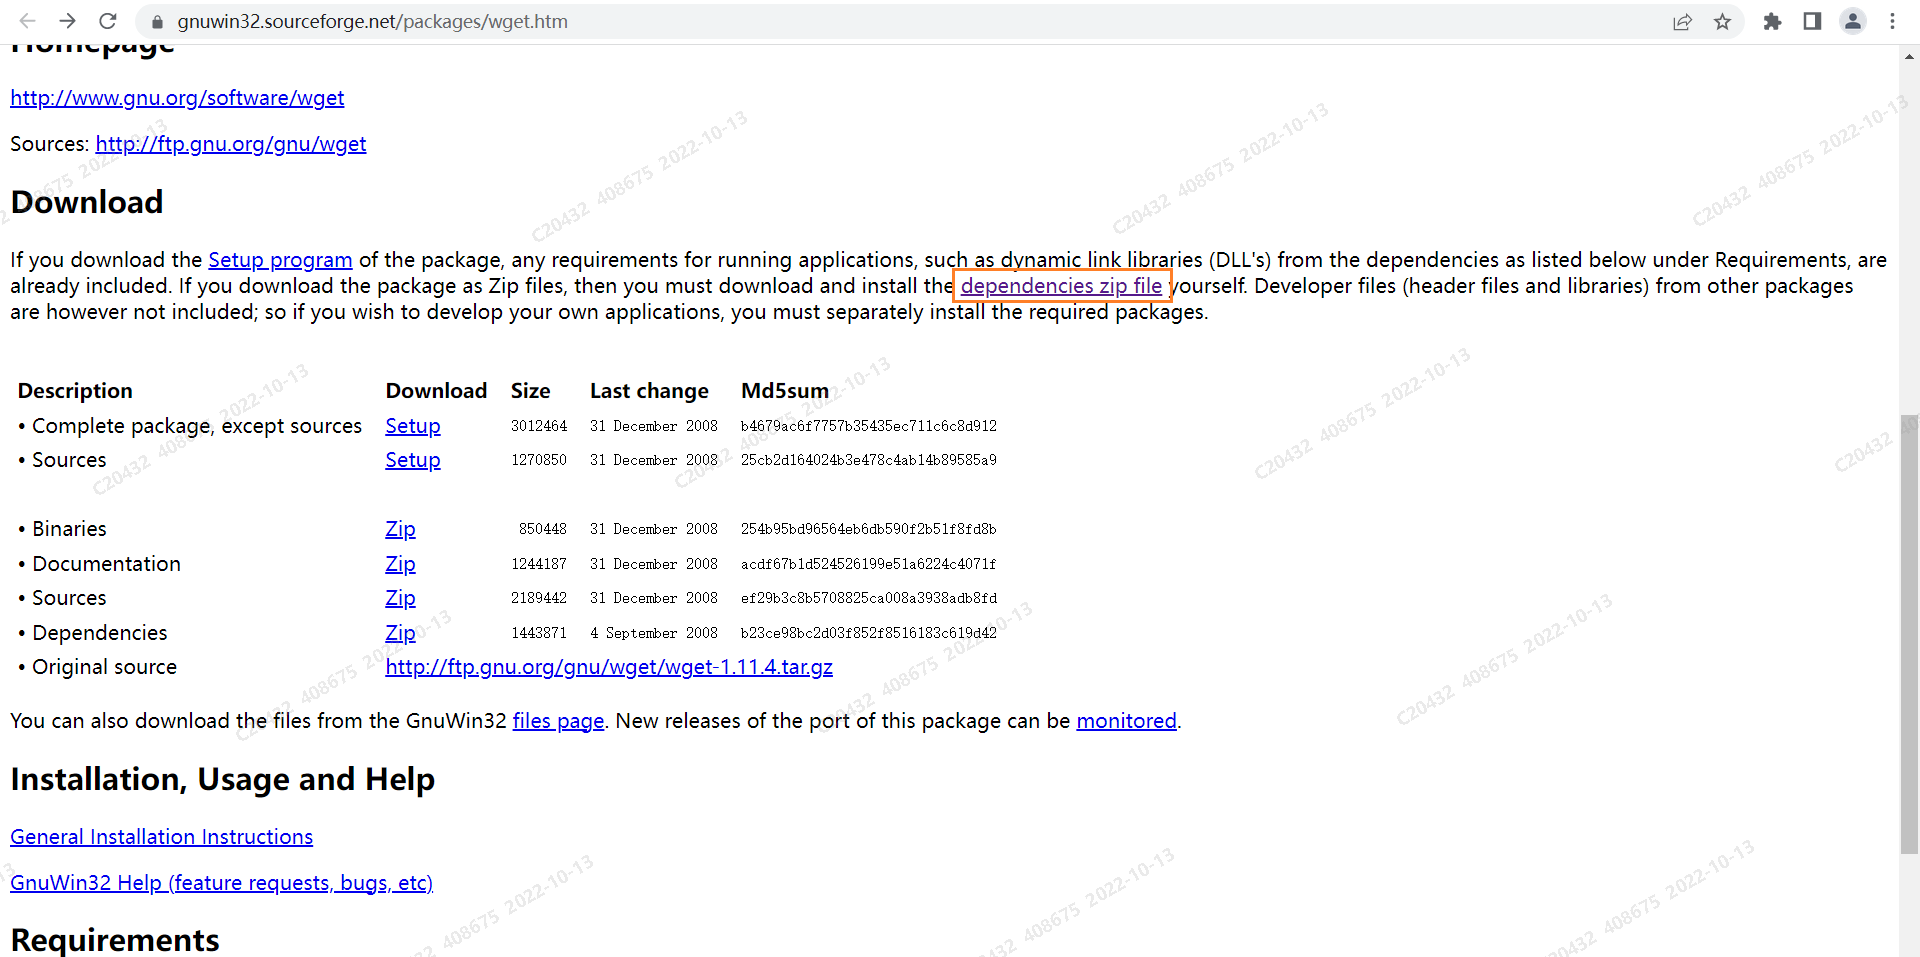
- step1.2 选择
Download Lastest Version,下载得到sed-4.2.1-setup.exe.exe安装包文件
step2 安装GNUWin
- step2.1 开始安装:鼠标右键安装包,以管理员身份运行安装包
- step2.1 ... 下面是一路next
...
安装目录可以改一下,装到自己想装的位置,并记住这个位置 ,后面需要添加环境变量
step3 配置环境变量(GUN_HOME / Path)
- 此电脑→属性→高级系统设置→环境变量→系统变量→新建(
GUN_HOME)
GUN_HOME
D:\Program\GNUWin\GnuWin32
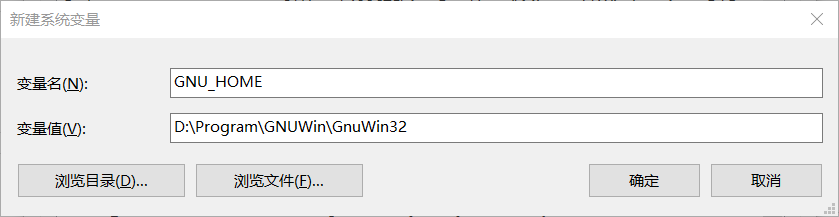
- 系统变量→Path→编辑环境变量→新建→(输入配置)→确定
Path
%GNU_HOME%\bin
step4 验证是否安装成功
-
win+R→cmd -
输入
wget --help,出现如下的界面说明安装成功:

2.1.2 windows 下安装 wget (2)
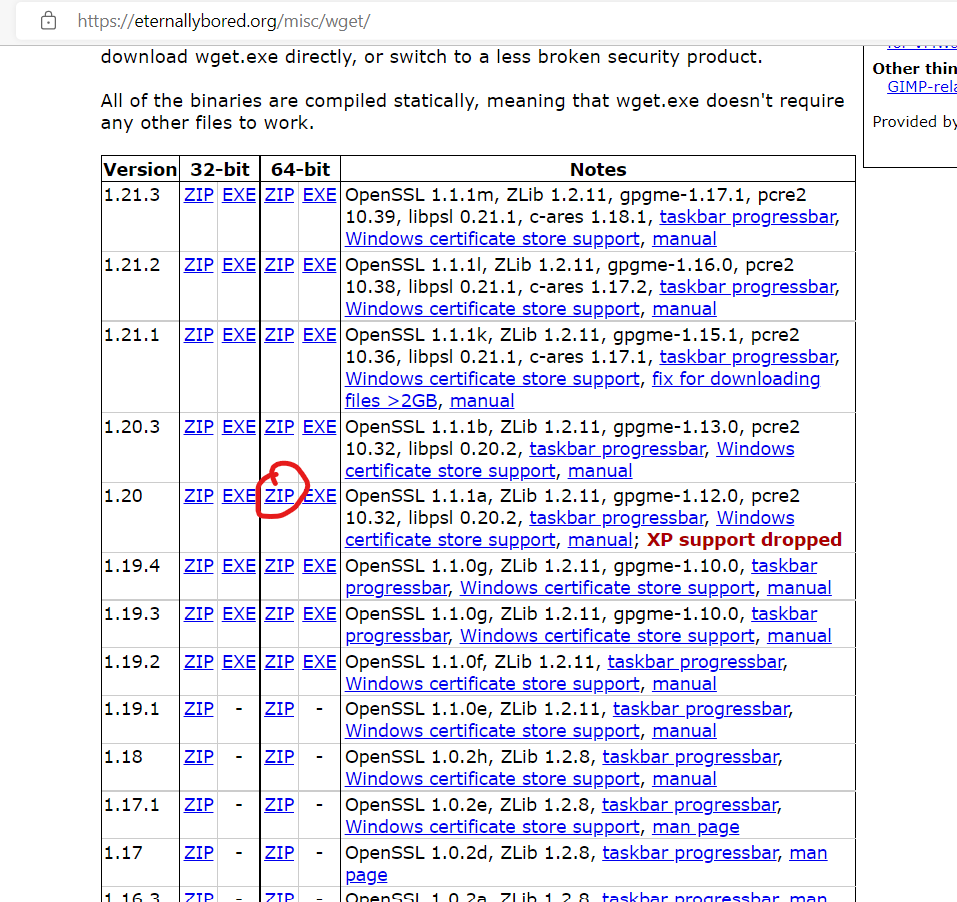
下面开始解决问题:
- 去该网址下载二进制文件:GNU Wget 1.21.3 for Windows
注意:要根据你的电脑选择
32位还是64位,这很重要
我下载的是这个,仅供参考
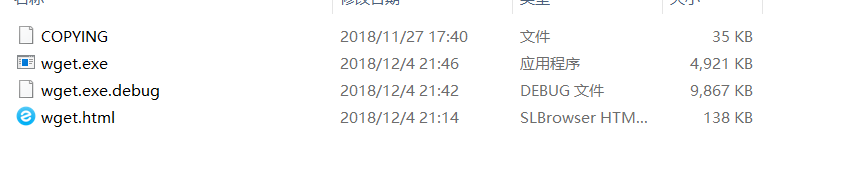
-
然后,你会得到一个
.zip格式的文件夹 -
解压,解压到哪里都行。里面有这些东西:
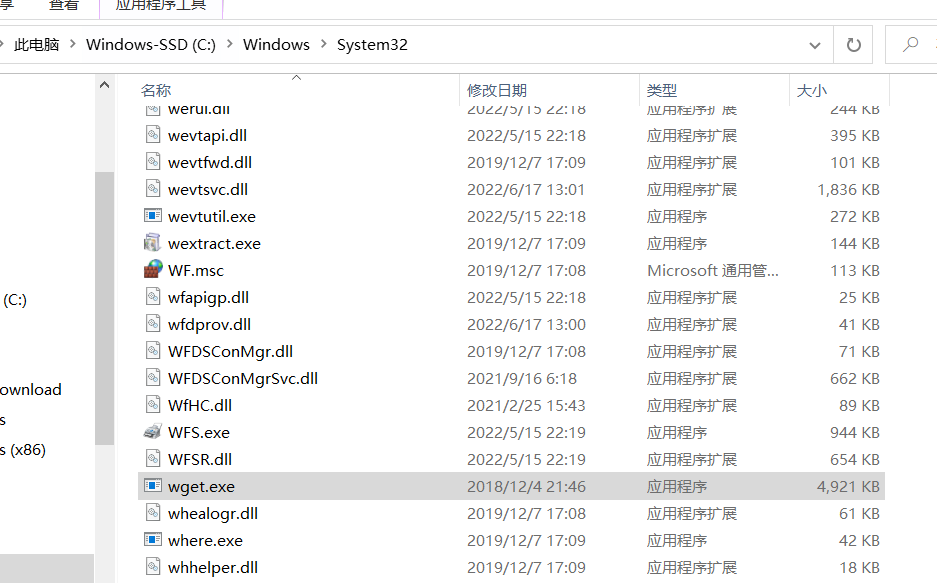
- 然后将
wget.exe复制到C:\Windows\System32下,就像这样:
2.1.X 参考文献
2.2 wget参数详解
C:\Users\xxxx> wget --help
GNU Wget 1.20, a non-interactive network retriever.
Usage: wget [OPTION]... [URL]...

Mandatory arguments to long options are mandatory for short options too.

Startup:
  -V,  --version                   display the version of Wget and exit
  -h,  --help                      print this help
  -b,  --background                go to background after startup
  -e,  --execute=COMMAND           execute a `.wgetrc'-style command

Logging and input file:
  -o,  --output-file=FILE          log messages to FILE
  -a,  --append-output=FILE        append messages to FILE
  -d,  --debug                     print lots of debugging information
  -q,  --quiet                     quiet (no output)
  -v,  --verbose                   be verbose (this is the default)
  -nv, --no-verbose                turn off verboseness, without being quiet
       --report-speed=TYPE         output bandwidth as TYPE.  TYPE can be bits
  -i,  --input-file=FILE           download URLs found in local or external FILE
       --input-metalink=FILE       download files covered in local Metalink FILE
  -F,  --force-html                treat input file as HTML
  -B,  --base=URL                  resolves HTML input-file links (-i -F)
                                     relative to URL
       --config=FILE               specify config file to use
       --no-config                 do not read any config file
       --rejected-log=FILE         log reasons for URL rejection to FILE

Download:
  -t,  --tries=NUMBER              set number of retries to NUMBER (0 unlimits)
       --retry-connrefused         retry even if connection is refused
       --retry-on-http-error=ERRORS    comma-separated list of HTTP errors to retry
  -O,  --output-document=FILE      write documents to FILE
  -nc, --no-clobber                skip downloads that would download to
                                     existing files (overwriting them)
       --no-netrc                  don't try to obtain credentials from .netrc
  -c,  --continue                  resume getting a partially-downloaded file
       --start-pos=OFFSET          start downloading from zero-based position OFFSET
       --progress=TYPE             select progress gauge type
       --show-progress             display the progress bar in any verbosity mode
  -N,  --timestamping              don't re-retrieve files unless newer than
                                     local
       --no-if-modified-since      don't use conditional if-modified-since get
                                     requests in timestamping mode
       --no-use-server-timestamps  don't set the local file's timestamp by
                                     the one on the server
  -S,  --server-response           print server response
       --spider                    don't download anything
  -T,  --timeout=SECONDS           set all timeout values to SECONDS
       --dns-timeout=SECS          set the DNS lookup timeout to SECS
       --connect-timeout=SECS      set the connect timeout to SECS
       --read-timeout=SECS         set the read timeout to SECS
  -w,  --wait=SECONDS              wait SECONDS between retrievals
       --waitretry=SECONDS         wait 1..SECONDS between retries of a retrieval
       --random-wait               wait from 0.5*WAIT...1.5*WAIT secs between retrievals
       --no-proxy                  explicitly turn off proxy
  -Q,  --quota=NUMBER              set retrieval quota to NUMBER
       --bind-address=ADDRESS      bind to ADDRESS (hostname or IP) on local host
       --limit-rate=RATE           limit download rate to RATE
       --no-dns-cache              disable caching DNS lookups
       --restrict-file-names=OS    restrict chars in file names to ones OS allows
       --ignore-case               ignore case when matching files/directories
  -4,  --inet4-only                connect only to IPv4 addresses
  -6,  --inet6-only                connect only to IPv6 addresses
       --prefer-family=FAMILY      connect first to addresses of specified family,
                                     one of IPv6, IPv4, or none
       --user=USER                 set both ftp and http user to USER
       --password=PASS             set both ftp and http password to PASS
       --ask-password              prompt for passwords
       --use-askpass=COMMAND       specify credential handler for requesting
                                     username and password.  If no COMMAND is
                                     specified the WGET_ASKPASS or the SSH_ASKPASS
                                     environment variable is used.
       --no-iri                    turn off IRI support
       --local-encoding=ENC        use ENC as the local encoding for IRIs
       --remote-encoding=ENC       use ENC as the default remote encoding
       --unlink                    remove file before clobber
       --keep-badhash              keep files with checksum mismatch (append .badhash)
       --metalink-index=NUMBER     Metalink application/metalink4+xml metaurl ordinal NUMBER
       --metalink-over-http        use Metalink metadata from HTTP response headers
       --preferred-location        preferred location for Metalink resources

Directories:
  -nd, --no-directories            don't create directories
  -x,  --force-directories         force creation of directories
  -nH, --no-host-directories       don't create host directories
       --protocol-directories      use protocol name in directories
  -P,  --directory-prefix=PREFIX   save files to PREFIX/..
       --cut-dirs=NUMBER           ignore NUMBER remote directory components

HTTP options:
       --http-user=USER            set http user to USER
       --http-password=PASS        set http password to PASS
       --no-cache                  disallow server-cached data
       --default-page=NAME         change the default page name (normally
                                     this is 'index.html'.)
  -E,  --adjust-extension          save HTML/CSS documents with proper extensions
       --ignore-length             ignore 'Content-Length' header field
       --header=STRING             insert STRING among the headers
       --compression=TYPE          choose compression, one of auto, gzip and none. (default: none)
       --max-redirect              maximum redirections allowed per page
       --proxy-user=USER           set USER as proxy username
       --proxy-password=PASS       set PASS as proxy password
       --referer=URL               include 'Referer: URL' header in HTTP request
       --save-headers              save the HTTP headers to file
  -U,  --user-agent=AGENT          identify as AGENT instead of Wget/VERSION
       --no-http-keep-alive        disable HTTP keep-alive (persistent connections)
       --no-cookies                don't use cookies
       --load-cookies=FILE         load cookies from FILE before session
       --save-cookies=FILE         save cookies to FILE after session
       --keep-session-cookies      load and save session (non-permanent) cookies
       --post-data=STRING          use the POST method; send STRING as the data
       --post-file=FILE            use the POST method; send contents of FILE
       --method=HTTPMethod         use method "HTTPMethod" in the request
       --body-data=STRING          send STRING as data. --method MUST be set
       --body-file=FILE            send contents of FILE. --method MUST be set
       --content-disposition       honor the Content-Disposition header when
                                     choosing local file names (EXPERIMENTAL)
       --content-on-error          output the received content on server errors
       --auth-no-challenge         send Basic HTTP authentication information
                                     without first waiting for the server's
                                     challenge

HTTPS (SSL/TLS) options:
       --secure-protocol=PR        choose secure protocol, one of auto, SSLv2,
                                     SSLv3, TLSv1, TLSv1_1, TLSv1_2 and PFS
       --https-only                only follow secure HTTPS links
       --no-check-certificate      don't validate the server's certificate
       --certificate=FILE          client certificate file
       --certificate-type=TYPE     client certificate type, PEM or DER
       --private-key=FILE          private key file
       --private-key-type=TYPE     private key type, PEM or DER
       --ca-certificate=FILE       file with the bundle of CAs
       --ca-directory=DIR          directory where hash list of CAs is stored
       --crl-file=FILE             file with bundle of CRLs
       --pinnedpubkey=FILE/HASHES  Public key (PEM/DER) file, or any number
                                   of base64 encoded sha256 hashes preceded by
                                   'sha256//' and separated by ';', to verify
                                   peer against
       --random-file=FILE          file with random data for seeding the SSL PRNG

       --ciphers=STR           Set the priority string (GnuTLS) or cipher list string (OpenSSL) directly.
                                   Use with care. This option overrides --secure-protocol.
                                   The format and syntax of this string depend on the specific SSL/TLS engine.
HSTS options:
       --no-hsts                   disable HSTS
       --hsts-file                 path of HSTS database (will override default)

FTP options:
       --ftp-user=USER             set ftp user to USER
       --ftp-password=PASS         set ftp password to PASS
       --no-remove-listing         don't remove '.listing' files
       --no-glob                   turn off FTP file name globbing
       --no-passive-ftp            disable the "passive" transfer mode
       --preserve-permissions      preserve remote file permissions
       --retr-symlinks             when recursing, get linked-to files (not dir)

FTPS options:
       --ftps-implicit                 use implicit FTPS (default port is 990)
       --ftps-resume-ssl               resume the SSL/TLS session started in the control connection when
                                         opening a data connection
       --ftps-clear-data-connection    cipher the control channel only; all the data will be in plaintext
       --ftps-fallback-to-ftp          fall back to FTP if FTPS is not supported in the target server
WARC options:
       --warc-file=FILENAME        save request/response data to a .warc.gz file
       --warc-header=STRING        insert STRING into the warcinfo record
       --warc-max-size=NUMBER      set maximum size of WARC files to NUMBER
       --warc-cdx                  write CDX index files
       --warc-dedup=FILENAME       do not store records listed in this CDX file
       --no-warc-compression       do not compress WARC files with GZIP
       --no-warc-digests           do not calculate SHA1 digests
       --no-warc-keep-log          do not store the log file in a WARC record
       --warc-tempdir=DIRECTORY    location for temporary files created by the
                                     WARC writer

Recursive download:
  -r,  --recursive                 specify recursive download
  -l,  --level=NUMBER              maximum recursion depth (inf or 0 for infinite)
       --delete-after              delete files locally after downloading them
  -k,  --convert-links             make links in downloaded HTML or CSS point to
                                     local files
       --convert-file-only         convert the file part of the URLs only (usually known as the basename)
       --backups=N                 before writing file X, rotate up to N backup files
  -K,  --backup-converted          before converting file X, back up as X.orig
  -m,  --mirror                    shortcut for -N -r -l inf --no-remove-listing
  -p,  --page-requisites           get all images, etc. needed to display HTML page
       --strict-comments           turn on strict (SGML) handling of HTML comments

Recursive accept/reject:
  -A,  --accept=LIST               comma-separated list of accepted extensions
  -R,  --reject=LIST               comma-separated list of rejected extensions
       --accept-regex=REGEX        regex matching accepted URLs
       --reject-regex=REGEX        regex matching rejected URLs
       --regex-type=TYPE           regex type (posix|pcre)
  -D,  --domains=LIST              comma-separated list of accepted domains
       --exclude-domains=LIST      comma-separated list of rejected domains
       --follow-ftp                follow FTP links from HTML documents
       --follow-tags=LIST          comma-separated list of followed HTML tags
       --ignore-tags=LIST          comma-separated list of ignored HTML tags
  -H,  --span-hosts                go to foreign hosts when recursive
  -L,  --relative                  follow relative links only
  -I,  --include-directories=LIST  list of allowed directories
       --trust-server-names        use the name specified by the redirection
                                     URL's last component
  -X,  --exclude-directories=LIST  list of excluded directories
  -np, --no-parent                 don't ascend to the parent directory

Email bug reports, questions, discussions to <bug-wget@gnu.org>
and/or open issues at https://savannah.gnu.org/bugs/?func=additem&group=wget.
2.3 常见使用方法
CASE1 wget
$ wget http://www.lxlinux.net
--2021-09-20 17:23:47-- http://www.lxlinux.net/
Resolving www.lxlinux.net... 93.184.216.34, 2606:2800:220:1:248:1893:25c8:1946
Connecting to www.lxlinux.net|93.184.216.34|:80... connected.
HTTP request sent, awaiting response... 200 OK
Length: 1256 (1.2K) [text/html]
Saving to: 'index.html'
调用微服务Web接口:k8s集群内调用方式 VS http://域名:port调用方式
二者本质都是基于 http 协议调用

CASE2 wget {url} --output-document
如果你想给下载的文件重新命名,那么可以使用
--output-document选项(或者更简便,直接使用 -O 即可):
wget http://www.lxlinux.net --output-document newfile.html
CASE3 wget --continue {url} / 断点续传
如果你要下载的文件非常大,因为网络的原因有可能出现一次性无法下载完全的情况。如果每次都要重新下载,那么都不知道要等到猴年马月。
这种情况下,就可以使用
--continue选项(或者-c)实现断点续传。也就是说,如果因为各种原因导致下载中断,使用了这个选项,就可以继续上次的下载,而不需要重新进行下载。
$ wget --continue https://www.lxlinux.net/linux-distro.iso
CASE4 wget {urlRegex} :下载一系列文件
如果你下载的不是一个大文件,而是需要很多个小文件,那么 wget 命令也可以帮你轻松实现。
但是,这里还需要使用一些 bash 语法来实现目的。一般来讲,这些文件的名称都有一定的规律,比如:file_1.txt,file_2.txt,file_3.txt,等等,那么你就需要使用这样的命令:
$ wget http://www.lxlinux.net/file_{1..4}.txt
CASE5 查看请求头
学过网络通讯的小伙伴都知道,HTTP 数据包里包含了非常多的元素。其中,HTTP 标头是数据包初始的组成部分。
当你使用浏览器浏览网页时,你的浏览器会向服务器发送 HTTP 请求标头。具体发了些什么东西呢?可以使用--debug选项查看 wget 每次请求发送的标头信息:
$ wget --debug www.lxlinux.net
---request begin---
GET / HTTP/1.1
User-Agent: Wget/1.19.5 (linux-gnu)
Accept: */*
Accept-Encoding: identity
Host: www.lxlinux.net
Connection: Keep-Alive

---request end---
CASE6 修改请求头
你可以使用
--header选项修改请求标头。为什么要这么做呢?其实有很多使用场景的。例如,有时候为了测试,需要模拟特定的浏览器发出的请求。
比如,你想模拟 Edge 浏览器发出来的请求,可以这样操作:
$ wget --debug --header="User-Agent: Mozilla/5.0 (Windows NT 10.0; Win64; x64) AppleWebKit/537.36 (KHTML, like Gecko) Chrome/91.0.4472.124 Safari/537.36 Edg/91.0.864.59" http://www.lxlinux.net
除此之外,你还可以伪装成特定的移动设备(比如 iPhone ):
$ wget --debug \
--header = "User-Agent: Mozilla/5.0 (iPhone; CPU iPhone OS 13_5_1 like Mac OS X) AppleWebKit/605.1.15 (KHTML, like Gecko) Version/13.1.1 Mobile/15E148 Safari /604.1" \
HTTP:// www.lxlinux.net
CASE7 查看响应标头
与浏览器请求发送标头信息的方式相同,标头信息也包含在响应中。同样地,你可以使用 --debug 选项查看响应标头:
$ wget --debug www.lxlinux.net
[...]
---response begin---
HTTP/1.1 200 OK
Accept-Ranges: bytes
Age: 188102
Cache-Control: max-age=604800
Content-Type: text/html; charset=UTF-8
Etag: "3147526947"
Server: ECS (sab/574F)
Vary: Accept-Encoding
X-Cache: HIT
Content-Length: 1256

---response end---
200 OK
Registered socket 3 for persistent reuse.
URI content encoding = 'UTF-8'
Length: 1256 (1.2K) [text/html]
Saving to: 'index.html'
CASE8 响应 301(重定向) 响应
熟悉网络协议的都知道,200 响应码意味着一切都按预期进行。而 301 响应则意味着 URL 已经指向不同的网站。
这种情况下,如果你需要下载文件,那么就需要使用 wget 的重定向功能。所以,如果你遇到 301 响应时,就需要使用 --max-redirect 选项。
如果你不想要重定向,那么可以将 --max-redirect 设置为 0 。
$ wget --max-redirect 0 http://www.lxlinux.net
--2021-09-21 11:01:35-- http://www.lxlinux.net/
Resolving www.lxlinux.net... 192.0.43.8, 2001:500:88:200::8
Connecting to www.lxlinux.net|192.0.43.8|:80... connected.
HTTP request sent, awaiting response... 301 Moved Permanently
Location: https://www.www.lxlinux.net/ [following]
0 redirections exceeded.
或者,你还可以将其设置为其他数字以控制 wget 跟随的重定向数量。
CASE9 展开短链接
有时候,我们需要将一个长链接转为短链接,例如在文本框里填写信息时,有时候文本框对字符长度有限制,这时短链就可以大大减少字符数。
除了使用第三方平台,其实我们可以直接使用 wget 命令来将短链接还原为长链接。这里依然使用 --max-redirect 选项:
$ wget --max-redirect 0 "https://bit.ly/2yDyS4T"
--2021-09-21 11:32:04-- https://bit.ly/2yDyS4T
Resolving bit.ly... 67.199.248.10, 67.199.248.11
Connecting to bit.ly|67.199.248.10|:443... connected.
HTTP request sent, awaiting response... 301 Moved Permanently
Location: http://www.lxlinux.net/ [following]
0 redirections exceeded.
输出的倒数第二行,在 Location 部分,后面你就看到了短链展开之后的真面目。
CASE10 请求时取消HTTPS的SSL验证,以避免报错:Unable to establish SSL connection
- 当你发起HTTPS请求时,可能会报如下错误:
# wget https://github.com/Mirantis/cri-dockerd/releases/download/v0.2.6/cri-dockerd-0.2.6.amd64.tgz
--2025-05-08 00:09:22--  https://github.com/Mirantis/cri-dockerd/releases/download/v0.2.6/cri-dockerd-0.2.6.amd64.tgz
Resolving github.com (github.com)... 20.205.243.166
Connecting to github.com (github.com)|20.205.243.166|:443... connected.

Unable to establish SSL connection.
此时,可以选择取消SSL验证:
# wget --no-check-certificate https://github.com/Mirantis/cri-dockerd/releases/download/v0.2.6/cri-dockerd-0.2.6.amd64.tgz

CASE11 指定HTTP请求的SSL协议版本
wget --secure-protocol=TLSv1_2 https://example.com/file.zip
延申: curl 方式
curl --tlsv1.2 https://github.com
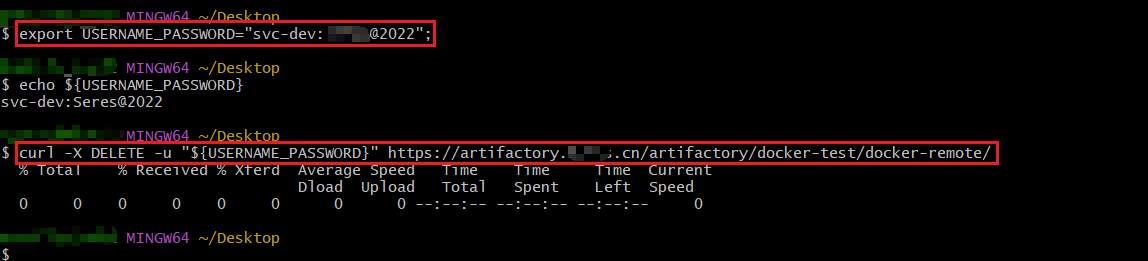
3 特殊字符的处理
方法1: 变量法
例如下面案例中含有
@/-等特殊字符,会导致命令执行失败(鉴权失败,报401)
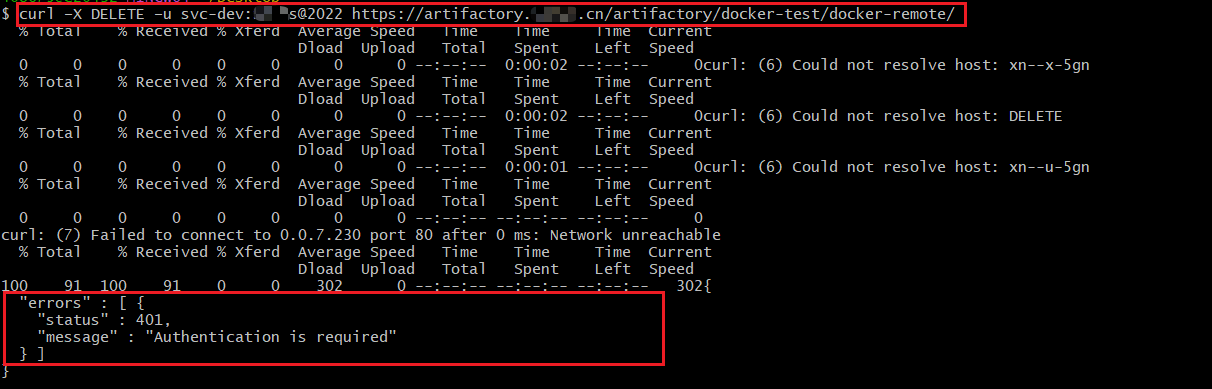
export USERNAME_PASSWORD="svc-dev:wahaha@2022";
curl -X DELETE -u "${USERNAME_PASSWORD}" https://artifactory.xxxx.cn/artifactory/docker-test/docker-remote/
方法2: 转义字符/反斜杠符
在特殊字符前使用''号
passwd=\@31\&3*J
参考文献
P FAQ for curl
Q: curl 命令中,-x 和 -X 参数的区别?
在 curl 命令中,-x 和 -X 参数是两个完全不同的选项,它们的作用和用途如下:
-x 参数
- 作用:用于指定代理服务器。
- 格式:
-x [protocol://]host[:port]或--proxy [protocol://]host[:port] - 说明:通过
-x参数,curl可以将请求发送到指定的代理服务器,而不是直接连接到目标服务器。代理服务器可以是 HTTP 代理、HTTPS 代理或 SOCKS 代理等。 - 示例:
在这个例子中,curl -x http://proxy.example.com:8080 http://www.example.comcurl会通过代理服务器proxy.example.com(端口为 8080)来访问目标网站www.example.com。
-X 参数
- 作用:用于指定请求的 HTTP 方法。
- 格式:
-X <command>或--request <command> - 说明:
-X参数允许用户显式指定要使用的 HTTP 方法(如GET、POST、PUT、DELETE等)。如果不使用-X参数,curl默认使用GET方法。 - 示例:
在这个例子中,curl -X POST http://www.example.com/api/datacurl会向目标 URL 发送一个POST请求。
区别总结
- 功能:
-x是用于设置代理服务器,主要用于网络连接的中间转发。-X是用于指定 HTTP 请求方法,用于控制与目标服务器的交互方式。
- 使用场景:
-x通常用于需要通过代理服务器访问目标资源的场景,例如公司内网或需要隐藏真实 IP 的情况。-X用于需要明确指定 HTTP 方法的场景,尤其是在与 RESTful API 交互时,需要根据 API 的要求选择合适的方法(如GET、POST、PUT等)。
Q: curl 请求http接口时报:curl: (52) Empty reply from server
- 问题描述
通过
ssh -v 127.0.0.1 -p 9200验证网络互通的前提下,通过curl http请求时,curl 报curl: (52) Empty reply from server
$ curl -v -X GET 'http://127.0.0.1:9200/_cluster/health?pretty' \
> --header 'Content-Type: application/json' \
> --header 'Authorization: Basic dGVzdDpwYXNzd29yZA=='
-
问题分析
可能原因:服务器启用了HTTPS协议,且停用了HTTP协议。 -
解决方法
- 当ES集群启用HTTPS协议时:
继续采用上面的方式请求时,将报:
curl: (52) Empty reply from server错误(本质原因是:不支持HTTP协议)
- 解决方法1:服务器关闭HTTPS协议,并支持http协议
- 解决方法2
怎么正确的请求呢?改用HTTPS请求方式(参见↓)
$ curl -v -X GET 'https://127.0.0.1:9200/_cluster/health?pretty' -k \
> --header 'Content-Type: application/json' \
> --header 'Authorization: Basic dGVzdDpwYXNzd29yZA=='
-k: 忽略TLS/SSL认证
- 参考文献
PKIX path building failed ?
情况1:有些朋友遇到的是协议不对,导致访问返回curl: (52) Empty reply from server,更改对应的协议即可 修改成https便成功访问
强烈2:有时候服务器的防火墙会拦截一些请求,还有就是网络不通导致访问异常
Q:curl上传文件时,报:curl: (26) Failed to open/read local data from file/application
- 问题描述
E:\> curl  -i -X POST -H "Content-Type: multipart/form-data"  -F "file=@\E:\source_code\Other-Projects\go-apps\data-file.txt"  -F "requestId=123456"  http://127.0.0.1:9999/uploadFiles
curl: (26) Failed to open/read local data from file/application
- 问题分析
假设要上传的本地文件的路径:
F:\我的下载\test.xlsx
- 错误写法1:使用【单引号】
curl -X POST "https://xxx/upload" -H "Authorization:xx" -F 'myFile=@"F:/我的下载/test.xlsx"'
- 错误写法2:路径写错
curl -X POST "https://xxx/upload" -H "Authorization:xx" -F "myFile=@/F:/我的下载/test.xlsx"
- 正确写法1:使用绝对路径
curl -X POST "https://xxx/upload" -H "Authorization:xx" -F "myFile=@F:/我的下载/test.xlsx"
- 正确写法2:使用相对路径
先切换到:F:\我的下载
curl -X POST "https://xxx/upload" -H "Authorization:xx" -F "myFile=@./我的下载/test.xlsx"
- 解决方法
【请求端】
E:\> curl  -i -X POST -H "Content-Type: multipart/form-data"  -F "file=@E:/source_code/Other-Projects/go-apps/data-file.txt"  -F "requestId=123456"  http://127.0.0.1:9999/uploadFiles
HTTP/1.1 100 Continue

HTTP/1.1 200 OK
Date: Mon, 06 Jan 2025 10:01:15 GMT
Content-Length: 42
Content-Type: text/plain; charset=utf-8

File uploaded successfully: data-file.txt

【Server端】
$ go run http_server.go
Uploaded File: data-file.txt
File Size: 47556070
MIME Header: map[Content-Disposition:[form-data; name="file"; filename="data-file.txt"] Content-Type:[text/plain]]
- 参考文献
Y 推荐文献
含:Centos7 Linux中设置网络代理
X 参考文献

本文链接: https://www.cnblogs.com/johnnyzen
关于博文:评论和私信会在第一时间回复,或直接私信我。
版权声明:本博客所有文章除特别声明外,均采用 BY-NC-SA 许可协议。转载请注明出处!
日常交流:大数据与软件开发-QQ交流群: 774386015 【入群二维码】参见左下角。您的支持、鼓励是博主技术写作的重要动力!

 浙公网安备 33010602011771号