IDEA自动生成JPA实体
idea自动生成jpa实体类
1.连接数据库
view -> Tool Windows -> Database

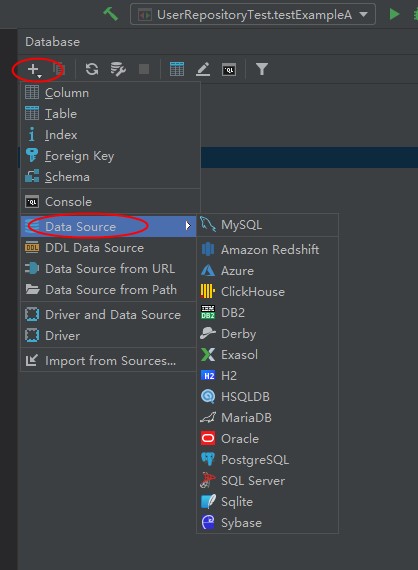
2.在右侧弹出的Database选项里
+ -> DataSource -> 数据库类型

3.在弹出框配置数据库连接,注意左下角可能会有蓝色提示缺少jar,点击就会自动下载,然后测试连接,应用

4.配置生成策略
回到2的Database,可以看到可以显示第三部连接的数据库以及数据库中的表,选中表(可多选),
右键 Scripted Extensions -> Go to Scripts Directory

生成策略常用的有两种,第一种是普通的get set的方式,讲下面代码复制到Generate POJOS.groovy里
    import com.intellij.database.model.DasTable
import com.intellij.database.util.Case
import com.intellij.database.util.DasUtil

/*
 * Available context bindings:
 *   SELECTION   Iterable<DasObject>
 *   PROJECT     project
 *   FILES       files helper
 */
packageName = "com.sample;"  //这里要换成自己项目 实体的包路径
typeMapping = [
  (~/(?i)int/)                      : "long",  //数据库类型和Jave类型映射关系
  (~/(?i)float|double|decimal|real/): "double",
  (~/(?i)datetime|timestamp/)       : "java.sql.Timestamp",
  (~/(?i)date/)                     : "java.sql.Date",
  (~/(?i)time/)                     : "java.sql.Time",
  (~/(?i)/)                         : "String"
]

FILES.chooseDirectoryAndSave("Choose directory", "Choose where to store generated files") { dir ->
  SELECTION.filter { it instanceof DasTable }.each { generate(it, dir) }
}

def generate(table, dir) {
  def className = javaName(table.getName(), true)
  def fields = calcFields(table)
  new File(dir, className + ".java").withPrintWriter { out -> generate(out, className, fields) }
}

def generate(out, className, fields) {
  out.println "package $packageName"
  out.println ""
  out.println ""
  out.println "public class $className {"
  out.println ""
  fields.each() {
    if (it.annos != "") out.println "  ${it.annos}"
    out.println "  private ${it.type} ${it.name};"
  }
  out.println ""
  fields.each() {
    out.println ""
    out.println "  public ${it.type} get${it.name.capitalize()}() {"
    out.println "    return ${it.name};"
    out.println "  }"
    out.println ""
    out.println "  public void set${it.name.capitalize()}(${it.type} ${it.name}) {"
    out.println "    this.${it.name} = ${it.name};"
    out.println "  }"
    out.println ""
  }
  out.println "}"
}

def calcFields(table) {
  DasUtil.getColumns(table).reduce([]) { fields, col ->
    def spec = Case.LOWER.apply(col.getDataType().getSpecification())
    def typeStr = typeMapping.find { p, t -> p.matcher(spec).find() }.value
    fields += [[
                 name : javaName(col.getName(), false),
                 type : typeStr,
                 annos: ""]]
  }
}

def javaName(str, capitalize) {
  def s = com.intellij.psi.codeStyle.NameUtil.splitNameIntoWords(str)
    .collect { Case.LOWER.apply(it).capitalize() }
    .join("")
    .replaceAll(/[^\p{javaJavaIdentifierPart}[_]]/, "_")
  capitalize || s.length() == 1? s : Case.LOWER.apply(s[0]) + s[1..-1]
}
第二种策略是 lombok提供的注解方式的实体,并且可以映射字段和属性对应关系,这种比较实用一些。
import com.intellij.database.model.DasTable
import com.intellij.database.model.ObjectKind
import com.intellij.database.util.Case
import com.intellij.database.util.DasUtil

/*
 * Available context bindings:
 *   SELECTION   Iterable<DasObject>
 *   PROJECT     project
 *   FILES       files helper
 */
packageName = "com.sample;"  //这里要换成自己项目 实体的包路径
typeMapping = [
        (~/(?i)int/)                      : "Integer",  //数据库类型和Jave类型映射关系
        (~/(?i)float|double|decimal|real/): "Double",
        (~/(?i)bool|boolean/)             : "Boolean",
        (~/(?i)datetime|timestamp/)       : "java.util.Date",
        (~/(?i)date/)                     : "java.sql.Date",
        (~/(?i)time/)                     : "java.sql.Time",
        (~/(?i)/)                         : "String"
]

FILES.chooseDirectoryAndSave("Choose directory", "Choose where to store generated files") { dir ->
    SELECTION.filter { it instanceof DasTable && it.getKind() == ObjectKind.TABLE }.each { generate(it, dir) }
}

def generate(table, dir) {
    def className = javaName(table.getName(), true)
    def fields = calcFields(table)
    new File(dir, className + ".java").withPrintWriter { out -> generate(out, table, className, fields) }
}

def generate(out, table, className, fields) {
    def tableName = table.getName()
    out.println "package $packageName"
    out.println ""
    out.println "import lombok.Data;"
    out.println ""
    out.println "import javax.persistence.*;"
    out.println "import java.io.Serializable;"
    out.println ""
    out.println "@Data"
    out.println "@Entity"
    out.println "@Table(name = \"$tableName\")"
    out.println "public class $className  implements Serializable {"
    out.println ""

    if ((tableName + "_id").equalsIgnoreCase(fields[0].colum) || "id".equalsIgnoreCase(fields[0].colum)) {
        out.println "\t@Id"
        out.println "\t@GeneratedValue(strategy=GenerationType.IDENTITY)"
    }
    fields.each() {
        if (it.annos != "") out.println "  ${it.annos}"
        if (it.colum != it.name) {
            out.println "\t@Column(name = \"${it.colum}\")"
        }
        out.println "\tprivate ${it.type} ${it.name};"
        out.println ""
    }
    out.println "}"
}

def calcFields(table) {
    DasUtil.getColumns(table).reduce([]) { fields, col ->
        def spec = Case.LOWER.apply(col.getDataType().getSpecification())
        def typeStr = typeMapping.find { p, t -> p.matcher(spec).find() }.value
        fields += [[
                           name : javaName(col.getName(), false),
                           colum: col.getName(),
                           type : typeStr,
                           annos: ""]]
    }
}

def javaName(str, capitalize) {
    def s = str.split(/(?<=[^\p{IsLetter}])/).collect { Case.LOWER.apply(it).capitalize() }
            .join("").replaceAll(/[^\p{javaJavaIdentifierPart}]/, "_").replaceAll(/_/, "")
    capitalize || s.length() == 1 ? s : Case.LOWER.apply(s[0]) + s[1..-1]
}
5.生成实体类
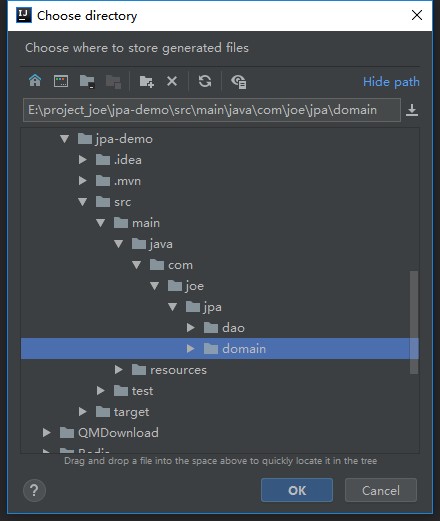
在DataBase属性那里Scripted -> Extensions -> Generate POJOS.groovy -> 弹出框选择实体类保存位置。

右下角看到提示,成功。

然后在对应目录下就可以看到生成的实体类

Joe小学弟


