初识SpringSecurity
一、什么是SpringSecurity?
官网原文:
Spring Security is a powerful and highly customizable authentication and access-control framework. It is the de-facto standard for securing Spring-based applications.
Spring Security is a framework that focuses on providing both authentication and authorization to Java applications. Like all Spring projects, the real power of Spring Security is found in how easily it can be extended to meet custom requirements
大体意思如下:
Spring Security是一个框架,他有强大的功能和高度可定制的身份验证和访问控制。它是保护以Spring为基础的应用程序的标准。它能够为java应用程序提供身份验证和授权,它真正强大的功能在于容易扩展和定制。
看完上面的简单描述,我们对SpringSecurity也有了一个基本的认识:
- 它是一个为Spring应用程序提供安全保护的框架。
- 它的主要功能有身份验证、访问控制以及权限控制。
- 它易于扩展和定制。
二、SpringSecurity如何使用
1.第一步:添加依赖
     <dependency>
            <groupId>org.springframework.boot</groupId>
            <artifactId>spring-boot-starter-security</artifactId>
        </dependency>
添加此依赖不进行任何其他配置时,对页面进行访问会进入一个"/login"页面,如下:

用户名为user,而密码是随机生成的,会被写入在应用的日志文件中。经过认证之后,就有权限访问应用了。
显而易见的,Security已经启用了对我们的应用的保护,那么现在它做了些什么呢?
- 在访问应用之前我们需要进行认证
- 认证是通过HTTP basic认证对话框实现的
- 不需要特定的角色和权限
- 用户是默认的user,密码随机生成
但是很明显以上并不能满足我们的生产需求,至少我们得满足以下的要求:
- 通过自定义的登陆页面来进行用户的认证
- 对于不同的请求路径,执行不同的安全规则
因此我们需要对Spring Security进行一些配置,来覆盖它默认的配置。
2.配置SpringSecurity
下面将会以一个简单的例子来对SpringSecurity的一些基础配置进行说明。
之前老版本继承WebSecuConfigurerAdapter的配置已经废弃,这里我们使用官方推荐的新的配置方式,如下:
package com.jms.springsecurity.config;

import org.springframework.context.annotation.Bean;
import org.springframework.context.annotation.Configuration;
import org.springframework.security.config.annotation.web.builders.HttpSecurity;
import org.springframework.security.config.annotation.web.configuration.EnableWebSecurity;
import org.springframework.security.core.userdetails.User;
import org.springframework.security.core.userdetails.UserDetails;
import org.springframework.security.crypto.bcrypt.BCryptPasswordEncoder;
import org.springframework.security.crypto.password.PasswordEncoder;
import org.springframework.security.provisioning.InMemoryUserDetailsManager;
import org.springframework.security.web.SecurityFilterChain;
import org.springframework.security.web.util.matcher.AntPathRequestMatcher;

@Configuration
@EnableWebSecurity
public class SecurityConfig {
    //用户认证
    @Bean
    public SecurityFilterChain filterChain(HttpSecurity http) throws Exception {
        http.authorizeHttpRequests(authors -> authors.antMatchers("/", "/index").permitAll()
                        .antMatchers("/model1/**").hasRole("VIP1")
                        .antMatchers("/model2/**").hasRole("VIP2")
                        .antMatchers("/model3/**").hasRole("VIP3"))
                //loginPage()是自定义登陆页面;loginProcessingUrl()是自定义登录请求,登录请求默认是/login
                .formLogin(login -> login.loginPage("/login").loginProcessingUrl("/doLogin"))
                //logoutRequestMatcher()是自定义登出请求的形式,默认路径为“/logout”,请求方式为Post;logoutSuccessUrl()是自定义登出后跳转到的页面,默认是登录页
                .logout(logout -> logout.logoutRequestMatcher(new AntPathRequestMatcher("/doLogout", "GET")).logoutSuccessUrl("/"));
                //.logout(logout -> logout.logoutUrl("/doLogout").logoutSuccessUrl("/"));
        return http.build();
    }

    //密码加密
    @Bean
    public PasswordEncoder passwordEncoder() {
        return new BCryptPasswordEncoder();
    }

    //身份验证 内存中
    @Bean
    public InMemoryUserDetailsManager userDetailsService() {
        UserDetails user = User.builder()
                .username("root")
                .password(new BCryptPasswordEncoder().encode("123456"))
                .roles("VIP1", "VIP2")
                .build();
        UserDetails user1 = User.builder()
                .username("root1")
                .password(new BCryptPasswordEncoder().encode("123456"))
                .roles("VIP1", "VIP2", "VIP3")
                .build();
        return new InMemoryUserDetailsManager(user, user1);
    }
}
这个类做了什么事情呢,首先看注解:
@Configuration说明它是一个Spring配置类,@EnableWebSecurity说明它开启了Web安全,这个注解就是用在SpringSecurity配置上的。
然后再看类里面的内容,就是三个方法分别往容器中注入了三个Bean,现在来看三个方法分别作了哪些事情。
filterChain方法中进行了三项配置,第一项配置是authorizeHttpRequests来配置权限验证,像以上代码中,“/”和“/index”开放权限,随意访问,而model1、model2、model3目录下的资源则需要权限“VIP1”“VIP2”“VIP3”才能访问;第二项配置是登陆的配置,当用户处于未登录状态时,访问到超出权限的内容会跳转到登陆页面,SpringSecurity是自带登陆页面的,默认请求url为“/login”,同时登陆时表单的请求也为“/login”,只不过访问登陆页面是方法是GET,表单提交时方法是Post,上述代码中对登录进行了配置,自定义了登陆的页面以及登陆的请求;第三项是对登出操作的配置,这里配置了登出的请求方式跟url,并设置了登出后跳转到“/”页面,可以看到在登出下面有一条注释掉的代码,其中配置更加简洁,用logoutUrl配置了登出请求的url,但是logoutUrl必须是Post请求,由于我写的登出是通过<a><a/>标签进行操作的,使用的是get请求,所以需要通过logoutRequesMather的方式进行配置。
passwordEncoder方法是对SpringSecurity的密码存储设置进行改变,也就是改变当我们想要加密密码时使用的编码设置,官方文档中有这样一句话:
Spring Security 默认使用 DelegatingPasswordEncoder。然而,你可以通过将 PasswordEncoder 暴露为 Spring Bean 来进行定制。
也就是说若想要改变SpringSecurity的默认密码加密设置,需要注入一个方法名为PasswordEncoder的Bean。
最后一个方法是设置一些在内存中的用户,一般来书评用户信息都是存储在数据库中的,这里为了方便演示便利用了内存中的用户。
3.测试

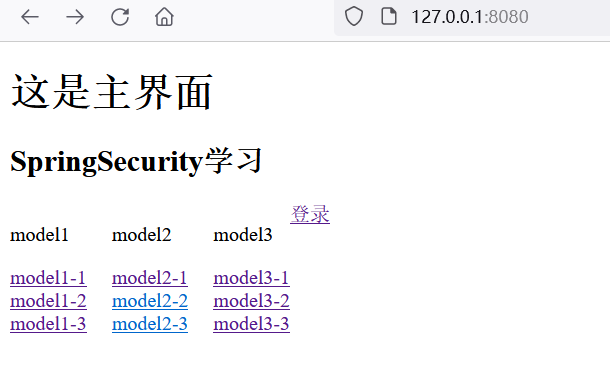
这是未经验证的主界面,用户随意访问,此时尝试访问model1-1,进入登陆页面:

登录root用户,跳转到model1-1页面:

此时返回主页尝试进入model3的页面:

进入失败,因为root用户只有VIP1和VIP2的权限,无法进入需要VIP3的model3
此时,返回model1-1页面,并点击登出:

登出后回到主页面,此时再进入model1:

需要重新登陆。
嗯,基本上没有问题,那么本次对SpringSecurity也有了一个大概的认识,更加详细的学习会在后续不断展开。
(本文仅作个人学习记录用,如有纰漏敬请指正)


 浙公网安备 33010602011771号