ATG教程-DEV1 Charpter1: Getting Started, Chapter2: Components
| Developing ATG Applications Part I Using ATG Repositories, Scenario PersonalizationSM and the Dynamo Application Framework |
| Labs/Exercises ATG |
Document Version
Developing ATG Applications Part I v1.1 Revision Date: 26-Sep-03 Print date: 19-May-11
Copyright
Copyright ã 1998-2003 Art Technology Group, Inc.
This publication may not, in whole or in part, be copied, photocopied, translated, or reduced to any electronic medium or machine-readable form for commercial use without prior consent, in writing, from Art Technology Group, Inc (“ATG”). ATG does authorize you to copy documents published by ATG on the World Wide Web for non-commercial uses within your organization only. In consideration of this authorization, you agree that any copy of these documents that you make shall retain all copyright and other proprietary notices contained herein.
Trademarks
Dynamo® is a registered trademark of Art Technology Group, Inc.
ATG Dynamo Application Serverä, ATG Relationship Management PlatformSM, ATG Scenario PersonalizationSM, ATG Portalä, ATG Commerceä, ATG Publishingä, ATG Data Anywhere ArchitectureSM, and ATG Control Centerä are trademarks or registered trademarks of Art Technology Group, Inc.
Javaä and all Java-based trademarks and logos are trademarks or registered trademarks of Sun Microsystems, Inc. in the United States and other countries.
All other company and product names are the trademarks or registered trademarks of their respective companies.
No Warranty
This documentation is provided “as is” without warranty of any kind, either express or implied, including, but not limited to, the implied warranties of merchantability, fitness for a particular purpose, or non-infringement.
The contents of this publication could include technical inaccuracies or typographical errors. Changes are periodically added to the information in this document; these changes will be incorporated in the new editions of the publication. ATG may make improvements and/or changes in the publication and/or product(s) described in the publication at any time without notice.
Limitation of Liability
In no event will ATG be liable for direct, indirect, special, incidental, economic, cover, or consequential damages of any kind arising out of the use of or inability to use this documentation even if advised of the possibility of such damages. Some states do not allow the exclusion or limitation of implied warranties or limitation of liability for incidental or consequential damages, so the above limitation or exclusion may not apply to you.
Contact
ATG
25 First Street
Cambridge, MA 02141
617.386.1000 phone
617.386.1111 fax
www.atg.com
Contents
Exercise 1: Creating a J2EE web application module. 3
Exercise 1: Modifying component configurations. 8
Exercise 2: Creating a component. 9
Exercise Setup
Background
The <atgdir> symbolic folder that this document makes frequent reference to is the location of the top-level ATG folder; e.g. D:\ATG
All the files that you will need to complete these exercises can be found in the Developing ATG Applications course folder, <atgdir>\training\dev1.
Directory structure:
<atgdir>\training\dev1
docs contains documentation
examples contains sample code
setup contains files need to setup the course
solutions contains individual solution files for the exercises
src contains any source code or starter files you will need for each exercise
Solutions Module
A final solution module for the course labs is provided in a folder called final solution, located in the solutions folder.
Chapter 1: Getting Started
Exercise 1: Creating a J2EE web application module
Exercise Objective
After completing this exercise, you will be able to start ATG and the ATG Control Center (ACC), and create and start a new ATG project.
Problem Statement
Use the ACC to create a new J2EE web application called “Dynamusic”. All lab work for this course will be contained in this application, a music sharing site. To start, the application will consist of a set of static html “mockup” pages that will be provided for you.
Some of the exercises in this document use and build upon several baseline components that have been provided in a module called “Dynamusic-Base”. The module that you will create in this exercise to contain your Dynamusic web application will have a dependency upon this module. Do not worry too much about the contents of Dynamusic-Base at this time as this document will describe these baseline components as needed to complete the individual exercises.
Guided Instruction
Start Solid, ATG, and the ATG Control Center (ACC)
1. Start the SOLID database process by selecting: Start > Programs > ATG 9.1 > ATG Consumer Commerce > 1. Start SOLID Server.
2. Start ATG by selecting: Start > Programs > ATG 9.1 > ATG Consumer Commerce > 2. Start ATG 9.1.
3. Wait for ATG to start up. This may take a minute or so. You will know ATG has completely initialized when you see Nucleus Running displayed in the ATG logging window.
4. Use a browser to navigate to http://localhost:8080/PioneerCycling and verify that you are brought to the Pioneer Cycling application. Take a few minutes to explore this reference application for the ATG Relationship Management platform.
5. Start the ACC by selecting: Start > Programs > ATG 9.1 > Tools > ATG Control Center. When prompted, enter “admin” / “admin” as the User Name / Password.
6. Download eclipse-jee-galileo-SR2-win32.zip and unzip it. Create a folder called ‘Dynamusic’ under ATG installation folder (e.g. The folder is like D:\ATG\ATG9.1\Dynamusic).
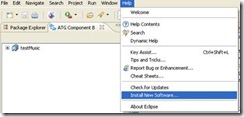
7. Install new plug-in: Open eclipse, select Help – Install New Software…
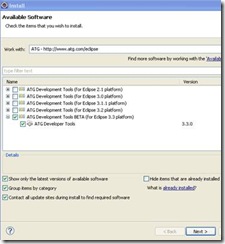
Click ‘Add’ button. Input Name(ATG) and Location http://www.atg.com/eclipse. Click OK.
Click ‘Next’ and ‘Finish’ until installation succeed. Restart Eclipse.
8. Open ATG perspective: windows – Open Perspective – Other – Choose ATG
Dynamusic dependency on module Dynamusic-Base
9. The Dynamusic-Base is a required module to provide support functionality for the application that will be created in the lab exercises. To install this module:
a. Make sure the DYNAMO_HOME is set to the <atgdir>\ATG9.1\home
b. Execute the <atgdir>\training\dev1\setup\setup_dev1.bat
Create a new J2EE Application
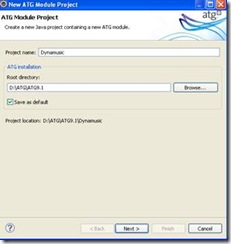
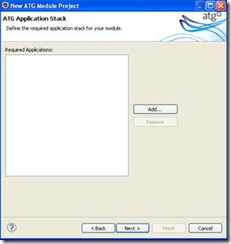
10. New – New ATG Module . Input project name and ATG installation location.
Click ‘Next’ button.
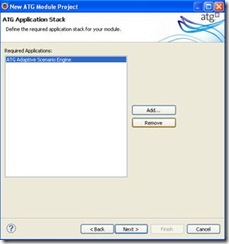
Select ATG Adaptive Scenario Engine and click ‘Remove’ button.
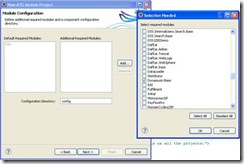
Click ‘Next’ button and click ‘Add’. Choose additional required module ‘Dynamusic-Base’. Click ‘OK’.
Click ‘Next’ button and then ‘Next’ button.
Create the J2EE Web Application
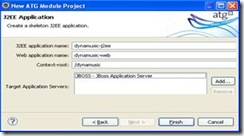
11. Input j2ee application name, web application name and context root. Select target application server.
12. Click ‘Finish’ button to finish creation.
Test your new application
13. Stop ATG jboss.
14. Close the ACC by selecting Exit from the File menu.
15. Start ATG manually, using the new Dynamusic module.
Open a cmd prompt window and enter the following commands:
cd %DYNAMO_HOME%\bin
startDynamoOnJBoss –m Dynamusic
16. Wait for Nucleus Running to be displayed in the ATG logging window.
17. Visit http://localhost:8080/dynamusic and verify that your welcome file, dynamusic-web Test JSP Page, is displayed.
Bookmark the ATG Documentation in your browser
18. Locate the ATG Documentation set by selecting: Start > Programs > ATG9.1 > Documentation > ATG Dynamo Documentation. This page provides access to the various ATG guides which will be useful to you in this class.
19. Open the Dynamo Programming Guide and the API Reference and bookmark these pages for quick access.
Chapter 2: Components
Catching Up
Successful completion of the Chapter 1 exercises is required to complete the exercises in the rest of the course. If you were unable to finish the previous exercise, copy the Dynamusic module from <atgdir>/training/dev1/solutions/chapter01 to <atgdir>/ATG9.1/Dynamusic.
Exercise 1: Modifying component configurations
Exercise Objective
After completing this exercise, you will be able to modify component configurations via properties files.
Problem Statement
Create a Dynamusic specific configuration file and set Dynamusic as the default configuration layer for component modifications made via the ACC. In addition, set the default SMTP email “from” address to an application specific value for Dynamusic.
Guided Instruction
Create a new CONFIG.properties file and add it to the Dynamusic module
1. Use a text editor to create a CONFIG.properties file in the config folder of the Dynamusic module (i.e. <atgplatform>\Dynamusic\config\CONFIG.properties.)
2. Set the name and defaultForUpdates properties as follows:
name=Dynamusic
defaultForUpdates=true
A true defaultForUpdates property value tells the ACC that any component configuration changes should be saved in this configuration layer. The name property tells the ACC how to label this configuration layer when displaying a components configuration in the Configuration tab or “Set Update Layer for Properties Files”.
3. In addition to turning on default updating for Dynamusic, you have to turn off default updating for the localconfig layer. Edit <atgdir>\ATG9.1\home\localconfig\CONFIG.properties and change defaultForUpdates to false, and save the file.
4. Restart ATG to pick up the new CONFIG.properties values. You can restart ATG or by typing Ctrl-C twice in the Command Prompt window, and hitting the up arrow to return to the previous command line. (You will need to restart ATG frequently throughout the rest of the exercises.)
5. Make sure you see Nucleus Running in the ATG logging window before proceeding!
Modify the /atg/dynamo/service/SMTPEmail component
6. In the ACC, select Pages and Components > Components by Path.
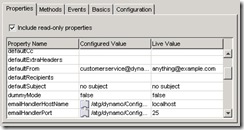
7. Open the /atg/dynamo/service/SMTPEmail component and change the configured value of the defaultFrom property to “customerservice@dynamusic.com“.
8. Save your changes ![]() . When asked whether you want to change the component’s live value, select No. (In subsequent exercises, you will usually say Yes to this question, but for this exercise you should explore the difference between Live and Configured values.)
. When asked whether you want to change the component’s live value, select No. (In subsequent exercises, you will usually say Yes to this question, but for this exercise you should explore the difference between Live and Configured values.)
9. Note the different values in the “Configured Value” and “Live Value” columns of the component properties window.
10. Use a text editor to open the file <ATG9.1>\Dynamusic\config\atg\dynamo\service\SMTPEmail.properties and observe that your new property value has been recorded.
11. Restart ATG.
12. From the ACC, open the SMTPEmail component and verify that your change has been recognized and that the live configuration value is now set to your new value.
Exercise 2: Creating a component
Exercise Objective
After completing this exercise, you will be able to create components based on existing Java classes.
Problem Statement
Create a component to hold a list of featured songs.
Guided Instruction
Create a new component based on a custom class
A custom class called dynamusic.FeaturedSongs, which includes a songs String array property, has been provided in the Dynamusic-Base module.
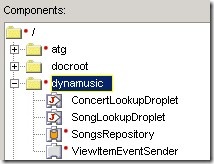
1. From the ACC select Components by Path. Select dynamusic from the configuration hierarchy.
2. Create a new component by selecting the new component ![]() button. Select the Generic Component template.
button. Select the Generic Component template.
3. Base your globally scoped component on the dynamusic.FeaturedSongs class. Name your component FeaturedSongs. (On this screen you can also choose a directory in which to put the component; be sure to confirm that your dynamusic directory is selected, otherwise the resulting component will be created in an incorrect folder.)
4. Add your own list of featured songs using the songs property. Select the ellipses ![]() button to enter your array of song titles. Click OK when done.
button to enter your array of song titles. Click OK when done.
5. Set the loggingDebug property to true.
7. Hit the start ![]() button to load the component into the live configuration.
button to load the component into the live configuration.
8. Examine the ATG logging window and verify that debug output for the FeaturedSongs component is displayed.
9. Use your Windows Explorer to open the <ATG9.1dir>\Dynamusic\config\dynamusic folder and locate the FeaturedSongs.properties file. Open the file and observe your setting. (If you cannot locate the properties file under your Dynamusic directory, check under < ATG9.1dir >\home\localconfig. If you find it there, it means that your CONFIG.properties defaultForUpdates line is not configured properly.)
posted on 2011-05-19 11:44 Eason Jiang 阅读(1299) 评论(0) 收藏 举报




 浙公网安备 33010602011771号