
ELK安装部署
本文主要介绍ELK的部署架构(优化)、安装部署过程、以及安装部署过程中遇到的问题和解决方法,希望通过本文能给初步接触ELK的朋友一些指引。
1. ELK介绍
ELK由ElasticSearch、Logstash和Kiabana三个开源工具组成。
|
ElasticSearch |
开源分布式搜索引擎,它的特点有:分布式,零配置,自动发现,索引自动分片,索引副本机制,restful风格接口,多数据源,自动搜索负载等 |
|
Logstash |
对日志进行收集、过滤,并将其存储供以后使用 |
|
Kiabana |
开源和免费的工具,Kibana可以为 Logstash 和 ElasticSearch 提供的日志分析友好的 Web 界面,可以帮助您汇总、分析和搜索重要数据日志 |
2. ELK架构
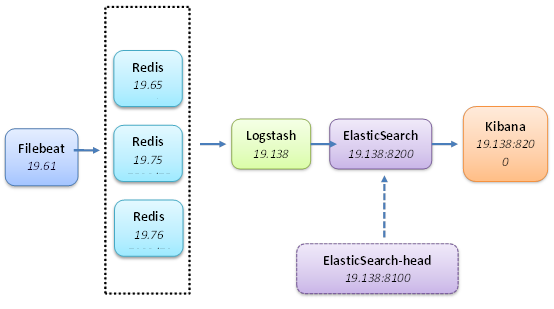
结合项目实际我们采用了filebeat采集日志,采集日志后传输到redis服务器中,通过Logstash分析过滤日志后存储到ElasticSearch,再通过kibana展示。
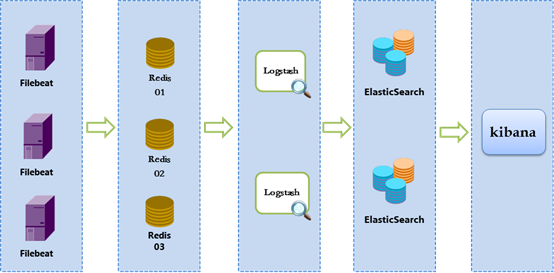
3. 部署结构图如下:
4. 安装环境
CentOS release 6.9 (Final)
JDK 1.8.0_144
5. 安装包
|
1 |
filebeat-6.0.1-linux-x86_64.tar.gz |
|
2 |
logstash-6.0.1.zip |
|
3 |
elasticsearch-6.0.1.zip |
|
4 |
elasticsearch-head-master.zip |
|
5 |
kibana-6.0.1-linux-x86_64.tar.gz |
|
6 |
node-v8.11.2-linux-x64.tar.xz |
6. 相关安装及配置
6.1. filebeat安装
1) 进入安装包所在目录,解压安装文件。
$ cd /usr/local/elk/
$ tar -zxvf filebeat-6.0.1-linux-x86_64.tar.gz
2) 进入filebeat目录,修改filebeat.yml文件
$ cd filebeat-6.0.1-linux-x86_64
$ vi filebeat.yml
- type: log
# Change to true to enable this prospector configuration.
enabled: true
# Paths that should be crawled and fetched. Glob based paths.
#指定要监控的日志,可以指定具体得文件或者目录
# elk-service1代表以elk-service1开头的日志文件
paths:
- /usr/local/elk/logs/ elk-service1/*.log
#- c:\programdata\elasticsearch\logs\*
tags: ["elk-service1"]
document_type: " elk-service1"
#================================ redis output ======================
#收集日志输出到redis集群
- output.redis:
enabled: true
hosts: ["192.168.19.65:6500","192.168.19.65:6501","192.168.19.75:7500","192.168.19.75:7501","192.168.19.76:7600","192.168.19.76:7601"]
key: "elk_log_file"
db: 0
timeout: 5
#----------------------------- Logstash output --------------------------------
3) 启动filebeat
$ ohup ./filebeat -c ./filebeat.yml &
6.2. logstash安装
1) 进入安装包所在目录,解压安装文件
$ cd /usr/local/elk/
$ unzip logstash-6.0.1.zip
2) 在logstash-6.0.1的config下文件logstash_to_es.conf内容如下
$ cd /usr/local/elk/logstash-6.0.1/config
$ vi logstash_to_es.conf
3) 启动logstash
$ nohup ./bin/logstash -f config/logstash_to_es.conf >>logstash.out &
6.3.ElasticSearch安装
1) 进入安装包所在目录,解压安装文件
$ cd /usr/local/elk/
$ unzip elasticsearch-6.0.1.zip
2) 进入elasticsearch的config文件夹修改elasticsearch.yml文件
$ cd /usr/local/elk/elasticsearch-6.0.1/config
$ vi elasticsearch.yml
3) 相关配置如下:
# ---------------------------------- Network -----------------------------------
#
# Set the bind address to a specific IP (IPv4 or IPv6):
#
network.host: 192.168.19.138
#
# Set a custom port for HTTP:
#
http.port: 8200
#
# For more information, consult the network module documentation.
#
# --------------------------------- Discovery ----------------------------------
bootstrap.memory_lock: false
bootstrap.system_call_filter: false
4) 启动elasticsearch
$ nohup ./bin/elasticsearch >>elasticsearch.out &
5) elasticsearch安装过程中错误解决
错误:
unable to install syscall filter:
java.lang.UnsupportedOperationException: seccomp unavailable: CONFIG_SECCOMP not compiled into kernel, CONFIG_SECCOMP and CONFIG_SECCOMP_FILTER are needed at org.elasticsearch.bootstrap.SystemCallFilter.linuxImpl(SystemCallFilter.java:341) ~[elasticsearch-6.0.1.jar:6.0.1]
解决:
在elasticsearch.yml新增如下配置
#Centos6不支持SecComp所以要关闭
bootstrap.memory_lock: false
bootstrap.system_call_filter: false
错误:
ERROR: [1] bootstrap checks failed
[1]: max virtual memory areas vm.max_map_count [65530] is too low, increase to at least [262144]
解决:
切换到root用户修改配置sysctl.conf
$ sudo vi /etc/sysctl.conf
添加下面配置:
vm.max_map_count=655360
并执行命令:
$ sudo sysctl -p
6.4. elasticsearch-head安装
安装elasticsearch-head前需先安装nodejs,主要安装步骤如下:
1) 进入nodejs安装包所在目录,解压安装文件
$ cd /usr/local/elk/
$ tar xf node-v8.3.0-linux-x64.tar.xz
2) 安装nodejs所需相关插件
$ sudo yum -y install gcc make gcc-c++ openssl-devel wget
3) 设置node和npm为全局变量
$ sudo ln -s /usr/local/elk/node-v8.11.2-linux-x64/bin/node /usr/local/bin/node
$ sudo ln -s /usr/local/elk/node-v8.11.2-linux-x64//bin/npm /usr/local/bin/npm
4) 修改.bash_profile文件,新增如下配置
$ vi ~/.bash_profile
# .bash_profile
# Get the aliases and functions
if [ -f ~/.bashrc ]; then
. ~/.bashrc
fi
# User specific environment and startup programs
PATH=$PATH:$HOME/bin:/usr/local/elk/node-v8.11.2-linux-x64/bin
export PATH
5) 执行如下命令使.bash_profile修改生效
$ source ~/.bash_profile
6) 测试nodejs是否安装成功
$ node -v
$ npm -v
7) 安装grunt
由于elasticsearch-head 插件的执行文件是由grunt 命令来执行的,所以这个命令必须安装。运行
- 安装grunt所需插件
$ npm install -g grunt-cli
$ npm install grunt-contrib-clean
$npm install grunt-contrib-concat
$ npm install grunt-contrib-watch
$ npm install grunt-contrib-connect
$ npm install grunt-contrib-copy
$ npm install grunt-contrib-jasmine
- 安装grunt
$ npm install grunt --save-dev
$ npm install
查看grunt是否安装成功
$ grunt -version
8) 进入elasticsearch-head安装包所在目录,解压安装文件
$ cd /usr/local/elk/
$ unzip elasticsearch-head-master.zip
9) 进入elasticsearch-head-master目录,修改Gruntfile.js文件
$ cd elasticsearch-head-master
$ vim Gruntfile.js
connect: {
server: {
options: {
port: 8100,
hostname: '*',
base: '.',
keepalive: true
}
}
}
10) 修改_site/app.js 文件,修改head的连接地址
$ cd elasticsearch-head-master
$ vim _site/app.js
app.App = ui.AbstractWidget.extend({
defaults: {
base_uri: null
},
init: function(parent) {
this._super();
this.prefs = services.Preferences.instance();
this.base_uri = this.config.base_uri || this.prefs.get("app-base_uri") ||
"http://192.168.19.138:8200";
if( this.base_uri.charAt( this.base_uri.length - 1 ) !== "/" ) {
// XHR request fails if the URL is not ending with a "/"
this.base_uri += "/";
}
.....
}
})
11) 启动elasticsearch-head插件:
$ grunt server &
6.5. kibana安装
1) 进入nodejs安装包所在目录,解压安装文件
$ cd /usr/local/elk/
$ tar -zxvf kibana-6.0.1-linux-x86_64.tar.gz
2) 进入kibana的config文件夹修改kibana.yml文件
$ cd /usr/local/elk/kibana-6.0.1-linux-x86_64/config
$ vi kibana.yml
# Kibana is served by a back end server. This setting specifies the port to use.
server.port: 8601
server.host: "192.168.19.138"
# to Kibana. This setting cannot end in a slash.
#server.basePath: ""
server.name: "your-hostname"
elasticsearch.url: "http://192.168.19.138:8200"
3) 启动kibana
$ nohup ./bin/kibana >>kibana.out &
