切面编程(二)
一、动态织入切面代码
AOP的核心在于“业务代码”与“切面代码”的分离,这样设计的好处是
(1)切面代码写一次即可
(2)开发者只需关注业务代码的实现,无需重复编写功能重复的切面代码
(3)运行时,执行业务代码时候动态织入切面代码
如何实现分离,在本节和下节(切面编程(三))中将详细介绍几种方式
二、代理工厂实现AOP
spring+jdk动态代理实现AOP详细样例实现
步骤1.编写切面代码,并将切面加入IOC容器
package com.jyk.spring.aop;

import org.springframework.stereotype.Component;

@Component //加入IOC容器
public class UserAop {

    public void begin()
    {
        System.out.println("开启事务");
    }

    public void commit()
    {
        System.out.println("结束事务");
    }
}
步骤2.编写业务接口和实现类,并将实现类加入IOC容器
package com.jyk.spring.aop;

public interface UserInterface {

    public void add();

    public void delete();
}
package com.jyk.spring.aop;

import javax.annotation.Resource;
import org.springframework.stereotype.Component;

@Component
public class UserImpl implements UserInterface{

    @Resource
    private UserAop ua;

    @Override
    public void add() {
        System.out.println("核心业务1");
    }

    @Override
    public void delete() {
        System.out.println("核心业务2");
    }
}
步骤3.编写代理工厂
package com.jyk.spring.aop;

import java.lang.reflect.InvocationHandler;
import java.lang.reflect.Method;
import java.lang.reflect.Proxy;

import org.springframework.stereotype.Component;

import com.jyk.spring.proxy.ProxyFactory;

public class UserProxyFactory {

    static Object target;
    static UserAop aop;

    //生成代理对象的方法
    public static Object getProxyInstance(Object mTarget,UserAop mUserAop)
    {

        target = mTarget;
        aop = mUserAop;

        return Proxy.newProxyInstance(
                target.getClass().getClassLoader(),
                target.getClass().getInterfaces(),
                new InvocationHandler() {

                    @Override
                    public Object invoke(Object proxy, Method method, Object[] args)
                            throws Throwable {
                        aop.begin();
                        Object returnObject = method.invoke(target, args);
                        aop.commit();
                        return returnObject;
                    }
                });
    }
}
步骤4.在spring配置文件中开启bean扫描,将配置加入IOC的容器的bean加入到容器中管理,同时将代理对象配置成bean。
     <!-- 开启注解扫描 -->
        <context:component-scan base-package="com.jyk.spring.aop"></context:component-scan>

        <!-- 调用工厂方法,返回UserDao代理后的对象 -->
        <bean id="userImplProxy" class="com.jyk.spring.aop.UserProxyFactory" factory-method="getProxyInstance">
            <constructor-arg index="0" ref="userImpl"></constructor-arg>
            <constructor-arg index="1" ref="userAop"></constructor-arg>
        </bean>
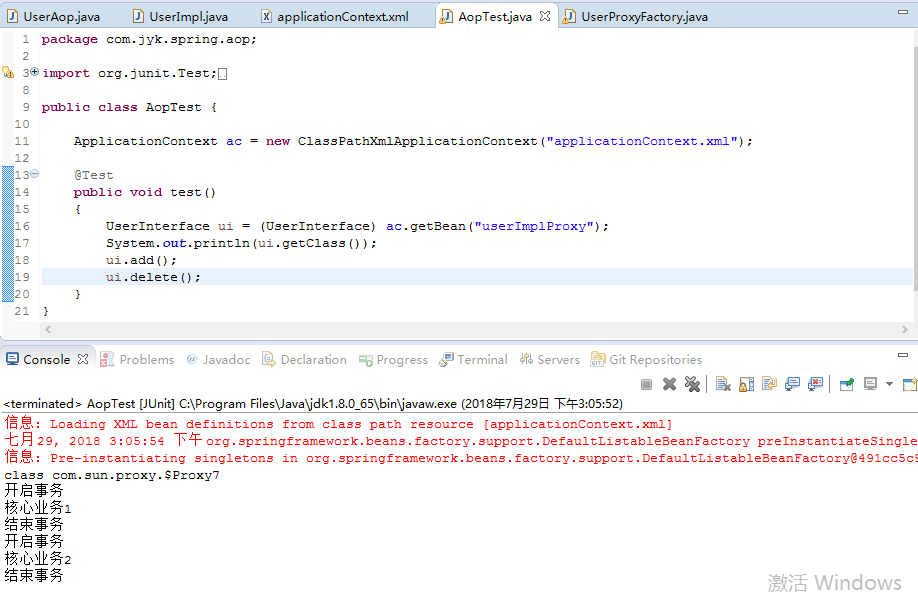
步骤5.启动测试,截图可见动态代理方式有效的对业务方法实现了拦截

三、注解实现AOP
spring提供了丰富的注解实现aop的功能,通过配置注解,即可实现切面及切入点,一定程度上节省了开发的工作量,提高了效率。
步骤1.引入aop相关jar包,核心jar包主要有spring-aop-x.x.x.RELEASE.jar,aopalliance.jar,aspectjweaver.jar和aspectjrt.jar,也可直接引入spring的核心jar包。
步骤2.在spring的配置文件中引入aop名称空间,并对业务实现类所在的包开启切面扫描注解。
<?xml version="1.0" encoding="UTF-8"?>
<!-- 名称空间 -->
<beans xmlns="http://www.springframework.org/schema/beans"
    xmlns:xsi="http://www.w3.org/2001/XMLSchema-instance"
    xmlns:aop="http://www.springframework.org/schema/aop"
    xmlns:p="http://www.springframework.org/schema/p"
    xmlns:context="http://www.springframework.org/schema/context"
    xsi:schemaLocation="
        http://www.springframework.org/schema/beans
        http://www.springframework.org/schema/beans/spring-beans.xsd
        http://www.springframework.org/schema/context
        http://www.springframework.org/schema/context/spring-context.xsd
        http://www.springframework.org/schema/aop
        http://www.springframework.org/schema/aop/spring-aop.xsd
        ">

        <!-- 开启aop注解方式 -->
        <aop:aspectj-autoproxy></aop:aspectj-autoproxy>

        <!-- 开启注解扫描 -->
        <context:component-scan base-package="com.jyk.spring.aop1"></context:component-scan>

</beans>
步骤3.相关注解解释及使用
@Aspect 指定一个类为切面类
@Pointcut("execution(* com.jyk.spring.aop1.*.*(..))") 指定切入点表达式
@Before("pointCut_()") 前置通知: 目标方法之前执行
@After("pointCut_()") 后置通知:目标方法之后执行(始终执行)
@AfterReturning("pointCut_()") 返回后通知: 执行方法结束前执行(异常不执行)
@AfterThrowing("pointCut_()") 异常通知: 出现异常时候执行
@Around("pointCut_()") 环绕通知: 环绕目标方法执行
步骤4.编写切面类并编写切入点 package com.jyk.spring.aop1;
import org.aspectj.lang.ProceedingJoinPoint;
import org.aspectj.lang.annotation.After;
import org.aspectj.lang.annotation.AfterReturning;
import org.aspectj.lang.annotation.AfterThrowing;
import org.aspectj.lang.annotation.Around;
import org.aspectj.lang.annotation.Aspect;
import org.aspectj.lang.annotation.Before;
import org.aspectj.lang.annotation.Pointcut;
import org.springframework.stereotype.Component;

@Component
@Aspect //指定当前类为切面类
public class UserAop {

    //指定切入点表达式,即拦截哪些方法
  //com.jyk.spring.aop1.*.*(..))即表示拦截该包下所有类的所有方法

    @Pointcut("execution(* com.jyk.spring.aop1.*.*(..))")
    public void testPT()
    {

    }

    //前置通知,执行目标方法前执行
    @Before("testPT()")
    public void begin()
    {
        System.out.println("开启事务");
    }

    //后置通知,执行目标方法后执行
    @After("testPT()")
    public void commit()
    {
        System.out.println("结束事务");
    }

    //返回后通知,目标方法调用结束后执行,出现异常不执行
    @AfterReturning("testPT()")
    public void afterRunning()
    {
        System.out.println("目标方法调用结束后执行");
    }

    //异常通知,目标方法调用发生异常时执行
    @AfterThrowing("testPT()")
    public void throwException()
    {
        System.out.println("执行目标方法出现了异常");
    }

    //环绕通知,环绕目标方法执行
    @Around("testPT()")
    public void arround(ProceedingJoinPoint pj)throws Throwable
    {
        System.out.println("环绕前");
        //执行目标方法
        pj.proceed();
        System.out.println("环绕后");
    }
}
步骤5.编写业务接口和具体实现,并将实现类加入到spring的IOC容器
package com.jyk.spring.aop1;

public interface UserInterface {

    public void add();

    public void delete();
}
package com.jyk.spring.aop1;

import javax.annotation.Resource;

import org.springframework.stereotype.Component;

@Component
public class UserImpl implements UserInterface{

    @Override
    public void add() {
        System.out.println("核心业务1");
    }

    @Override
    public void delete() {
        System.out.println("核心业务2");
    }
}
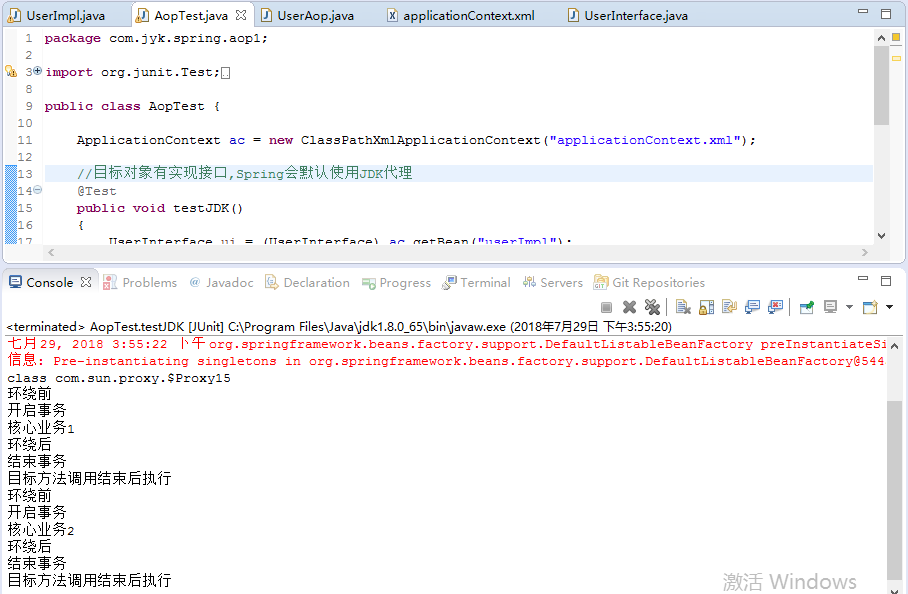
步骤6.验证切入点执行顺序,和执行结果
ApplicationContext ac = new ClassPathXmlApplicationContext("applicationContext.xml");

    //目标对象有实现接口,Spring会默认使用JDK代理
    @Test
    public void testJDK()
    {
        UserInterface ui = (UserInterface) ac.getBean("userImpl");
        System.out.println(ui.getClass());
        ui.add();
        ui.delete();
    }

由执行结果可知,Around前拦截先于Before前拦截,Around后拦截先于After后拦截,AfterReturning先于Around后拦截,慢于After后拦截。
其中,AfterThrowing只有在目标对象的目标方法出现异常时候才执行。
注:目标对象有实现接口,Spring会默认使用JDK代理,目标对象没有实现接口,Spring会默认使用cglib代理。


【推荐】国内首个AI IDE,深度理解中文开发场景,立即下载体验Trae
【推荐】编程新体验,更懂你的AI,立即体验豆包MarsCode编程助手
【推荐】抖音旗下AI助手豆包,你的智能百科全书,全免费不限次数
【推荐】轻量又高性能的 SSH 工具 IShell:AI 加持,快人一步
· 开发者必知的日志记录最佳实践
· SQL Server 2025 AI相关能力初探
· Linux系列:如何用 C#调用 C方法造成内存泄露
· AI与.NET技术实操系列(二):开始使用ML.NET
· 记一次.NET内存居高不下排查解决与启示
· 开源Multi-agent AI智能体框架aevatar.ai,欢迎大家贡献代码
· Manus重磅发布:全球首款通用AI代理技术深度解析与实战指南
· 被坑几百块钱后,我竟然真的恢复了删除的微信聊天记录!
· 没有Manus邀请码?试试免邀请码的MGX或者开源的OpenManus吧
· 园子的第一款AI主题卫衣上架——"HELLO! HOW CAN I ASSIST YOU TODAY
2017-07-29 学习Zookeeper需要了解的专业名词
2017-07-29 Zookeeper概述和基本概念