

Cesium渲染模块之FBO与RBO
 渲染是前端可视化的核心,本文描述Cesium渲染模块的FBO
1. 引言
Cesium是一款三维地球和地图可视化开源JavaScript库,使用WebGL来进行硬件加速图形,使用时不需要任何插件支持,基于Apache2.0许可的开源程序,可以免费用于商业和非商业用途
Cesium官网:Cesium: The Platform for 3D Geospatial
Cesium GitHub站点:CesiumGS/cesium: An open-source JavaScript library for world-class 3D globes and maps (github.com)
API文档:Index - Cesium Documentation
通过阅读源码,理清代码逻辑,有助于扩展与开发,笔者主要参考了以下两个系列的文章
渲染是前端可视化的核心,本文描述Cesium渲染模块的FBO
2. WebGL中的FBO
帧缓冲对象(Frame Buffer Object)是被推荐用于将数据渲染到纹理对象的扩展,FrameBuffer就像是一个webgl显示容器一样,平时使用gl.drawArrays或者gl.drawElements都是将对象绘制在了默认的窗口中,而当指定一个FrameBuffer为当前窗口时,用这两个方法去绘制,则会将对象绘制于指定的FrameBuffer中
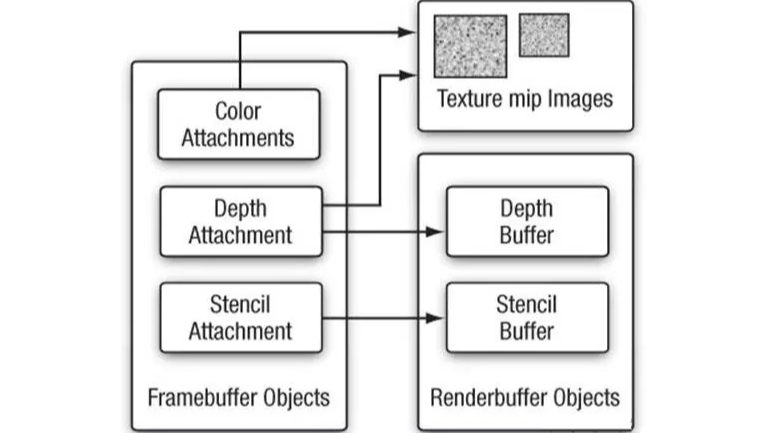
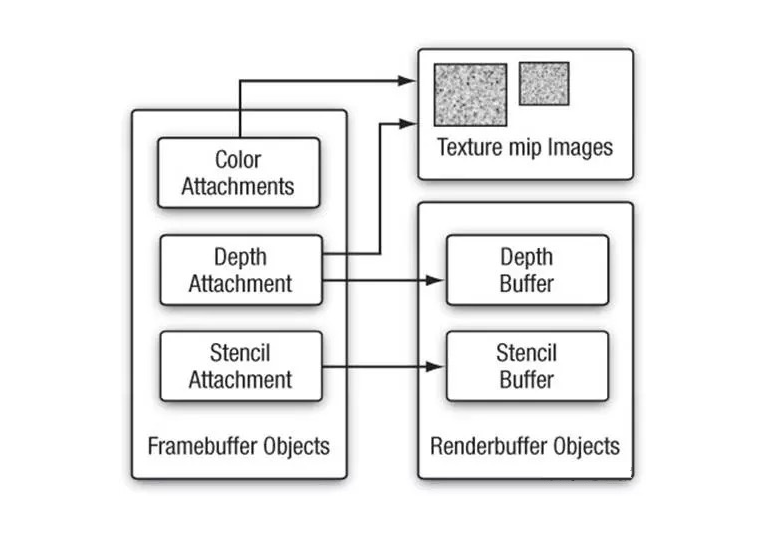
FBO可以理解为存放颜色对象、深度对象、模板对象的指针的容器,在FBO中可以存放纹理对象或者渲染缓冲区对象(RBO)的指针,如下图所示:
一份极简的包含FBO的WebGL绘制代码如下(完整代码见附录):
// 创建并绑定FBO const fbo = gl.createFramebuffer(); gl.bindFramebuffer(gl.FRAMEBUFFER, fbo); // 创建并绑定纹理对象 const texture = gl.createTexture(); gl.bindTexture(gl.TEXTURE_2D, texture); gl.texImage2D(gl.TEXTURE_2D, 0, gl.RGB, canvas.width, canvas.height, 0, gl.RGB, gl.UNSIGNED_BYTE, null); gl.framebufferTexture2D(gl.FRAMEBUFFER, gl.COLOR_ATTACHMENT0, gl.TEXTURE_2D, texture, 0); // 使用FBO进行绘制(并不直接显示) gl.useProgram(frameShaderProgram); gl.clearColor(0.2, 0.2, 0.2, 1.0); gl.clear(gl.COLOR_BUFFER_BIT); gl.drawArrays(gl.TRIANGLE_STRIP, 0, 4); // 解绑FBO gl.bindTexture(gl.TEXTURE_2D, null); gl.bindFramebuffer(gl.FRAMEBUFFER, null); // 在默认窗口绘制FBO的内容 gl.useProgram(shaderProgram); gl.bindTexture(gl.TEXTURE_2D, texture); gl.clearColor(0.2, 0.3, 0.3, 1.0); gl.clear(gl.COLOR_BUFFER_BIT); gl.drawArrays(gl.TRIANGLE_STRIP, 0, 4);
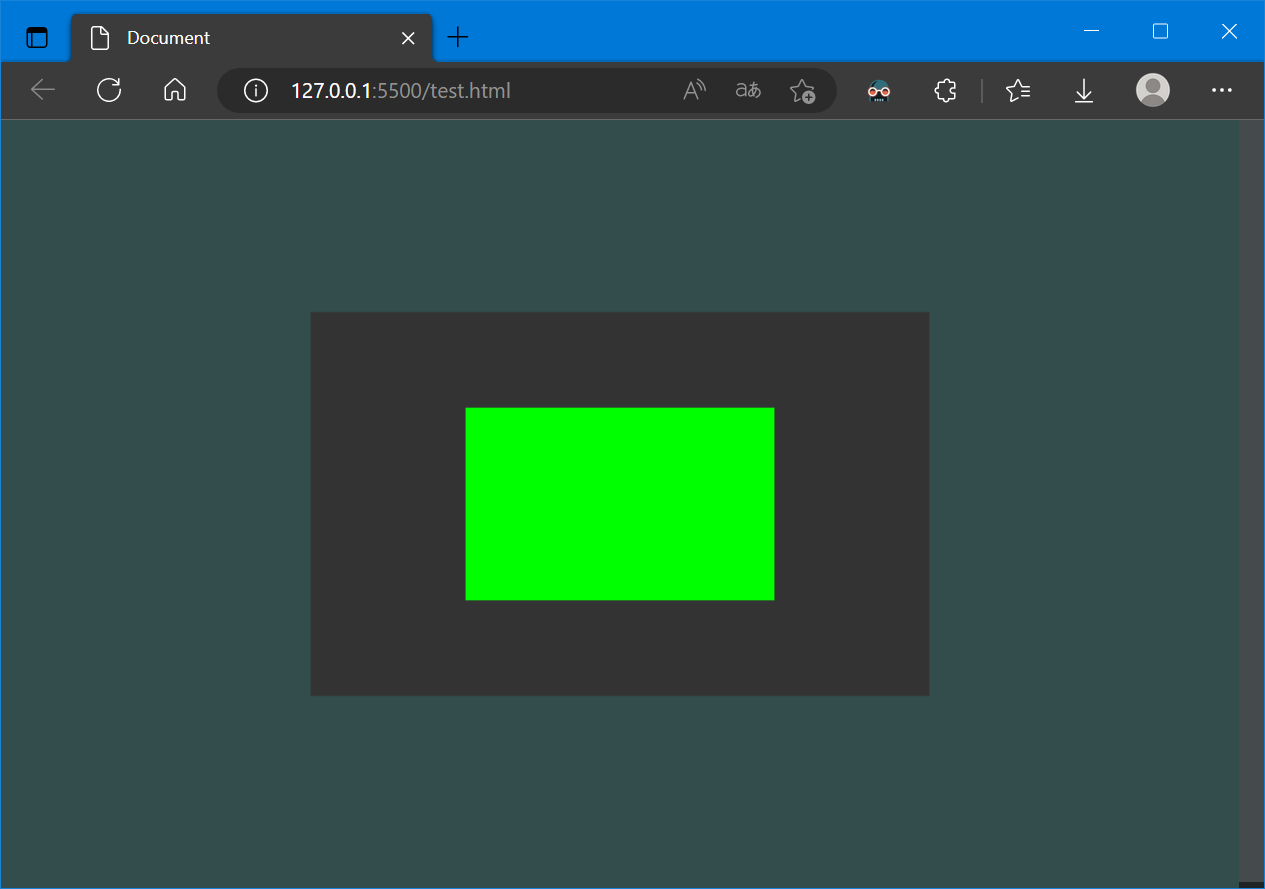
上图中,绿色矩形和黑色矩形为FBO绘制的内容,笔者将其作为纹理再次绘制显示出来
FBO的使用大致为以下流程:
- 创建并绑定FBO
gl.createFramebuffer()、gl.bindFramebuffer() - 创建并绑定纹理对象
gl.texImage2D()、gl.framebufferTexture2D() - 使用FBO进行绘制
gl.drawArrays() - 解绑FBO
gl.bindFramebuffer(gl.FRAMEBUFFER, null) - 绘制或使用FBO的对象
gl.bindTexture(gl.TEXTURE_2D, texture)
创建并绑定纹理对象时,和一般的创建纹理对象相比,这里的gl.texImage2D()并没有输入数据,除了可以使用gl.framebufferTexture2D()绑定纹理外,还可以使用gl.bindRenderbuffer()绑定渲染缓冲对象RBO,具体的参数可以参考:
- WebGLRenderingContext.bindRenderbuffer() - Web APIs | MDN (mozilla.org)
- WebGLRenderingContext.bindFramebuffer() - Web APIs | MDN (mozilla.org)
使用FBO绘制过后,数据保存在了FBO绑定的对象中(比如,纹理),再次使用这个对象就可以读取之前FBO绘制的结果(比如上述代码中再次使用纹理对象)
更为具体的流程与函数解释可以参考:帧缓冲 - LearnOpenGL CN (learnopengl-cn.github.io)
3. Cesium中的FBO
Cesium源码中,对FBO进行了一些封装:
function Framebuffer(options) { // ... this._bind(); if (defined(options.colorTextures)) { const textures = options.colorTextures; length = this._colorTextures.length = this._activeColorAttachments.length = textures.length; for (i = 0; i < length; ++i) { texture = textures[i]; attachmentEnum = this._gl.COLOR_ATTACHMENT0 + i; attachTexture(this, attachmentEnum, texture); this._activeColorAttachments[i] = attachmentEnum; this._colorTextures[i] = texture; } } if (defined(options.colorRenderbuffers)) { const renderbuffers = options.colorRenderbuffers; length = this._colorRenderbuffers.length = this._activeColorAttachments.length = renderbuffers.length; for (i = 0; i < length; ++i) { renderbuffer = renderbuffers[i]; attachmentEnum = this._gl.COLOR_ATTACHMENT0 + i; attachRenderbuffer(this, attachmentEnum, renderbuffer); this._activeColorAttachments[i] = attachmentEnum; this._colorRenderbuffers[i] = renderbuffer; } } // ... this._unBind(); }
创建一个FBO的示例代码:
// Create a framebuffer with color and depth texture attachments. const width = context.canvas.clientWidth; const height = context.canvas.clientHeight; const framebuffer = new Framebuffer({ context : context, colorTextures : [new Texture({ context : context, width : width, height : height, pixelFormat : PixelFormat.RGBA })], depthTexture : new Texture({ context : context, width : width, height : height, pixelFormat : PixelFormat.DEPTH_COMPONENT, pixelDatatype : PixelDatatype.UNSIGNED_SHORT }) });
Framebuffer类还封装了以下函数:
function attachTexture(framebuffer, attachment, texture) function attachRenderbuffer(framebuffer, attachment, renderbuffer) Framebuffer.prototype._bind = function () Framebuffer.prototype._unBind = function () Framebuffer.prototype.bindDraw = function () Framebuffer.prototype.bindRead = function () Framebuffer.prototype._getActiveColorAttachments = function () Framebuffer.prototype.getColorTexture = function (index) Framebuffer.prototype.getColorRenderbuffer = function (index) Framebuffer.prototype.destroy = function ()
另外,还有FramebufferManager,用来管理和创建Framebuffer:
FramebufferManager.prototype.update = function(context, width, height, numSamples, pixelDatatype, pixelFormat) FramebufferManager.prototype.getColorTexture = function (index) FramebufferManager.prototype.setColorTexture = function (texture, index) FramebufferManager.prototype.getColorRenderbuffer = function (index) FramebufferManager.prototype.setColorRenderbuffer = function (renderbuffer, index) // ...
在Cesium源码中,可以看到构建Framebuffer类主要是通过直接new Framebuffer(),例如ComputeEngine.js:
function createFramebuffer(context, outputTexture) { return new Framebuffer({ context: context, colorTextures: [outputTexture], destroyAttachments: false, }); }
4. Cesium中的RBO
渲染缓冲对象RBO(Renderbuffer Object)可用于存储颜色,深度或模板值,并可用作帧缓冲区对象中的颜色,深度或模板附件
和FBO相比,RBO是具有真正存储内容的缓冲区,由于渲染缓冲区对象是只写的,因此它们通常用作深度和模板附件,因为大多数时候并不需要读取它们的值,只关心深度和模板测试
由于RBO只写的特性,渲染缓冲区不能直接用作GL纹理
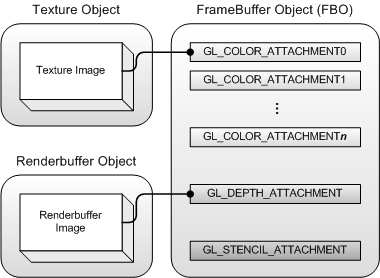
RBO、FBO、Texture通常一起使用进行离屏渲染(offscreen-rendering),关系图大致如下所示:
WebGL中,RBO的使用流程一般为:
// 1. 创建并绑定RBO const renderbuffer = gl.createRenderbuffer(); gl.bindRenderbuffer(gl.RENDERBUFFER, renderbuffer); // 2. 创建并初始化RBO数据存储 gl.renderbufferStorage(gl.RENDERBUFFER, gl.RGBA4, 256, 256); // 3. 将RBO与FBO绑定 gl.framebufferRenderbuffer(gl.FRAMEBUFFER, gl.COLOR_ATTACHMENT0, gl.RENDERBUFFER, renderbuffer);
Cesium源码中,对RBO进行了一些封装:
function Renderbuffer(options) { // ... gl.bindRenderbuffer(gl.RENDERBUFFER, this._renderbuffer); if (numSamples > 1) { gl.renderbufferStorageMultisample(gl.RENDERBUFFER, numSamples, format, width, height); } else { gl.renderbufferStorage(gl.RENDERBUFFER, format, width, height); } gl.bindRenderbuffer(gl.RENDERBUFFER, null); }
5. 参考资料
[1] WebGLFramebuffer - Web APIs | MDN (mozilla.org)
[2] 帧缓冲 - LearnOpenGL CN (learnopengl-cn.github.io)
[3] Cesium原理篇:6 Render模块(4: FBO) - fu*k - 博客园 (cnblogs.com)
[4] WebGL中图片多级处理(FrameBuffer) - 纸异兽 - 博客园 (cnblogs.com)
[5] CesiumJS 2022^ 源码解读 5 - 着色器相关的封装设计 - 岭南灯火 - 博客园 (cnblogs.com)
[6] Renderbuffer Object - OpenGL Wiki (khronos.org)
[7] OpenGL FrameBuffer Objects,RenderBuffer Objects and Textures - (caolongs.github.io)
[8] WebGLRenderbuffer - Web API 接口参考 | MDN (mozilla.org)
[9] WebGL— FrameBuffer,RenderBuffer,Texture区别_webglframebuffer 是什么_weixin_43787178的博客-CSDN博客
6. 附录
包含FBO的WebGL绘制代码:
<canvas id="canvas"></canvas> <script> const vertexSource = ` attribute vec3 aPos; attribute vec2 aTextureCoord; varying highp vec2 vTextureCoord; void main() { gl_Position = vec4(aPos.x, aPos.y, aPos.z, 1.0); vTextureCoord = aTextureCoord; } ` const fragmentSource = ` varying highp vec2 vTextureCoord; uniform sampler2D uSampler; void main() { gl_FragColor = texture2D(uSampler, vTextureCoord); } ` const frameFragmentSource = ` void main() { gl_FragColor = vec4(0.0, 1.0, 0.0, 1.0); } ` const canvas = document.getElementById('canvas'); canvas.width = canvas.clientWidth; canvas.height = canvas.clientHeight; const gl = canvas.getContext('webgl2'); const vertices = new Float32Array([ 0.5, -0.5, 0.0, -0.5, -0.5, 0.0, 0.5, 0.5, 0.0, -0.5, 0.5, 0.0, ]); const vbo = gl.createBuffer(); gl.bindBuffer(gl.ARRAY_BUFFER, vbo); gl.bufferData(gl.ARRAY_BUFFER, vertices, gl.STATIC_DRAW); const vao = gl.createVertexArray(); gl.bindVertexArray(vao); gl.vertexAttribPointer(0, 3, gl.FLOAT, false, 0, 0); gl.enableVertexAttribArray(0) const vertexShader = gl.createShader(gl.VERTEX_SHADER); gl.shaderSource(vertexShader, vertexSource); gl.compileShader(vertexShader); const fragmentShader = gl.createShader(gl.FRAGMENT_SHADER); gl.shaderSource(fragmentShader, fragmentSource); gl.compileShader(fragmentShader); const frameFragmentShader = gl.createShader(gl.FRAGMENT_SHADER); gl.shaderSource(frameFragmentShader, frameFragmentSource); gl.compileShader(frameFragmentShader); const shaderProgram = gl.createProgram(); gl.attachShader(shaderProgram, vertexShader); gl.attachShader(shaderProgram, fragmentShader); gl.linkProgram(shaderProgram); const frameShaderProgram = gl.createProgram(); gl.attachShader(frameShaderProgram, vertexShader); gl.attachShader(frameShaderProgram, frameFragmentShader); gl.linkProgram(frameShaderProgram); // 加载纹理坐标到GPU const textureCoordinates = new Float32Array([ 1.0, 0.0, 0.0, 0.0, 1.0, 1.0, 0.0, 1.0, ]); const textureCoordinatesBuffer = gl.createBuffer(); gl.bindBuffer(gl.ARRAY_BUFFER, textureCoordinatesBuffer); gl.bufferData(gl.ARRAY_BUFFER, textureCoordinates, gl.STATIC_DRAW); // 设置纹理坐标属性 textureCoordAttribute = gl.getAttribLocation(shaderProgram, "aTextureCoord"); gl.enableVertexAttribArray(textureCoordAttribute); gl.vertexAttribPointer(textureCoordAttribute, 2, gl.FLOAT, false, 0, 0); // 创建并绑定FBO const fbo = gl.createFramebuffer(); gl.bindFramebuffer(gl.FRAMEBUFFER, fbo); // 创建并绑定纹理对象 const texture = gl.createTexture(); gl.bindTexture(gl.TEXTURE_2D, texture); gl.texImage2D(gl.TEXTURE_2D, 0, gl.RGB, canvas.width, canvas.height, 0, gl.RGB, gl.UNSIGNED_BYTE, null); gl.framebufferTexture2D(gl.FRAMEBUFFER, gl.COLOR_ATTACHMENT0, gl.TEXTURE_2D, texture, 0); // 使用FBO进行绘制(并不直接显示) gl.useProgram(frameShaderProgram); gl.clearColor(0.2, 0.2, 0.2, 1.0); gl.clear(gl.COLOR_BUFFER_BIT); gl.drawArrays(gl.TRIANGLE_STRIP, 0, 4); // 解绑FBO gl.bindTexture(gl.TEXTURE_2D, null); gl.bindFramebuffer(gl.FRAMEBUFFER, null); // 在默认窗口绘制FBO的内容 gl.useProgram(shaderProgram); gl.bindTexture(gl.TEXTURE_2D, texture); gl.clearColor(0.2, 0.3, 0.3, 1.0); gl.clear(gl.COLOR_BUFFER_BIT); gl.drawArrays(gl.TRIANGLE_STRIP, 0, 4); </script>


【推荐】国内首个AI IDE,深度理解中文开发场景,立即下载体验Trae
【推荐】编程新体验,更懂你的AI,立即体验豆包MarsCode编程助手
【推荐】抖音旗下AI助手豆包,你的智能百科全书,全免费不限次数
【推荐】轻量又高性能的 SSH 工具 IShell:AI 加持,快人一步
· 无需6万激活码!GitHub神秘组织3小时极速复刻Manus,手把手教你使用OpenManus搭建本
· C#/.NET/.NET Core优秀项目和框架2025年2月简报
· 一文读懂知识蒸馏
· Manus爆火,是硬核还是营销?
· 终于写完轮子一部分:tcp代理 了,记录一下
2022-03-13 Java对象布局