新增题目功能模块总结
前言:这个新增题目,不是想象中的那么简单。它复杂就复杂在它是动态的,有四种类型的题目,选择、判断、填空、问答。
每一种题目,都要分别去处理。而添加题目是一个整体,也就是把这四种题型整合到了一起。

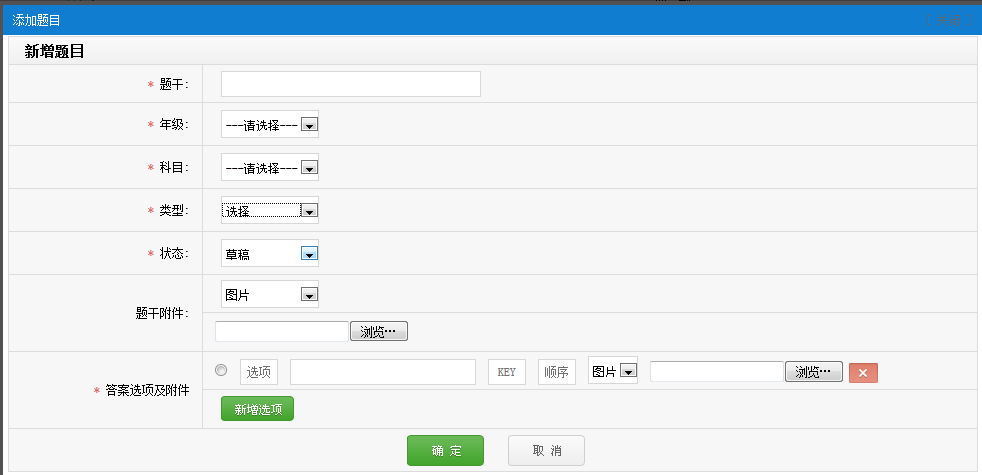
如上图所示,这是个基本页面。静态页面。
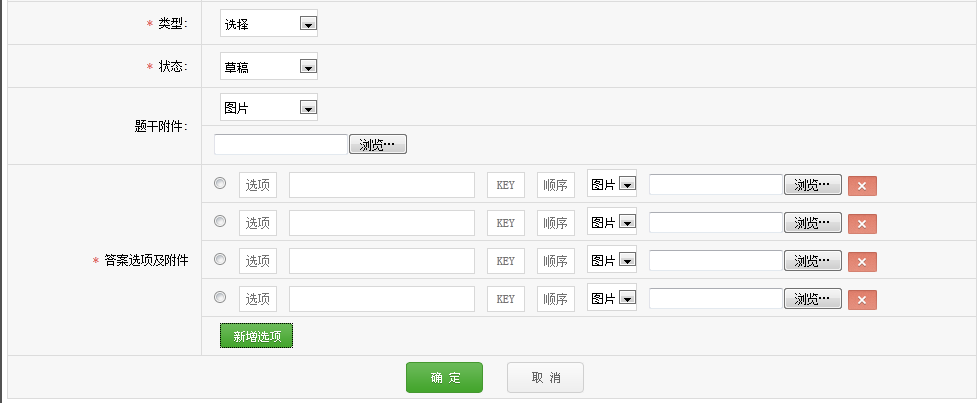
要让它实现几个效果,其一就是选择题型有变化时,答案选项及附件会相应的变化。如下图所示,选择判断题时,会变成判断题的效果。

选择选择题时会成选择题的效果。

这主要是靠jQuery来实现的,实现这个效果还是比较容易的。
代码如下:
//类型变动
        $("#type").change(function(){
            var type = $(this).val();
            if(type!=""){
                if(type == 1){
                    $("#choice_answer").removeAttr("hidden");
                    $("#answer").attr("hidden","hidden").removeClass('required');
                    $(".error[for=answer]").remove();
                    $("#judge_answer").attr("hidden","hidden");
                }else if(type == 2 ){
                    $("#judge_answer").removeAttr("hidden");
                    $("#choice_answer").attr("hidden","hidden");
                    $("#answer").attr("hidden","hidden").removeClass('required');
                    $(".error[for=answer]").remove();
                }else if(type == 3 || type ==4){
                    $("#answer").removeAttr("hidden").addClass('required');
                    $("#choice_answer").attr("hidden","hidden");
                    $("#judge_answer").attr("hidden","hidden");
                }
            }else{
                $("#answer").removeAttr("hidden").addClass('required');
                $("#choice_answer").attr("hidden","hidden");
                $("#judge_answer").attr("hidden","hidden");
            }
        });
主要是控制hidden属性,选择其中之一时,另外的隐藏掉。根据获取的type进行判断。1的时候是选择题,2的时候是判断题,3、4的时候是填空和简答。
这其中选择题的添加是最为复杂的,我的思路就是先实现,判断、填空和简答题的添加工作。对数据进行验证,包括不能为空,验证之后,获取需要的数据,添加到数据库中。
上传题目的时候,还有附件,附件要进行类型验证。有图片类型的、声音类型的、视频类型的三种,都要进行验证工作。
代码如下:
//进行上传验证
                var flag = true;
                var qfiles = $("#qfiles").val();
                if(qfiles!=""){
                    //验证
                    var mainAttachType = $("#mainAttachType").val();
                    var extension = getExtension(qfiles).toLowerCase();//获取后缀名并转化为小写

                    if(!rgExpType(extension,mainAttachType)){
                        $("#qfiles").siblings(".error").html("<font color='#E15B50'>文件类型不匹配</font>");
                        flag = false;
                    }else{
                        $("#qfiles").siblings(".error").html("");
                    }
                }
function rgExpType(extension,type){
            if(type == 1){
                //图片
                var rgExp = /^jpg|png|jpeg|gif$/;
            }else if(type == 2){
                //音频
                var rgExp = /^mp3|wav|midi|wma$/;
            }else if(type == 3){
                //视频
                var rgExp = /^mp4|rm|rmvb|3gp|avi|mov|flv$/;
            }
            if(!rgExp.exec(extension)){
                return false;
            }else{
                return true;
            }
        }

        function getExtension(str){
            var pos = str.lastIndexOf(".");
            var res = str.substring(pos+1);
            return res;
        }
这段代码的思路就是,获取上传文件的后缀名,同时获取到其类型。与相应的类型进行比较。符合的就上传,不符合的就提示错误。这里比较好的处理就是,把具有一定功能的代码,提取到方法中,这样可以多次使用。比如上面的获取后缀名和验证类型。
接下来的效果,就是选择题选项的灵活添加与删除。

点击新增选项,可以添加任意多的选项。点击后面的删除可以删掉当前选项。
代码如下:
//新增选项
        $(".xz_xx").click(function(){
             choice_tr.clone(true).insertBefore("#choice_xz");//克隆,包括事件也克隆
        });

        //删除选项
        $(".del").click(function(){
            if($(this).siblings("[name*=qsubid]").val()!=''){
                //ajax删除
                if(confirm("确定删除此选项?")){
                    var questionssubid = $(this).siblings("[name*=qsubid]").val();
                    $.ajax({
                        type:"POST",
                        url:"/questions/teacher/ajax/do/delquestionsub",
                        data:"questionssubid="+questionssubid,
                        success:function(response){
                            //alert(response);
                        }
                    });
                    //remove()方法删除节点
                    $(this).parent().parent().remove();
                }
            }else{
                //remove()方法删除节点
                $(this).parent().parent().remove();
            }
        });
//预存一个tr
        var choice_tr = $("#choice_tr").clone(true);//放在最后就包含了所有的事件了,放在开头没有加载相应的事件
        choice_tr.find("[name*=label]").val('选项');
        choice_tr.find("[name*=subcontent]").val('');
        choice_tr.find("[name*=key]").val('KEY');
        choice_tr.find("[name*=ord]").val('顺序');
        choice_tr.find("[name*=qsubid]").val('');
        choice_tr.find("[name*=subfiles]").next().html('  ');
这个choice_tr是一个克隆、要写在最后。在页面加载时,才能把选项加载进去,克隆#choice_tr的事件。克隆完之后,要进行一定的处理工作,修改一些错误的克隆信息。
新增时,就把克隆的对象,加入到页面中即可choice_tr.clone(true).insertBefore("#choice_xz");//克隆,包括事件也克隆
删除就把当前的节点删除即可。
注:用jQuery,一定要了解它的节点思想。一切元素皆节点也。
效果,实现的差不多了,要实现功能了。
无非就是获取数据,获取有效地数据,并且能够灵活地处理这些数据,把它们正确的添加到数据库中。
这里比较难的就是,获取选择题选项的数据,因为它是批量的,获取时要用数组来传递数据。
<tr height="38" id="choice_tr" >
<td >
<input type="radio" name="choice" class="radio" value=""/>
<input type="hidden" name="qsubid[]" value="">
<input type="text" name="label[]" class="option input_text36 grey label choice_click notnull" value="选项" />
<input type="text" name="subcontent[]" class="input_text258 subcontent notnull" style="width:180px;" />
<input type="text" name="key[]" class="input_text36 grey key choice_click notnull" value="KEY" />
<input type="text" name="ord[]" class="input_text36 grey ord choice_click notnull" value="顺序" />
<select name="subAttachType[]" id="subAttachType" class="select_text subAttachType" style="width:50px;">
<!--{html_options options=$aAttachType selected=""|default:'0'}-->
</select>
<input type="hidden" name="file_true[]" class="file_true" value="">
<input name="subfiles[]" type="file" value="图片上传" class="subfile" style="width:181px;" />
<img src="http://images.cnblogs.com/teacher/delete_2.gif" class="img_va del"/>
</td>
</tr>
如上面代码所示,命名都加上[],表示传递的是数组数据。传到后台的效果为:
Array
(
    [content] => 123
    [grade] => 1
    [lesson_id] => 1
    [type] => 1
    [status] => 1
    [mainAttachType] => 1
    [answer] =>
    [judge_answer] => 1
    [radio_select] => 1
    [label] => Array
        (
            [0] => A
            [1] => B
            [2] => C
        )

    [subcontent] => Array
        (
            [0] => 123
            [1] => 123
            [2] => 123
        )

    [key] => Array
        (
            [0] => 1
            [1] => 2
            [2] => 3
        )

    [ord] => Array
        (
            [0] => 1
            [1] => 2
            [2] => 3
        )

    [subAttachType] => Array
        (
            [0] => 1
            [1] => 1
            [2] => 1
        )

    [file_true] => Array
        (
            [0] => false
            [1] => true
            [2] => false
        )

    [choice] =>
)
Array
(
    [files] => Array
        (
            [name] => Array
                (
                    [0] =>
                )

            [type] => Array
                (
                    [0] =>
                )

            [tmp_name] => Array
                (
                    [0] =>
                )

            [error] => Array
                (
                    [0] => 4
                )

            [size] => Array
                (
                    [0] => 0
                )

        )

    [subfiles] => Array
        (
            [name] => Array
                (
                    [0] =>
                    [1] => 10.png
                    [2] =>
                )

            [type] => Array
                (
                    [0] =>
                    [1] => image/png
                    [2] =>
                )

            [tmp_name] => Array
                (
                    [0] =>
                    [1] => D:\xampp\tmp\phpC77E.tmp
                    [2] =>
                )

            [error] => Array
                (
                    [0] => 4
                    [1] => 0
                    [2] => 4
                )

            [size] => Array
                (
                    [0] => 0
                    [1] => 52128
                    [2] => 0
                )

        )

)
注:表单提交时,有name名称的,后天才能够接收到。加上[] 表示传递的内容为数组。
这些数据一一对应,分别对应选择题选项中的A、B、C等选项。
这样就能很好的处理相应的数据了,用foreach方法遍历即可。
其中,有一个比较难处理的就是,就是题目有附件、选择题也有附件信息。这两个附件信息,如何区分并且上传到服务器呢?
就是分别命名,题目附件命名为
<input name="files[]" id="qfiles" type="file" value="图片上传" class="file" />
选择题附件命名为
<input name="subfiles[]" type="file" value="图片上传" class="subfile" style="width:181px;" />
这样,在后台可以对它们进行分别处理。可以窥探一下后台的文件上传代码
$src = $this->uploadFiles('/upload/questions');
                            $aQattachMent = array();
                            $aQattachMent['type'] = $this->_request->getParam('mainAttachType');
                            if($aQattachMent['type']==1){//上传为图片
                                $aImgInfo = getimagesize("../webroot" . $src[0]['src']);
                                $width = $aImgInfo[0];
                                $height = $aImgInfo[1];
                                $aQattachMent["width"] = $width;
                                $aQattachMent["height"] = $height;
                            }
                            isset($src[0]['src']) && $src[0]['src'] ? $aQattachMent['url'] = $this->concaturl($src[0]['src']) : null;
这是文件上传部分代码,主要是调用uploadFiles方法。此方法本来只有一个参数,就是文件上传的路径。默认的文件名为files,也就是只能处理题目附件的上传信息。
我将它重写了一下,加了一个参数,也就是文件名,这样它就可以灵活的处理更多的内容了。
方法具体代码如下:
/**
     * 上传图片至服务器 ...
     * @param $_FILES[''] 需要curl请求
     * @author ddp
     */
     protected function uploadFiles($imgpath,$filesname="files") {
        if (!isset($_FILES) || $_FILES == null) {//如果没有图片上传则返回false
            return false;
        }
        $time = time();
        $patharray = explode('/', substr($imgpath, 1));
        //print_r($patharray);exit;
        //如果不存在文件夹则创建
        $base_path = STORE_PATH;
        foreach ($patharray as $items) {
            $base_path .= '/' . $items; //echo $base_path.'<br><br>';
            if (!file_exists($base_path)) {
                mkdir($base_path, 0777);
            }
        }
        //exit;
        $pic_count = count($_FILES[$filesname]['name']);
        for ($i = 0; $i < $pic_count; $i++) {
            $fileName = $_FILES[$filesname]['name'][$i]; //名称
            $extname = substr($fileName, strrpos($fileName, '.')); //后缀名
            $tmpName = $_FILES[$filesname]['tmp_name'][$i]; //临时名称(系统定)
            $savePath = $base_path . '/' . $time . '-' . rand(1000, 9999) . $extname; //保存的路径

            if (move_uploaded_file($tmpName, $savePath)) {//如果上传成功 则返回图片地址
                $return[$i]['src'] = str_replace(STORE_PATH, '', $savePath);
                $return[$i]['size'] = $_FILES[$filesname]['size'][$i];
            } else {//否则返回失败信息
                $return[$i]['src'] = '';
                $return[$i]['size'] = '';
            }
        }
        return $return;
    }
第二个参数filesname是我加上去的,默认为files。想处理其他name的文件上传时,添加一个参数即可。
$src = $this->uploadFiles('/upload/questionssub','subfiles');
                                $aLabel = $this->_request->getParam('label');
                                $aSubcontent = $this->_request->getParam('subcontent');
                                $aKey = $this->_request->getParam('key');
                                $aOrd = $this->_request->getParam('ord');
                                $aFileTrue = $this->_request->getParam('file_true');
                                $aSubAttachType = $this->_request->getParam('subAttachType');
                                $aQuestionssub = array();
                                foreach($aLabel as $k=>$v){
                                    $aQuestionssub[$k]['label'] = $aLabel[$k];
                                    $aQuestionssub[$k]['content'] = $aSubcontent[$k];
                                    $aQuestionssub[$k]['key'] = $aKey[$k];
                                    $aQuestionssub[$k]['ord'] = $aOrd[$k];
                                    if($aFileTrue[$k] == 'true'){
                                        $aQuestionssub[$k]['is_attachment'] = 1;
                                    }else{
                                        $aQuestionssub[$k]['is_attachment'] = 2;
                                    }
                                    $aQuestionssub[$k]['questions_id'] = $questionId;
                                    //添加选项
                                    $newSubId = $this->dao_questions->addQuestionsSub($aQuestionssub[$k]);//逐条插入
                                    //上传选择题选项附件
                                    if($aFileTrue[$k]=="true"){//此选项有附件
                                        $aQuestionssubAttach = array();
                                        $aQuestionssubAttach['questionssub_id'] = $newSubId;
                                        $aQuestionssubAttach['type'] = $aSubAttachType[$k];
                                        if($aQuestionssubAttach['type']==1){
                                            $aImgInfo = getimagesize("../webroot" . $src[$k]['src']);
                                            $width = $aImgInfo[0];
                                            $height = $aImgInfo[1];
                                            $aQuestionssubAttach["width"] = $width;
                                            $aQuestionssubAttach["height"] = $height;
                                        }
                                        isset($src[$k]['src']) && $src[$k]['src'] ? $aQuestionssubAttach['url'] = $this->concaturl($src[$k]['src']) : null;
                                        $this->dao_questions->addSAttachment($aQuestionssubAttach);
                                    }
如上所示为子选项附件添加。$src = $this->uploadFiles('/upload/questionssub','subfiles');核心代码就是这一句。
上传后,获取相应的值,添加到数据库即可。
至此,题目添加的工作基本完成。难点也一一攻破。


