
RabbitMQ
一、什么是 RabbitMQ
RabbitMQ是一个开源的遵循AMQP协议实现的基于Erlang语言编写,支持多种客户端(语言)。用于在分布式系统中存储消息,转发消息,具有高可用,高可扩性,易用性等特征的中间件。
二、RabbitMQ 相关概念
1、RabbitMQ 核心概念
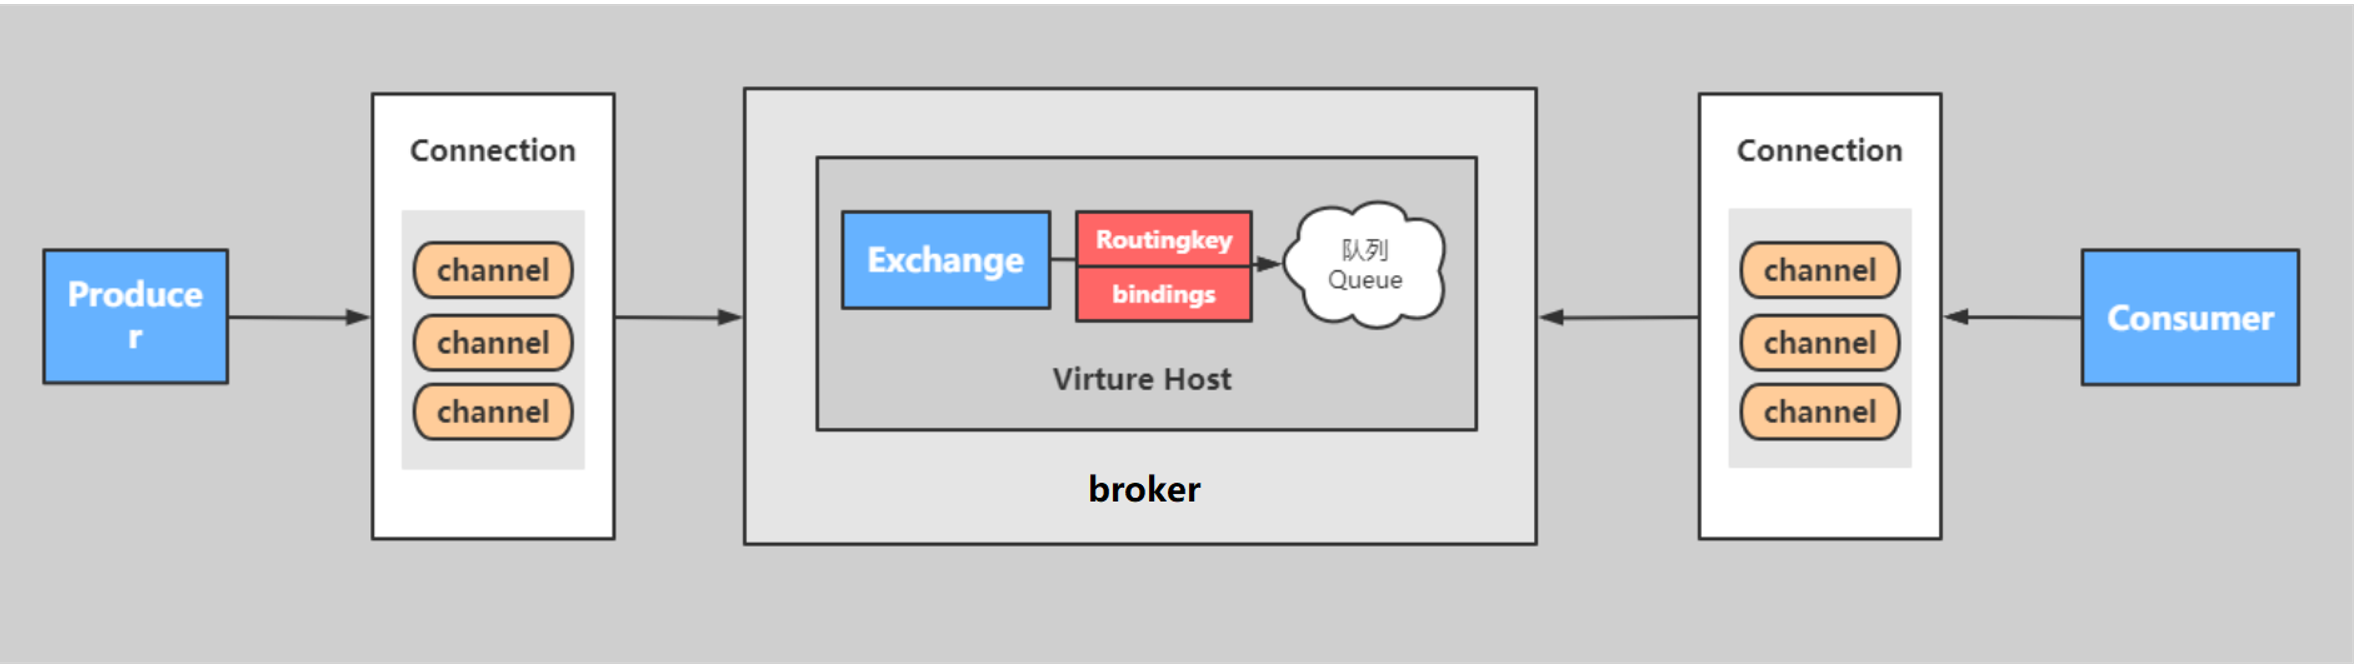
- Server:又称Broker ,接受客户端的连接,实现AMQP实体服务。 安装rabbitmq-server
- Connection:连接,应用程序与Broker的网络连接 TCP/IP/ 三次握手和四次挥手
- Channel:网络信道,几乎所有的操作都在Channel中进行,Channel是进行消息读写的通道,客户端可以建立对各Channel,每个Channel代表一个会话任务。
- Message :消息,服务与应用程序之间传送的数据,由Properties和body组成,Properties可是对消息进行修饰,比如消息的优先级,延迟等高级特性,Body则就是消息体的内容。
- Virtual Host 虚拟地址,用于进行逻辑隔离,最上层的消息路由,一个虚拟主机里可以有若干个Exhange和- Queueu,同一个虚拟主机里面不能有相同名字的Exchange
- Exchange:交换机,接受消息,根据路由键发送消息到绑定的队列。(不具备消息存储的能力)
- Bindings:Exchange和Queue之间的虚拟连接,binding中可以保存多个routing key.
- Routing key:是一个路由规则,虚拟机可以用它来确定如何路由一个特定消息。
- Queue:队列:也成为Message Queue,消息队列,保存消息并将它们转发给消费者。
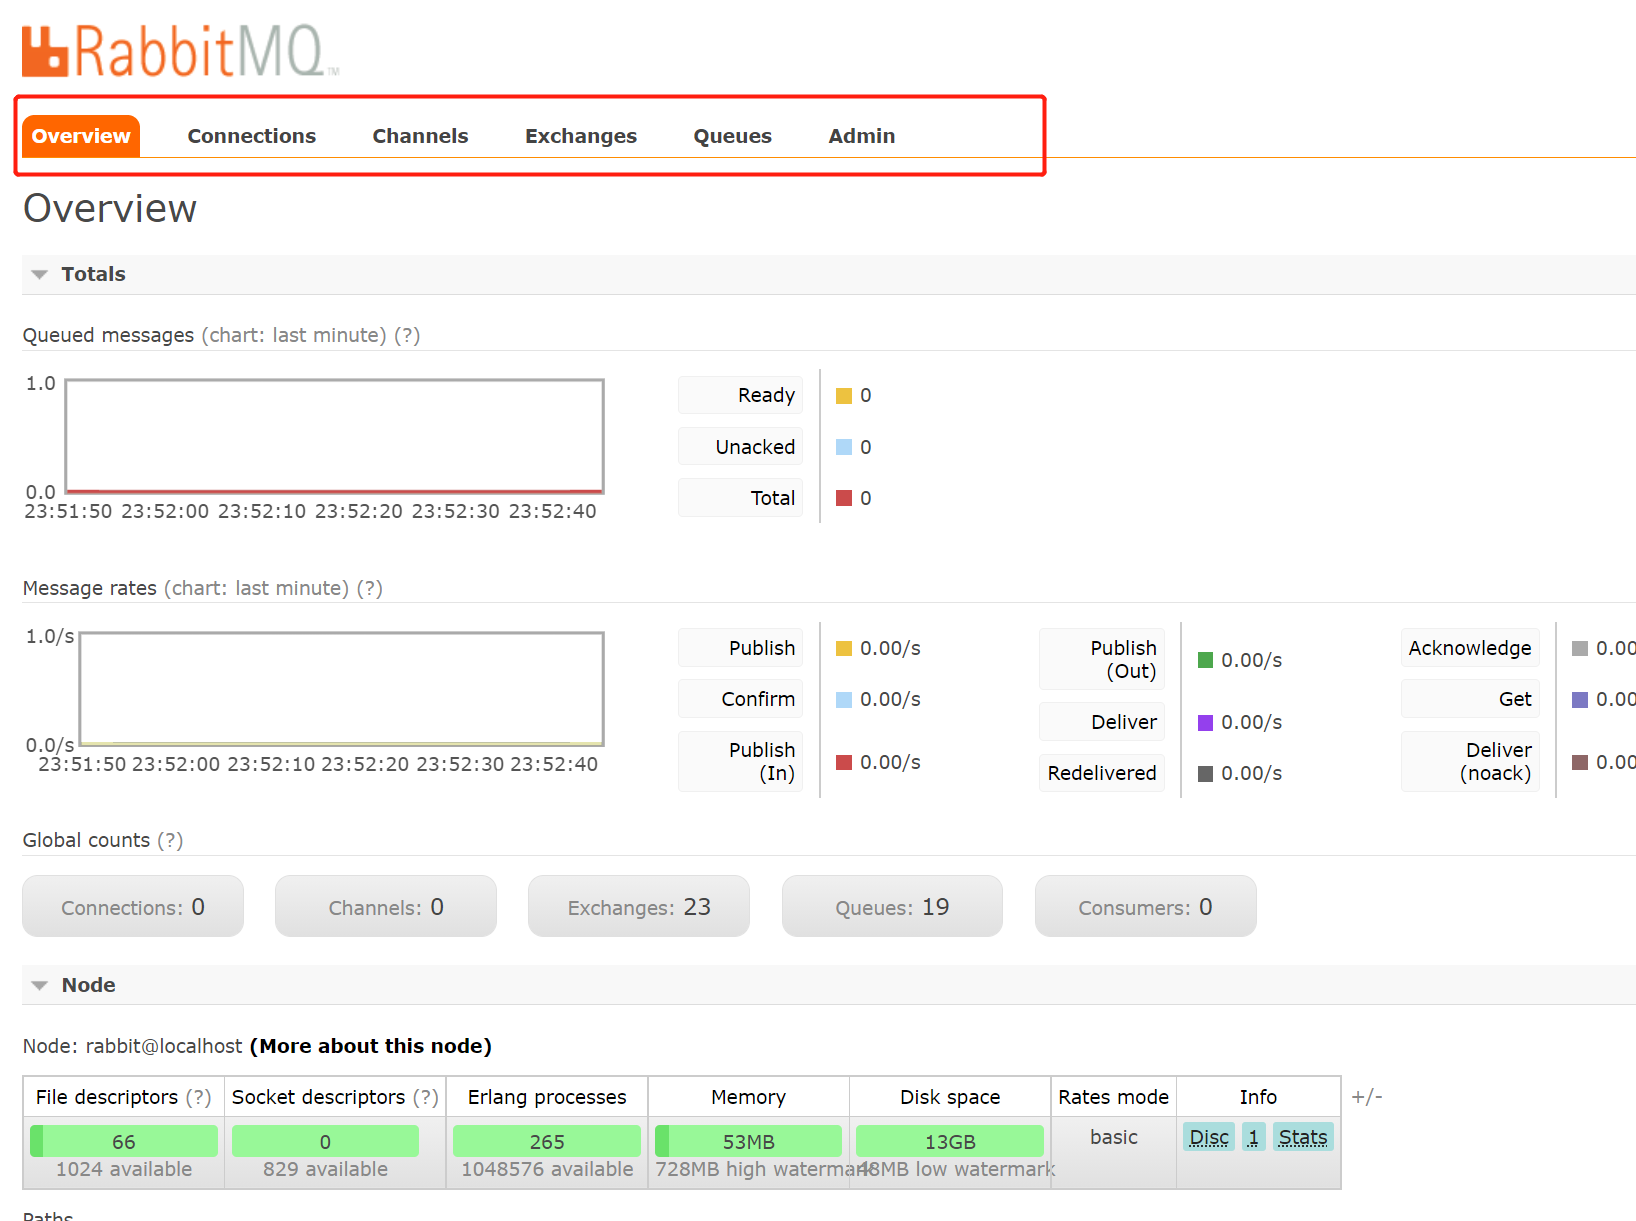
RabbitMQ 的管理界面中就可以看到这些相关的概念:
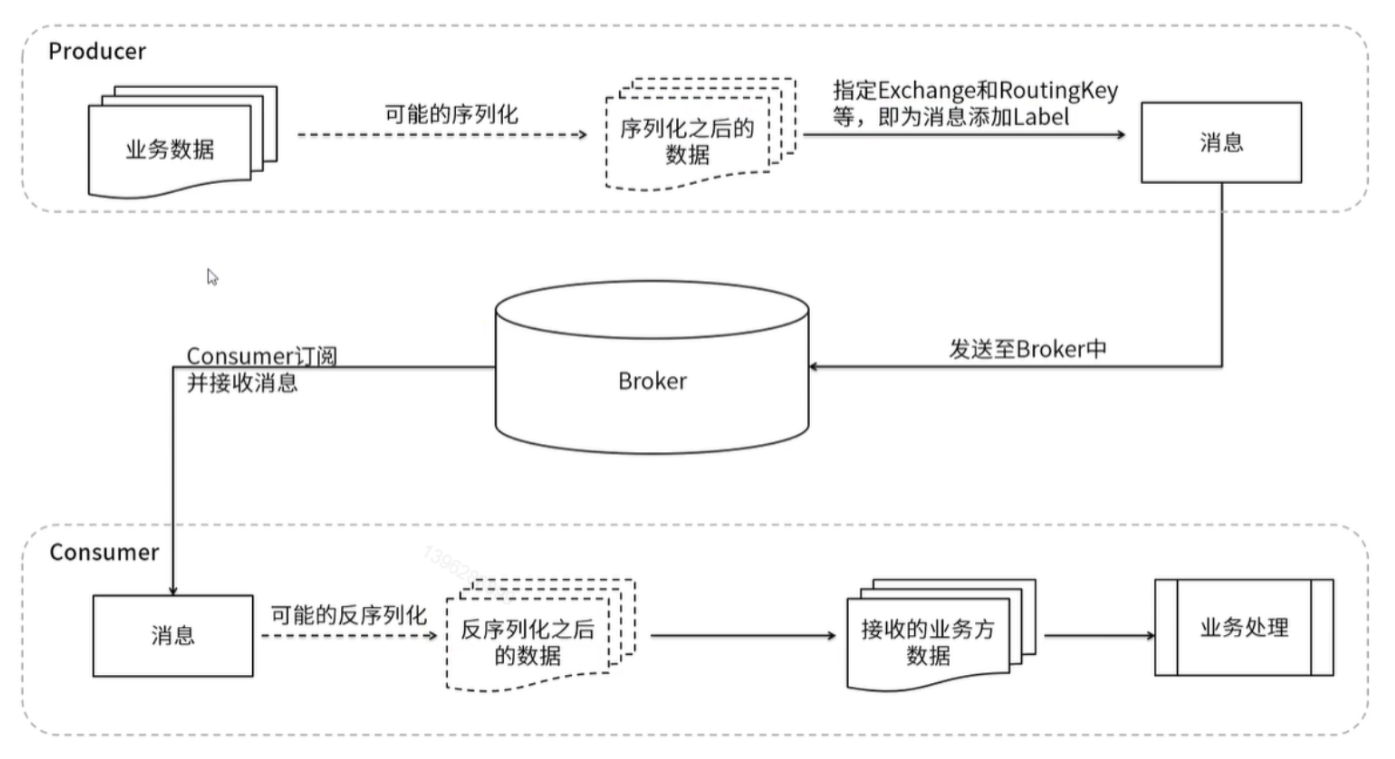
2、RabbitMQ 运行流程
3、RabbitMQ 支持消息的模式
参考官网:https://www.rabbitmq.com/getstarted.html
-
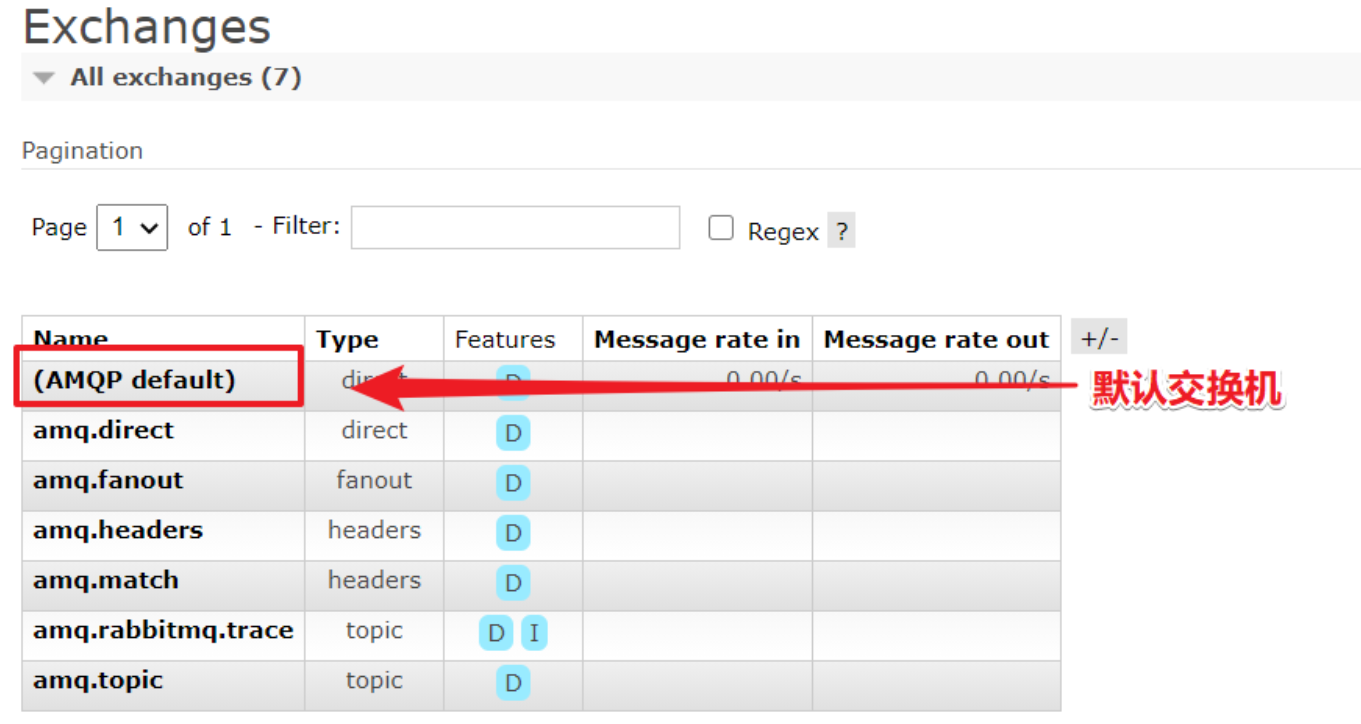
简单模式 Simple:不指定交换机,会使用默认交换机
-
工作模式 Work
类型:无 ;特点:分发机制 -
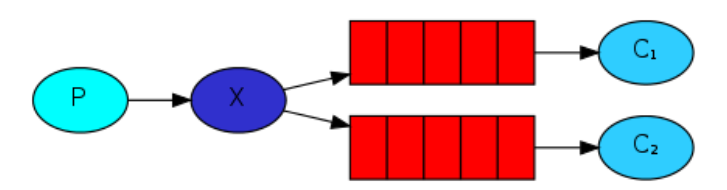
发布订阅模式
类型:fanout;特点:Fanout—发布与订阅模式,是一种广播机制,它是没有路由key的模式。 -
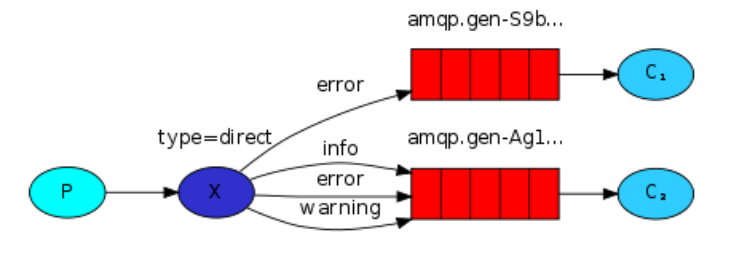
路由模式
类型:direct;特点:有routing-key的匹配模式 -
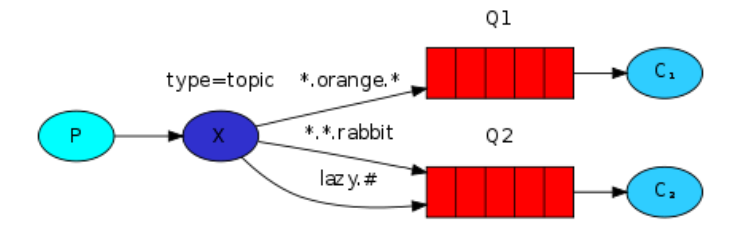
主题Topic模式
类型:topic;特点:模糊的routing-key的匹配模式 -
参数模式
类型:headers;特点:参数匹配模式
4、RabbitMQ 使用场景
解耦:RabbitMQ可以实现不同应用之间的解耦,应用之间不直接进行通信,而是通过MQ来建立桥接。
削峰:以秒杀场景为例,会瞬时产生大量的请求,应用本身一时无法处理得完,因此可以先将请求都放入消息队列,引用再去慢慢处理。
异步:将比较耗时而且不需要即时(同步)返回结果的操作,作为消息放入消息队列,以此减少请求响应时间,提高系统性能。
三、以代码入门
先创建一个maven工程,pom 引入RabbitMQ:
<dependency>
    <groupId>com.rabbitmq</groupId>
    <artifactId>amqp-client</artifactId>
    <version>5.10.0</version>
</dependency>
使用MQ一般主要就是两个角色,生产者(producer)和消费者(consumer),RabbitMQ创建生产者和消费者步骤类似,主要分为一下几步:
- 1、创建连接工厂
- 2、创建连接Connection
- 3、通过链接获取通道channel
- 4、通过通道,可以创建交换机、声明队列、绑定关系、路由key、发送消息、接收消息
- 5、主备消息内容
- 6、发送消息给队列queue
- 7、关闭连接
- 8、关闭通道
下面讲解下各个模式下得代码实现。
1、简单模式
不声明交换机(exchange),使用默认交换机

生产者
import com.rabbitmq.client.Channel;
import com.rabbitmq.client.Connection;
import com.rabbitmq.client.ConnectionFactory;

import java.io.IOException;

public class Producer {
    public static void main(String[] args) {
        // 1、创建连接工程
        ConnectionFactory factory = new ConnectionFactory();
        factory.setHost("192.168.10.136");
        factory.setPort(5672);
        factory.setUsername("guest");
        factory.setPassword("guest");
        factory.setVirtualHost("/");

        Connection connection = null;
        Channel channel = null;
        try {
            // 2、创建连接 Connection
            connection = factory.newConnection("生产者");
            // 3、通过链接获取通道 Channel
            channel = connection.createChannel();
            // 4、通过通道,可以创建交换机、声明队列、绑定关系、路由key、发送消息、接收消息
            // 这里我们声明一个队列
            String queueName = "queue-jinsh";
            /*
              @params1:队列名称,
              @params2:是否持久化,就是消息是否存盘。其实非持久化也会存盘,但会伴随服务重启丢失
              @params3:排他性,是否是一个独占队列
              @params4:是否自动删除,随着最后一个消费者消费完毕消息后是否把队列删除
              @params5:携带一些附加参数
             */
            channel.queueDeclare(queueName, false, false, false, null);
            // 5、准备消息内容
            String message = "信其雌蛙一次莫黑多刺";
            // 6、发送消息给队列queue
            /*
              @params1:交换机,这里没有指定,会使用默认的交换机
              @params2:队列、路由key
              @params3:消息的状态控制
              @params4:消息主题
             */
            channel.basicPublish("", queueName, null, message.getBytes());
        } catch (Exception e) {
            e.printStackTrace();
        } finally {
            // 7、关闭通道
            if (channel != null && channel.isOpen()) {
                try {
                    channel.close();
                } catch (Exception e) {
                    e.printStackTrace();
                }
            }
            // 8、关闭连接
            if (connection != null && connection.isOpen()) {
                try {
                    connection.close();
                } catch (IOException e) {
                    e.printStackTrace();
                }
            }
        }
    }
}
消费者
import com.rabbitmq.client.*;

import java.io.IOException;

public class Consumer {

    /**
     * 1、创建连接工厂
     * 2、创建连接Connection
     * 3、通过链接获取通道channel
     * 4、通过通道,可以创建交换机、声明队列、绑定关系、路由key、发送消息、接收消息
     * 5、主备消息内容
     * 6、发送消息给队列queue
     * 7、关闭连接
     * 8、关闭通道
     */
    public static void main(String[] args) {
        // 1、创建连接工程
        ConnectionFactory factory = new ConnectionFactory();
        factory.setHost("192.168.10.136");
        factory.setPort(5672);
        factory.setUsername("guest");
        factory.setPassword("guest");
        factory.setVirtualHost("/");

        Connection connection = null;
        Channel channel = null;
        try {
            // 2、创建连接 Connection
            connection = factory.newConnection("消费者");
            // 3、通过链接获取通道 Channel
            channel = connection.createChannel();
            // 4、通过通道,可以创建交换机、声明队列、绑定关系、路由key、发送消息、接收消息
            // 消费消息
            String queueName = "queue1";
            channel.basicConsume(queueName, true, new DeliverCallback() {
                public void handle(String consumerTag, Delivery message) throws IOException {
                    System.out.println("收到消息是:" + new String(message.getBody(), "utf-8"));
                }
            }, new CancelCallback() {
                public void handle(String consumerTag) throws IOException {
                    System.out.println("接收失败");
                }
            });

        } catch (Exception e) {
            e.printStackTrace();
        } finally {
            // 7、关闭通道
            if (channel != null && channel.isOpen()) {
                try {
                    channel.close();
                } catch (Exception e) {
                    e.printStackTrace();
                }
            }
            // 8、关闭连接
            if (connection != null && connection.isOpen()) {
                try {
                    connection.close();
                } catch (IOException e) {
                    e.printStackTrace();
                }
            }
        }
    }
}
2、发布订阅模式
发布订阅模式在声明交换机(exchange)时需要指定交换机类型(type)为fanout,当生产者发布消息,绑定(binding)得所有消费者都将收到消息。
生产者
import com.rabbitmq.client.Channel;
import com.rabbitmq.client.Connection;
import com.rabbitmq.client.ConnectionFactory;

import java.io.IOException;
import java.util.concurrent.TimeoutException;

public class Producer {

    public static void main(String[] args) {
        ConnectionFactory factory = new ConnectionFactory();
        factory.setHost("192.168.10.136");
        factory.setPort(5672);
        factory.setUsername("guest");
        factory.setPassword("guest");
        factory.setVirtualHost("/");

        Connection connection = null;
        Channel channel = null;
        try {
            connection = factory.newConnection("生产者");
            channel = connection.createChannel();
            channel.queueDeclare("queue4", false, false, false, null);
            channel.queueDeclare("queue5", false, false, false, null);
            String message = "信其雌蛙一次莫黑多刺";
            // 准备交换机
            String exchangeName = "fanout-exchange";
            // 定义路由key
            String routeKey = "";
            // 交换机类型
            String type = "fanout";
            channel.exchangeDeclare(exchangeName, type, false, false, false, null);
            channel.queueBind("queue4", exchangeName, "");
            channel.queueBind("queue5", exchangeName, "");
            channel.basicPublish(exchangeName, routeKey, null, message.getBytes());
        } catch (Exception e) {
            e.printStackTrace();
        } finally {
            if (channel != null && channel.isOpen()) {
                try {
                    channel.close();
                } catch (IOException e) {
                    e.printStackTrace();
                } catch (TimeoutException e) {
                    e.printStackTrace();
                }
            }
            if (connection != null && connection.isOpen()) {
                try {
                    connection.close();
                } catch (IOException e) {
                    e.printStackTrace();
                }
            }
        }
    }
}
消费者
import com.rabbitmq.client.*;

import java.io.IOException;
import java.util.concurrent.TimeoutException;

public class Consumer{

    private static Runnable runnable = () -> {
        // 1、创建连接工程
        ConnectionFactory factory = new ConnectionFactory();
        factory.setHost("192.168.10.136");
        factory.setPort(5672);
        factory.setUsername("guest");
        factory.setPassword("guest");
        factory.setVirtualHost("/");

        Connection connection = null;
        Channel channel = null;
        try {
            // 2、创建连接 Connection
            connection = factory.newConnection("消费者");
            // 3、通过链接获取通道 Channel
            channel = connection.createChannel();
            // 4、通过通道,可以创建交换机、声明队列、绑定关系、路由key、发送消息、接收消息
            // 消费消息
            String queueName = Thread.currentThread().getName();
            channel.basicConsume(queueName, true, new DeliverCallback() {
                public void handle(String consumerTag, Delivery message) throws IOException {
                    System.out.println(queueName + ":收到消息是:" + new String(message.getBody(), "utf-8"));
                }
            }, new CancelCallback() {
                public void handle(String consumerTag) throws IOException {
                    System.out.println("接收失败");
                }
            });

        } catch (Exception e) {
            e.printStackTrace();
        } finally {
            // 7、关闭通道
            if (channel != null && channel.isOpen()) {
                try {
                    channel.close();
                } catch (IOException e) {
                    e.printStackTrace();
                } catch (TimeoutException e) {
                    e.printStackTrace();
                }
            }
            // 8、关闭连接
            if (connection != null && connection.isOpen()) {
                try {
                    connection.close();
                } catch (IOException e) {
                    e.printStackTrace();
                }
            }
        }
    };

    public static void main(String[] args) {
        new Thread(runnable, "queue4").start();
        new Thread(runnable, "queue5").start();
    }
}
3、路由模式
路由模式在声明交换机(exchange)时需要指定交换机类型(type)为direct,每个消费者和生产者绑定时需要指定一个路由key(routing-key),当生产者发布消息时也需要指定路由key,只有与发布时的路由key相同的绑定时的路由key对应的消费者才能消费到消息。
生产者
import com.rabbitmq.client.Channel;
import com.rabbitmq.client.Connection;
import com.rabbitmq.client.ConnectionFactory;

import java.io.IOException;
import java.util.concurrent.TimeoutException;

public class Producer {

    public static void main(String[] args) {
        ConnectionFactory factory = new ConnectionFactory();
        factory.setHost("192.168.10.136");
        factory.setPort(5672);
        factory.setUsername("guest");
        factory.setPassword("guest");
        factory.setVirtualHost("/");

        Connection connection = null;
        Channel channel = null;
        try {
            connection = factory.newConnection("生产者");
            channel = connection.createChannel();
            // 申明queue
            channel.queueDeclare("queue2", false, false, false, null);
            channel.queueDeclare("queue3", false, false, false, null);
            String message = "信其雌蛙一次莫黑多刺";
            // 准备交换机
            String exchangeName = "direct-exchange";
            // 定义路由key
            String routeKey = "email";
            // 交换机类型
            String type = "direct";
            // 申明exchange
            channel.exchangeDeclare(exchangeName, type, false, false, false, null);

            channel.queueBind("queue2", exchangeName, "email");
            channel.queueBind("queue3", exchangeName, "sms");
            channel.basicPublish(exchangeName, routeKey, null, message.getBytes());
        } catch (Exception e) {
            e.printStackTrace();
        } finally {
            if (channel != null && channel.isOpen()) {
                try {
                    channel.close();
                } catch (IOException e) {
                    e.printStackTrace();
                } catch (TimeoutException e) {
                    e.printStackTrace();
                }
            }
            if (connection != null && connection.isOpen()) {
                try {
                    connection.close();
                } catch (IOException e) {
                    e.printStackTrace();
                }
            }
        }
    }
}
消费者
import com.rabbitmq.client.*;

import java.io.IOException;
import java.util.concurrent.TimeoutException;

public class Consumer{

    private static Runnable runnable = () -> {
        // 1、创建连接工程
        ConnectionFactory factory = new ConnectionFactory();
        factory.setHost("192.168.10.136");
        factory.setPort(5672);
        factory.setUsername("guest");
        factory.setPassword("guest");
        factory.setVirtualHost("/");

        Connection connection = null;
        Channel channel = null;
        try {
            // 2、创建连接 Connection
            connection = factory.newConnection("消费者");
            // 3、通过链接获取通道 Channel
            channel = connection.createChannel();
            // 4、通过通道,可以创建交换机、声明队列、绑定关系、路由key、发送消息、接收消息
            // 消费消息
            String queueName = Thread.currentThread().getName();
            channel.basicConsume(queueName, true, new DeliverCallback() {
                public void handle(String consumerTag, Delivery message) throws IOException {
                    System.out.println(queueName + ":收到消息是:" + new String(message.getBody(), "utf-8"));
                }
            }, new CancelCallback() {
                public void handle(String consumerTag) throws IOException {
                    System.out.println("接收失败");
                }
            });

        } catch (Exception e) {
            e.printStackTrace();
        } finally {
            // 7、关闭通道
            if (channel != null && channel.isOpen()) {
                try {
                    channel.close();
                } catch (IOException e) {
                    e.printStackTrace();
                } catch (TimeoutException e) {
                    e.printStackTrace();
                }
            }
            // 8、关闭连接
            if (connection != null && connection.isOpen()) {
                try {
                    connection.close();
                } catch (IOException e) {
                    e.printStackTrace();
                }
            }
        }
    };

    public static void main(String[] args) {
        new Thread(runnable, "queue2").start();
        new Thread(runnable, "queue3").start();
    }
}
4、主题Topic模式
路由模式在声明交换机(exchange)时需要指定交换机类型(type)为topic,与路由模式相同,也需要routing-key的匹配,只不过主题模式的routing-key是模糊匹配,匹配规则如下:
-
*:必须匹配一个单词 -
#:匹配0个或1个或多个单词
例如生产者和消费者绑定时的routing-key="#.aaa.*" ,那么生产者发送消息时的routing-key的值为"dd.aaa.b"可以匹配上,或"dd.cc.aaa.b"也可以匹配上,但"dd.aaa.b.cc"是匹配不上的。
生产者
import com.rabbitmq.client.Channel;
import com.rabbitmq.client.Connection;
import com.rabbitmq.client.ConnectionFactory;

import java.io.IOException;
import java.util.concurrent.TimeoutException;

public class Producer {

    public static void main(String[] args) {
        ConnectionFactory factory = new ConnectionFactory();
        factory.setHost("192.168.10.136");
        factory.setPort(5672);
        factory.setUsername("guest");
        factory.setPassword("guest");
        factory.setVirtualHost("/");

        Connection connection = null;
        Channel channel = null;
        try {
            connection = factory.newConnection("生产者");
            channel = connection.createChannel();
            channel.queueDeclare("queue6", false, false, false, null);
            channel.queueDeclare("queue7", false, false, false, null);
            channel.queueDeclare("queue8", false, false, false, null);
            String message = "信其雌蛙一次莫黑多刺";
            // 准备交换机
            String exchangeName = "topic-exchange";
            // 定义路由key
            String routeKey = "com.jinsh.user";
            // 交换机类型
            String type = "topic";
            channel.exchangeDeclare(exchangeName, type, false, false, false, null);

            channel.queueBind("queue6", exchangeName, "#.jinsh.#");
            channel.queueBind("queue7", exchangeName, "com.*");
            channel.queueBind("queue8", exchangeName, "com.#");
            channel.basicPublish(exchangeName, routeKey, null, message.getBytes());
        } catch (Exception e) {
            e.printStackTrace();
        } finally {
            if (channel != null && channel.isOpen()) {
                try {
                    channel.close();
                } catch (IOException e) {
                    e.printStackTrace();
                } catch (TimeoutException e) {
                    e.printStackTrace();
                }
            }
            if (connection != null && connection.isOpen()) {
                try {
                    connection.close();
                } catch (IOException e) {
                    e.printStackTrace();
                }
            }
        }
    }
}
消费者
import com.rabbitmq.client.*;

import java.io.IOException;
import java.util.concurrent.TimeoutException;

public class Consumer{

    private static Runnable runnable = () -> {
        // 1、创建连接工程
        ConnectionFactory factory = new ConnectionFactory();
        factory.setHost("192.168.10.136");
        factory.setPort(5672);
        factory.setUsername("guest");
        factory.setPassword("guest");
        factory.setVirtualHost("/");

        Connection connection = null;
        Channel channel = null;
        try {
            // 2、创建连接 Connection
            connection = factory.newConnection("消费者");
            // 3、通过链接获取通道 Channel
            channel = connection.createChannel();
            // 4、通过通道,可以创建交换机、声明队列、绑定关系、路由key、发送消息、接收消息
            // 消费消息
            String queueName = Thread.currentThread().getName();
            channel.basicConsume(queueName, true, new DeliverCallback() {
                public void handle(String consumerTag, Delivery message) throws IOException {
                    System.out.println(queueName + ":收到消息是:" + new String(message.getBody(), "utf-8"));
                }
            }, new CancelCallback() {
                public void handle(String consumerTag) throws IOException {
                    System.out.println("接收失败");
                }
            });

        } catch (Exception e) {
            e.printStackTrace();
        } finally {
            // 7、关闭通道
            if (channel != null && channel.isOpen()) {
                try {
                    channel.close();
                } catch (IOException e) {
                    e.printStackTrace();
                } catch (TimeoutException e) {
                    e.printStackTrace();
                }
            }
            // 8、关闭连接
            if (connection != null && connection.isOpen()) {
                try {
                    connection.close();
                } catch (IOException e) {
                    e.printStackTrace();
                }
            }
        }
    };

    public static void main(String[] args) {
        new Thread(runnable, "queue6").start();
        new Thread(runnable, "queue7").start();
        new Thread(runnable, "queue8").start();
    }
}
5、工作模式
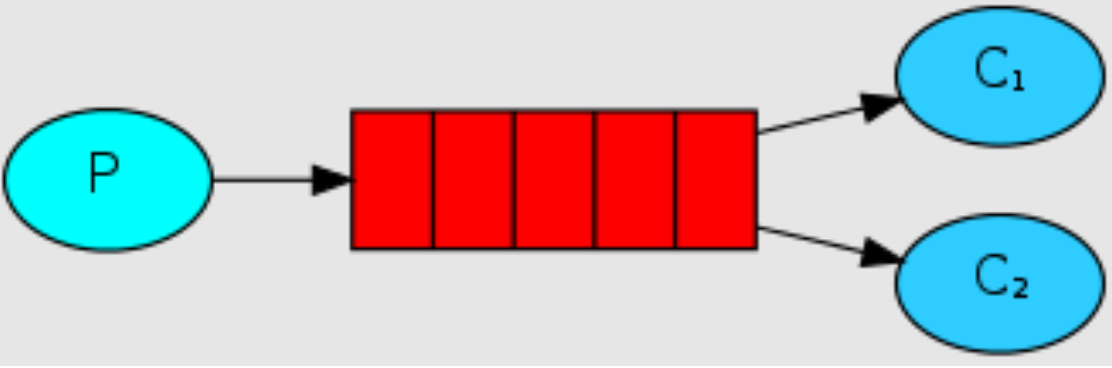
当有多个消费者时,我们的消息会被哪个消费者消费呢,我们又该如何均衡消费者消费信息的多少呢?
主要有两种模式:
1、轮询模式的分发:一个消费者一条,按均分配;
2、公平分发:根据消费者的消费能力进行公平分发,处理快的处理的多,处理慢的处理的少;按劳分配;
轮询模式
生产者
public class Producer {
    public static void main(String[] args) {
        // 1: 创建连接工厂
        ConnectionFactory factory = new ConnectionFactory();
        // 2: 设置连接属性
        factory.setHost("192.168.10.136");
        factory.setPort(5672);
        factory.setUsername("guest");
        factory.setPassword("guest");
        factory.setVirtualHost("/");
        Connection connection = null;
        Channel channel = null;
        try {
            // 3: 从连接工厂中获取连接
            connection = factory.newConnection("生产者");
            // 4: 从连接中获取通道channel
            channel = connection.createChannel();
            // 6: 准备发送消息的内容
            for (int i = 1; i <= 20; i++) {
                //消息的内容
                String msg = "学相伴:" + i;
                // 7: 发送消息给中间件rabbitmq-server
                // @params1: 交换机exchange
                // @params2: 队列名称/routingkey
                // @params3: 属性配置
                // @params4: 发送消息的内容
                channel.basicPublish("", "queue1", null, msg.getBytes());
            }
            System.out.println("消息发送成功!");
        } catch (Exception ex) {
            ex.printStackTrace();
            System.out.println("发送消息出现异常...");
        } finally {
            // 7: 释放连接关闭通道
            if (channel != null && channel.isOpen()) {
                try {
                    channel.close();
                } catch (Exception ex) {
                    ex.printStackTrace();
                }
            }
            if (connection != null) {
                try {
                    connection.close();
                } catch (Exception ex) {
                    ex.printStackTrace();
                }
            }
        }
    }
}
消费者1
public class Work1 {
    public static void main(String[] args) {
        // 1: 创建连接工厂
        ConnectionFactory factory = new ConnectionFactory();
        // 2: 设置连接属性
        factory.setHost("192.168.10.136");
        factory.setPort(5672);
        factory.setUsername("guest");
        factory.setPassword("guest");
        factory.setVirtualHost("/");
        Connection connection = null;
        Channel channel = null;
        try {
            // 3: 从连接工厂中获取连接
            connection = factory.newConnection("消费者-Work1");
            // 4: 从连接中获取通道channel
            channel = connection.createChannel();
            // 5: 申明队列queue存储消息
            // 这里如果queue已经被创建过一次了,可以不需要定义
//            channel.queueDeclare("queue1", false, false, false, null);
            // 同一时刻,服务器只会推送一条消息给消费者
            // 6: 定义接受消息的回调
            Channel finalChannel = channel;
            finalChannel.basicConsume("queue1", true, new DeliverCallback() {
                @Override
                public void handle(String s, Delivery delivery) throws IOException {
                    try{
                        System.out.println("Work1-收到消息是:" + new String(delivery.getBody(), "UTF-8"));
                        Thread.sleep(2000);
                    }catch(Exception ex){
                        ex.printStackTrace();
                    }
                }
            }, new CancelCallback() {
                @Override
                public void handle(String s) throws IOException {
                }
            });
            System.out.println("Work1-开始接受消息");
            System.in.read();
        } catch (Exception ex) {
            ex.printStackTrace();
            System.out.println("发送消息出现异常...");
        } finally {
            // 7: 释放连接关闭通道
            if (channel != null && channel.isOpen()) {
                try {
                    channel.close();
                } catch (Exception ex) {
                    ex.printStackTrace();
                }
            }
            if (connection != null && connection.isOpen()) {
                try {
                    connection.close();
                } catch (Exception ex) {
                    ex.printStackTrace();
                }
            }
        }
    }
}
消费者2
public class Work2 {
    public static void main(String[] args) {
        // 1: 创建连接工厂
        ConnectionFactory factory = new ConnectionFactory();
        // 2: 设置连接属性
        factory.setHost("192.168.10.136");
        factory.setPort(5672);
        factory.setUsername("guest");
        factory.setPassword("guest");
        factory.setVirtualHost("/");
        Connection connection = null;
        Channel channel = null;
        try {
            // 3: 从连接工厂中获取连接
            connection = factory.newConnection("消费者-Work2");
            // 4: 从连接中获取通道channel
            channel = connection.createChannel();
            // 5: 申明队列queue存储消息
            // 这里如果queue已经被创建过一次了,可以不需要定义
            //channel.queueDeclare("queue1", false, true, false, null);
            // 同一时刻,服务器只会推送一条消息给消费者
            //channel.basicQos(1);
            // 6: 定义接受消息的回调
            Channel finalChannel = channel;
            finalChannel.basicConsume("queue1", true, new DeliverCallback() {
                @Override
                public void handle(String s, Delivery delivery) throws IOException {
                    try{
                        System.out.println("Work2-收到消息是:" + new String(delivery.getBody(), "UTF-8"));
                        Thread.sleep(200);
                    }catch(Exception ex){
                        ex.printStackTrace();
                    }
                }
            }, new CancelCallback() {
                @Override
                public void handle(String s) throws IOException {
                }
            });
            System.out.println("Work2-开始接受消息");
            System.in.read();
        } catch (Exception ex) {
            ex.printStackTrace();
            System.out.println("发送消息出现异常...");
        } finally {
            // 7: 释放连接关闭通道
            if (channel != null && channel.isOpen()) {
                try {
                    channel.close();
                } catch (Exception ex) {
                    ex.printStackTrace();
                }
            }
            if (connection != null && connection.isOpen()) {
                try {
                    connection.close();
                } catch (Exception ex) {
                    ex.printStackTrace();
                }
            }
        }
    }
}
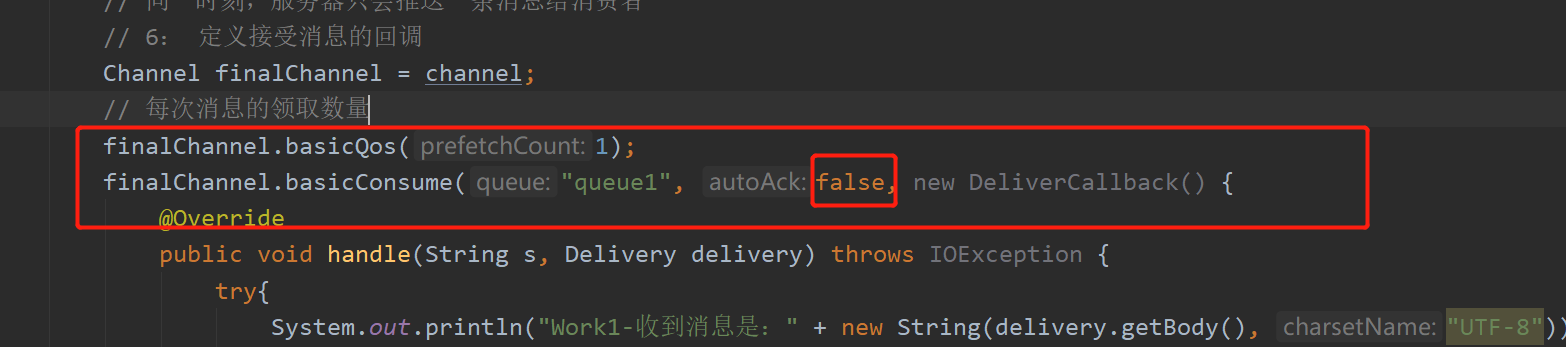
公平分发模式
公平分发模式生产者和消费者代码与轮询模式一样,只是消费者的代码略有修改:
- 新增
finalChannel.basicQos(1);,表示每次消息的消费数量,即一次消费1个消息 - basicConsume方法autoAck参数改为false,不自定应答
SpringBoot 中使用 RabbitMQ
首先pom文件引入
<dependency>
    <groupId>org.springframework.boot</groupId>
    <artifactId>spring-boot-starter-amqp</artifactId>
</dependency>
其次配置文件配置连接
spring:
  rabbitmq:
    host: 192.168.10.136
    port: 5672
    username: guest
    password: guest
    virtual-host: /
声明交换机、声明队列、交换机绑定队列
这个类是即可以放在生产者项目这边,也可以放在消费者项目那边,一般选择放消费者项目那边写。
import org.springframework.amqp.core.Binding;
import org.springframework.amqp.core.BindingBuilder;
import org.springframework.amqp.core.FanoutExchange;
import org.springframework.amqp.core.Queue;
import org.springframework.context.annotation.Bean;
import org.springframework.context.annotation.Configuration;

@Configuration
public class rabbitMqConfiguration {

    // 1、声明交换机类型
    @Bean
    public Exchange exchange() {
        return new Exchange("order_exchange", true, false);
    }

    // 2、声明队列
    @Bean
    public Queue emailQueue() {
        return new Queue("email.queue", true);
    }

    // 3、绑定交换机和队列
    @Bean
    public Binding binding() {
        return BindingBuilder.bind(emailQueue()).to(exchange());
    }
}
生产者
@Service
public class ProduceService {

    @Autowired
    private RabbitTemplate rabbitTemplate;

	public void sendMessage() {
		// 参数1:交换机,参数2:路由key/queue队列名,参数3:消息内容
        rabbitTemplate.convertAndSend("order_exchange", "", orderId, "hahahahahahahaha");
	}
}
消费者
import org.springframework.amqp.rabbit.annotation.RabbitHandler;
import org.springframework.amqp.rabbit.annotation.RabbitListener;
import org.springframework.stereotype.Component;

@RabbitListener(queues = {"email.queue"})
@Component
public class SmsDirectConsumer {

    @RabbitHandler
    public void receiveMessage(String message) {
        System.out.println("收到消息:" + message);
    }

}
对于上面“声明交换机、声明队列、交换机绑定队列”这一步,也可以通过注解的方式声明,写在消费类里:
import org.springframework.amqp.core.ExchangeTypes;
import org.springframework.amqp.rabbit.annotation.*;
import org.springframework.stereotype.Component;

@RabbitListener(bindings = @QueueBinding(
        value = @Queue(value = "email.topic.queue", durable = "true", autoDelete = "false"),
        exchange = @Exchange(value = "topic_order_exchange", type = ExchangeTypes.TOPIC),
        key = "*.email.#"
))
@Component
public class EmailTopicConsumer {

    @RabbitHandler
    public void receiveMessage(String message) {
        System.out.println("email topic 收到订单消息:" + message);
    }
}
1、发布订阅模式
声明交换机、声明队列、交换机绑定队列
import org.springframework.amqp.core.Binding;
import org.springframework.amqp.core.BindingBuilder;
import org.springframework.amqp.core.FanoutExchange;
import org.springframework.amqp.core.Queue;
import org.springframework.context.annotation.Bean;
import org.springframework.context.annotation.Configuration;

@Configuration
public class FanoutRabbitMqConfiguration {

    // 1、声明交换机类型
    @Bean
    public FanoutExchange fanoutExchange() {
        return new FanoutExchange("fanout_order_exchange", true, false);
    }

    // 2、声明队列
    @Bean
    public Queue fanoutEmailQueue() {
        return new Queue("email.fanout.queue", true);
    }
    @Bean
    public Queue fanoutSmsQueue() {
        return new Queue("sms.fanout.queue", true);
    }
    @Bean
    public Queue fanoutWxQueue() {
        return new Queue("wx.fanout.queue", true);
    }

    // 3、绑定交换机和队列
    @Bean
    public Binding fanoutEmailBinding() {
        return BindingBuilder.bind(fanoutEmailQueue()).to(fanoutExchange());
    }
    @Bean
    public Binding fanoutSmsBinding() {
        return BindingBuilder.bind(fanoutSmsQueue()).to(fanoutExchange());
    }
    @Bean
    public Binding fanoutWxBinding() {
        return BindingBuilder.bind(fanoutWxQueue()).to(fanoutExchange());
    }
}
消费者这里只展示了1个其余两个类似
import org.springframework.amqp.rabbit.annotation.RabbitHandler;
import org.springframework.amqp.rabbit.annotation.RabbitListener;
import org.springframework.stereotype.Component;

@RabbitListener(queues = {"email.fanout.queue"})
@Component
public class EmailFanoutConsumer {

    @RabbitHandler
    public void receiveMessage(String message) {
        System.out.println("email fanout 收到订单消息:" + message);
    }

}
生产者
    public void makeOrderFanout() {
        String orderId = UUID.randomUUID().toString();
        System.out.println("订单生产成功:" + orderId);
        // 3、通过rabbitmq完成消息分发
        String exchange = "fanout_order_exchange";
        // 参数1:交换机,参数2:路由key/queue队列名,参数3:消息内容
        rabbitTemplate.convertAndSend(exchange, "", orderId, postProcessor);
    }
2、路由模式
声明交换机、声明队列、交换机绑定队列
@Configuration
public class DirectRabbitMqConfiguration {

    // 1、声明交换机类型
    @Bean
    public DirectExchange directExchange() {
        return new DirectExchange("direct_order_exchange", true, false);
    }

    // 2、声明队列
    @Bean
    public Queue directEmailQueue() {
        return new Queue("email.direct.queue", true, );
    }
    @Bean
    public Queue directSmsQueue() {
        return new Queue("sms.direct.queue", true);
    }
    @Bean
    public Queue directWxQueue() {
        return new Queue("wx.direct.queue", true);
    }

    // 3、绑定交换机和队列
    @Bean
    public Binding directEmailBinding() {
        return BindingBuilder.bind(directEmailQueue()).to(directExchange()).with("email");
    }
    @Bean
    public Binding directSmsBinding() {
        return BindingBuilder.bind(directSmsQueue()).to(directExchange()).with("sms");
    }
    @Bean
    public Binding directWxBinding() {
        return BindingBuilder.bind(directWxQueue()).to(directExchange()).with("wx");
    }
}
消费者与上面类似这里不展示了
生产者
public void makeOrderDirect() {
        String orderId = UUID.randomUUID().toString();
        System.out.println("订单生产成功:" + orderId);
        // 3、通过rabbitmq完成消息分发
        String exchange = "direct_order_exchange";
        // 参数1:交换机,参数2:路由key/queue队列名,参数3:消息内容
        rabbitTemplate.convertAndSend(exchange, "email", orderId);
        rabbitTemplate.convertAndSend(exchange, "sms", orderId);
    }
3、主题模式
声明交换机、声明队列、交换机绑定队列
@Configuration
public class TopicRabbitMqConfiguration {

    // 1、声明交换机类型
    @Bean
    public DirectExchange topicExchange() {
        return new DirectExchange("topic_order_exchange", true, false);
    }

    // 2、声明队列
    @Bean
    public Queue topicEmailQueue() {
        return new Queue("email.topic.queue", true, );
    }
    @Bean
    public Queue directSmsQueue() {
        return new Queue("sms.topic.queue", true);
    }
    @Bean
    public Queue directWxQueue() {
        return new Queue("wx.topic.queue", true);
    }

    // 3、绑定交换机和队列
    @Bean
    public Binding topicEmailBinding() {
        return BindingBuilder.bind(topicEmailQueue()).to(topicExchange()).with("#.email.#");
    }
    @Bean
    public Binding topicSmsBinding() {
        return BindingBuilder.bind(topicSmsQueue()).to(topicExchange()).with("#.sms.*");
    }
    @Bean
    public Binding topicWxBinding() {
        return BindingBuilder.bind(topicWxQueue()).to(topicExchange()).with("*.wx.*");
    }
}
消费者与上面类似这里不展示了
生产者
public void makeOrderTopic() {
        String orderId = UUID.randomUUID().toString();
        System.out.println("订单生产成功:" + orderId);
        // 3、通过rabbitmq完成消息分发
        String exchange = "topic_order_exchange";
        // 参数1:交换机,参数2:路由key/queue队列名,参数3:消息内容
        rabbitTemplate.convertAndSend(exchange, "com.sms.aa", orderId);
        rabbitTemplate.convertAndSend(exchange, "aa.email.cc.vv", orderId);
    }
4、过期队列 TTL
过期队列要在队列声明时设置
@Bean
    public Queue ttlQueue() {
        Map<String, Object> arg = new HashMap<String, Object>();
        // 设置过期时间5秒
        arg.put("x-message-ttl", 5000);
        // 设置队列最多容纳几个消息
        // arg.put("x-max-length", 5);
        return new Queue("ttl.direct.queue", true, false, false, arg);
    }
即消息发布到队列中5秒内还没有被消费,则将废弃。
以上时对整个队列中的消息过期设置,还有一种是对单个消息的过期时间设置,在生产者端消息发送时配置:
public void makeOrderFanout() {
        String orderId = UUID.randomUUID().toString();
        System.out.println("订单生产成功:" + orderId);
        String exchange = "fanout_order_exchange";
        // 给消息设置过期时间
        MessagePostProcessor postProcessor = new MessagePostProcessor() {
            @Override
            public Message postProcessMessage(Message message) throws AmqpException {
				// 设置5秒过期
                message.getMessageProperties().setExpiration("5000");
                message.getMessageProperties().setContentEncoding("UTF-8");
                return message;
            }
        };
        // 参数1:交换机,参数2:路由key/queue队列名,参数3:消息内容
        rabbitTemplate.convertAndSend(exchange, "", orderId, postProcessor);
    }
当两种方式同时存在时,过期时间短的生效。
5、死信队列 DLX
所谓死信队列就是一个接盘用的队列,声明方式与普通队列一样
@Configuration
public class DeadQueueConfiguration {

    // 1、声明交换机类型
    @Bean
    public DirectExchange deadExchange() {
        return new DirectExchange("dead_order_exchange", true, false);
    }

    // 2、声明队列
    @Bean
    public Queue deadQueue() {
        return new Queue("dead.direct.queue", true);
    }

    // 3、绑定交换机和队列
    @Bean
    public Binding deadBinding() {
        return BindingBuilder.bind(deadQueue()).to(deadExchange()).with("dead");
    }
}
死信队列的作用就是用于存放失效的消息,以便再次业务处理。例如过期未消费的消息,过期后会被从原队列移动到死信队列里,需要在原队列里配置死信队列:
    @Bean
    public Queue ttlQueue() {
        Map<String, Object> arg = new HashMap<String, Object>();
        // 设置过期时间5秒
        arg.put("x-message-ttl", 5000);
        // 过期则或超过消息最大个数则进入死信队列
        arg.put("x-dead-letter-exchange", "dead_order_exchange");
        arg.put("x-dead-letter-routing-key", "dead");
        return new Queue("ttl.direct.queue", true, false, false, arg);
    }
6、延时队列
延时队列其实就是过期队列与死信队列的配合使用,达到消息延时处理的目的。例如,消息延时一分钟后处理,那么消息先发布到超时队列中,超时时间设置为60000毫秒,时间到了,消息就会进入死信队列,此时我们再在死信队列里处理这条消息就行了。
7、消息确认机制的配置
消息确认就是当生产者发布消息成功后,可以收到确认回调。
配置文件中开启publisher-confirm-type:
spring:
  rabbitmq:
    host: 192.168.10.136
    port: 5672
    username: guest
    password: guest
    virtual-host: /
    publisher-confirm-type: correlated
publisher-confirm-type:
- NONE值是禁用发布确认模式,是默认值
- CORRELATED值是发布消息成功到交换器后会触发回调方法,如1示例
- SIMPLE值经测试有两种效果,其一效果和CORRELATED值一样会触发回调方法,其二在发布消息成功后使用rabbitTemplate调用waitForConfirms或waitForConfirmsOrDie方法等待broker节点返回发送结果,根据返回结果来判定下一步的逻辑,要注意的点是waitForConfirmsOrDie方法如果返回false则会关闭channel,则接下来无法发送消息到broker;
确认回调类
package com.xuexiangban.rabbitmq.springbootorderrabbitmqproducer.callback;
import org.springframework.amqp.rabbit.connection.CorrelationData;
import org.springframework.amqp.rabbit.core.RabbitTemplate;
import org.springframework.stereotype.Component;

public class MessageConfirmCallback implements RabbitTemplate.ConfirmCallback {
    @Override
    public void confirm(CorrelationData correlationData, boolean ack, String cause) {
        if(ack){
            System.out.println("消息确认成功!!!!");
        }else{
            System.out.println("消息确认失败!!!!");
        }
    }
}
生产者发布消息时设置
public void makeOrderTopic(){
        String orderId = UUID.randomUUID().toString();
        System.out.println("保存订单成功:id是:" + orderId);
        // 设置消息确认机制
        rabbitTemplate.setConfirmCallback(new MessageConfirmCallback());
        rabbitTemplate.convertAndSend("topic_order_ex","com.email.sms.xxx",orderId);
    }
8、消息重发次数与手动应答
消息消费过程中出现异常默认会再次发送消息,继续消费,然后继续异常,以此类推发生死循环。
解决这个问题主要有两种方案:
- 配置消息的重发次数
- try-catch捕捉异常,然后手动应答
两种方案最好还要配上死信队列,将异常消息最终放入死信队列里,再根据业务逻辑处理。
配置文件
spring:
  rabbitmq:
    host: 192.168.10.136
    port: 5672
    username: guest
    password: guest
    virtual-host: /
    listener:
      simple:
        retry:
          enabled: true # 开启重试
          max-attempts: 3 # 最大重试次数
          initial-interval: 2000ms # 重试间隔时间
       #  acknowledge-mode: manual # 手动应答
消息消费出现异常
@RabbitListener(queues = {"email.direct.queue"})
@Component
public class EmailDirectConsumer {

    @RabbitHandler
    public void receiveMessage(String message, Channel channel, CorrelationData correlationData,
                            @Header(AmqpHeaders.DELIVERY_TAG) long tag) throws IOException {
        try {
            System.out.println("email direct 收到订单消息:" + message);

            // 消息消费过程中出现异常,会发生死循环
            int a = 1/0;

            channel.basicAck(tag, false);
        } catch (Exception e) {
            // 如果出现异常情况,根据实际情况去进行重发
            // 参数1:消息的tag,参数2:多条处理,参数3:requeue 重发
            // requeue = false,消息不会重发,会把消息打入死信队列
            // requeue = true,会死循环重发,如果使用true的话建议使用“解决方案1:控制重发次数”,通过重发次数去限制循环,
            // 不要使用try-catch方案,try-catch方案配置acknowledge-mode: manual,手动形式会使重发次数的配置失效。
            channel.basicNack(tag, false, false);
        }
    }
}

