
SpringBoot web 开发
SpringBoot web 开发
1、寻找静态资源路径
-
WebMvcAutoConfiguration类 ,webmvc自动装配类
-
addResourceHandlers方法
protected void addResourceHandlers(ResourceHandlerRegistry registry) { super.addResourceHandlers(registry); // 不启用默认资源处理,直接return if (!this.resourceProperties.isAddMappings()) { logger.debug("Default resource handling disabled"); return; } ServletContext servletContext = getServletContext(); // 请求路径:/webjars/**,映射路径:classpath:/META-INF/resources/webjars/ addResourceHandler(registry, "/webjars/**", "classpath:/META-INF/resources/webjars/"); /* 请求路径:staticPathPattern,没有在配置文件里配置(spring.mvc.static-path-pattern:)的话默认是/** 映射路径:staticLocations, 其值为"classpath:/META-INF/resources/", "classpath:/resources/", "classpath:/static/", "classpath:/public/" */ addResourceHandler(registry, this.mvcProperties.getStaticPathPattern(), (registration) -> {registration.addResourceLocations(this.resourceProperties.getStaticLocations()); if (servletContext != null) { registration.addResourceLocations(new ServletContextResource(servletContext, SERVLET_LOCATION)); } }); } // 上面方法的意思是,启用默认资源处理的情况下,静态路径可以放在classpath:/META-INF/resources/webjars/ 或者 "classpath:/META-INF/resources/" 或者 "classpath:/resources/" 或者 "classpath:/static/" 或者 "classpath:/public/"目录下, -
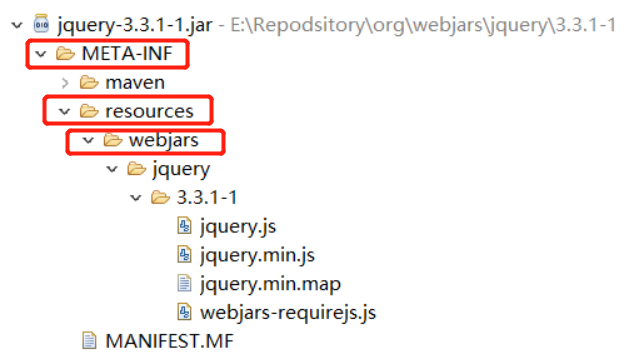
webjars
可以使用maven的方式引入前端资源文件,例如pom引入jquery
<dependency>
    <groupId>org.webjars</groupId>
    <artifactId>jquery</artifactId>
    <version>3.3.1-1</version>
</dependency>
则会引入以jar包形式打包jQuery前端文件,其文件路径 classpath:/META-INF/resources/webjars/
2、默认首页
-
WebMvcAutoConfiguration类下访问首页方法welcomePageHandlerMapping
@Bean
public WelcomePageHandlerMapping welcomePageHandlerMapping(ApplicationContext applicationContext, FormattingConversionService mvcConversionService, ResourceUrlProvider mvcResourceUrlProvider) {
    WelcomePageHandlerMapping welcomePageHandlerMapping = new WelcomePageHandlerMapping(
        new TemplateAvailabilityProviders(applicationContext), applicationContext,
// 查看 getWelcomePage()方法
getWelcomePage(), this.mvcProperties.getStaticPathPattern());
    welcomePageHandlerMapping.setInterceptors(getInterceptors(mvcConversionService, mvcResourceUrlProvider));
    welcomePageHandlerMapping.setCorsConfigurations(getCorsConfigurations());
    return welcomePageHandlerMapping;
}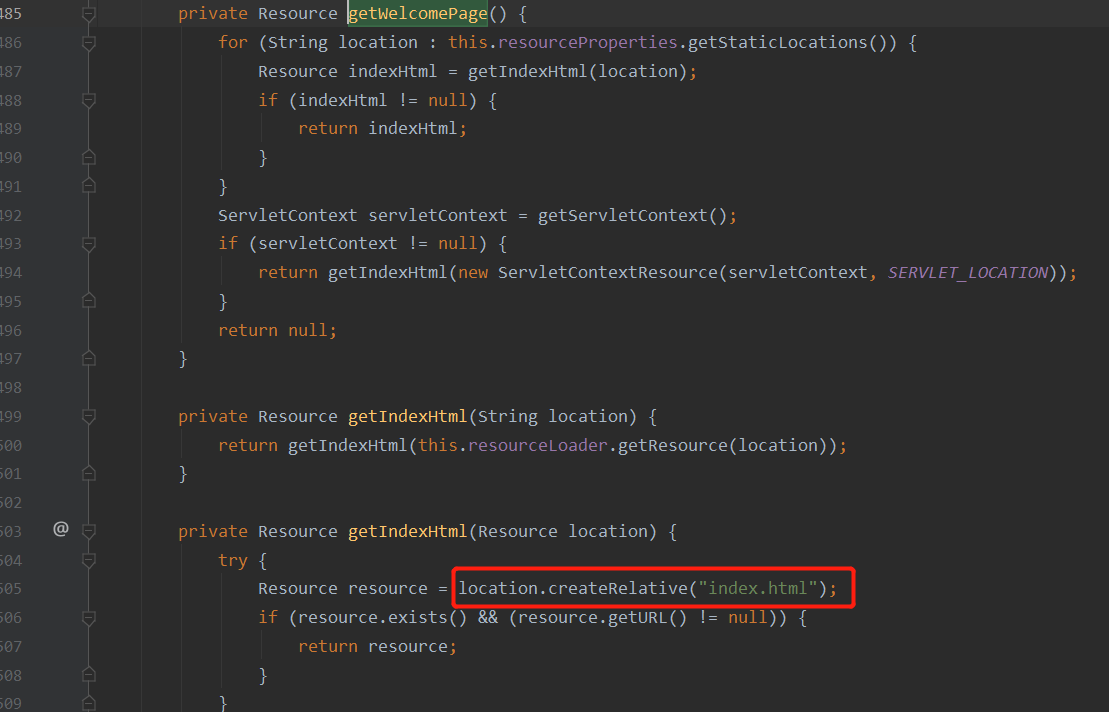
我们可以得到,默认的首页是 index.html
3、模板引擎Thymeleaf
引入Thymelaef
-
方式一:创建项目时勾选上Thymeleaf依赖
-
方式二:pom依赖引入Thymeleaf启动器
<dependency>
    <groupId>org.springframework.boot</groupId>
    <artifactId>spring-boot-starter-thymeleaf</artifactId>
</dependency>
前端文件路径
-
首先我们找thymeleaf的配置器,一般spring boot配置器都是 XxxProperties,所以这里我们找ThymeleafProperties
-
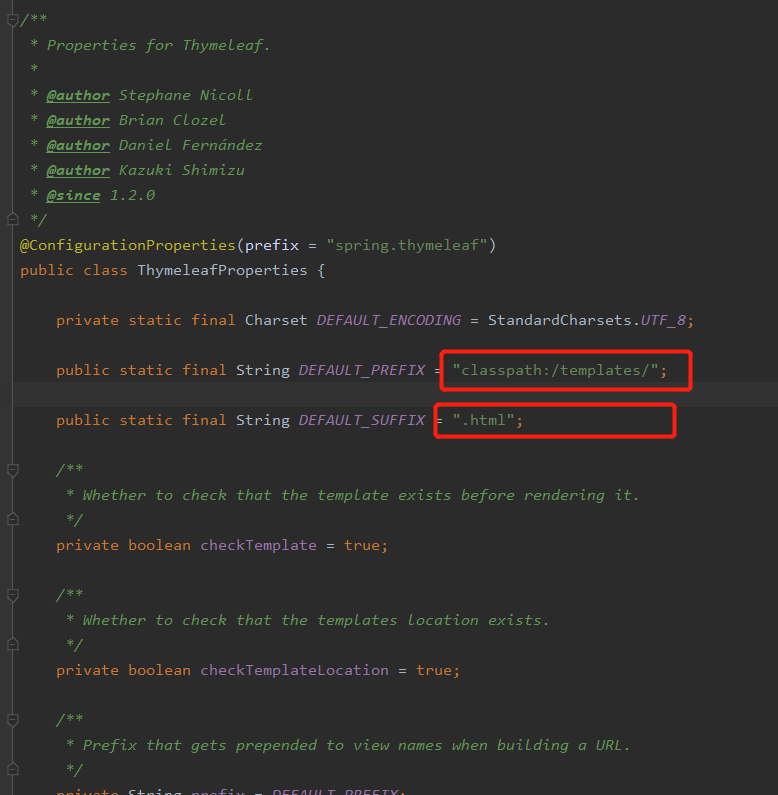
从源码中不难得出,我们的前端html页面需要放在classpath:/templates/目录下面就行了。templates下的页面我们需要用controller来跳转。
Thymeleaf 语法
-
<!DOCTYPE html> <!-- html标签添加thymeleaf命名空间: xmlns:th="http://www.thymeleaf.org" --> <html xmlns:th="http://www.thymeleaf.org"> <head> <meta charset="UTF-8"> <title>title</title> </head> <body> <!-- 此处使用了th:text 语法 --> <p th:text="${msg}"></p> </body> </html> -
简单表达式:
- 变量表达式:
${...} - 选择变量表达式:
*{...} - 消息表达式(国际化):
#{...} - URL表达式:
@{...} - 代码片段插入表达式:
~{...}
- 变量表达式:
-
常量
- 文本常量:
'one text','Another one!',… - 数字常量:
0,34,3.0,12.3,… - 布尔常量:
true,false - Null值:
null - 文字标记:
one,sometext,main,…
- 文本常量:
-
文本处理:
- 字符串拼接:
+ - 变量替换:
|The name is ${name}|
- 字符串拼接:
-
算术运算:
- 二元运算:
+,-,*,/,% - 负号:
-
- 二元运算:
-
布尔运算:
- 且或:
and,or - 非:
!,not
- 且或:
-
比较运算:
- 比较操作符:
>,<,>=,<=(gt,lt,ge,le) - 等式操作符:
==,!=(eq,ne)
- 比较操作符:
-
条件运算符:
- If-then:
(if) ? (then) - If-then-else:
(if) ? (then) : (else) - Default:
(value) ?: (defaultvalue)
- If-then:
-
专用记号:
- No-Operation:
_
- No-Operation:
-
循环:
th:each="item : $(list)" -
连接传参用括号:
th:href="@{/index.html(l='zh_CN')}" -
thymeleaf工具类:
-
string:
th:if="${not #strings.isEmpty(msg)}" -
date:
${#dates.format(date, 'dd/MMM/yyyy HH:mm')}
-
-
提取公共页面:
-
标记公共页面:
th:fragment="topbar" -
插入或替换上公共页面:
th:insert="~{commons/commons :: topbar}"或th:replace="~{commons/commons :: topbar}如果需要传递参数,可以直接追加括号
th:replace="~{commons/commons :: topbar(active='home')}"- commons/commons是页面路径,代表commons文件夹下的commons.html页面
- (active='home'),传递了个active参数,标记公共页面内调用到这个参数
-
4、实现国际化i18n
-
国际化配置文件
-
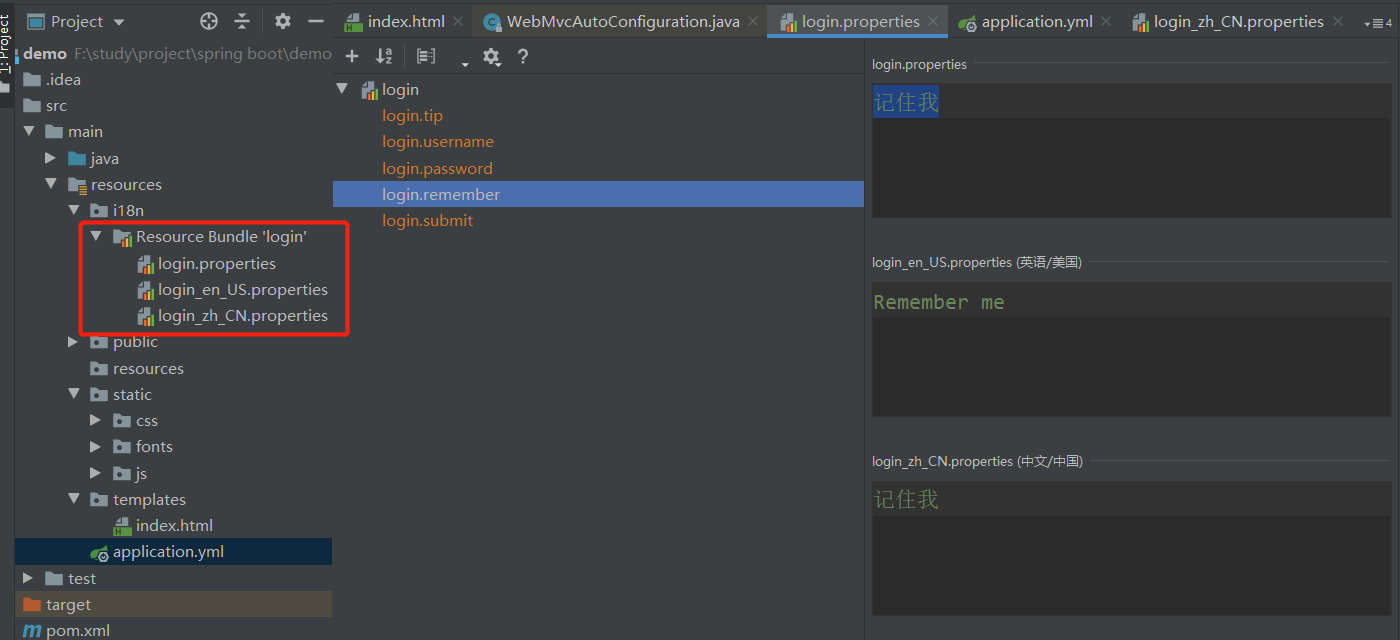
Resource Bundle
一堆有着相同前缀名称但有着不同语言后缀名称的属性文件的集合
-
-
工程配置文件配置国际化文件的路径
spring: messages: basename: i18n.login # 国际化配置文件位置 -
html 页面使用 thymeleaf 语法
#{}<div class="panel panel-primary"> <div class="panel-heading"> <span class="glyphicon glyphicon-home mr-3"></span> <span th:text="#{login.tip}">Please sign in</span> </div> <label class="panel-body"> <form> <input type="text" class="form-control mb-3" th:placeholder="#{login.username}"> <input type="password" class="form-control mb-3" th:placeholder="#{login.password}"> <div class="mb-3"> <label> <input type="checkbox" > [[#{login.remember}]] </label> </div> <button class="btn btn-primary btn-block" type="submit">[[#{login.submit}]]</button> <p class="mt-5 mb-3 text-muted">@ 2020-2021</p> <a class="btn btn-sm">中文</a> | <a class="btn btn-sm">English</a> </form> </label> </div> -
对于中英文切换按钮的功能实现,我们可以通过添加自定义配置实现。
- 先给请求添加语言参数:
<!-- thymeleaf地址后传参直接使用括号 --> <a class="btn btn-sm" th:href="@{/index.html(l='zh_CN')}">中文</a> | <a class="btn btn-sm" th:href="@{/index.html(l='en_US')}">English</a>- 定义自己的本地语言解析器,实现LocaleResolver接口,重写resolveLocale方法,可以参照spring中AcceptHeaderLocaleResolver类的resolveLocale写法。
package com.jsh.demo.config; import org.springframework.util.StringUtils; import org.springframework.web.servlet.LocaleResolver; import javax.servlet.http.HttpServletRequest; import javax.servlet.http.HttpServletResponse; import java.util.Locale; public class MyLocaleResolver implements LocaleResolver { @Override public Locale resolveLocale(HttpServletRequest request) { Locale loacale = Locale.getDefault(); if (loacale != null && request.getHeader("Accept-Language") == null) { return loacale; } else { // 截取请求参数,获取语言环境 String lang = request.getParameter("l"); if(StringUtils.hasLength(lang)){ // 如果没有传使用默认的 String[] langArr = lang.split("_"); loacale = new Locale(langArr[0], langArr[1]); } } return loacale; } @Override public void setLocale(HttpServletRequest httpServletRequest, HttpServletResponse httpServletResponse, Locale locale) { } }- 定义自己的本地语言解析器以Bean的方式注入spring容器中,就可以了.
@Configuration
public class MyMvcConfig implements WebMvcConfigurer {

    @Bean
    public LocaleResolver localeResolver(){
        return new MyLocaleResolver();
    }
}
5、登录请求拦截器
在未登录的情况下,访问后台页面需要将其拦截,并重定向到登录页
package com.jsh.demo.config;

import org.springframework.web.servlet.HandlerInterceptor;

import javax.servlet.http.HttpServletRequest;
import javax.servlet.http.HttpServletResponse;

/**
 * 登录请求拦截器
 */
public class LoginHandlerInterceptor implements HandlerInterceptor {

    @Override
    public boolean preHandle(HttpServletRequest request, HttpServletResponse response, Object handler) throws Exception {
        // 首先获取session值,没有session值则需要重新登录,这里的session在登录成功后会塞入用户名
        Object loginUser = request.getSession().getAttribute("loginUser");
        if(loginUser == null){ // 没有登录
            request.setAttribute("msg", "没有权限,请先登录!");
            // 重定向到登录页
            request.getRequestDispatcher("/index").forward(request, response);
            return false;
        }else{
            return true;
        }
    }
}
重写WebMvcConfigurer接口的addInterceptors方法
@Configuration
public class MyMvcConfig implements WebMvcConfigurer {

    /**
     * 配置登录拦截器,拦截未登录的请求
     * @param registry
     */
    @Override
    public void addInterceptors(InterceptorRegistry registry) {
        registry.addInterceptor(new LoginHandlerInterceptor())
                .addPathPatterns("/**") // 拦截所有请求
                .excludePathPatterns("/user/login", "/index", "/index.html", "/",
                        "/css/**", "/js/**", "/fonts/**"); // 哪些请求剔除,不拦截
    }
}
这里写了个简单的登录方法
package com.jsh.demo.controller;

import org.springframework.stereotype.Controller;
import org.springframework.ui.Model;
import org.springframework.util.StringUtils;
import org.springframework.web.bind.annotation.RequestMapping;
import org.springframework.web.bind.annotation.RequestParam;
import org.springframework.web.bind.annotation.SessionAttribute;

import javax.servlet.http.HttpSession;

@Controller
public class IndexController {

    @RequestMapping("/user/login")
    public String login(@RequestParam("username") String username, @RequestParam("password") String password, Model model, HttpSession session){
        String msg = "";
        if(!StringUtils.hasLength(username) || !StringUtils.hasLength(password)) {
            msg = "登录名或密码不能为空!";
        }else if("111".equals(password)){
            // 塞入登录session
            session.setAttribute("loginUser", username);
            return "redirect:/main.html";
        } else{
            msg = "登录名或密码错误!";
        }
        model.addAttribute("msg", msg);
        return "index";
    }
}

