Ubuntu install TensorFlow 1.10 + CUDA 9.2 + cuDNN 7.2
为了装TensorFlow 1.10 下面升级一下系统的软件环境
NVIDIA DRIVER
去官网下载最新的linux驱动 http://www.nvidia.com/Download/index.aspx
直接运行会报错
sudo bash NVIDIA-Linux-x86_64-390.87.run
ERROR: You appear to be running an X server; please exit X before
         installing. For further details, please see the section INSTALLING
         THE NVIDIA DRIVER in the README available on the Linux driver
         download page at www.nvidia.com.
需要先关闭图形界面,在另一台电脑上用ssh登录这台电脑然后运行
sudo init 3
sudo killall Xorg
然后再运行
sudo bash NVIDIA-Linux-x86_64-390.87.run
装好后运行
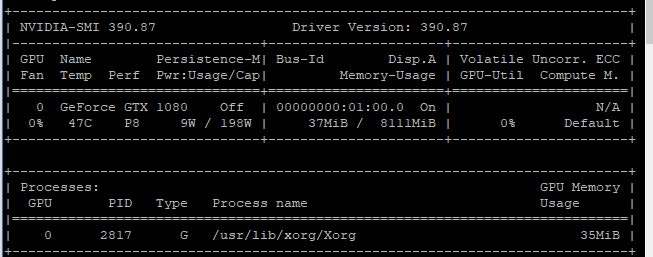
nvidia-smi
出现下图结果说明成功安装
再运行下面命令恢复图形界面
sudo init 5
可以重启一下确认显卡驱动是否正常
如果需要改gcc 或g++版本 请参考上一篇博文 https://www.cnblogs.com/jins-note/p/9597210.html
CUDA 9.2
由于TensorFlow 1.10 支持cuda 9.2
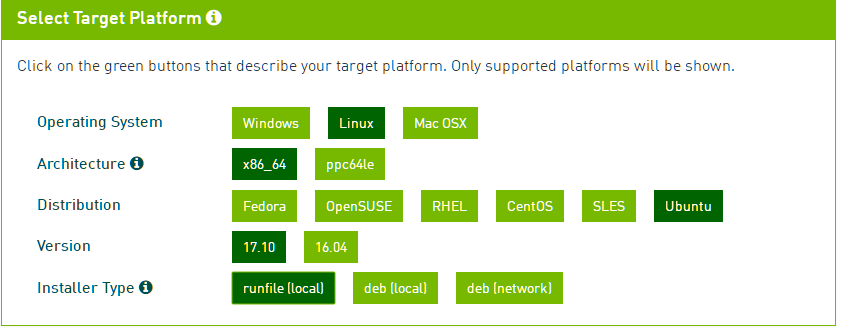
去官网下载最新版本
https://developer.nvidia.com/cuda-downloads?target_os=Linux&target_arch=x86_64&target_distro=Ubuntu&target_version=1710&target_type=runfilelocal
先安装一些推荐库
sudo apt-get install freeglut3-dev build-essential libx11-dev libxmu-dev libxi-dev libgl1-mesa-glx libglu1-mesa libglu1-mesa-dev libglfw3-dev libgles2-mesa-dev
这里注意:cuda里带的驱动比刚从官网下的新,那么用cuda里带的驱动(居然比官网下的显卡驱动新??)
不然会报错
cudaerrorinsufficientdriver
然后安装
sudo init 3
sudo killall Xorg
sudo bash cuda_9.2.148_396.37_linux.run
安装过程如下
安装 补丁
sudo bash cuda_9.2.148.1_linux.run
装好后修改环境变量 ~/.bashrc 在末尾添加
export LD_LIBRARY_PATH="$LD_LIBRARY_PATH:/usr/local/cuda/lib64"
export CUDA_HOME=/usr/local/cuda
export PATH="$CUDA_HOME/bin:$PATH"
修改完毕之后执行一下使其生效:
source ~/.bashrc
恢复显示
sudo init 5
装好后去 CUDA Samples 目录编译一些例子看看能不能运行,能运行就ok
cd ~/NVIDIA_CUDA-9.2_Samples/
make -j8
编译好后去下面目录里运行
cd bin/x86_64/linux/release
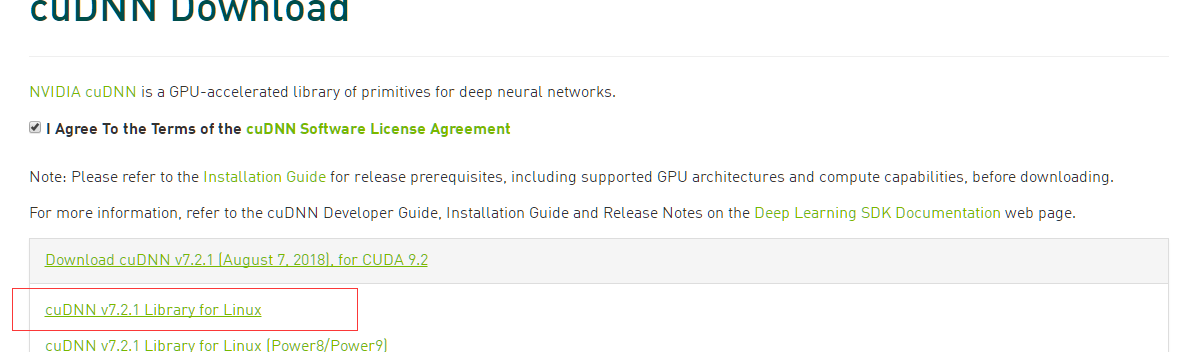
cuDNN
去官网下载对应版本 https://developer.nvidia.com/rdp/cudnn-download 需要登录才能下载
下载后的文件后缀名应该是 *.tgz 如果 是 .solitairetheme8 那就改成 .tgz
安装很简单,解压复制到对应目录就好
tar -zxvf cudnn-9.2-linux-x64-v7.2.1.38.tgz
sudo cp cuda/include/cudnn.h /usr/local/cuda/include/
sudo cp cuda/lib64/libcudnn* /usr/local/cuda/lib64/ -d
sudo chmod a+r /usr/local/cuda/include/cudnn.h
sudo chmod a+r /usr/local/cuda/lib64/libcudnn*
TensorFlow 1.10
安装 Anaconda 从这里下载 https://www.anaconda.com/download/
更换为国内源 https://mirrors.ustc.edu.cn/help/anaconda.html
conda config --add channels https://mirrors.ustc.edu.cn/anaconda/pkgs/free/
conda config --add channels https://mirrors.ustc.edu.cn/anaconda/pkgs/main/
conda config --add channels https://mirrors.ustc.edu.cn/anaconda/cloud/conda-forge/
conda config --set show_channel_urls yes
然后安装
conda install tensorflow-gpu==1.10
装好后测试
import tensorflow as tf
tf.__version__
参考: https://cuiqingcai.com/5822.html
欢迎转载,转载请保留页面地址。帮助到你的请点个推荐。

 浙公网安备 33010602011771号