Cloudera Manager5安装总结遇到问题及解决办法 CDH 5.8 on CentOS 7
1.Cloudera Manager在线安装你认为有什么优点和缺点?
2.Cloudera Manager安装过程中遇到,你认为该如何解决?
3.在线安装addr.arpa domain name pointer localhost出现这个问题该如何解决?

安装过程中,由于网络终端,导致下面问题:
问题1:安装停止在获取安装锁
/tmp/scm_prepare_node.tYlmPfrT
using SSH_CLIENT to get the SCM hostname: 172.16.77.20 33950 22
opening logging file descriptor
正在启动安装脚本...正在获取安装锁...BEGIN flock 4

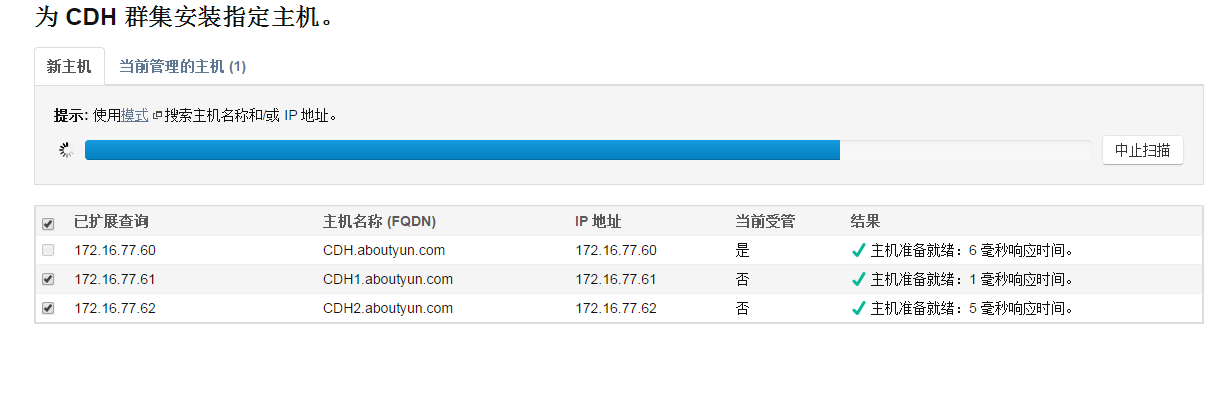
问题2:不能选择主机
安装失败了,重新不能选主机

图1
解决方案,需要清理安装失败文件
卸载 Cloudera Manager 5.1.x.和 相关软件【官网翻译:高可用】

问题3:DNS反向解析PTR localhost:
描述:
DNS反向解析错误,不能正确解析Cloudera Manager Server主机名
日志:
解决方案:
将连不上的机器 /usr/bin/host 文件删掉,执行下面命令:
说明:不明白cloudera的初衷,这里已经得到 Cloudera Manager Server的ip了,却还要把ip解析成主机名来连接由于DNS反向解析没有配置好,根据Cloudera Manager Server 的ip解析主机名却得到了localhost,造成之后的连接错误这里的解决方案是直接把/usr/bin/host删掉,这样Cloudera Manager就会直接使用 ip进行连接,就没有错了参考:

问题 4 NTP:
问题描述:Bad Health --Clock OffsetThe host's NTP service did not respond to a request for the clock offset.解决:配置NTP服务步骤参考:
CentOS配置NTP Server:
http://www.hailiangchen.com/centos-ntp/
国内常用NTP服务器地址及IP
http://www.douban.com/note/171309770/
修改配置文件:
[root@work03 ~]# vim /etc/ntp.conf# Use public servers from the pool.ntp.org project.# Please consider joining the pool (http://www.pool.ntp.org/join.html).server s1a.time.edu.cn preferserver s1b.time.edu.cnserver s1c.time.edu.cn
restrict 172.16.1.0 mask 255.255.255.0 nomodify <===放行局域网来源
启动ntp
#service ntpd restart <===启动ntp服务
客户端同步时间(work02,work03):
ntpdate work01
说明:NTP服务启动需要大约五分钟时间,服务启动之前,若客户端同步时间,则会出现错误“no server suitable for synchronization found”
定时同步时间:
在work02和 work03上配置crontab定时同步时间
crontab -e
00 12 * * * root /usr/sbin/ntpdate 192.168.56.121 >> /root/ntpdate.log 2>&1
问题 2.2
描述:
Clock Offset
- Ensure that the host's hostname is configured properly.
- Ensure that port 7182 is accessible on the Cloudera Manager Server (check firewall rules).
- Ensure that ports 9000 and 9001 are free on the host being added.
问题定位:
- Check agent logs in /var/log/cloudera-scm-agent/ on the host being added (some of the logs can be found in the installation details).
解决:
在对应host(work02、work03)上运行 'ntpdc -c loopinfo'
[root@work03 work]# ntpdc -c loopinfo
ntpdc: read: Connection refused
开启ntp服务:
三台机器都开机启动 ntp服务
chkconfig ntpd on

问题 5 heartbeat:
错误信息:
Installation failed. Failed to receive heartbeat from agent.
解决:关闭防火墙centos7.0(默认是使用firewall作为防火墙,如若未改为iptables防火墙,使用以下命令查看和关闭防火墙)
查看防火墙状态:firewall-cmd --state
关闭防火墙:systemctl stop firewalld.service

问题 6 Unknow Health:
Unknow Health
重启后:Request to theHost Monitor failed.
service --status-all| grep clo
机器上查看scm-agent状态:cloudera-scm-agent dead but pid file exists
解决:重启服务
service cloudera-scm-agent restartservice cloudera-scm-server restart

问题 7 canonial name hostname consistent:
Bad HealthThe hostname and canonical name for this host are not consistent when checked from a Java process.canonical name:4092 Monitor-HostMonitor throttling_logger WARNING (29 skipped) hostname work02 differs from the canonical name work02.xinzhitang.com解决:修改hosts 使FQDN和 hostname相同ps:虽然解决了但是不明白为什么主机名和主机别名要一样/etc/hosts192.168.1.185 work01 work01192.168.1.141 work02 work02192.168.1.198 work03 work03

问题 8 Concerning Health:
Concerning Health Issue-- Network Interface Speed --描述:The host has 2 network interface(s) that appear to be operating at less than full speed. Warning threshold: any.详细:This is a host health test that checks for network interfaces that appear to be operating at less than full speed.
A failure of this health test may indicate that network interface(s) may be configured incorrectly and may be causing performance problems. Use the ethtool command to check and configure the host's network interfaces to use the fastest available link speed and duplex mode.解决:本次测试修改了 Cloudera Manager 的配置,应该不算是真正的解决
Cloudera 建议将 /proc/sys/vm/swappiness 设置为 0。当前设置为 60。使用 sysctl 命令在运行时更改该设置并编辑 /etc/sysctl.conf 以在重启后保存该设置。您可以继续进行安装,但可能会遇到问题,Cloudera Manager 报告您的主机由于交换运行状况不佳。以下主机受到影响:
echo 0 > /proc/sys/vm/swappiness1.查看你的系统里面的swappiness$ cat /proc/sys/vm/swappiness
不出意外的话,你应该看到是 60
2.修改swappiness值为10$ sudo sysctl vm.swappiness=10
但是这只是临时性的修改,在你重启系统后会恢复默认的60,所以,还要做一步:$ gksudo gedit /etc/sysctl.conf
在这个文档的最后加上这样一行:vm.swappiness=10
问题10:
rm /var/lib/cloudera-scm-agent/*
问题11:
Failed to create Oozie database.
rm -rf /var/lib/oozie/*
drop database oozie on postgresql
scm数据库的用户名,密码
more /etc/cloudera-scm-server/db.properties
其他数据库(如amon,hmon,smon,rman,nav)的用户名、密码
more /etc/cloudera-scm-server/db.mgmt.properties
数据库管理者(相当于oracle DBA)cloudera-scm的用户名、密码
/var/lib/cloudera-scm-server-db/data/generated_password.txt
hive数据库的用户名、密码
You can find the databaes admin(cloudera-scm) password in /var/lib/cloudera-scm-server-db/data/generated_password.txt.
针对数据库的管理
1:连接数据库
psql --host=localhost --port=7432 --username=scm --dbname=postgres -v ON_ERROR_STOP=1
psql --host=localhost --port=7432 --username=hmon --dbname=hmon -v ON_ERROR_STOP=1
psql --host=localhost --port=7432 --username=hive --dbname=hive -v ON_ERROR_STOP=1
psql --host=localhost --port=7432 --username=cloudera-scm -W=Cl5y3a3i6C --dbname=postgres -v ON_ERROR_STOP=1
输入用户口令后即可进入数据库
显示数据库列表 \l
切换数据库\c test
退出 \q
列表表、视图、序列 \d
2:数据查询
注意在查看hive数据库中表中的数据时,可以由于hive数据库在建表时,表的定义使用了大小写混合拼写的方式,在PostgreSQL中使用双引号来界定标识符使您的具体大小写混合的拼写。否则会报下图中的错误:
ERROR: relation "dbs" does not exist

3、数据导出
pg_dump -h localhost -p 7432 -U scm > /tmp/scm_server_db_backup.$(date +%Y%m%d)
1. 下载mysql的repo源
$ wget http://repo.mysql.com/mysql-community-release-el7-7.noarch.rpm
2. 安装mysql-community-release-el7-5.noarch.rpm包
$ sudo rpm -ivh mysql-community-release-el7-7.noarch.rpm
安装这个包后,会获得两个mysql的yum repo源:/etc/yum.repos.d/mysql-community.repo,/etc/yum.repos.d/mysql-community-source.repo。
3. 安装mysql
$ sudo yum install mysql-server
根据步骤安装就可以了,不过安装完成后,没有密码,需要重置密码。
来源: http://www.mamicode.com/info-detail-503994.html
4、 install the MySQL connector on a RHEL system:
sudo yum install mysql-connector-java
service mysqld start
sudo /usr/bin/mysql_secure_installation
6、To make sure the MySQL server starts at boot:
- On RHEL systems:
$ sudo /sbin/chkconfig mysqld on
$ sudo /sbin/chkconfig --list mysqld
mysqld          0:off   1:off   2:on    3:on    4:on    5:on    6:off
mysql -u root -pmysql> CREATE USER 'hive'@'metastorehost' IDENTIFIED BY 'mypassword';...mysql> REVOKE ALL PRIVILEGES, GRANT OPTION FROM 'hive'@'metastorehost';mysql> GRANT ALL PRIVILEGES ON metastore.* TO 'hive'@'metastorehost';mysql> FLUSH PRIVILEGES;mysql> quit;
sudo -u hdfs hadoop jar /opt/cloudera/parcels/CDH/lib/hadoop-mapreduce/hadoop-mapreduce-examples.jar pi 10 100
The "Getting Started with Hadoop" Tutorial
>Install htop on CentOS 7
First, enable the epel release on CentOS 7.
yum -y install epel-release
Now we can install CentOS htop using yum install command.
yum -y install htop
欢迎转载,转载请保留页面地址。帮助到你的请点个推荐。


 浙公网安备 33010602011771号