collections
namedtuple 具名元组
我们知道tuple可以表示不变集合,例如,一个点的二维坐标就可以表示成:
但是,看到(1, 2),很难看出这个tuple是用来表示一个坐标的。
这时,namedtuple就派上了用场:
from collections import namedtuple

# 可以通过列表的方式传值
# 具名元组
# point = namedtuple('坐标', ['x', 'y', 'z'])
# 这边个人觉得用法有点像matplotlib ,tinker等等  它们都支持字符串,它们会自动切割成列表
# point = namedtuple('坐标', 'x y z')
# p = point(1,2,4)
# print(p)
# print(type(p))
# print(p.x)
# print(p.y)
# print(p.z)


# card = namedtuple('扑克牌',' color number')
# A = card('黑桃', 'A')
# print(A)
# print(A.color)
# print(A.number)
#
#
#
# city = namedtuple('日本', 'name person size')
# c = city('东京', 'R老师', 'L')
# print(c)
# print(c.name)
# print(c.person)
# print(c.size)
deque 双端队列
使用list存储数据时,按索引访问元素很快,但是插入和删除元素就很慢了,因为list是线性存储,数据量大的时候,插入和删除效率很低。
deque是为了高效实现插入和删除操作的双向列表,适合用于队列和栈:
# from collections import deque
# q = deque(['a', 'b', 'c'])

# append  appendleft
# pop  popleft pop(0)

# q.append(1)
# q.appendleft(2)
#
#
# q.insert(0, 'hello world')
# print(q.pop())
# print(q.popleft())
# print(q.popleft())
OrderDict 特殊有序字典
使用dict时,Key是无序的。在对dict做迭代时,我们无法确定Key的顺序。
如果要保持Key的顺序,可以用OrderedDict:
# normal_d = dict([('a',1),('b',2),('c',3)])
# print(normal_d)
# from collections import OrderedDict不可思议吧  对就是这样
# order_d = OrderedDict([('a',1),('b',2),('c',3)])
# print(order_d, type(order_d))
# order_d1 = OrderedDict()
# order_d1['x'] = 1
# order_d1['y'] = 2
# order_d1['z'] = 3
# print(order_d1)
# for i in order_d1:
#     print(i)
# print(order_d1)
defaultdict 特殊弹性字典
使用dict时,如果引用的Key不存在,就会抛出KeyError。如果希望key不存在时,返回一个默认值,就可以用defaultdict
# from collections import defaultdict
#
# values = [11, 22, 33, 44, 55, 66, 77, 88, 99, 90]
# # 直接生成一个特殊字典对象,相对于先创造好字典里面的k1,k2键之后[]进行放值流程这个方法
# my_dict = defaultdict(list)
#
# print(my_dict['aaa'])
# for value in values:
#     if value > 66:
#         my_dict['k1'].append(value)
#     else:
#         my_dict['k2'].append(value)
# print(my_dict)
#
# my_dict1 = defaultdict(int)
# print(my_dict1['xxx'])
# print(my_dict1['yyy'])
#
# my_dict2 = defaultdict(bool)
# print(my_dict2)
#
# my_dict3 = defaultdict(tuple)
# print(my_dict3['mmm'])
Counter 统计次数
Counter类的目的是用来跟踪值出现的次数。它是一个无序的容器类型,以字典的键值对形式存储,其中元素作为key,其计数作为value。计数值可以是任意的Interger(包括0和负数)。Counter类和其他语言的bags或multisets很相似。
# 可以列出各个字符的数量
# 先循环当前字符串 讲每一个字符串都采用字典新建键值对的范式
from collections import Counter
s = 'afafhkjfhl;fha你gkaj'
res = Counter(s)
print(res)
for i in res:
    print(i)
time
表示时间的三种方式
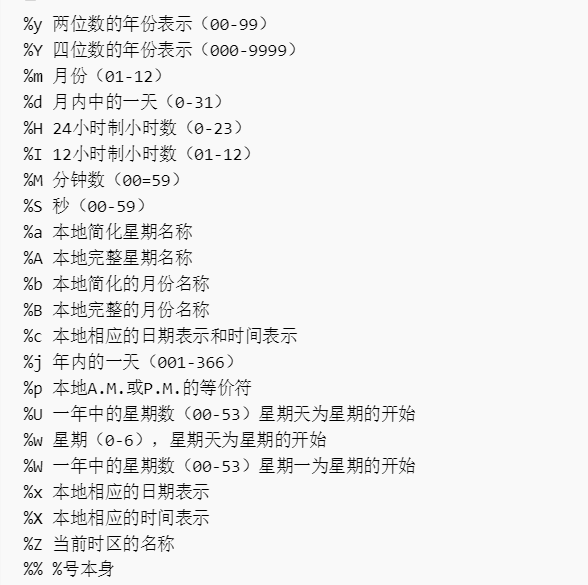
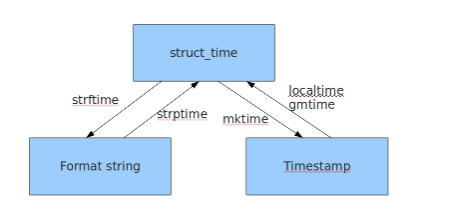
在Python中,通常有这三种方式来表示时间:时间戳、元组(struct_time)、格式化的时间字符串:
(1)时间戳(timestamp) :通常来说,时间戳表示的是从1970年1月1日00:00:00开始按秒计算的偏移量。我们运行“type(time.time())”,返回的是float类型。
(2)格式化的时间字符串(Format String): ‘1999-12-06’
(3)元组(struct_time) :struct_time元组共有9个元素共九个元素:(年,月,日,时,分,秒,一年中第几周,一年中第几天等)

#常用方法
1.time.sleep(secs)
(线程)推迟指定的时间运行。单位为秒。
2.time.time()
获取当前时间戳
#导入时间模块
>>>import time

#时间戳
>>>time.time()
1500875844.800804

#时间字符串
>>>time.strftime("%Y-%m-%d %X")
'2017-07-24 13:54:37'
>>>time.strftime("%Y-%m-%d %H-%M-%S")
'2017-07-24 13-55-04'

#时间元组:localtime将一个时间戳转换为当前时区的struct_time
time.localtime()
time.struct_time(tm_year=2017, tm_mon=7, tm_mday=24,
          tm_hour=13, tm_min=59, tm_sec=37,
                 tm_wday=0, tm_yday=205, tm_isdst=0)
小结:时间戳是计算机能够识别的时间;时间字符串是人能够看懂的时间;元组则是用来操作时间的
几种时间格式之间的转换

时间类型的转换代码
#时间戳-->结构化时间
#time.gmtime(时间戳)    #UTC时间,与英国伦敦当地时间一致
#time.localtime(时间戳) #当地时间。例如我们现在在北京执行这个方法:与UTC时间相差8小时,UTC时间+8小时 = 北京时间
>>>time.gmtime(1500000000)
time.struct_time(tm_year=2017, tm_mon=7, tm_mday=14, tm_hour=2, tm_min=40, tm_sec=0, tm_wday=4, tm_yday=195, tm_isdst=0)
>>>time.localtime(1500000000)
time.struct_time(tm_year=2017, tm_mon=7, tm_mday=14, tm_hour=10, tm_min=40, tm_sec=0, tm_wday=4, tm_yday=195, tm_isdst=0)

#结构化时间-->时间戳
#time.mktime(结构化时间)
>>>time_tuple = time.localtime(1500000000)
>>>time.mktime(time_tuple)
1500000000.0
#结构化时间-->字符串时间
#time.strftime("格式定义","结构化时间")  结构化时间参数若不传,则显示当前时间
>>>time.strftime("%Y-%m-%d %X")
'2017-07-24 14:55:36'
>>>time.strftime("%Y-%m-%d",time.localtime(1500000000))
'2017-07-14'

#字符串时间-->结构化时间
#time.strptime(时间字符串,字符串对应格式)
>>>time.strptime("2017-03-16","%Y-%m-%d")
time.struct_time(tm_year=2017, tm_mon=3, tm_mday=16, tm_hour=0, tm_min=0, tm_sec=0, tm_wday=3, tm_yday=75, tm_isdst=-1)
>>>time.strptime("07/24/2017","%m/%d/%Y")
time.struct_time(tm_year=2017, tm_mon=7, tm_mday=24, tm_hour=0, tm_min=0, tm_sec=0, tm_wday=0, tm_yday=205, tm_isdst=-1)
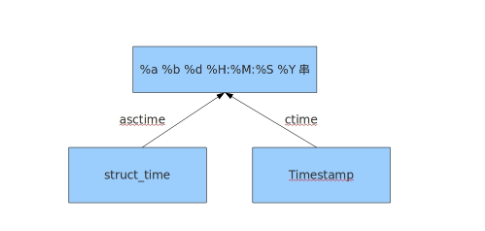
其他时间格式转化为固定格式的字符串时间格式

#结构化时间 --> %a %b %d %H:%M:%S %Y串
#time.asctime(结构化时间) 如果不传参数,直接返回当前时间的格式化串
>>>time.asctime(time.localtime(1500000000))
'Fri Jul 14 10:40:00 2017'
>>>time.asctime()
'Mon Jul 24 15:18:33 2017'

#时间戳 --> %a %b %d %H:%M:%S %Y串
#time.ctime(时间戳)  如果不传参数,直接返回当前时间的格式化串
>>>time.ctime()
'Mon Jul 24 15:19:07 2017'
>>>time.ctime(1500000000)
'Fri Jul 14 10:40:00 2017'
datetime 日期时间,可以方便计算日期时间差
import datetime
# print(datetime.date.today())  # date>>>:年月日
# print(datetime.datetime.today())  # datetime>>>:年月日 时分秒
# res = datetime.date.today()
# res1 = datetime.datetime.today()
# print(res.year)
# print(res.month)
# print(res.day)
# print(res.weekday())  # 0-6表示星期  0表示周一

# print(res.isoweekday())  # 1-7表示星期 7就是周日
"""
(******)
日期对象 = 日期对象 +/- timedelta对象
timedelta对象 = 日期对象 +/- 日期对象
"""
# current_time = datetime.date.today()  # 日期对象
# timetel_t = datetime.timedelta(days=7)  # timedelta对象
# res1 = current_time+timetel_t  # 日期对象
#
# print(current_time - timetel_t)
# print(res1-current_time)
random 随机生成模块
# 随机模块
import random

# print(random.randint(1,6))  # 随机取一个你提供的整数范围内的数字  包含首尾
# print(random.random())  # 随机取0-1之间小数
# print(random.choice([1,2,3,4,5,6]))  # 摇号 随机从列表中取一个元素
# res = [1,2,3,4,5,6]
# random.shuffle(res)  # 洗牌
# print(res)
列子:随机生成n位数的随机验证码
def get_code(n):
    code = ''
    for i in range(n):
        # 先生成随机的大写字母 小写字母 数字
        upper_str = chr(random.randint(65,90))
        lower_str = chr(random.randint(97,122))
        random_int = str(random.randint(0,9))
        # 从上面三个中随机选择一个作为随机验证码的某一位
        code += random.choice([upper_str,lower_str,random_int])
    return code
res = get_code(4)
print(res)
os 跟操作系统打交道的模块
import os
# BASE_DIR = os.path.dirname(__file__)
# MOVIE_DIR = os.path.join(BASE_DIR,'老师们的作品')
# movie_list = os.listdir(MOVIE_DIR)
# while True:
#     for i,j in enumerate(movie_list,1):
#         print(i,j)
#     choice = input('你想看谁的啊(今日热搜:tank老师)>>>:').strip()
#     if choice.isdigit():  # 判断用户输入的是否是纯数字
#         choice = int(choice)  # 传成int类型
#         if choice in range(1,len(movie_list)+1):  # 判断是否在列表元素个数范围内
#             # 获取用户想要看的文件名
#             target_file = movie_list[choice-1]
#             # 拼接文件绝对路径
#             target_path = os.path.join(MOVIE_DIR,target_file)
#             with open(target_path,'r',encoding='utf-8') as f:
#                 print(f.read())


# os.mkdir('tank老师精选')  # 自动创建文件夹
# print(os.path.exists(r'D:\Python项目\day16\rion老师精选'))  # 判断文件是否存在
# print(os.path.exists(r'D:\Python项目\day16\老师们的作品\tank老师.txt'))  # 判断文件是否存在
# print(os.path.isfile(r'D:\Python项目\day16\tank老师精选'))  # 只能判断文件 不能判断文件夹
# print(os.path.isfile(r'D:\Python项目\day16\老师们的作品\tank老师.txt'))  # 只能判断文件 不能判断文件夹

# os.rmdir(r'D:\Python项目\day16\老师们的作品')  # 只能删空文件夹

# print(os.getcwd())
# print(os.chdir(r'D:\Python项目\day16\老师们的作品'))  # 切换当前所在的目录
# print(os.getcwd())

# 获取文件大小
# print(os.path.getsize(r'D:\Python项目\day16\老师们的作品\tank老师.txt'))  # 字节大小
# with open(r'D:\Python项目\day16\老师们的作品\tank老师.txt',encoding='utf-8') as f:
#     print(len(f.read()))
sys 跟python解释器打交道的模块
import sys
# sys.path.append()  # 将某个路径添加到系统的环境变量中
# print(sys.platform)
# print(sys.version)  # python解释器的版本

print(sys.argv)  # 命令行启动文件 可以做身份的验证
if len(sys.argv) <= 1:
    print('请输入用户名和密码')
else:
    username = sys.argv[1]
    password = sys.argv[2]
    if username == 'jason' and password == '123':
        print('欢迎使用')
        # 当前这个py文件逻辑代码
    else:
        print('用户不存在 无法执行当前文件')
python序列化 2大模块 --->
序列化的目的

1、以某种存储形式使自定义对象持久化;
2、将对象从一个地方传递到另一个地方。
3、使程序更具维护性。

写入文件的数据必须是字符串
基于网络传输的数据必须是二进制
序列化:其他数据类型转成字符串的过程
反序列化:字符串转成其他数据类型

    json模块(******)
        所有的语言都支持json格式
        支持的数据类型很少  字符串 列表 字典 整型 元组(转成列表)  布尔值


    pickle模块(****)
        只支持python
        python所有的数据类型都支持
json 万能语言的交流大使
import json
dic1 = {'A' : 'a', 'B' : 'b', 'C' : 'c'}

# 转化成字符串 , json字符串符号都为 " " ,python自身的为 ' ' ,会将其转化

str_dic = json.dumps(dic1)

print(str_dic, type(str_dic))


转化json字符串为字典形式 ,又称反序列化

ps:

#注意,要用json的loads功能处理的字符串类型的字典中的字符串必须由""表示
dic2 = json.loads(str_dic)

print(dic2, type(dic2))
dump和dumps相对比 除了一个是要文件对象外,还有就是它序列化自带写入功能,
load和loads相对比 load可以操作文件对象读取, 而loads只能直接对着字符串来操作 在文件中只有读取之后才可以操作
ps:个人总结: 文件操作选择 load dump
单纯字符串操作 loads dumps
import json
# with open('userinfo','w',encoding='utf-8') as f:
#     json.dump(d,f)  # 装字符串并自动写入文件
# with open('userinfo','r',encoding='utf-8') as f:
#     res = json.load(f)
#     print(res,type(res))

#
# with open('userinfo','w',encoding='utf-8') as f:
#     json.dump(d,f)  # 装字符串并自动写入文件
#     json.dump(d,f)  # 装字符串并自动写入文件

# with open('userinfo','r',encoding='utf-8') as f:
#     res1 = json.load(f)  # 不能够多次反序列化
#     res2 = json.load(f)
#     print(res1,type(res1))
#     print(res2,type(res2))
json问题解决列子:
解决不能多行写入的问题
# with open('userinfo','w',encoding='utf-8') as f:
#     json_str = json.dumps(d)
#     json_str1 = json.dumps(d)
#     f.write('%s\n'%json_str)
#     f.write('%s\n'%json_str1)


# with open('userinfo','r',encoding='utf-8') as f:
#     for line in f:
#         res = json.loads(line)
#         print(res,type(res))
# t = (1,2,3,4)
# print(json.dumps(t))
解决json字符串后中文转ASCII问题默认为True
不想转需要在后面家伙是加个参数ensure_ascii=False
# d1 = {'name':'朱志坚'}
# print(json.dumps(d1,ensure_ascii=False))
pickle 可以把python中任意的数据类型序列化
(我个人送他个称号吧~python帝中帝,他处化身弟中弟)
ps:我还是依然爱它,那它有什么作用呢?
用法和json一样 不过dumps类型为字节 <class 'bytes'>
pickle.dumps(d)
# pickle
# import pickle
# d = {'name':'jason'}
# res = pickle.dumps(d)  # 将对象直接转成二进制
# print(pickle.dumps(d))
# res1 = pickle.loads(res)
# print(res1,type(res1))
同理 ,load dump 用于操作文件 不过有一点必须注意:
用pickle操作文件,打开模式必须为b模式!!!!!!
"""
用pickle操作文件的时候 文件的打开模式必须是b模式
"""
# with open('userinfo_1','wb') as f:
#     pickle.dump(d,f)

# with open('userinfo_1','rb') as f:
#     res = pickle.load(f)
#     print(res,type(res))
两者序列化方式的纠缠点
这时候机智的你又要说了,既然pickle如此强大,为什么还要学json呢?
这里我们要说明一下,json是一种所有的语言都可以识别的数据结构。
如果我们将一个字典或者序列化成了一个json存在文件里,那么java代码或者js代码也可以拿来用。
但是如果我们用pickle进行序列化,其他语言就不能读懂这是什么了~
所以,如果你序列化的内容是列表或者字典,我们非常推荐你使用json模块
但如果出于某种原因你不得不序列化其他的数据类型,而未来你还会用python对这个数据进行反序列化的话,那么就可以使用pickle
subprocess 创建一个新的进程让其执行另外的程序
并与它进行通信,获取标准的输入、标准输出、标准错误以及返回码等。
使用列子:
"""
1.用户通过网络连接上了你的这台电脑
2.用户输入相应的命令 基于网络发送给了你这台电脑上某个程序
3.获取用户命令 里面subprocess执行该用户命令
4.将执行结果再基于网络发送给用户
这样就实现  用户远程操作你这台电脑的操作
"""
# while True:
#     cmd = input('cmd>>>:').strip()
#     import subprocess
#     obj = subprocess.Popen(cmd,shell=True,stdout=subprocess.PIPE,stderr=subprocess.PIPE)
#     # print(obj)
#     print('正确命令返回的结果stdout',obj.stdout.read().decode('gbk'))
#     print('错误命令返回的提示信息stderr',obj.stderr.read().decode('gbk'))


