一文搞定 SonarQube 接入 C#(.NET) 代码质量分析
1. 前言
C#语言接入Sonar代码静态扫描相较于Java、Python来说,相对麻烦一些。Sonar检测C#代码时需要预先编译,而且C#代码必须用MSbuid进行编译,如果需要使用SonarQube对C#进行代码质量分析,则需要下载Sonar-Scanner-MSBuild和MSBuild,其中要求MSBuild在V14.0以上。
2. Sonar-Scanner for MSBuild安装与配置
1、下载SonarQube Scanner for MSBuild,它是C# Framework的Sonar分析插件。
下载地址:sonar-scanner-msbuild-4.3.1.1372
2、下载并解压之后,设置SonarQube Scanner for MSBuild的环境变量。
例如我的解压路径是:C:\Users\Administrator\Downloads\sonar-scanner-msbuild-4.3.1.1372-net466,则把该路径添加到Path下。
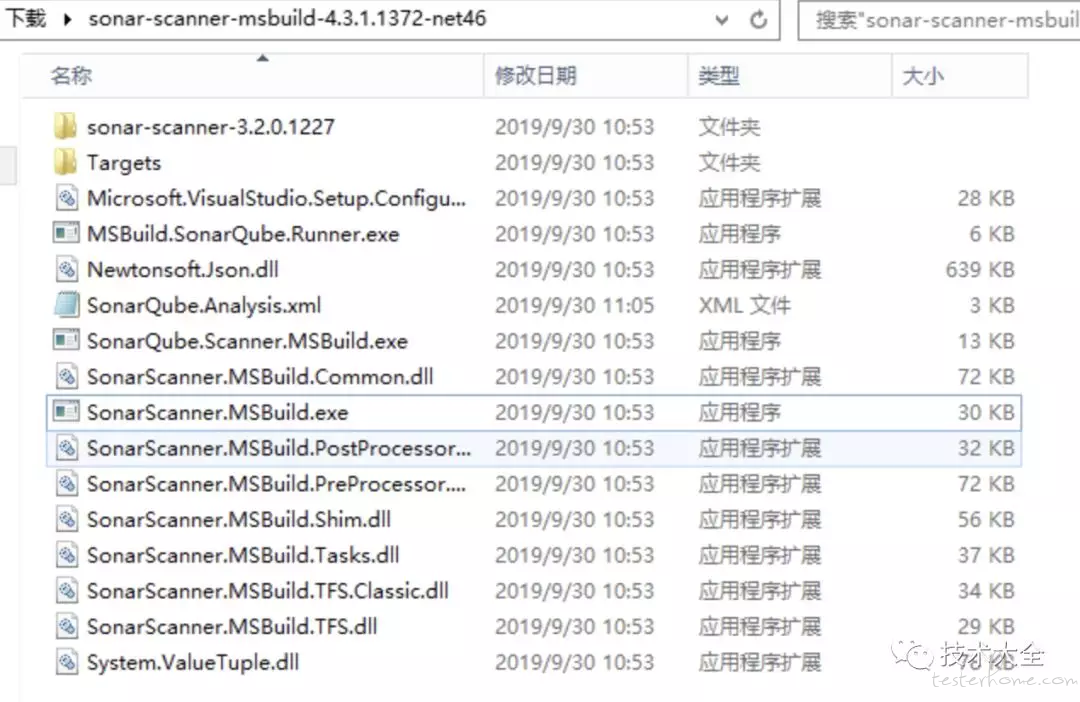
SonarQube Scanner for MSBuild解压目录如下图所示:
<?xml version="1.0" encoding="utf-8" ?>
<!--
  This file defines properties which would be understood by the SonarQube Scanner for MSBuild, if not overridden (see below)
  By default the SonarScanner.MSBuild.exe picks-up a file named SonarQube.Analysis.xml in the folder it
  is located (if it exists). It is possible to use another properties file by using the /s:filePath.xml flag
  The overriding strategy of property values is the following:
  - A project-specific property defined in the MSBuild *.*proj file (corresponding to a SonarQube module) can override:
  - A property defined in the command line (/d:propertyName=value) has which can override:
  - A property defined in the SonarQube.Analysis.xml configuration file [this file] which can override:
  - A property defined in the SonarQube User Interface at project level which can override:
  - A property defined in the SonarQube User Interface at global level which can't override anything.
  Note that the following properties cannot be set through an MSBuild project file or an SonarQube.Analysis.xml file:
  sonar.projectName, sonar.projectKey, sonar.projectVersion
  The following flags need to be used to set their value: /n:[SonarQube Project Name] /k:[SonarQube Project Key] /v:[SonarQube Project Version]
-->
<SonarQubeAnalysisProperties  xmlns:xsi="http://www.w3.org/2001/XMLSchema-instance" xmlns:xsd="http://www.w3.org/2001/XMLSchema" xmlns="http://www.sonarsource.com/msbuild/integration/2015/1">

  <Property Name="sonar.host.url">http://sonar_ip:sonar_port</Property>
  <Property Name="sonar.login">login_username</Property>
  <Property Name="sonar.password">login_password</Property>

  <!-- Required only for versions of SonarQube prior to 5.2 -->

  <Property Name="sonar.jdbc.url">jdbc:mysql://db_ip:db_port/sonar?useUnicode=true;characterEncoding=utf8;rewriteBatchedStatements=true;useConfigs=maxPerformance;useSSL=false</Property>
  <Property Name="sonar.jdbc.username">jdbc.username</Property>
  <Property Name="sonar.jdbc.password">jdbc.password</Property>

</SonarQubeAnalysisProperties>
3. MSBuild安装与配置
Visual Studio IDE在编译*.sln解决方案时默认是调用msbuild.exe来实现的。如果你的机器上没有装有Visual Studio,那么也可以单独使用MSBuild来编译.sln(工程解决方案)或.csproj(项目)。MSBuild可以直接通过.NETFramework来安装获得。
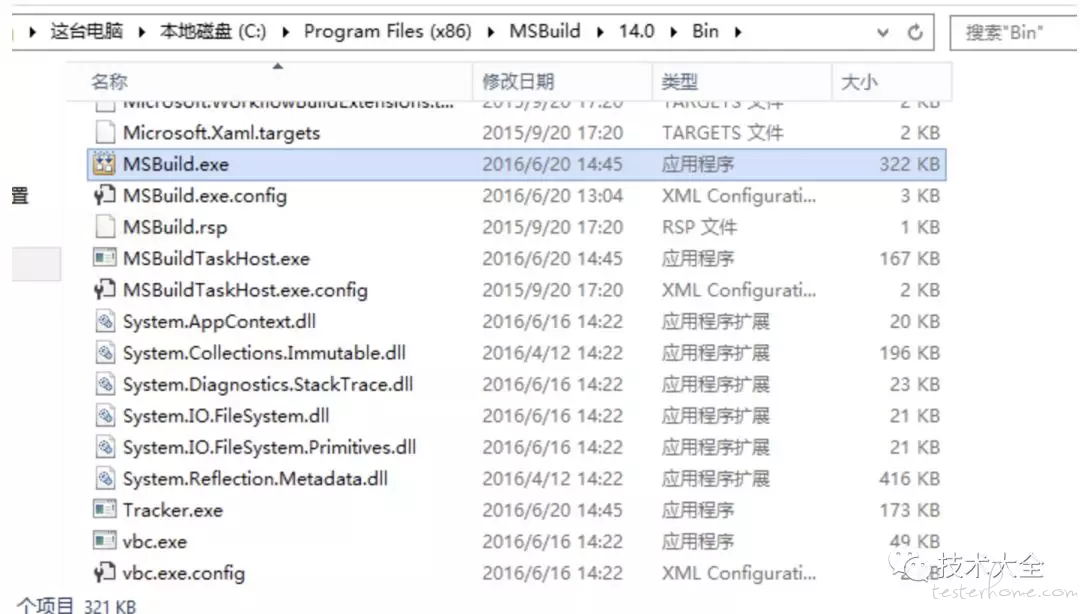
msbuild.exe的路径一般如下:
X86: C:\Program Files (x86)\MSBuild\14.0\Bin\MSBuild.exe
X64: C:\Program Files (x86)\MSBuild\14.0\Bin\amd64\MSBuild.exe
msbuild.exe 目录如下所示:
将MSBuild.exe添加到Path环境变量,便于后面在命令行中调用MSBuild。
msbuild常用编译命令:
MSBuild MyApp.sln /t:Rebuild /p:Configuration=Release
MSBuild MyApp.csproj /t:Clean /p:Configuration=Debug;/p:Platform=x86;TargetFrameworkVersion=v3.5

编译为 Release 代码 -p:configuration="release"
清理项目 -t:clean
重新编译 -t:rebuild
编译项目 -t:build 默认可以忽略这个参数
发布 -t:Publish

注意:这里的 -t 和 /t 作用是相同的。
4. Sonar+命令行分析C#代码
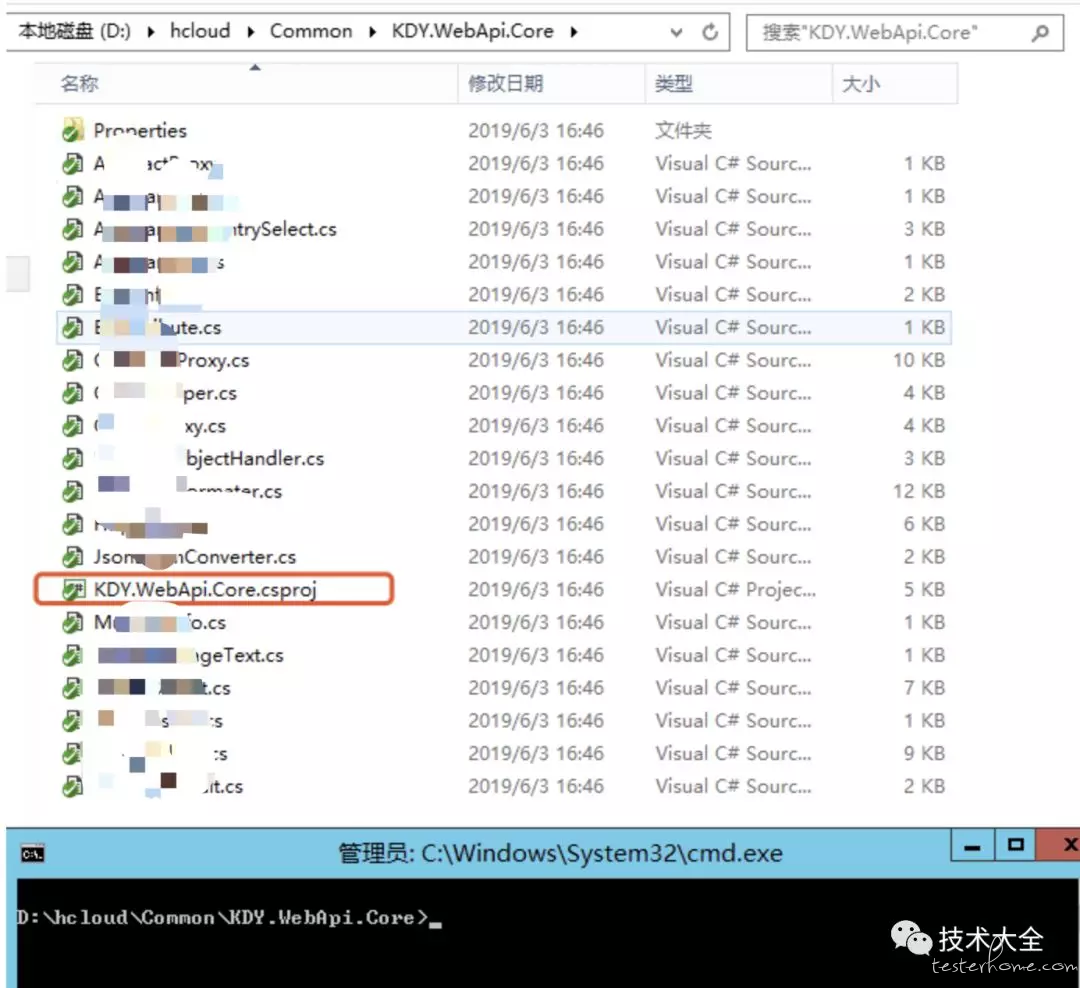
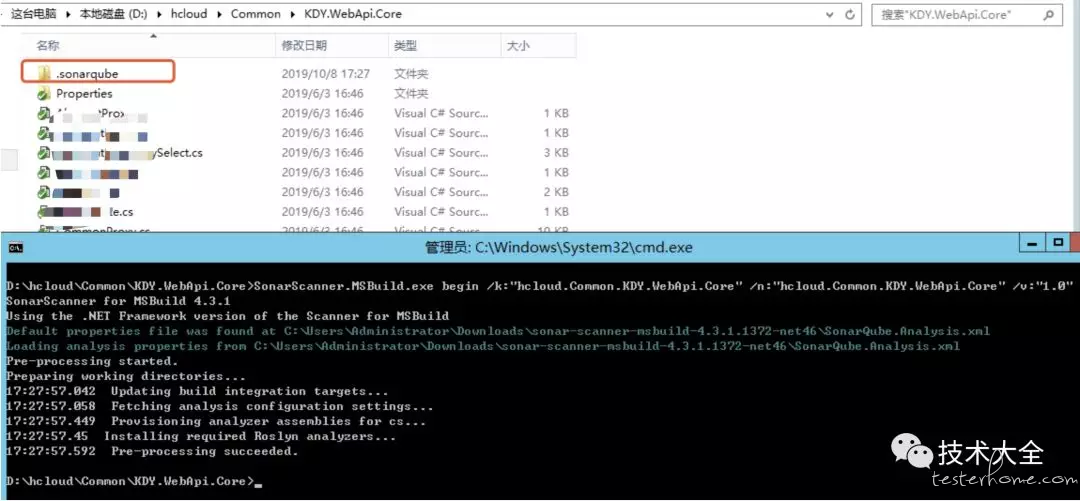
1、打开CMD,切换到指定的项目根目录,必须和.sln或者.csproj同级目录。例如以\hcloud\Common\KDY.WebApi.Core项目为例,如下图所示。
2、使用MSBuild方式进行Sonar Scanner扫描代码前期准备文件生成,CMD命令下运行:
SonarScanner.MSBuild.exe begin /k:"hcloud.Common.KDY.WebApi.Core" /n:"hcloud.Common.KDY.WebApi.Core" /v:"1.0"
命令执行结果如下:
- /key(简写k):对应projectKey即项目的唯一代码,如两套源代码使用同一个projectKey那扫描的结果将混在一起,所以一个项目需要有一个单独的projectKey
- /name(简写n):对应projectName即项目的名称,为项目的一个显示的名称,建立使用完整的项目名称
- /version(简写v):对应projectVersion即项目的版本,项目在不同的时期版本也是不一样的,如果方便,可以在sonarQube的服务器中查看到不同的版本代码其中问题的变化
执行上述命令后,在项目目录下,生成.sonarqube目录。
3、通过MSBuild命令编译项目,在CMD命令行下执行:
MSBuild.exe /t:Rebuild   (默认为Debug模式)

或者
MSBuild.exe /t:Rebuild /p:Configuration=Release  (指定编译模式)

或者
MSBuild.exe D:\hcloud\Common\Common.sln /t:Rebuild  (指定具体的.sln解决方案)
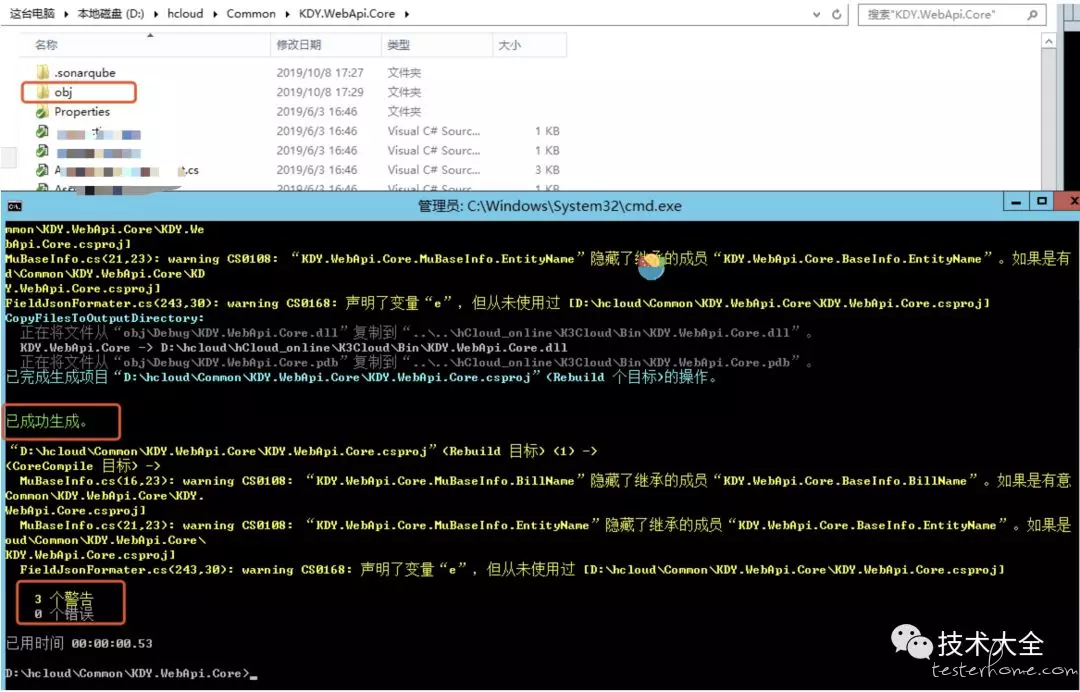
编译项目运行结果如下所示:
0个错误,则代表MSBuild编译成功,编译成功后,在当前目录下会生成一个obj目录。(编译成功后默认生成Debug产物),SonarQube分析C#项目工程时,前提需要MSBuild能预编译成功,如果存在错误,则无法成功完成后续Sonar分析动作。
4、分析C#扫描结果,将分析报告上传给SonarQube,CMD命令下运行:
SonarScanner.MSBuild.exe end
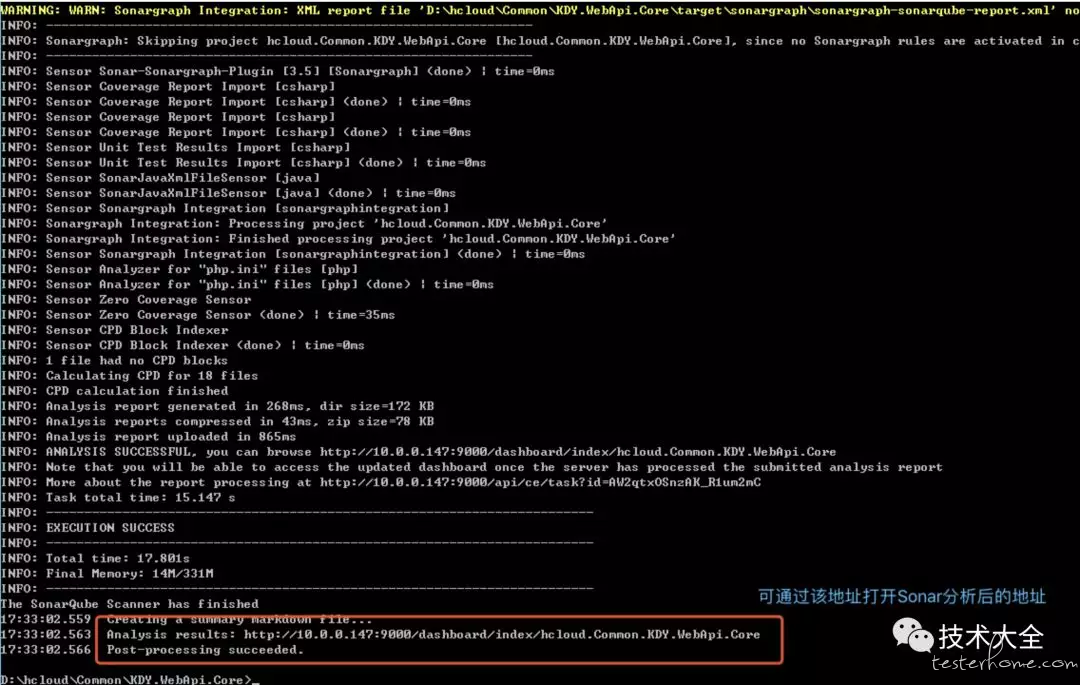
执行结果如下图所示:
温馨提示:
- 如果运行出现错误请检查sonar server的log,路径为Snoar\sonarqube-6.7\logs下的sonar.log,web.log和access.log。
- 如果遇到需要检测比较大的项目,可能上传的mysql数据量会很大,会超出默认的mysql上传的最大值,此时需要设置mysql的max_allowed_packet。
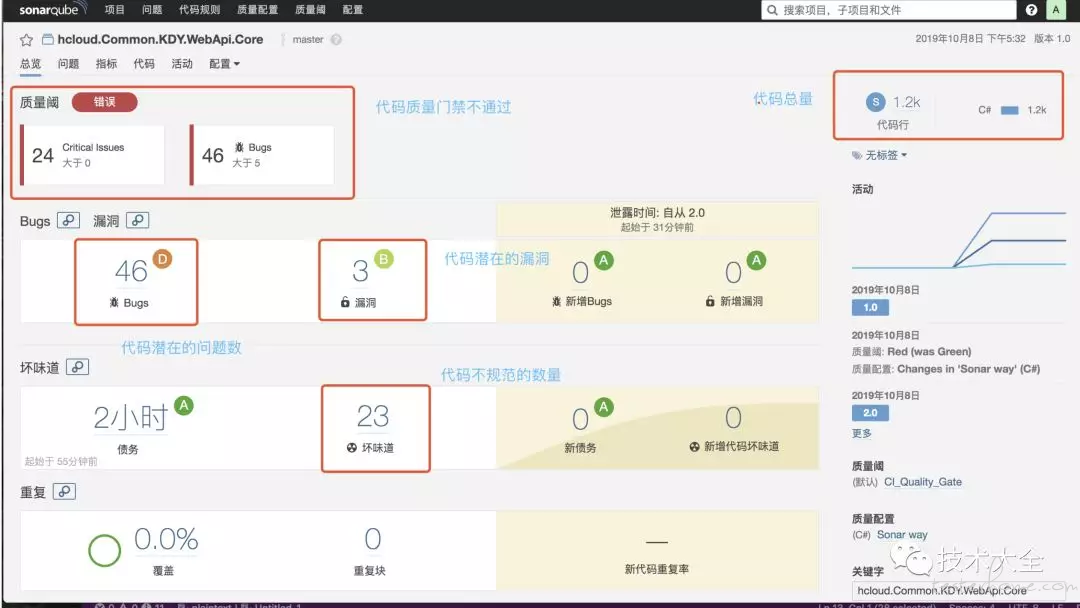
5、查看Sonar分析扫描后的结果,访问http://10.0.0.147:9000/dashboard?id=hcloud.Common.KDY.WebApi.Core,分析结果如下图所示:
5. Jenkins+Sonar+MSBuild分析C#代码
1、编译.NET(C#)应用程序可通过微软提供的MSBuild工具,先安装插件MSBuild,在Jenkins中搜索并安装MSBuild插件,如下图所示。
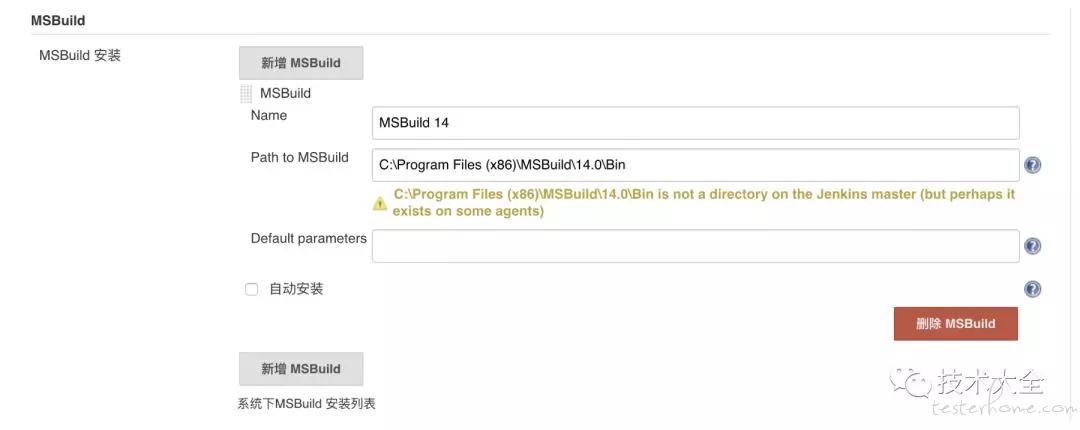
2、插件安装完毕后,进入系统管理->全局工具配置(Global Tool Configuration)找到MSBuild配置选项,如下图所示。
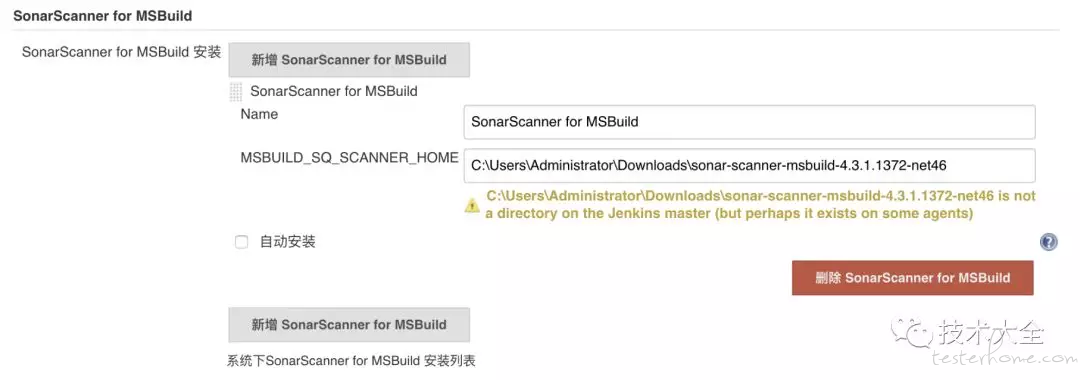
3、配置SonarScanner for MSBuild,如下图所示。
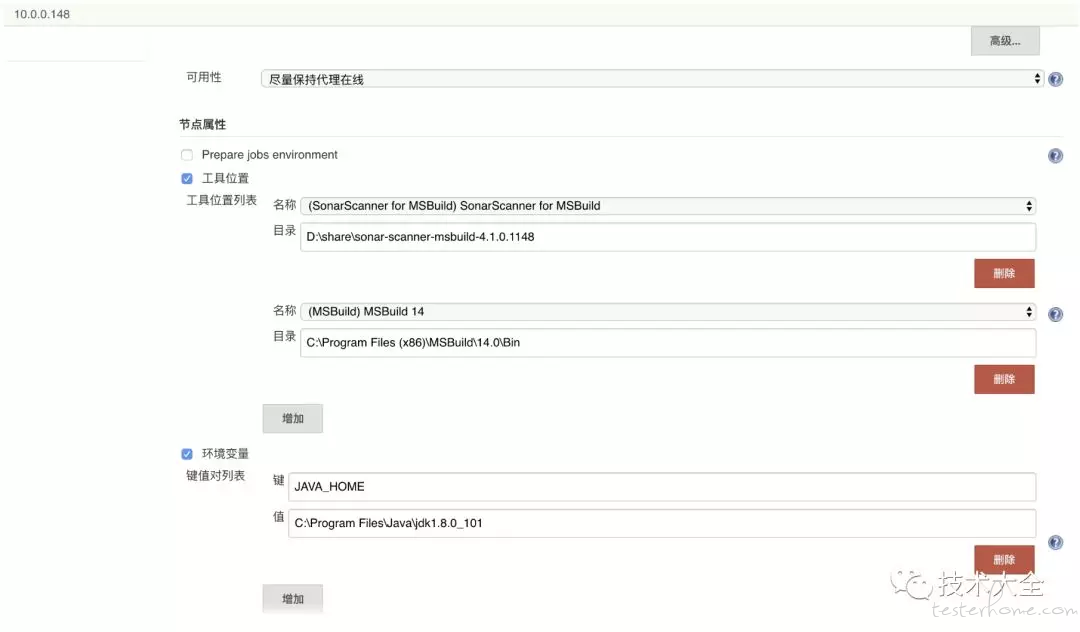
4、由于示例中的Jenkins服务是部署在Linux系统中,故此处可添加一台Windows主机(10.0.0.148)作为C#项目编译运行环境,在Windows从节点配置中,添加并配置相应工具,如下图所示。
5、新建并配置JOB,添加JOB运行节点(编译C#工程项目的运行机),如下图所示。
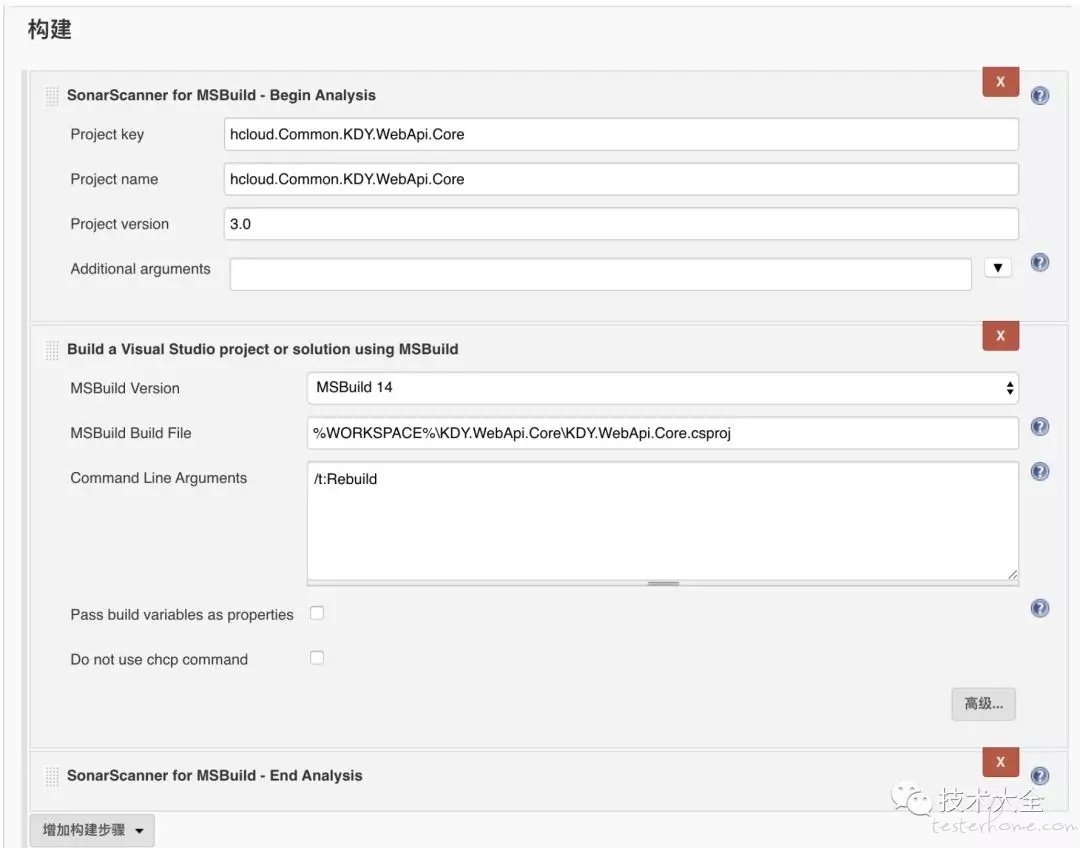
6、配置源码管理及其它所需配置(较为简单,此处省略)后,添加并配置构建选项,如下图所示。
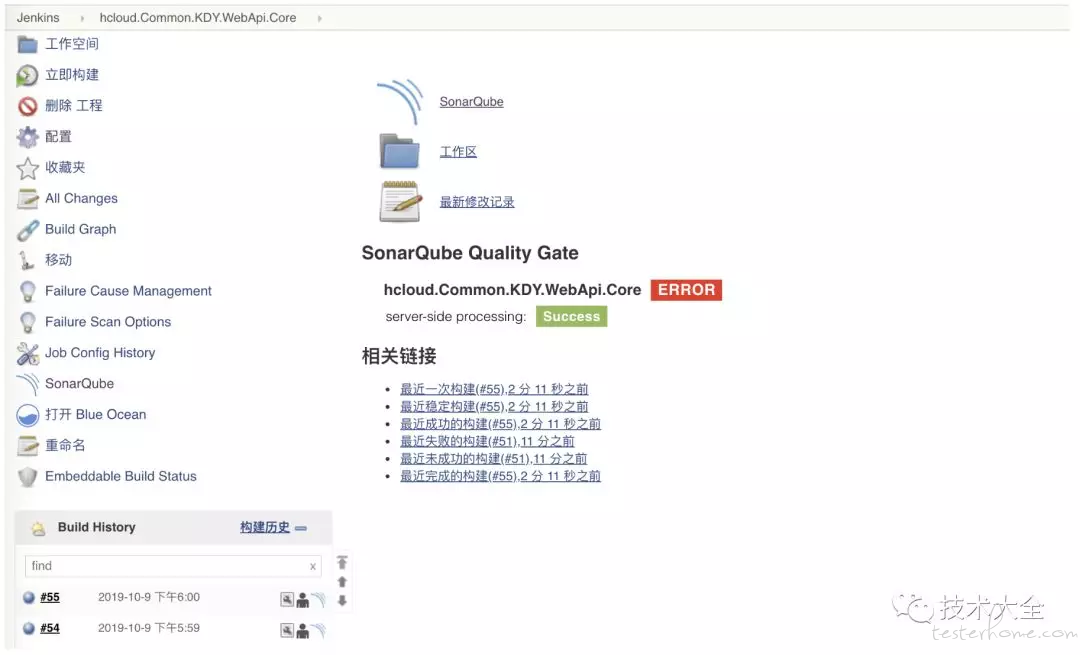
7、JOB构建运行结果如下图所示。
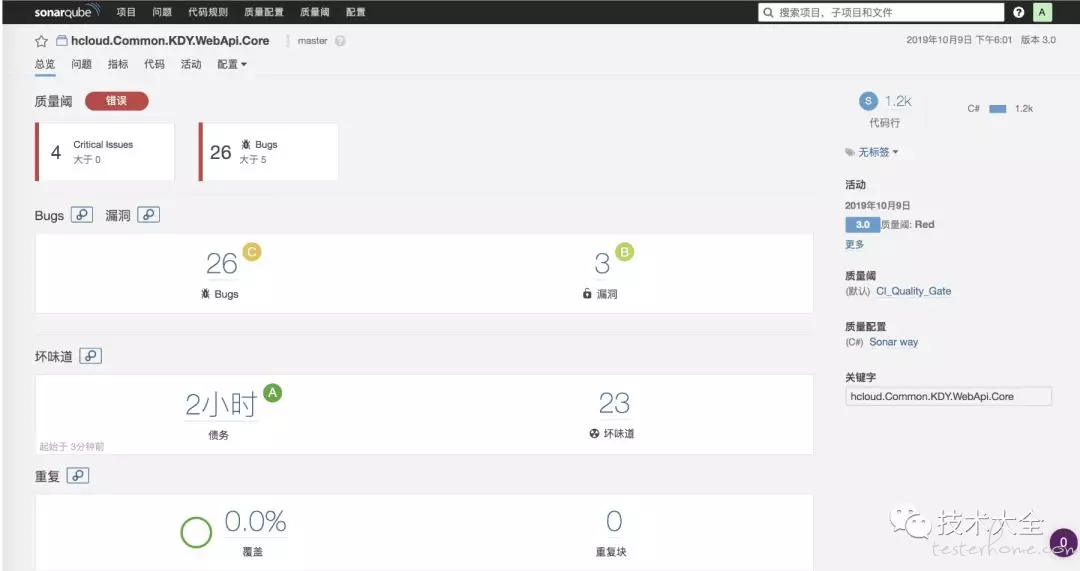
8、JOB构建成功后,Sonar代码分析报告如下图所示。
6. 常见问题
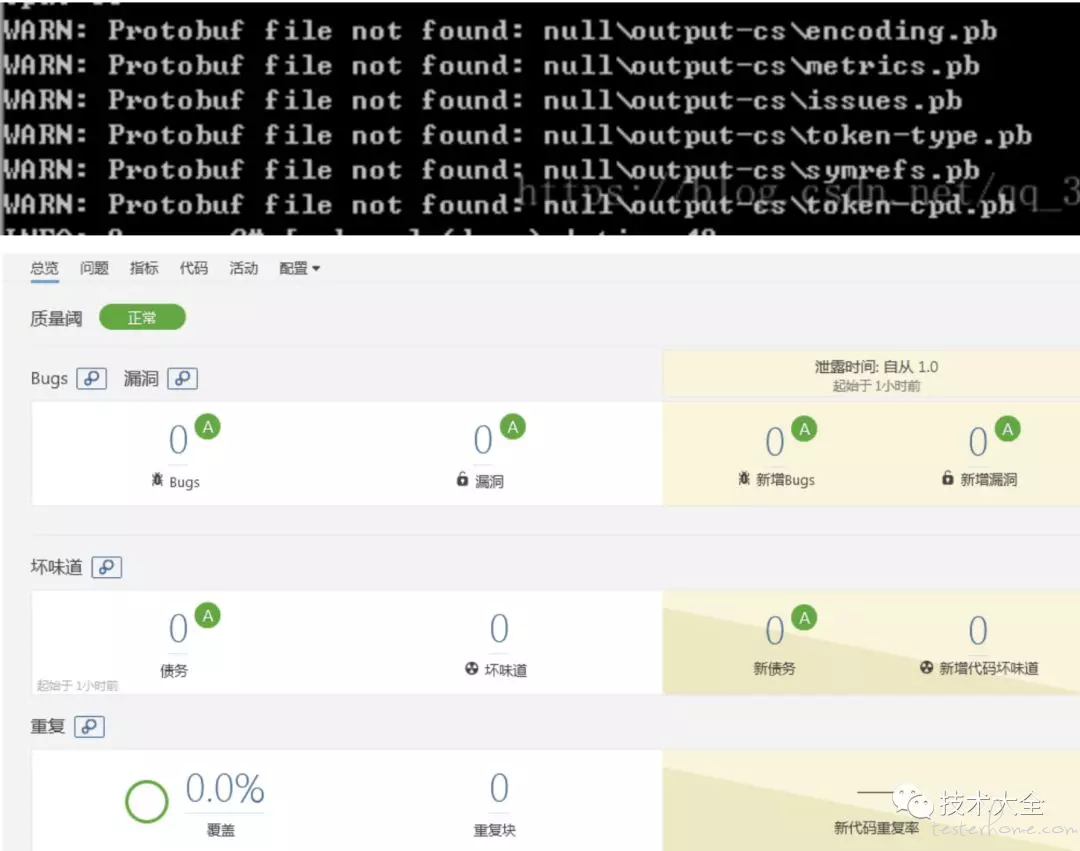
1、解决SonarQube检测C#执行成功,但不能获取检测结果的问题,现象如下图所示。
由图中可以看到文件扫描成功了,但是却没有任何文件被发现,所有的指标数据皆为0。
解决方案:
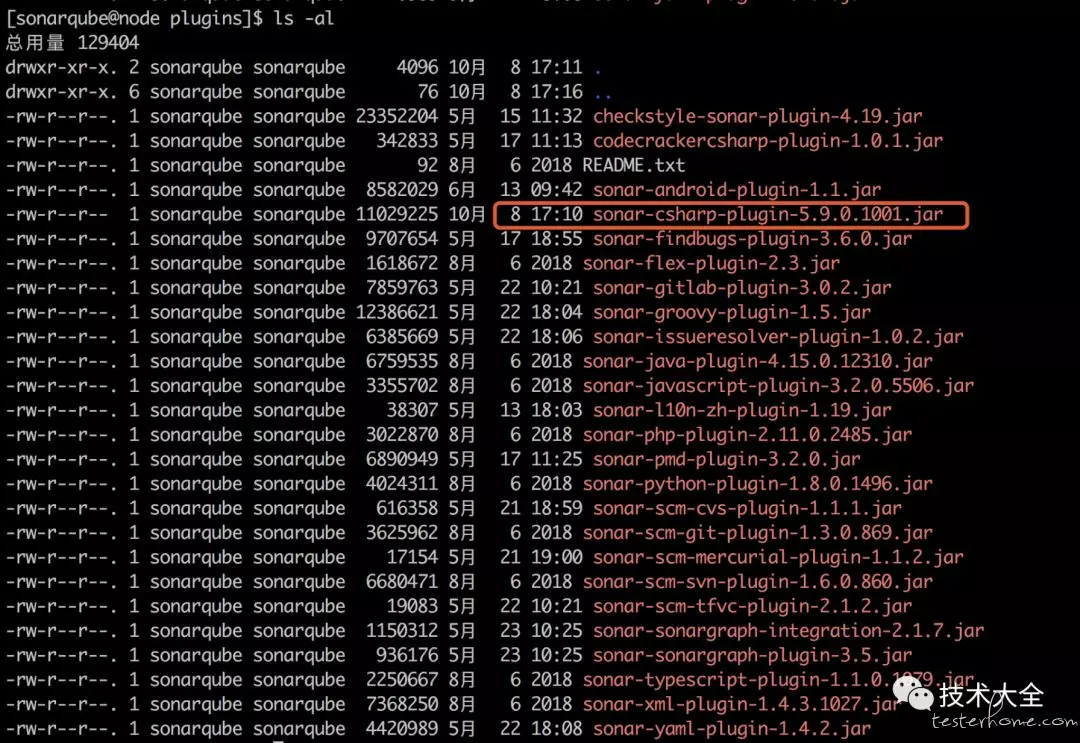
将Sonar插件中的C#插件改为5.9的版本即可。修改方式将plugin目录下原本的C#插件删除掉,将5.9版本的插件放入进来。重启SonarQube后问题即可解决。(备注示例中的SonarQube版本为6.7.5)
plugin目录替换后如下图所示:
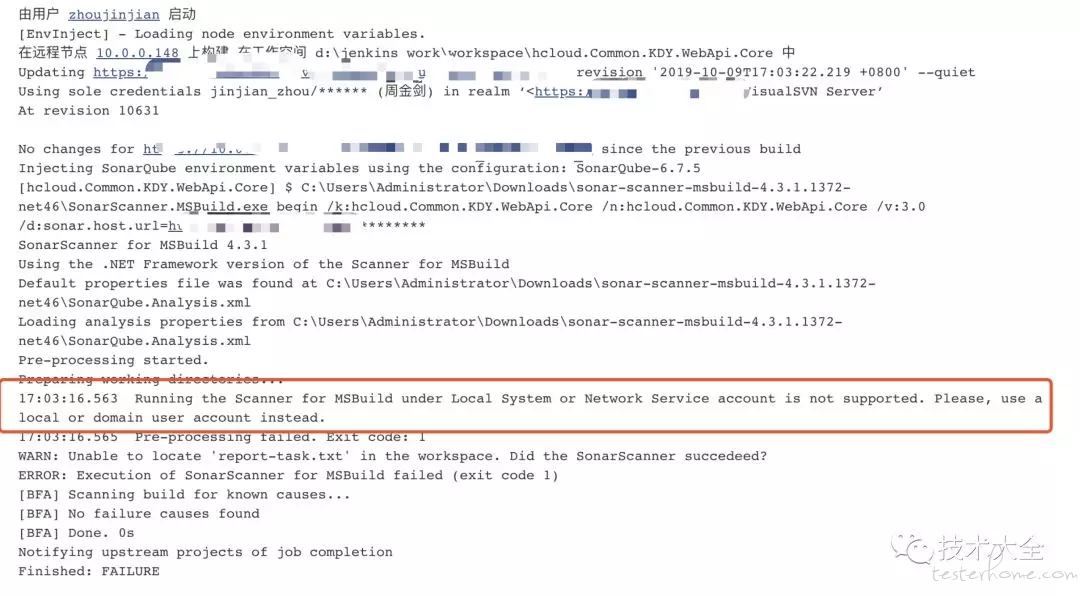
2、Jenkins +MSBuild+Sonar构建编译Job时提示Running the Scanner for MSBuild under Local System or Network Service account is not supported. Please, use a local or domain user account instead.
现象如下图所示:
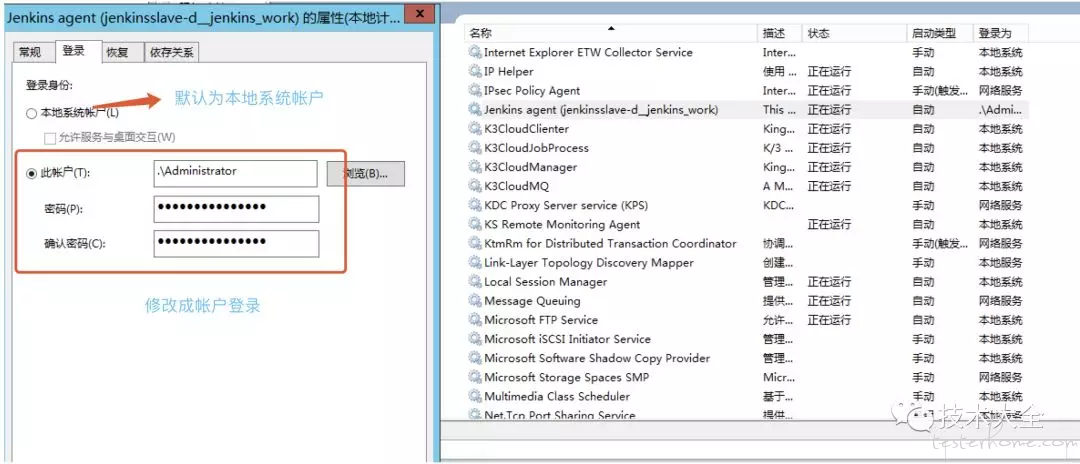
解决方法:
登录从节点10.0.0.148(windows主机),右击我的电脑选择管理然后从管理界面里面找到服务或者在cmd界面输入services.msc打开服务管理界面,从服务管理界面找到jenkins slave服务,右键点击属性,在弹出的对话框中切换到登陆标签,默认登录方式为本地系统帐号,此处我们选择此账户。然后输入账户和密码点击确定,完成以上操作以后重新启动jenkins slave服务然后再重新执行即可。
修改方式如下图所示:
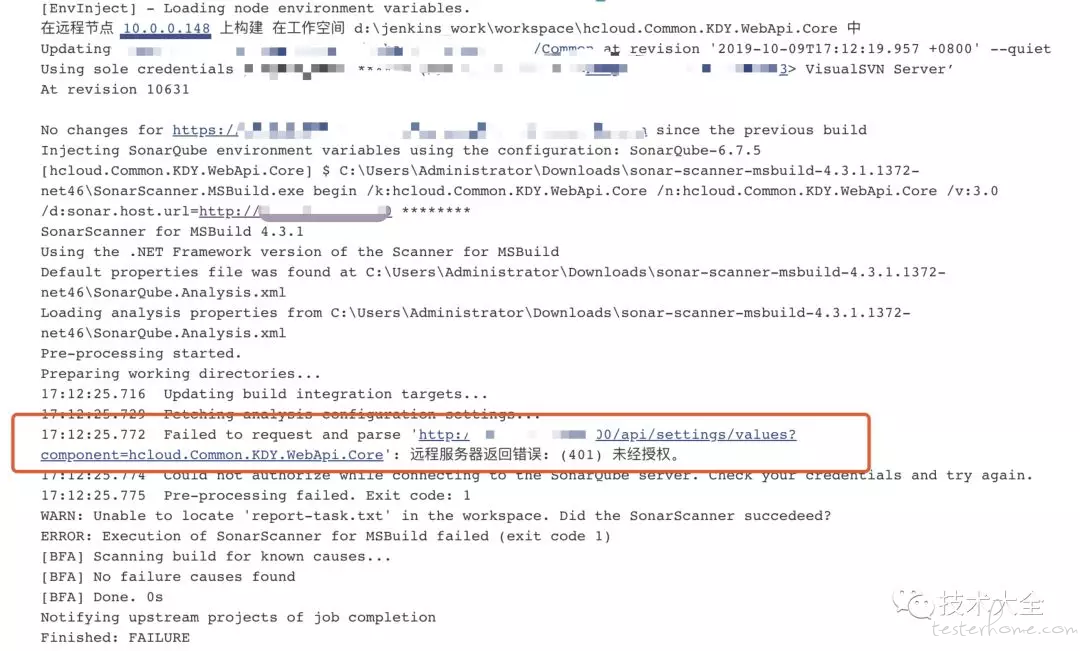
3、Jenkins单独构建没问题,Sonar静态检查代码单独执行也没问题,但是Jenkins+Sonar集成时出现未经授权问题,现象如下图所示。
解决方案:
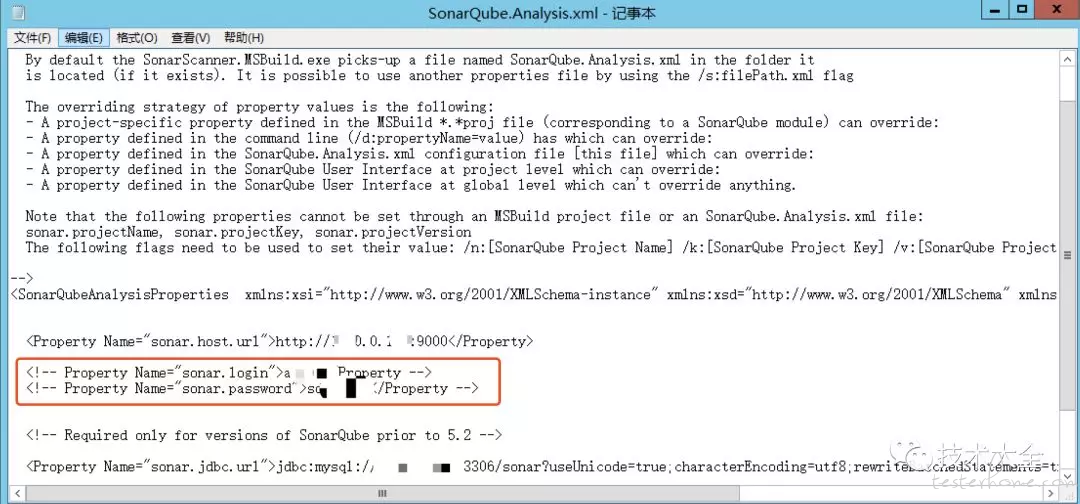
原因是由于Jenkins上已经通过admin生成了Token来进行连接认证,需要注释掉SonarQube.Analysis.xml里面的sonar.login和sonar.password,删除或者注释后,再重新执行即可。
修改如下图所示(下图采用注释来解决该问题的)。
7. 最后
原文链接发表于笔者公众号内:一文搞定SonarQube接入C#(.NET)代码质量分析
感兴趣的可以关注笔者公众号:技术大全(mikezhou_talk)


