阿里云CLB代理https转发到harbor
阿里云CLB代理https转发到harbor
背景
原来的harbor仓库和业务应用在同一台机器上,且没有域名。
现在需要迁移到一台单独机器上并配置域名。
迁移harbor
#原来的harbor在启动时就做了数据备份,先把数据copy到新机器上

scp -r /data/harbor 192.168.1.10:/data/harbor

#拷贝原harbor安装文件(其实不拷应该也没问题,但是很多配置相同这里懒得改了)

scp -r /usr/local/harbor  192.168.1.10:/usr/local/harbor

#登录新机器
ssh 192.168.1.10

cd /usr/local/harbor
#修改配置文件
vim harbor.yml
...
hostname: harbor.test  #域名

# http related config
http:
  # port for http, default is 80. If https enabled, this port will redirect to https port
  port: 10081 #对外暴露的端口

#因为本次使用SLB代理https证书,所以harbor的https配置不再需要
# https related config
#https:
  # https port for harbor, default is 443
  #  port: 10082
  # The path of cert and key files for nginx
  #  certificate: /usr/local/harbor/SSL/harbor.test.pem
  # private_key: /usr/local/harbor/SSL/harbor.test.key

# # Uncomment following will enable tls communication between all harbor components
# internal_tls:
#   # set enabled to true means internal tls is enabled
#   enabled: true
#   # put your cert and key files on dir
#   dir: /etc/harbor/tls/internal

# Uncomment external_url if you want to enable external proxy
# And when it enabled the hostname will no longer used
external_url: https://harbor.test   #这里改成你实际访问harbor的地址

# The initial password of Harbor admin
# It only works in first time to install harbor
# Remember Change the admin password from UI after launching Harbor.
harbor_admin_password: Harbor12345

# Harbor DB configuration
database:
  # The password for the root user of Harbor DB. Change this before any production use.
  password: root123
  # The maximum number of connections in the idle connection pool. If it <=0, no idle connections are retained.
  max_idle_conns: 100
  # The maximum number of open connections to the database. If it <= 0, then there is no limit on the number of open connections.
  # Note: the default number of connections is 1024 for postgres of harbor.
  max_open_conns: 900

# The default data volume
data_volume: /data/harbor #数据目录
...

#生成文件
sh prepare

#安装harbor
sh install.sh
另一种方法迁移,暂未验证
现在新的服务器上启动好harbor仓库,然后通过脚本把镜像逐个推到新仓库
#在服务器上配置好两个私有仓库地址
[root@spark1 ~]# cat /etc/docker/daemon.json
{
  "insecure-registries": ["10.1.119.12","172.10.10.xx"],     (这里为old与new的Harbor仓库服务器地址)
  "registry-mirrors": [
       "https://kuamavit.mirror.aliyuncs.com", "https://registry.docker-cn.com", "https://docker.mirrors.ustc.edu.cn"
    ]
}

#登录俩仓库
docker login http://172.10.10.xx

#获取需要迁移的仓库名
curl -X GET --header 'Accept: application/json' 'http://10.1.119.12/api/search?q=项目名称'

#迁移镜像脚本
#!/bin/bash

URL="http://10.1.119.12"
IP="10.1.119.12"
USER="admin"
PASS="Harbor12345"
targetIP="172.10.10.xx"
REPOS=$(curl -s -X GET --header 'Accept: application/json' "${URL}/api/repositories?project_id=45"|grep "name"|awk -F '"' '{print $4}')
for rp in ${REPOS}
do
  TAGS=$(curl -s -X GET --header 'Accept: application/json' "${URL}/api/repositories/${rp}/tags"|grep \"name\"|awk -F '"' '{print $4}'|sort -r)
  a=$(echo ${rp}|awk -F "/" '{print $2}')
    for t in ${TAGS}
    do
        docker pull ${IP}"/"${rp}":"${t}
        docker tag ${IP}"/"${rp}":"${t} ${targetIP}"/"${rp}":"${t}
        docker rmi ${IP}"/"${rp}":"${t}
        docker push ${targetIP}"/"${rp}":"${t}
    done
    echo "===================="
done
阿里云CLB操作
1.添加子域名解析
记录值为CLB的ip地址

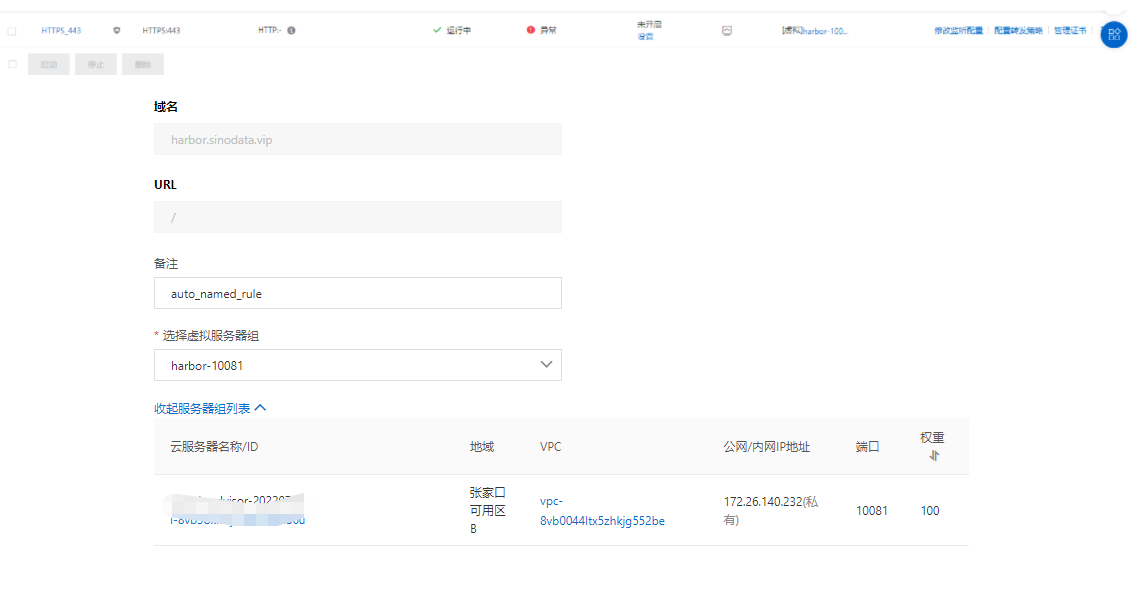
2.添加CLB转发
https转发

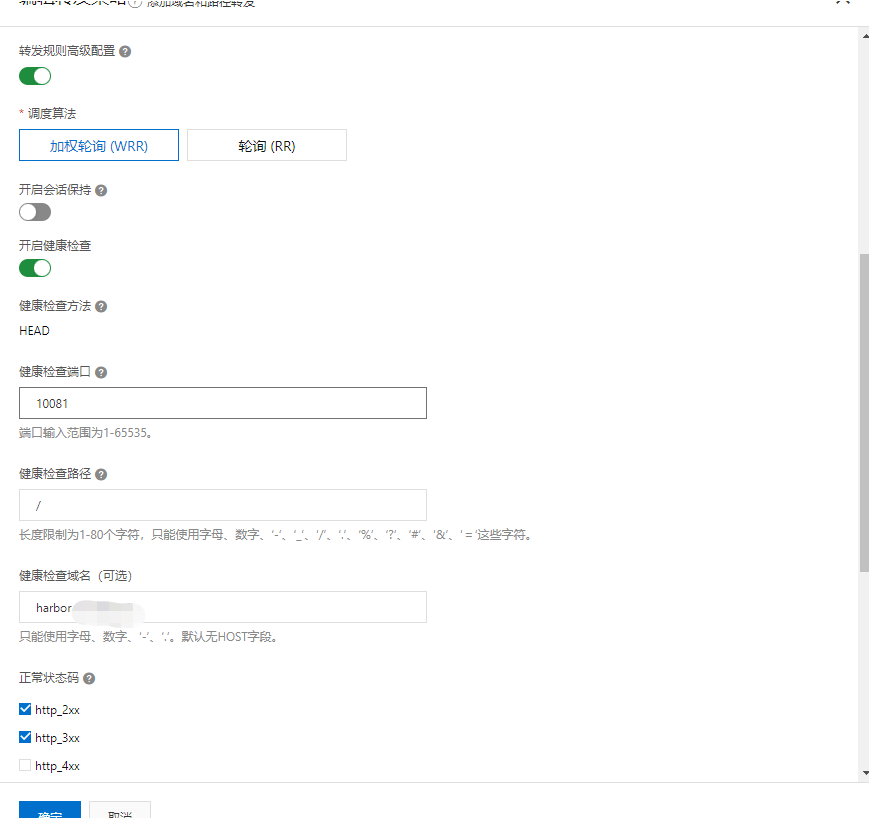
!!! 配置高级转发规则,一定要配置不然会报错502
检查的域名是在harbor配置文件写的域名

数据备份
#粗略备份脚本,缺少通知

#!/bin/bash
date;
echo "###############开始增量备份################"
rsync -avzp --delete /data/harbor /ali-data/harbor-bak

echo "###############结束备份###################"


#备份策略 根据需求调整
0 0 * * * /usr/local/back/harbor_bak.sh >> /usr/local/back/harbor_bak.log
FAQ
1.push镜像到私有仓库出现unknown blob
The push refers to repository [hub.kingboyworld.com/town-test/config]
b148c16cffe6: Pushing [==================================================>]   25.2MB/25.2MB
148268bf14be: Layer already exists
6a47dae912f7: Layer already exists
00439e7d6354: Layer already exists
a1a8b7f7efac: Layer already exists
341d865c1c22: Layer already exists
61c06e07759a: Layer already exists
bcbe43405751: Layer already exists
e1df5dc88d2c: Layer already exists
unknown blob


##解决方法
#修改nginx配置文件
cd /usr/local/harbor/common/config/nginx
vim nginx.config
#把配置文件中所有的proxy_set_header X-Forwarded-Proto $x_forwarded_proto 替换为proxy_set_header X-Forwarded-Proto https
...
#proxy_set_header X-Forwarded-Proto $x_forwarded_proto;
proxy_set_header X-Forwarded-Proto https;
...


【推荐】国内首个AI IDE,深度理解中文开发场景,立即下载体验Trae
【推荐】编程新体验,更懂你的AI,立即体验豆包MarsCode编程助手
【推荐】抖音旗下AI助手豆包,你的智能百科全书,全免费不限次数
【推荐】轻量又高性能的 SSH 工具 IShell:AI 加持,快人一步
· 震惊!C++程序真的从main开始吗?99%的程序员都答错了
· 【硬核科普】Trae如何「偷看」你的代码?零基础破解AI编程运行原理
· 单元测试从入门到精通
· winform 绘制太阳,地球,月球 运作规律
· 上周热点回顾(3.3-3.9)