前端代理nproxy
一、场景/用途
前端代理的用途,相信大家都清楚。应用场景很多,如——
1. 将线上的静态资源文件(JS、CSS、图片)替换为本地相应的文件,来调试线上(代码都被压缩过)的问题;
2. 本地开发过程,当后端接口未就绪的情况下(也就是前端和后端同学并行开发),将AJAX接口映射于本地文件;
3. 将测试环境或者线上环境的AJAX接口的数据映射于本地,反过来说,也就是开启本地的服务,本地的服务拉取的数据来自测试环境或者线上环境的数据(因为此时测试环境或者线上环境的服务比较稳定,还有,主要此时,测试同学基本都是基于测试环境来注明bug,所以此时可以直接将测试环境的数据来模拟本地拉取的数据,而不是用于自己模拟一套本地数据)
上述三个场景比较普遍,需要做代理映射的方面基本在后端服务接口及静态资源(页面代理当然也是可以,只不过场景不多)。
二、工具介绍
直接上官网吧,https://github.com/goddyZhao/nproxy,在git上搜索nproxy,会出现不少五花八门的nproxy,可别用错。来自作者GoddyZhao,牛叉的不得了。
基于node的代理服务工具,具体原理,我也不知,暂时停留在应用的阶段,能好好把它应用到极致,也是一个收获。
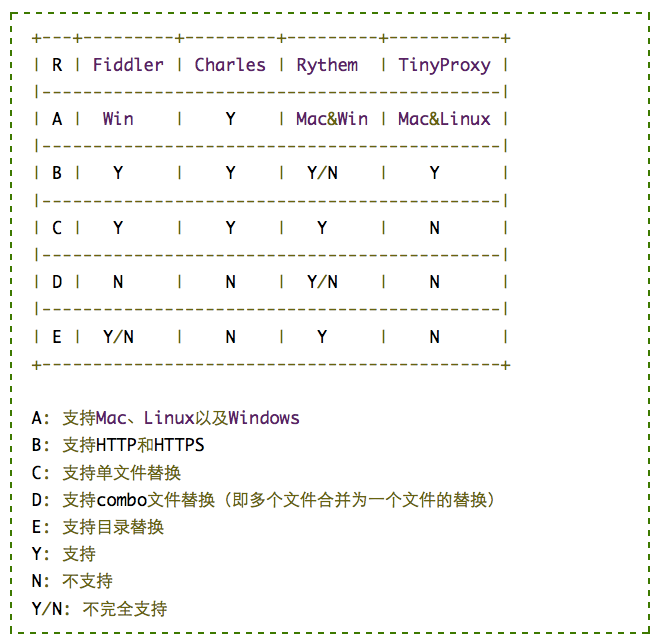
从官网中,作者提到几款流行的代理工具。下面是这些流行代理工具的对比图:

当然,上面的列举中我个人并没有真正去用过除了fiddler和nproxy之外的代理,当然还有一个web服务器nginx同样可以当做前端代理工具来使用。
如作者所说,nproxy的优势主要在这三个方面——
A: 支持Mac、Linux以及windows
D: 支持多个文件合并一个文件的替换
E: 支持目录替换
大家可以根据它的优势,可以适当的去做本地及线上文件的映射关系(可以用流行构建工具如Grunt、Gulp、Webpack、Fis等),来最大化呈现代理工具nproxy的优势。
至于,nproxy的具体使用,在这儿不copy了。主要注意要对浏览器使用代理进行端口配置,个人推荐chrome来去做,安装个chrome的代理工具插件会更加方便(如ProxySwitchySharp)。
下面是代理文件配置的模板文件
module.exports = [

  // 1. replace single file with local one
  {
    pattern: 'homepage.js',      // Match url you wanna replace
    responder:  "/home/goddyzhao/workspace/homepage.js"
  },

  // 2. replace single file with web file
  {
    pattern: 'homepage.js',      // Match url you wanna replace
    responder:  "http://www.anotherwebsite.com/assets/js/homepage2.js"
  },

  // 3. replace combo file with src with absolute file path
  {
    pattern: 'group/homepageTileFramework.*.js',
    responder: [
      '/home/goddyzhao/workspace/webapp/ui/homepage/js/a.js',
      '/home/goddyzhao/workspace/webapp/ui/homepage/js/b.js',
      '/home/goddyzhao/workspace/webapp/ui/homepage/js/c.js'
    ]
  },

  // 4. replace combo file with src with relative file path and specified dir
  {
    pattern: 'group/homepageTileFramework.*.js',
    responder: {
      dir: '/home/goddyzhao/workspace/webapp/ui/homepage/js',
      src: [
        'a.js',
        'b.js',
        'c.js'
      ]
    }
  },

  // 5. Map server image directory to local image directory
  {
    pattern: 'ui/homepage/img',  // must be a string
    responder: '/home/goddyzhao/image/' //must be a absolute directory path
  },

  // 6. Write responder with regular expression variables like $1, $2
  {
    pattern: /https?:\/\/[\w\.]*(?::\d+)?\/ui\/(.*)_dev\.(\w+)/,
    responder: 'http://localhost/proxy/$1.$2'
  },

  // 7. Map server image directory to local image directory with regular expression
  // This simple rule can replace multiple directories to corresponding locale ones
  // For Example,
  //   http://host:port/ui/a/img/... => /home/a/image/...
  //   http://host:port/ui/b/img/... => /home/b/image/...
  //   http://host:port/ui/c/img/... => /home/c/image/...
  //   ...
  {
    pattern: /ui\/(.*)\/img\//,
    responder: '/home/$1/image/'
  }
];
三、使用体验
根据我们常碰到的场景,举几个例子——
单文件映射:
{
    pattern: 'http://test-qian.genshuixue.com/asset/js/registerCard_68edda4ec0.js',
    responder: '/Users/bjhl/Desktop/workplace/qianqian-frontend/asset/js/registerCard.js' //must be a absolute directory path
}
要注意,要写本地文件的绝对路径。
映射目录:
{
    pattern: /asset\/js/,
    responder: '/Users/bjhl/Desktop/workplace/qianqian-frontend/output/asset/js/'
}
这个的应用场景,加入我的本地构建一次项目代码(非压缩版本),如果测试环境的代码同样没有压缩,那么我就可以顺利使用本地目录映射了。如果测试环境的代码是压缩过(这里我简单讲一下使用md5的方式)的,通过正则来进行映射——
{
    pattern: /^http:\/\/test-qian.genshuixue.com\/asset\/js\/(.*)_\w{10}.js$/,
    responder: '/Users/bjhl/Desktop/workplace/qianqian-frontend/output/asset/js/$1.js'
}
上面仅仅映射js文件,如果我想要同时样式asset目录项目的css文件,没有问题,如下配置——
{
    pattern: /^http:\/\/test-qian.genshuixue.com\/asset\/(.*)_\w{10}\.(js|css)$/,
    responder: '/Users/bjhl/Desktop/workplace/qianqian-frontend/asset/$1.$2'
}
玩儿好正则表达式,怎么美妙的映射方式你都可以构建。
对于多文件的映射方式,对于简单的js文件拼接方式,还行,否则,就要考虑文件的顺序了。这里举个小例子:
{
    pattern: 'http://test-tianyan.genshuixue.com/src/dep/base.js',
    responder: [
        '../js-common/dep/requirejs/require.min.js',
        '../js-common/dep/angular/angular-1.2.16.js',
        '../js-common/dep/angular-ui-router/release/angular-ui-router.js',
        '../js-common/dep/angular/ui-bootstrap-tpls-0.11.2.js'
    ]
}
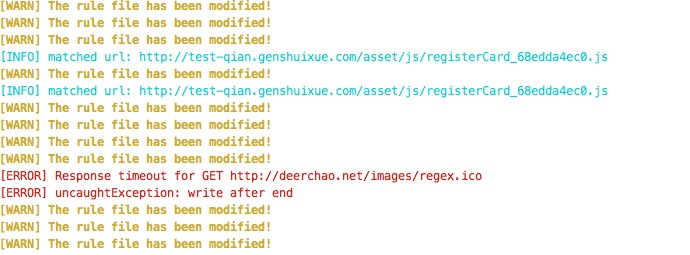
对nproxy的使用过程,下面截个图说明一下:

对于nproxy,启动一次就可以了。它会监控配置文件的实施变更。也就是上面的[WARN]。上面的[INFO]代表匹配成功的请求路径。[ERROR]代表网络异常或者匹配规则配置错误,需要重新配置匹配规则。
一般情况下,建议nproxy的配置文件(如nproxy-conf.js)放在项目工程同级目录下,没有其他好处,维护方便而已。
OK,对于nproxy的使用体验就写这么多。
跨平台前端代码调试神器,大家试试。

