实验三 CBC 和 CTR 模式下的 AES
实验内容#
【时间】6 月 6 号(周六)晚上
【地点】待定
【编程语言】Python(推荐)或者 C/C++
【实验目的】
- 了解分组密码的结构特点;
- 掌握传统分组密码结构 AES,以及 AES 在两种工作模式 CBC 和 CTR 下的实现;
- 通过使用 Python(推荐)或者 C,编程分别实现 CBC 和 CTR 模式下的 AES 加密解密。
【实验内容】
在本次实验中,需要实现两个加密/解密系统,一个在密文分组链接模式(CBC)下使用 AES,另一个在计数器模式(CTR)中使用 AES。
完成程序后,使用附件的 test.txt 中给出的四组密钥和密文(十六进制形式)来验证你的代码。
【要求】:
- 在两种模式下,16 字节的加密 IV 都要求是随机生成的,并被添加到密文前面;
- 对于 CBC 加密,要求使用 PKCS5 填充方案;
- 对于 AES 的基本实现,你可以使用现有的加密库,如 PyCrypto(Python),Crypto++(C++)或任何其他语言和库;
- 要求自己实现 CBC 和 CTR 模式,而不是直接调用 AES 库的内置功能;
实验准备#
本实验拟采用 C++ 作为编程语言,并调用 Crypto++ 对 AES 进行基本实现。
Crypto++ 下载地址:https://www.cryptopp.com/#download
由于 Crypto++ 的编译版本是使用 MSVC 构建的,我们用 Visual Studio 打开解决方案 cryptest.sln,并将 cryptlib 设为启动项目,然后按下 Ctrl + B 生成 cryptlib。此时路径 ./Win32/Output/Debug 下会输出 cryptlib.lib 文件。
接着,新建一个项目测试可用性。
首先需要引入头文件和库文件:打开 项目 - *** 属性 - VC++ 目录,把 Crypto++ 头文件所在路径和先前输出的库文件路径分别添加到包含目录和库目录。

然后在属性页的 链接器 - 输入 - 附加依赖项 中添加 cryptlib.lib。
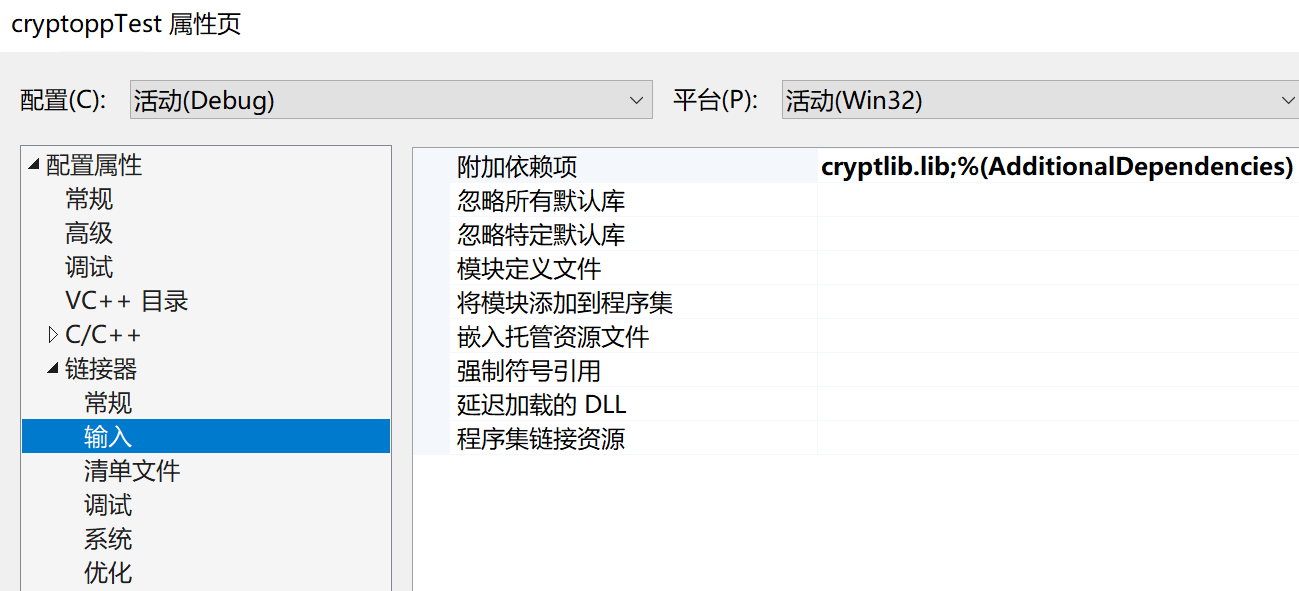
最后,在属性页的 C/C++ - 代码生成 - 运行库 中选择 多线程调试(/MTD)。

运行测试代码:
#include <iostream>
#include <aes.h>
using namespace std;
using namespace CryptoPP;
int main()
{
cout << "Hello Crypto++" << endl;
cout << "Aes block size is " << AES::BLOCKSIZE << endl;
return 0;
}
并有如下输出:
Hello Crypto++
Aes block size is 16
Crypto++ 的安装和使用参考了这篇文章
实验分析#
实验要求实现在 CBC 和 CTR 下的 AES,并有如下附加说明:
- 在两种模式下,16 字节的加密 IV 都要求是随机生成的,并被添加到密文前面;
- 对于 CBC 加密,要求使用 PKCS5 填充方案;
- 对于 AES 的基本实现,你可以使用现有的加密库,如 PyCrypto(Python),Crypto++(C++)或任何其他语言和库;
- 要求自己实现 CBC 和 CTR 模式,而不是直接调用 AES 库的内置功能;
最后,用 test.txt 给出的密钥和密文验证代码。
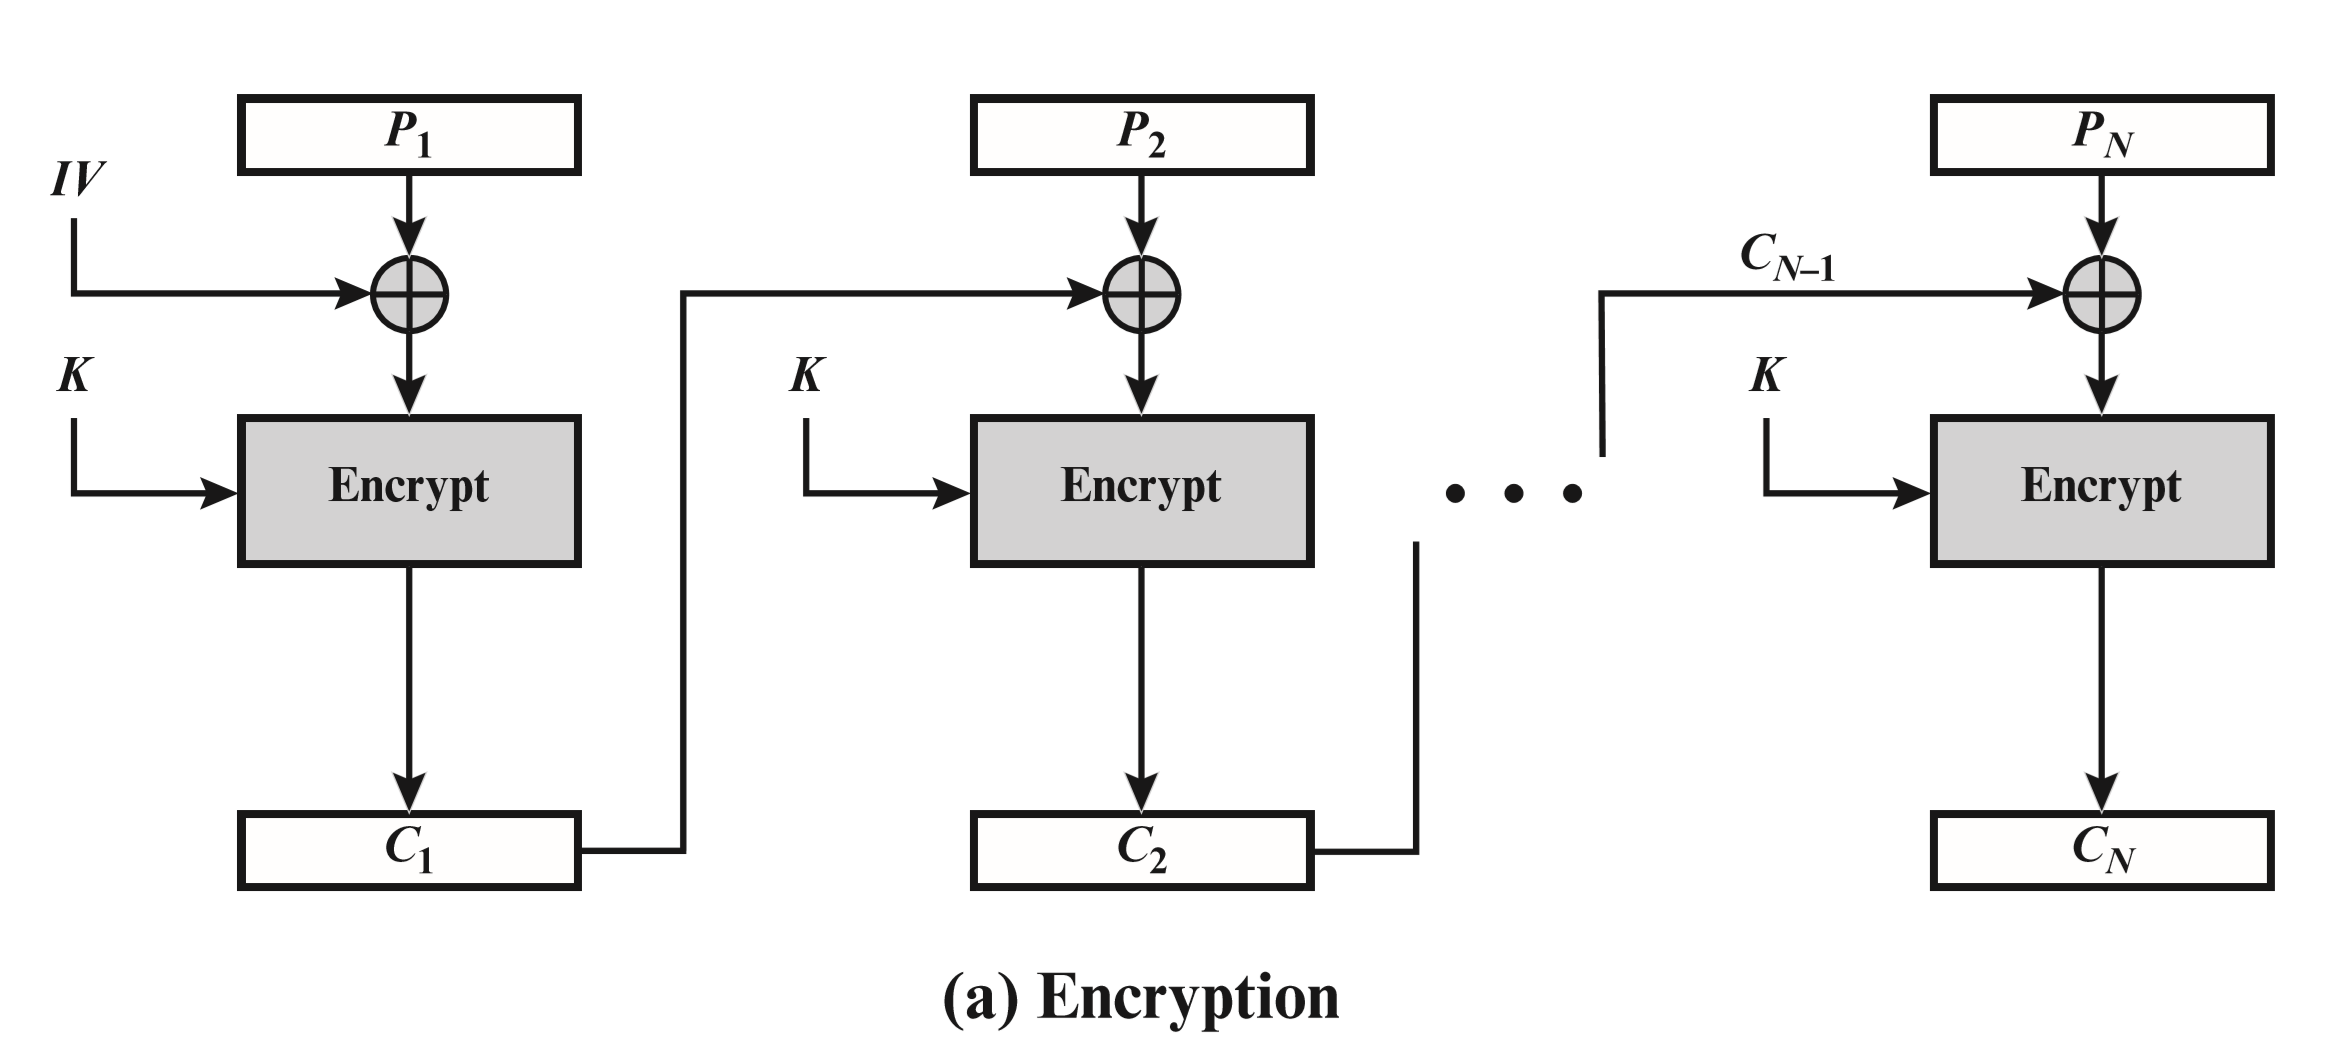
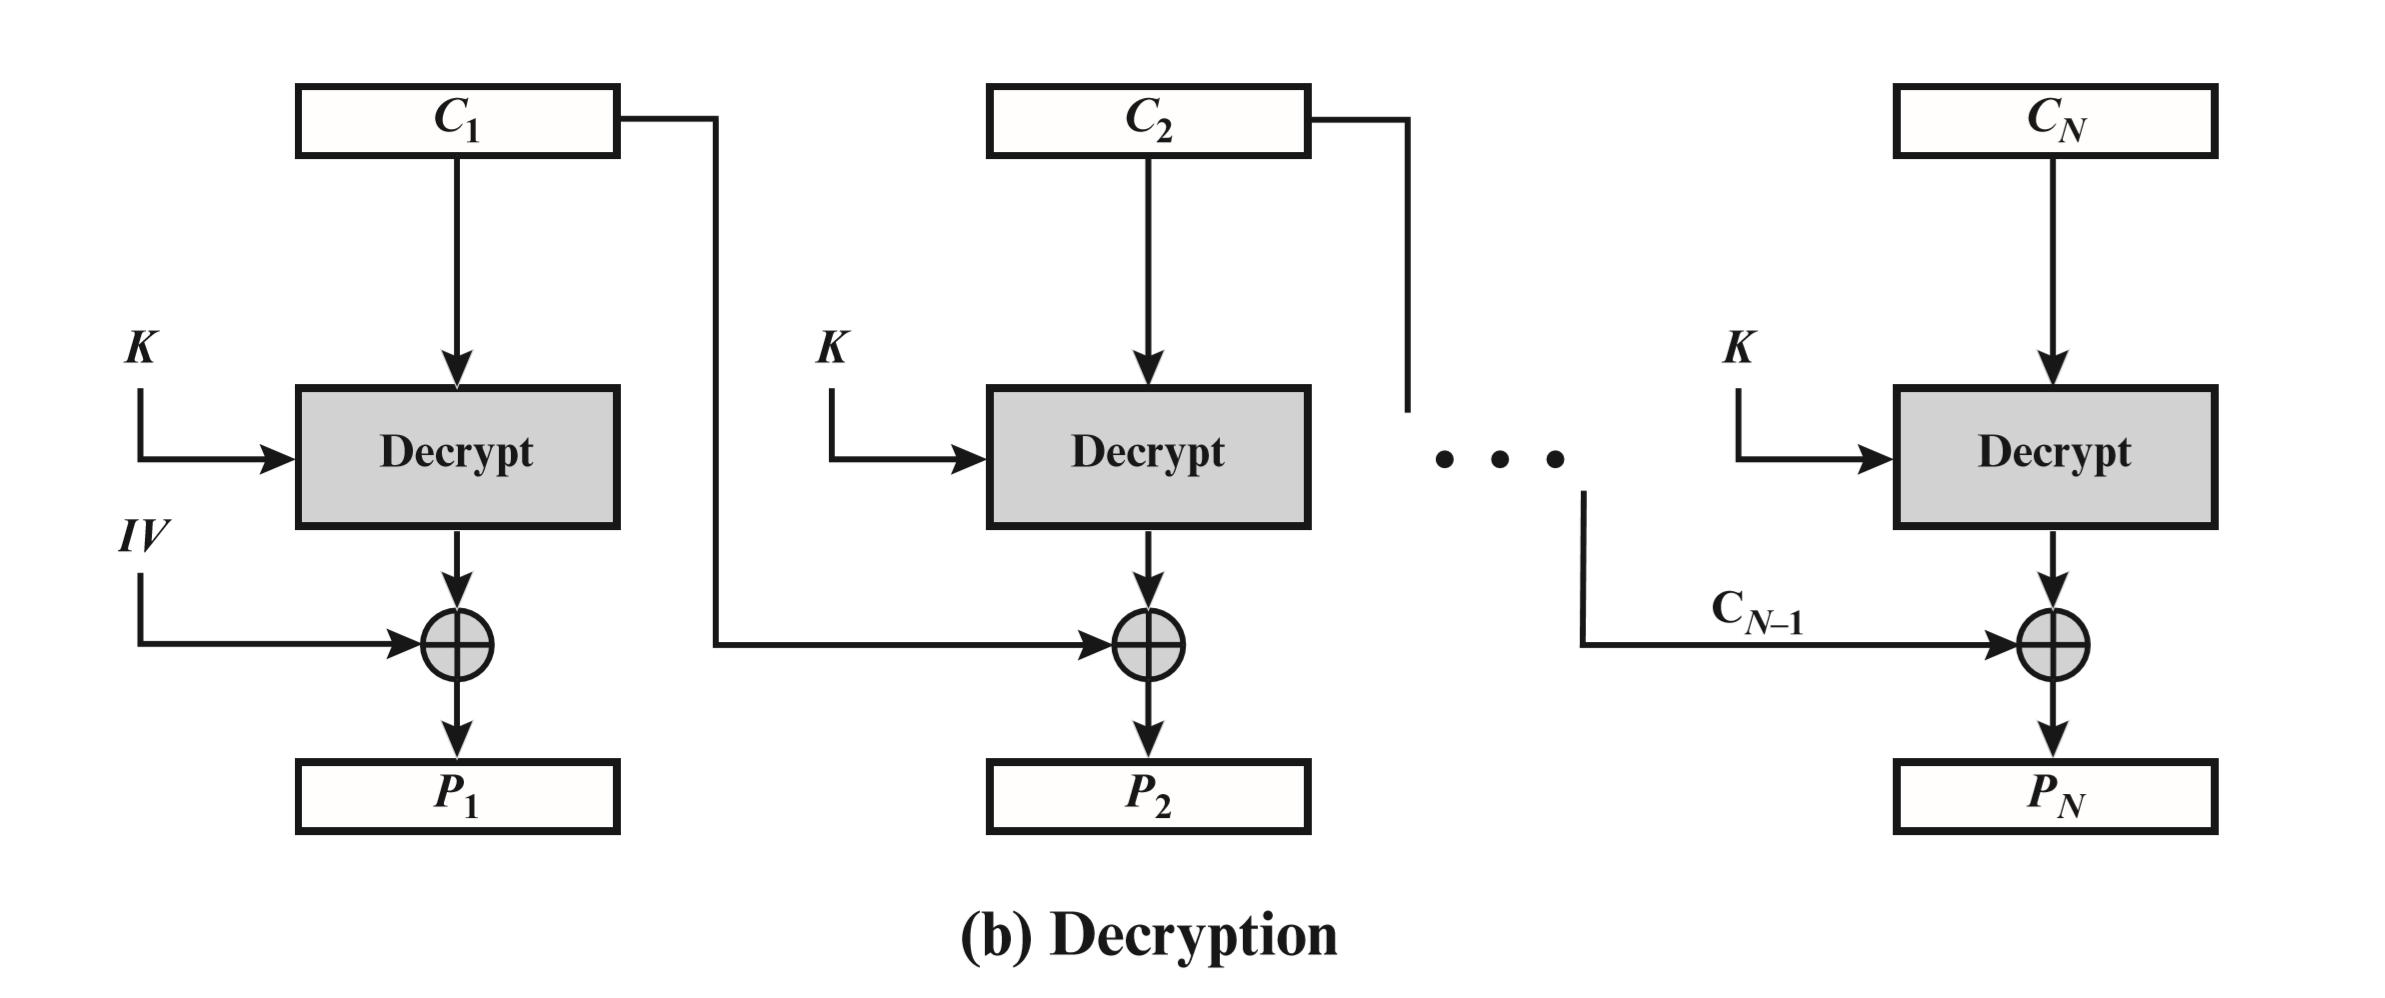
密文分组链接模式(CBC)#
CBC 的加解密过程如下:
填充#
CBC 是分组密码的一种工作模式,在加密前要对最后一块明文进行填充,实验要求使用 PKCS5 填充方案。
PKCS#5 是按 8 字节分组对数据进行填充的(不足 8 字节时,补全到 8 字节):如果要填充 1 个字节,那填入的值就是 0x01;如果要填充 2 个字节,那么填入的值就是 0x02,以此类推。但若待加密数据长度正好为 8 的整数倍时,则需要填入 8 个 0x08。
填充示例,分组大小为 8 字节,摘自这里:
h<0x07><0x07><0x07><0x07><0x07><0x07><0x07> 7
he<0x06><0x06><0x06><0x06><0x06><0x06> 6
hel<0x05><0x05><0x05><0x05><0x05> 5
hell<0x04><0x04><0x04><0x04> 4
hello<0x03><0x03><0x03> 3
hello <0x02><0x02> 2
hello w<0x01> 1
hello wo<0x08><0x08><0x08><0x08><0x08><0x08><0x08><0x08> 8
实际上,PKCS5 为 PKCS7 的一个子集(PKCS7 并不限于 8 字节的分组)。由于 AES 按 16 字节大小分组,如果采用 PKCS5,实质上就是采用 PKCS7。
填充发生在明文加密之前,而解密之后的明文需要去掉填充,这个过程可以看作是填充的逆过程。
去填充过程:首先我们获取字符串的最后一个字符 paddingNum,这个字符一定是填充的值。同时,说明有 paddingNum 个字符被填充进去了。我们只需循环地去掉末尾的 paddingNum 个字符即可。
加密前的填充代码
string padding(const string& plaintext)
{
string lastBlock;
int len = plaintext.length();
int paddingNum = AES::BLOCKSIZE - len % AES::BLOCKSIZE;
int quotient = len / AES::BLOCKSIZE;
lastBlock = plaintext.substr(AES::BLOCKSIZE * quotient, len % AES::BLOCKSIZE);
for(int i = 0; i < AES::BLOCKSIZE - len % AES::BLOCKSIZE; i++)
{
lastBlock.push_back((unsigned char)paddingNum);
}
return plaintext.substr(0, AES::BLOCKSIZE * quotient) + lastBlock;
}
解密后的去填充代码
// 密文/明文被分为 multiple 组
// 获取解密后的最后一组明文
string lastBlock = plaintext.substr((multiple - 1) * AES::BLOCKSIZE, AES::BLOCKSIZE);
// 从字符串最后一个字符获取填充字符
int paddingNum = (unsigned char)lastBlock[AES::BLOCKSIZE - 1];
// 把填充字符从明文中去掉
for(int i = 0; i < paddingNum; i++)
{
// 若填充字符出现不同,则说明给定密文有误
if(plaintext.back() != paddingNum)
{
return "Ciphertext is invalid!";
}
plaintext.pop_back();
}
代码#
最后,根据以上 CBC 的解密过程图和去填充思路可以写出解密代码:
string decrypt(const string& strCiphertext, const string& strKey)
{
string plaintext;
// 原始 key 为 16 进制形式,需按字节转换为 char
string key = hexToStr(strKey);
string ciphertext = hexToStr(strCiphertext);
// 密文的前 16 个字节为 vi
string vi = ciphertext.substr(0, AES::BLOCKSIZE);
ciphertext = ciphertext.substr(AES::BLOCKSIZE, ciphertext.length() - AES::BLOCKSIZE);
int multiple = ciphertext.length() / AES::BLOCKSIZE;
AESDecryption aesDecryptor;
aesDecryptor.SetKey((byte*)key.c_str(), key.length());
for(int i = 0; i < multiple; i++)
{
// 分组密文
string ciphertextBlock = ciphertext.substr(i * AES::BLOCKSIZE, AES::BLOCKSIZE);
unsigned char outBlock[AES::BLOCKSIZE];
memset(outBlock, 0, AES::BLOCKSIZE);
aesDecryptor.ProcessBlock((byte*)ciphertextBlock.c_str(), outBlock);
// AES 输出结果与上组密文或 vi 异或,得到明文
for(int j = 0; j < AES::BLOCKSIZE; j++)
{
plaintext.push_back(outBlock[j] ^ (unsigned char)vi[j]);
}
vi = ciphertextBlock;
}
// 解密后,最后一组明文单独处理
string lastBlock = plaintext.substr((multiple - 1) * AES::BLOCKSIZE, AES::BLOCKSIZE);
// 从字符串最后一个字符获取填充字符
int paddingNum = (unsigned char)lastBlock[AES::BLOCKSIZE - 1];
// 把填充字符从明文中去掉
for(int i = 0; i < paddingNum; i++)
{
// 若填充字符出现不同,则说明给定密文有误
if(plaintext.back() != paddingNum)
{
return "Ciphertext is invalid!";
}
plaintext.pop_back();
}
return plaintext;
}
加解密完整代码 👉 传送门
计数器模式(CTR)#
CTR 的加解密过程如下:

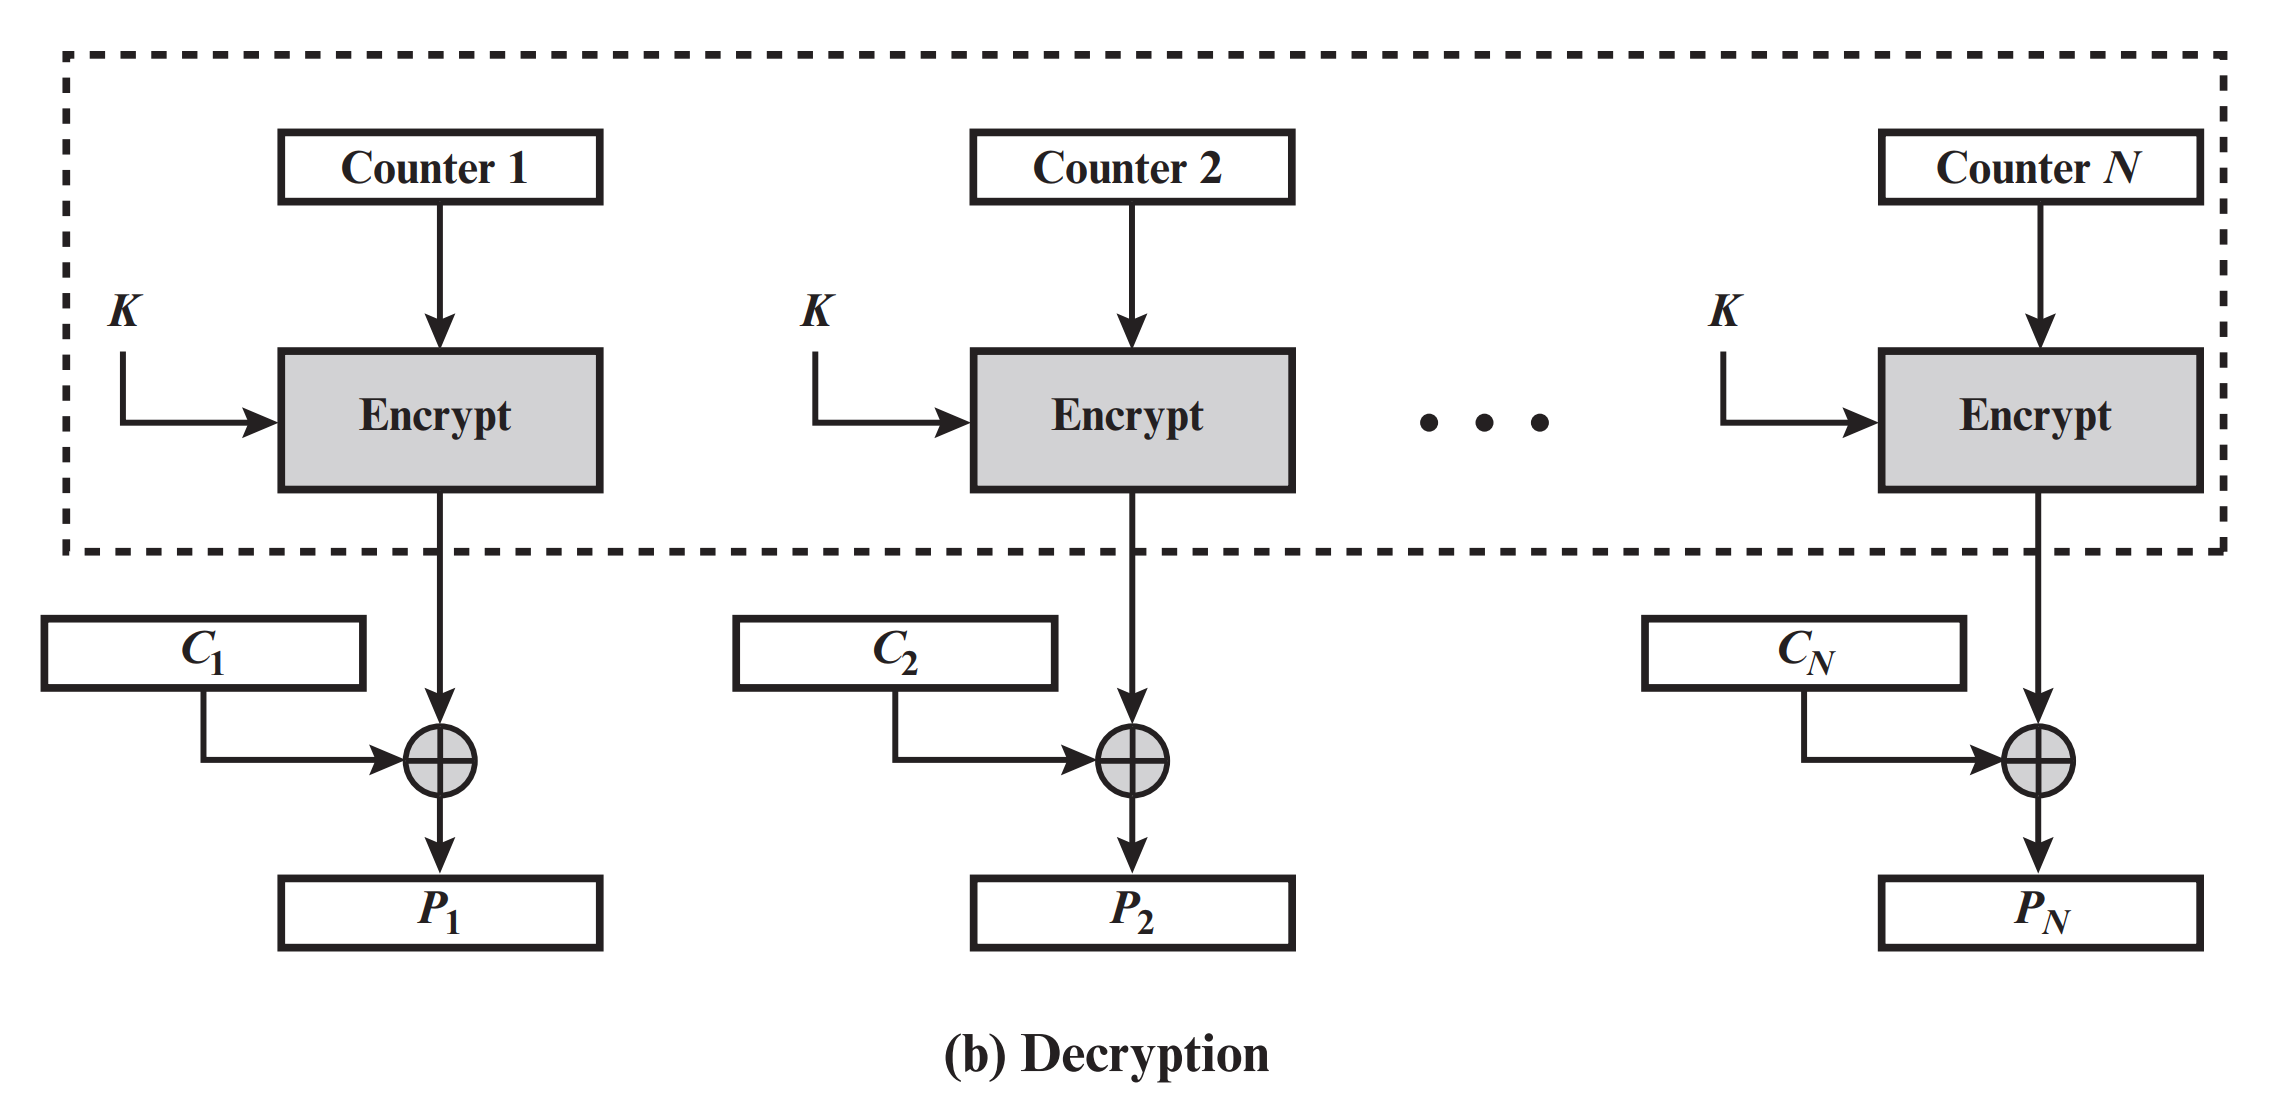
CTR 相较于 CBC 少了填充的过程。另外,CTR 需要维护一个自增的计数器。
计数器的自增代码
string counterIncrement(const string& counter, int n)
{
string res = counter;
int addend = n;
for(int i = counter.length() - 1; i >= 0; i--)
{
unsigned char tempChar = counter[i];
if((int)tempChar + addend > 255)
{
tempChar = tempChar + addend;
addend = 1;
}
else
{
tempChar = tempChar + addend;
addend = 0;
}
res[i] = tempChar;
}
return res;
}
代码#
根据以上 CTR 的解密过程图可以写出解密代码(可根据上方 CBC 修改):
string decrypt(const string& strCiphertext, const string& strKey)
{
string plaintext = "";
string key = hexToStr(strKey);
string ciphertext = hexToStr(strCiphertext);
// 密文的前 16 个字节为计数器的初始值
string counter = ciphertext.substr(0, AES::BLOCKSIZE);
ciphertext = ciphertext.substr(AES::BLOCKSIZE, ciphertext.length() - AES::BLOCKSIZE);
int multiple = ciphertext.length() / AES::BLOCKSIZE;
AESEncryption aesEncryptor;
aesEncryptor.SetKey((byte*)key.c_str(), key.length());
for(int i = 0; i < multiple; i++)
{
string ciphertextBlock = ciphertext.substr(i * AES::BLOCKSIZE, AES::BLOCKSIZE);
string xorBlock;
unsigned char outBlock[AES::BLOCKSIZE];
memset(outBlock, 0, AES::BLOCKSIZE);
aesEncryptor.ProcessBlock((byte*)counter.c_str(), outBlock);
// 密文和 AES 加密结果异或,得到明文
for(int j = 0; j < AES::BLOCKSIZE; j++)
{
xorBlock.push_back(outBlock[j] ^ (unsigned char)ciphertextBlock[j]);
}
plaintext += xorBlock;
// 计数器自增
counter = counterIncrement(counter, 1);
}
// 最后的分组可能不完整,单独输出
int residueLen = ciphertext.length() - multiple * AES::BLOCKSIZE;
string residueCiphertext = ciphertext.substr(multiple * AES::BLOCKSIZE, residueLen);
string xorBlock;
unsigned char outBlock[AES::BLOCKSIZE];
memset(outBlock, 0, AES::BLOCKSIZE);
aesEncryptor.ProcessBlock((byte*)counter.c_str(), outBlock);
for(int j = 0; j < residueLen; j++)
{
xorBlock.push_back(outBlock[j] ^ (unsigned char)residueCiphertext[j]);
}
plaintext += xorBlock;
return plaintext;
}
加解密完整代码 👉 传送门
实验结果#
对于 txt 中的测试 1 和测试 2,分别输出:Basic CBC mode encryption needs padding. 和 Our implementation uses rand. IV。
测试 3 和测试 4,分别输出:CTR mode lets you build a stream cipher from a block cipher. 和 Always avoid the two time pad!。
Crypto++ 中的 AES 库也内置了包括 CBC 和 CTR 在内的各种模式。此处为直接调用库函数的实现代码。
参考:
https://www.cnblogs.com/lit10050528/p/4081658.html
https://www.cnblogs.com/YZFHKMS-X/p/11829021.html
https://www.cryptopp.com/wiki/Advanced_Encryption_Standard
https://segmentfault.com/a/1190000019793040


【推荐】编程新体验,更懂你的AI,立即体验豆包MarsCode编程助手
【推荐】凌霞软件回馈社区,博客园 & 1Panel & Halo 联合会员上线
【推荐】抖音旗下AI助手豆包,你的智能百科全书,全免费不限次数
【推荐】博客园社区专享云产品让利特惠,阿里云新客6.5折上折
【推荐】轻量又高性能的 SSH 工具 IShell:AI 加持,快人一步
· PostgreSQL 和 SQL Server 在统计信息维护中的关键差异
· C++代码改造为UTF-8编码问题的总结
· DeepSeek 解答了困扰我五年的技术问题
· 为什么说在企业级应用开发中,后端往往是效率杀手?
· 用 C# 插值字符串处理器写一个 sscanf
· 为DeepSeek添加本地知识库
· 精选4款基于.NET开源、功能强大的通讯调试工具
· DeepSeek智能编程
· [翻译] 为什么 Tracebit 用 C# 开发
· 腾讯ima接入deepseek-r1,借用别人脑子用用成真了~