第十三周运维作业
1、简述DNS服务器原理,并搭建主-辅服务器。
答:
DNS工作原理:
第一步:客户机提出域名du解析请求,并将该请求发送给本zhi地的域名服务器dao。
第二步:当本地的域名服务器收到请求后,就先查询本地的缓存,如果有该纪录项,则本地的域名服务器就直接把查询的结果返回。
第三步:如果本地的缓存中没有该纪录,则本地域名服务器就直接把请求发给根域名服务器,然后根域名服务器再返回给本地域名服务器一个所查询域(根的子域) 的主域名服务器的地址。
第四步:本地服务器再向上一步返回的域名服务器发送请求,然后接受请求的服务器查询自己的缓存,如果没有该纪录,则返回相关的下级的域名服务器的地址。
第五步:重复第四步,直到找到正确的纪录。
第六步:本地域名服务器把返回的结果保存到缓存,以备下一次使用,同时还将结果返回给客户机。
搭建DNS主服务器 一台服务器 192.168.47.50 一台从服务端 192.168.47.70 一台客户端 192.168.47.154
[root@centos7 ~]# yum install bind
编辑/etc/named.conf 配置文件
options {
listen-on port 53 { localhost; };
listen-on-v6 port 53 { ::1; };
directory "/var/named";
dump-file "/var/named/data/cache_dump.db";
statistics-file "/var/named/data/named_stats.txt";
memstatistics-file "/var/named/data/named_mem_stats.txt";
recursing-file "/var/named/data/named.recursing";
secroots-file "/var/named/data/named.secroots";
allow-query { any; };
allow-transfer {192.168.47.70;}; 安全策略配置
[root@centos7 ~]#systemctl start named
[root@centos7 ~]#systemctl enable named
[root@centos7 named]# cp -p named.localhost jingyun.com.zone
[root@centos7 named]# vim jingyun.com.zone
$TTL 1D
@ IN SOA master.jingyun.com. admin.jingyun.com. (
0 ; serial
1D ; refresh
1H ; retry
1W ; expire
3H ) ; minimum
NS master1
NS master2
master1 A 192.168.47.50
master2 A 192.168.47.70
ftp A 2.2.2.2
DB A 3.3.3.3
www CNAME websrv
websrv A 192.168.47.154
保存退出
[root@centos7 named]# vim /etc/named.rfc1912.zones
zone "jingyun.com" IN {
type master;
file "jingyun.com.zone";
};
在以上文件中添加“jingyun”区域内容并保存退出
[root@centos7 named]# rndc reload
server reload successful
登录客户端 192.168.47.154
[root@centos7 ~]# host www.jingyun.com
www.jingyun.com is an alias for websrv.jingyun.com.
websrv.jingyun.com has address 192.168.47.154
[root@centos7 ~]# host db.jingyun.com
db.jingyun.com has address 3.3.3.3
[root@centos7 ~]# host ftp.jingyun.com
ftp.jingyun.com has address 2.2.2.2
搭建DNS从服务器 192.168.47.70
[root@centos7 ~]# yum install bind 安装bing服务程序
修改配置文件 named.conf
vim /etc/named.conf
options {
listen-on port 53 { localhost; };
listen-on-v6 port 53 { ::1; };
directory "/var/named";
dump-file "/var/named/data/cache_dump.db";
statistics-file "/var/named/data/named_stats.txt";
memstatistics-file "/var/named/data/named_mem_stats.txt";
recursing-file "/var/named/data/named.recursing";
secroots-file "/var/named/data/named.secroots";
allow-query { any; };
allow-transfer { none;}; 安全配置策略
[root@centos7 named]# vim /etc/named.rfc1912.zones 在此配置文件中添加区域
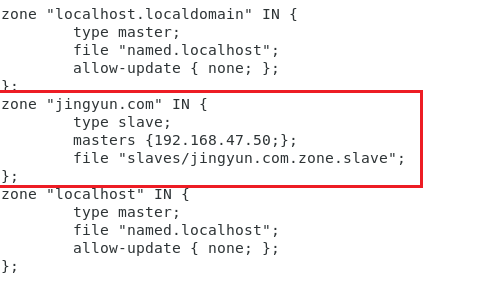
保存退出
[root@centos7 named]# rndc reload
server reload successful
在主DNS服务器配置文件目录中
[root@centos7 ~]# cd /var/named
[root@centos7 named]# vim jingyun.com.zone
$TTL 1D
@ IN SOA master.jingyun.com. admin.jingyun.com. (
2 ; serial
1D ; refresh
1H ; retry
1W ; expire
3H ) ; minimum
NS master1
NS master2
master1 A 192.168.47.50
master2 A 192.168.47.70
ftp A 2.2.2.2
DB A 3.3.3.3
www CNAME websrv
websrv A 192.168.47.154
@ MX 10 4.4.4.4
添加邮件地址并修改版本号 2:serial
[root@centos7 named]# rndc reload
server reload successful
启动客户端 192.168.47.154
[root@centos7 ~]# dig -t mx jingyun.com @192.168.47.70 从DNS
[root@centos7 ~]# dig -t mx jingyun.com @192.168.47.50 主DNS
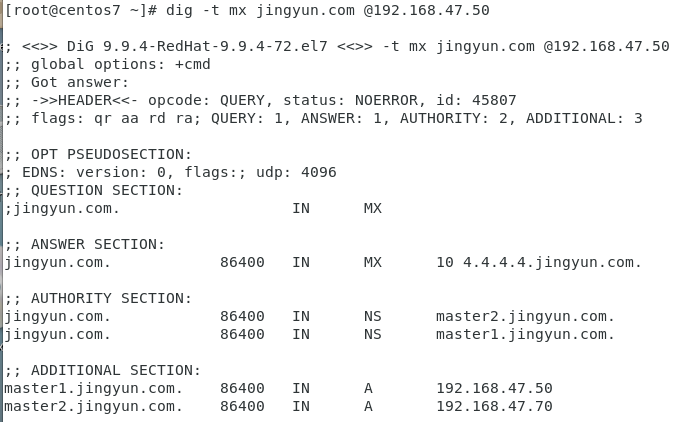
客户端在网络配置文件中中添加2个DNS服务器如下所示:
[root@centos7 ~]# vim /etc/sysconfig/network-scripts/ifcfg-ens33
BOOTPROTO=static
NAME=ens33
DEVICE=ens33
ONBOOT=yes
IPADDR=192.168.47.154
FREFIX=24
GATEWAY=192.168.47.254
DNS1=192.168.47.50
DNS2=192.168.47.70
[root@centos7 ~]# systemctl restart network
[root@centos7 ~]# dig -t mx jingyun.com
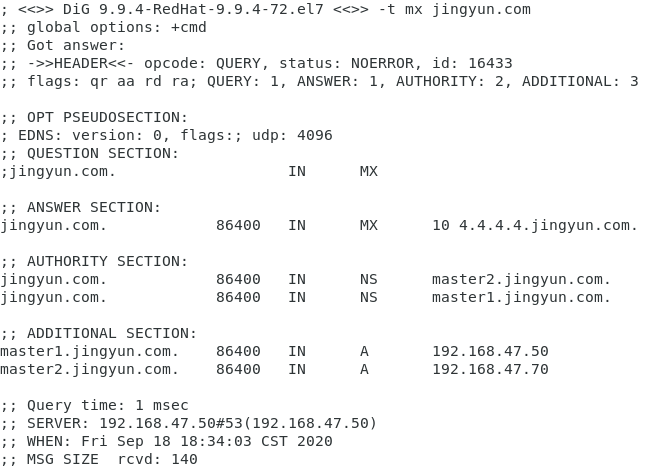
DNS服务down机,再次执行以上命令
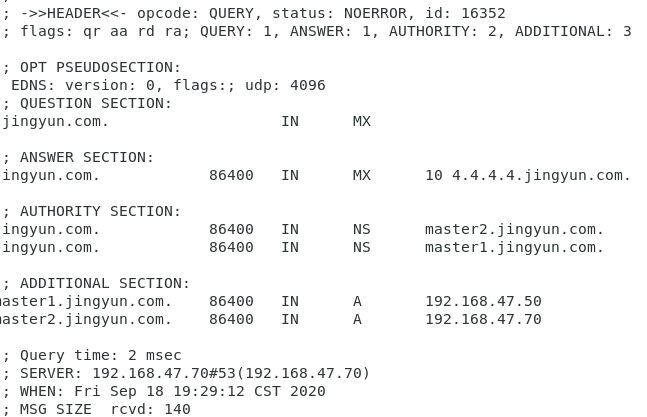
[root@centos7 ~]# dig -t mx jingyun.com
[root@centos7 ~]# systemctl stop named
2、搭建并实现智能DNS。环境一台装有bind服务软件的服务器192.168.47.70,一台客户端192.168.47.154
第一步:在centos7.6版本中安装bind服务软件并在主配置文件中进行相关配置 。注意:关闭防火墙、selinux服务并搭建epel源
[root@centos7 ~]# yum install bind
[root@centos7 named]# cd /var/named/ 在/var/named/目录下创建不同区域beijing、shanghai 的数据库
[root@centos7 named]# ll
-rw-r----- 1 root named 113 Sep 19 02:58 jingyun.com.zone.beijing
-rw-r----- 1 root named 111 Sep 19 02:59 jingyun.com.zone.shanghai
[root@centos7 named]# cat jingyun.com.zone.beijing
$TTL 1D
@ IN SOA ns1 admin ( 0 1D 1H 1W 3H)
NS ns1
ns1 A 192.168.47.70
wwww A 172.16.47.100
[root@centos7 named]# cat jingyun.com.zone.shanghai
$TTL 1D
@ IN SOA ns1 admin ( 1 1D 1H 1W 3H)
NS ns1
ns1 A 192.168.47.70
www A 192.168.47.200
[root@centos7 named]# vim /etc/named.rfc1912.zones.shanghai 定义zone的文件

zone "jingyun.com" {
type master;
file "jingyun.com.zone.shanghai";
};
zone "." IN {
type hint;
file "named.ca";
};
[root@centos7 named]# vim /etc/named.rfc1912.zones.beijing 定义zone的文件
zone "jingyun.com" {
type master;
file "jingyun.com.zone.beijing";
};
zone "." IN {
type hint;
file "named.ca";
};
[root@centos7 ~]# vim /etc/named.conf 配置主配置文件
手动添加 如下信息并注释掉 listen-on port 53 { 127.0.0.1; };和 allow-query {localhost; };
acl beijingnet { 172.16.0.0/16;}; 定义不同地方的用户列表和添加不通区域的数据库
acl shanghainet { 192.168.47.0/24;};


view view_beijing {
match-clients { beijingnet;};
include "/etc/named.rfc1912.zones.beijing";
};
view view_shanghai {
match-clients { shanghainet;};
include "/etc/named.rfc1912.zones.shanghai";
};
保存退出并重启服务
[root@centos7 named]# systemctl restart named
[root@centos7 named]# rndc reload
server reload successful
[root@centos7 named]# named-checkconf 对配置文件进行验证
root@centos7 named]# named-checkzone jingyun.com /var/named/jingyun.com.zone.beijing 对数据库进行验证
zone jingyun.com/IN: loaded serial 0
OK
[root@centos7 named]# named-checkzone jingyun.com /var/named/jingyun.com.zone.shanghai
zone jingyun.com/IN: loaded serial 1
OK
测试 启动客户端 ip地址为192.168.47.154
[root@centos7 ~]# dig www.jingyun.com @192.168.47.70

3、编译安装Mariadb,并启动后可以正常登录
答:在centos7.6中通过yum安装 Mariadb-server ,配置好yum源
[root@centos7 ~]# yum install mariadb-server.x86_64
[root@centos7 ~]# systemctl start mariadb
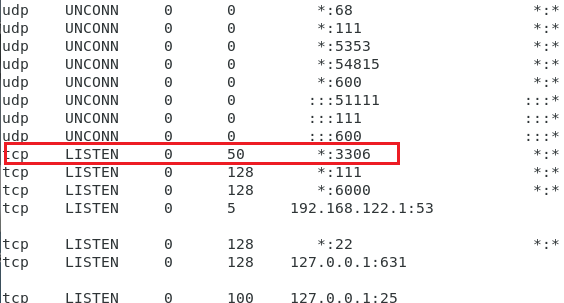
[root@centos7 ~]# ss -nult
[root@centos7 ~]# mysql
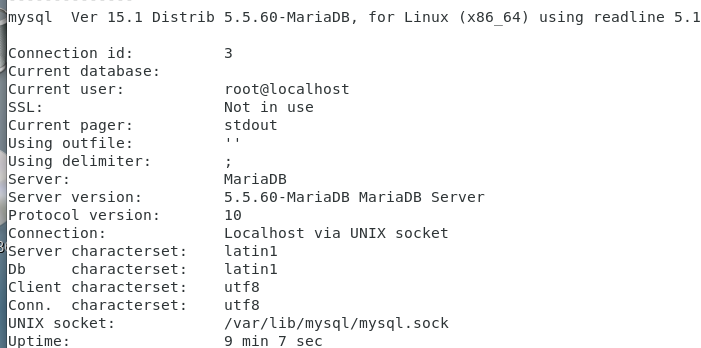
Welcome to the MariaDB monitor. Commands end with ; or \g.
Your MariaDB connection id is 3
Server version: 5.5.60-MariaDB MariaDB Server
Copyright (c) 2000, 2018, Oracle, MariaDB Corporation Ab and others.
Type 'help;' or '\h' for help. Type '\c' to clear the current input statement.
MariaDB [(none)]>status
二进制安装过程
实验:MYSQL二进制安装过程 ,环境centos 7.6系统,firewalld、iptables、selinux关闭
下载mysql 版本mariadb-10.2.25-linux-x86_64.tar.gz
[root@centos7 data]# rpm -q mariadb-server 系统没有安装过mysql记录
第一步:创建用户账号
[root@centos7 data]# getent passwd mysql 确定是否有mysql账户
[root@centos7 data]# useradd -r -s /sbin/nologin -d /data/mysql mysql 系统账号默认不会创建对应的家目录,如想强制创建加 –m 项该目录会自动生成一些.bashac 的文件
[root@centos7 ~]# mkdir /data/mysql 创建存放数据的目录
[root@centos7 local]# tar xvf mariadb-10.2.25-linux-x86_64.tar.gz -C /usr/local
[root@centos7 local]# du -sh mariadb-10.2.25-linux-x86_64/ 看文件大小
[root@centos7 local]# ln -s mariadb-10.2.25-linux-x86_64/ mysql
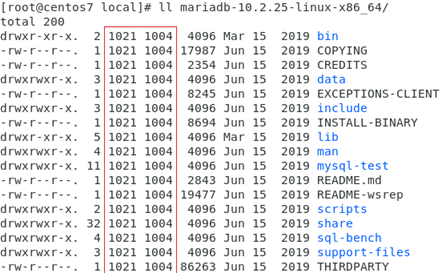
[root@centos7 local]# chown -R root.root mariadb-10.2.25-linux-x86_64/ 更改mysql目录下的所有组和所有者,如下图
[root@centos7 local]# chown -R root.root mysql/ 也可以指定软连接。
第二步:生成数据在mysql目录中,会用到scripts和support-files文件
[root@centos7 mysql]# ls scripts/ 该脚本作用就是创建数据库相关的文件,初始化用的。
mysql_install_db
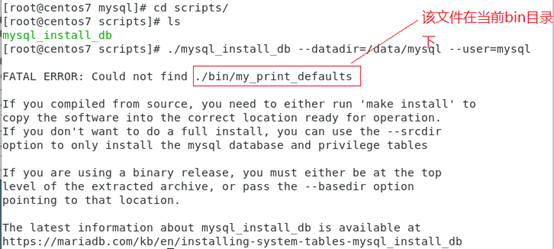
[root@centos7 scripts]# ./mysql_install_db --datadir=/data/mysql --user=mysql 执行此脚本指定目录并指定以谁的身份。
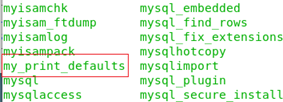
[root@centos7 mysql]# ll bin/
如想运行此的脚本必须在mysql目录下执行。
[root@centos7 mysql]# scripts/mysql_install_db --datadir=/data/mysql --user=mysql
Installing MariaDB/MySQL system tables in '/data/mysql' ...
OK
[root@centos7 mysql]# ll /data/mysql

系统默认存在/etc/my.cnf 配置文件但此配置文件不是二进制安装自带的所以不合适。
[root@centos7 mysql]# ls support-files/ 适合二进制安装的配置文件,如下图适于不同环境

[root@centos7 mysql]# mkdir /etc/mysql 为了避免和原有的冲突自定义创建文件夹
[root@centos7 mysql]# cp support-files/my-huge.cnf /etc/mysql/my.cnf
[root@centos7 mysql]# vim /etc/mysql/my.cnf 更改配置文件 添加数据路径

启动服务 用脚本启动服务
[root@centos7 mysql]# vim support-files/mysql.server 是启动脚本服务端
[root@centos7 mysql]# cp support-files/mysql.server /etc/init.d/mysqld 随时启动
[root@centos7 mysql]# chkconfig –list 启动查询
[root@centos7 mysql]# chkconfig --add mysqld 增加启动服务端
[root@centos7 mysql]# systemctl start mysqld ss –nult 查看服务端端口号 3306
客户端所在路径
[root@centos7 ~]# ls /usr/local/mysql/bin/mysql
[root@centos7 ~]# echo 'PATH=/usr/local/mysql/bin:$PATH' > /etc/profile.d/mysql.sh 变更客户端路径
[root@centos7 ~]# . /etc/profile.d/mysql.sh 生效 或者source
[root@centos7 ~]# mysql 创建成功
MariaDB [(none)]> show databases;
mysql安全加固
[root@centos7 ~]# mysql_secure_installation
[root@centos7 ~]# mysql –p 输入口令
实验:MYSQL源码编译安装
系统环境设置关闭firewalld,selinux.时间同步,搭建yum源
[root@centos7 ~]# useradd -r -s /sbin/nologin -d /data/mysql mysql 创建用户
[root@centos7 ~]#mkdir /data/mysql
[root@centos7 ~]#chown –R mysql:mysq. /data/mysql
[root@centos7 ~]# tar -zxvf /usr/local/mariadb-10.2.25.tar.gz
[root@centos7 ~]# yum install bison bison-devel zlib-devel libcurl-devel libarchive-devel boost-devel gcc gcc-c++ cmake ncurses-devel gnutls-devel libxml2-devel openssl-devel libevent-devel libaio-devel 安装包
[root@centos7 ~]# cmake . \ 编译安装 换行
> -DCMAKE_INSTALL_PREFIX=/app/mysql \
> -DMYSQL_DATADIR=/data/mysql/ \f
> -DSYSCONFDIR=/etc/ \
> -DMYSQL_USER=mysql \
> -DWITH_INNOBASE_STORAGE_ENGINE=1 \
> -DWITH_ARCHIVE_STORAGE_ENGINE=1 \
> -DWITH_BLACKHOLE_STORAGE_ENGINE=1 \
> -DWITH_PARTITION_STORAGE_ENGINE=1 \
> -DWITHOUT_MROONGA_STORAGE_ENGINE=1 \
> -DWITH_DEBUG=0 \
> -DWITH_READLINE=1 \
> -DWITH_SSL=system \
> -DWITH_ZLIB=system \
> -DWITH_LIBWRAP=0 \
> -DENABLED_LOCAL_INFILE=1 \
> -DMYSQL_UNIX_ADDR=/data/mysql/mysql.sock \
> -DDEFAULT_CHARSET=utf8 \
> -DDEFAULT_COLLATION=utf8_general_ci
[root@centos7 ~]# make -j 16 && make install
[root@centos7 mysql]# echo 'PATH=/app/mysql/bin:$PATH' > /etc/profile.d/mysql.sh
[root@centos7 ~]# . /etc/profile.d/mysql.sh
[root@centos7 ~]# cd /app/mysql/
[root@centos7 mysql]# scripts/mysql_install_db --datadir=/data/mysql/ --user=mysql
[root@centos7 ~]# cp /app/mysql/support-files/my-huge.cnf /etc/my.cnf
[root@centos7 ~]# cp /app/mysql/support-files/mysql.server /etc/init.d/mysqld
[root@centos7 ~]#chkconfig –add mysqld
[root@centos7 ~]#service mysqld start
[root@centos7 ~]# mysql
MariaDB [(none)]>
[root@centos7 ~]# mysql_secure_installation 安全加固


