


https原理、http连接池、HttpClient和OkHttp的区别
1、https原理
2、http连接池
3、HttpClient和OkHttp的区别
从二者的使用,超时设置,性能方面看下它们的不同之处。
3.1、二者的使用
HttpClient的使用
使用HttpClient发送请求主要分为一下几步骤:
- 创建 CloseableHttpClient对象或CloseableHttpAsyncClient对象,前者同步,后者为异步
- 创建Http请求对象
- 调用execute方法执行请求,如果是异步请求在执行之前需调用start方法
创建连接:
CloseableHttpClient httpClient = HttpClientBuilder.create().build();
该连接为同步连接,如果要使用异步连接(文件上传也是)需要引入额外依赖:
<!---文件上传-->
 <dependency>
     <groupId>org.apache.httpcomponents</groupId>
     <artifactId>httpmime</artifactId>
     <version>4.5.3</version>
 </dependency>
 <!--异步请求-->
 <dependency>
     <groupId>org.apache.httpcomponents</groupId>
     <artifactId>httpasyncclient</artifactId>
     <version>4.5.3</version>
 </dependency>
Get请求:
@Test
public void testGet() throws IOException {
    String api = "/api/files/1";
    String url = String.format("%s%s", BASE_URL, api);
    HttpGet httpGet = new HttpGet(url);
    CloseableHttpResponse response = httpClient.execute(httpGet);
    System.out.println(EntityUtils.toString(response.getEntity()));
}
Post请求:
@Test
public void testPost() throws IOException {
    String api = "/api/user";
    String url = String.format("%s%s", BASE_URL, api);
    HttpPost httpPost = new HttpPost(url);
    UserVO userVO = UserVO.builder().name("h2t2").build();
    httpPost.setHeader("Content-Type", "application/json;charset=utf8");
    httpPost.setEntity(new StringEntity(JSONObject.toJSONString(userVO), "UTF-8"));
    CloseableHttpResponse response = httpClient.execute(httpPost);
    System.out.println(EntityUtils.toString(response.getEntity()));
}
文件上传:
@Test
public void testUpload1() throws IOException {
    String api = "/api/files/1";
    String url = String.format("%s%s", BASE_URL, api);
    HttpPost httpPost = new HttpPost(url);
    File file = new File("/Users/hetiantian/Desktop/test.pdf");
    FileBody fileBody = new FileBody(file);
    MultipartEntityBuilder builder = MultipartEntityBuilder.create();
    builder.setMode(HttpMultipartMode.BROWSER_COMPATIBLE);
    builder.addPart("file", fileBody);  //addPart上传文件
    HttpEntity entity = builder.build();
    httpPost.setEntity(entity);
    CloseableHttpResponse response = httpClient.execute(httpPost);
    System.out.println(EntityUtils.toString(response.getEntity()));
}
OkHttp的使用
使用OkHttp发送请求主要分为一下几步骤:
- 创建OkHttpClient对象
- 创建Request对象
- 将Request 对象封装为Call
- 通过Call 来执行同步或异步请求,调用execute方法同步执行,调用enqueue方法异步执行
创建连接:
OkHttpClient client = new OkHttpClient();
Get请求:
@Test
public void testGet() throws IOException {
    String api = "/api/files/1";
    String url = String.format("%s%s", BASE_URL, api);
    Request request = new Request.Builder()
            .url(url)
            .get()
            .build();
    final Call call = client.newCall(request);
    Response response = call.execute();
    System.out.println(response.body().string());
}
Post请求:
@Test
public void testPost() throws IOException {
    String api = "/api/user";
    String url = String.format("%s%s", BASE_URL, api);
    //请求参数
    JSONObject json = new JSONObject();
    json.put("name", "hetiantian");
    RequestBody requestBody = RequestBody.create(MediaType.parse("application/json; charset=utf-8"),     String.valueOf(json));
    Request request = new Request.Builder()
            .url(url)
            .post(requestBody) //post请求
           .build();
    final Call call = client.newCall(request);
    Response response = call.execute();
    System.out.println(response.body().string());
}
文件上传:
@Test
public void testUpload() throws IOException {
    String api = "/api/files/1";
    String url = String.format("%s%s", BASE_URL, api);
    RequestBody requestBody = new MultipartBody.Builder()
            .setType(MultipartBody.FORM)
            .addFormDataPart("file", "docker_practice.pdf",
                    RequestBody.create(MediaType.parse("multipart/form-data"),
                            new File("C:/Users/hetiantian/Desktop/学习/docker_practice.pdf")))
            .build();
    Request request = new Request.Builder()
            .url(url)
            .post(requestBody)  //默认为GET请求,可以不写
            .build();
    final Call call = client.newCall(request);
    Response response = call.execute();
    System.out.println(response.body().string());
}
总结:从使用上来看,OkHttp的build模式创建对象更简洁一些
3.2、超时设置
HttpClient超时设置:
在HttpClient4.3+版本以上,超时设置通过RequestConfig进行设置
private CloseableHttpClient httpClient = HttpClientBuilder.create().build();
private RequestConfig requestConfig =  RequestConfig.custom()
        .setSocketTimeout(60 * 1000)
        .setConnectTimeout(60 * 1000).build();
String api = "/api/files/1";
String url = String.format("%s%s", BASE_URL, api);
HttpGet httpGet = new HttpGet(url);
httpGet.setConfig(requestConfig);  //设置超时时间
OkHttp超时设置:
直接在OkHttp上进行设置
private OkHttpClient client = new OkHttpClient.Builder()
        .connectTimeout(60, TimeUnit.SECONDS)//设置连接超时时间
        .readTimeout(60, TimeUnit.SECONDS)//设置读取超时时间
        .build();
总结:如果client是单例模式,HttpClient在设置超时方面来的更灵活,针对不同请求类型设置不同的超时时间,OkHttp一旦设置了超时时间,所有请求类型的超时时间也就确定。
3.3、性能比较
测试环境:
- CPU 六核
- 内存 8G
- windows10
每种测试用例都测试五次,排除偶然性
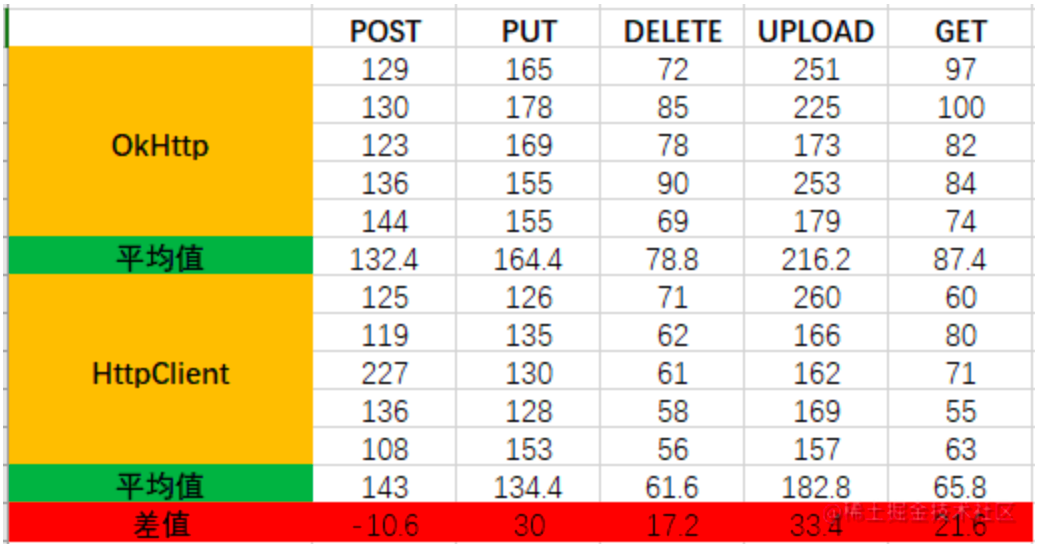
client连接为单例:
client连接不为单例:
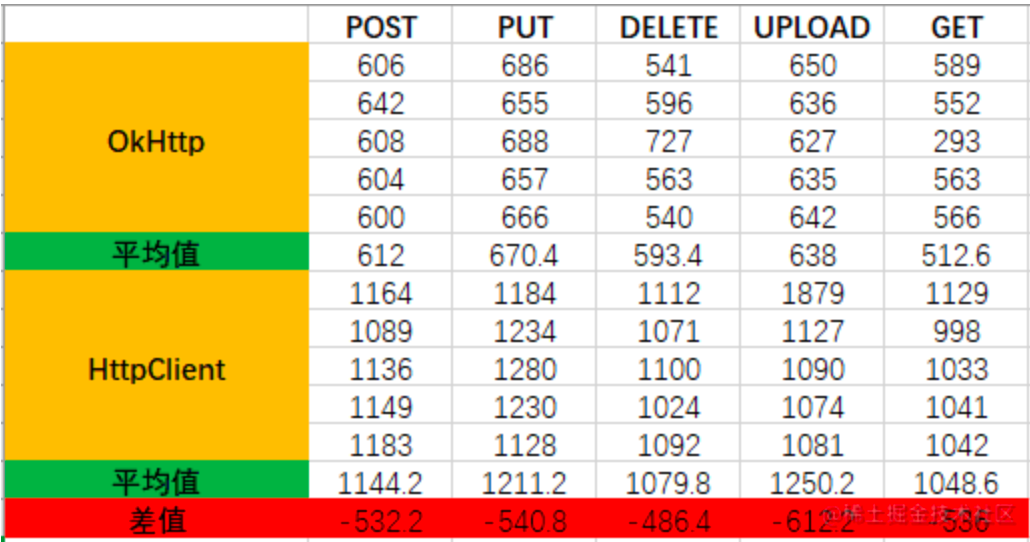
总结:二者在单例模式时都会使用到线程池,所以比非单例模式性能要高。单例模式下,HttpClient的响应速度要更快一些,单位为毫秒,性能差异相差不大,非单例模式下,OkHttp的性能更好,HttpClient创建连接比较耗时。
4、OKhttp原理
OKHttp的主要特性包括:
-
连接池:OKHttp维护一个连接池,可复用活动的HTTP和HTTP/2连接。
-
GZIP压缩:通过GZIP压缩下载的数据,可以减少传输数据量。
-
缓存机制:对请求的响应进行缓存,减少服务器的负载和带宽消耗。
-
支持SPDY和HTTP/2:在支持的服务器上使用,可以使用同一个连接发送多个请求。
-
请求构建和同步:OKHttp提供构建请求的构建器模式,支持同步和异步请求。
OKhttp对TCP的复用:利用连接池,缓存所有的有效连接对象。(默认最大5个连接)
清理机制:垃圾连接
1.超过5分钟没有用过的链接
2.超过5个闲置链接后,从最久闲置的链接开始执行清理(LRU)

