motan系列3——服务注册
1、回顾motan注册BeanDefinition
motan的整个注册、启动就是通过介入spring容器的启动来实现的,所以我们在这一节继续根据spring的启动顺序来看一下motan的服务注册。
在motan系列1——与spring集成中,我们介绍了motan是通过 AnnotationBean 实现 BeanFactoryPostProcessor 接口,将添加了@MotanService注解的类的 BeanDefinition 注册到 BeanDefinitionRegistry 的。这里再说下 BeanFactoryPostProcessor,这个接口只提供了一个方法 ,用来修改类的 BeanDefinition 信息或是向 BeanDefinitionRegistry 注册一些自定义的类。
void postProcessBeanFactory(ConfigurableListableBeanFactory var1) throws BeansException;
2、motan解析@MotanService的spring链路
AnnotationBean 还实现了BeanPostProcessor ,其中的 postProcessAfterInitialization() 就是motan用来解析@MotanService注册服务的。motan在postProcessBeforeInitialization()方法中解析@MotanRefer,这个在后面分析。来看下这两个方法在spring启动过程中的调用:
BeanFactory.getBean()——>createBean()——>populateBean()(属性注入)——>initializeBean()(初始化bean),前置和后置处理器就是在initializeBean()方法中调用的。
protected Object initializeBean(final String beanName, final Object bean, @Nullable RootBeanDefinition mbd) {
        //省略。。。
        /**
         * 调用BeanPostProcessor后置处理器的 postProcessBeforeInitialization 方法
         */
        if (mbd == null || !mbd.isSynthetic()) {
            wrappedBean = applyBeanPostProcessorsBeforeInitialization(wrappedBean, beanName);
        }

        /**
         * 先调用InitializingBean的afterPropertiesSet,在调用我们定义的init方法
         */
        try {
            invokeInitMethods(beanName, wrappedBean, mbd);
        }
        catch (Throwable ex) {
            throw new BeanCreationException(
                    (mbd != null ? mbd.getResourceDescription() : null),
                    beanName, "Invocation of init method failed", ex);
        }
        /**
         * 调用BeanPostProcessor后置处理器的 postProcessAfterInitialization 方法
         */
        if (mbd == null || !mbd.isSynthetic()) {
            wrappedBean = applyBeanPostProcessorsAfterInitialization(wrappedBean, beanName);
        }

        return wrappedBean;
    }
这就非常清晰地看到motan的调用时机了。
3、@MotanService的具体解析
代码如下,我们省略配置解析部分,这一步主要是解析service、basicService、protocol、registry中的信息(不清楚的可以参考motan的简单使用),将所有配置封装到com.weibo.api.motan.config.springsupport.ServiceConfigBean中。
    @Override
    public Object postProcessAfterInitialization(Object bean, String beanName) throws BeansException {

        Class<?> clazz = bean.getClass();

        MotanService service = clazz.getAnnotation(MotanService.class);
        if (service != null) {
            ServiceConfigBean<Object> serviceConfig = new ServiceConfigBean<Object>();
                /**
                 * 缺省。。。
                 */
                try {
                    serviceConfig.afterPropertiesSet();
                } catch (RuntimeException e) {
                    throw (RuntimeException) e;
                } catch (Exception e) {
                    throw new IllegalStateException(e.getMessage(), e);
                }
            }
            serviceConfig.setRef(bean);
            serviceConfigs.add(serviceConfig);
            serviceConfig.export();
        }
        return bean;
    }
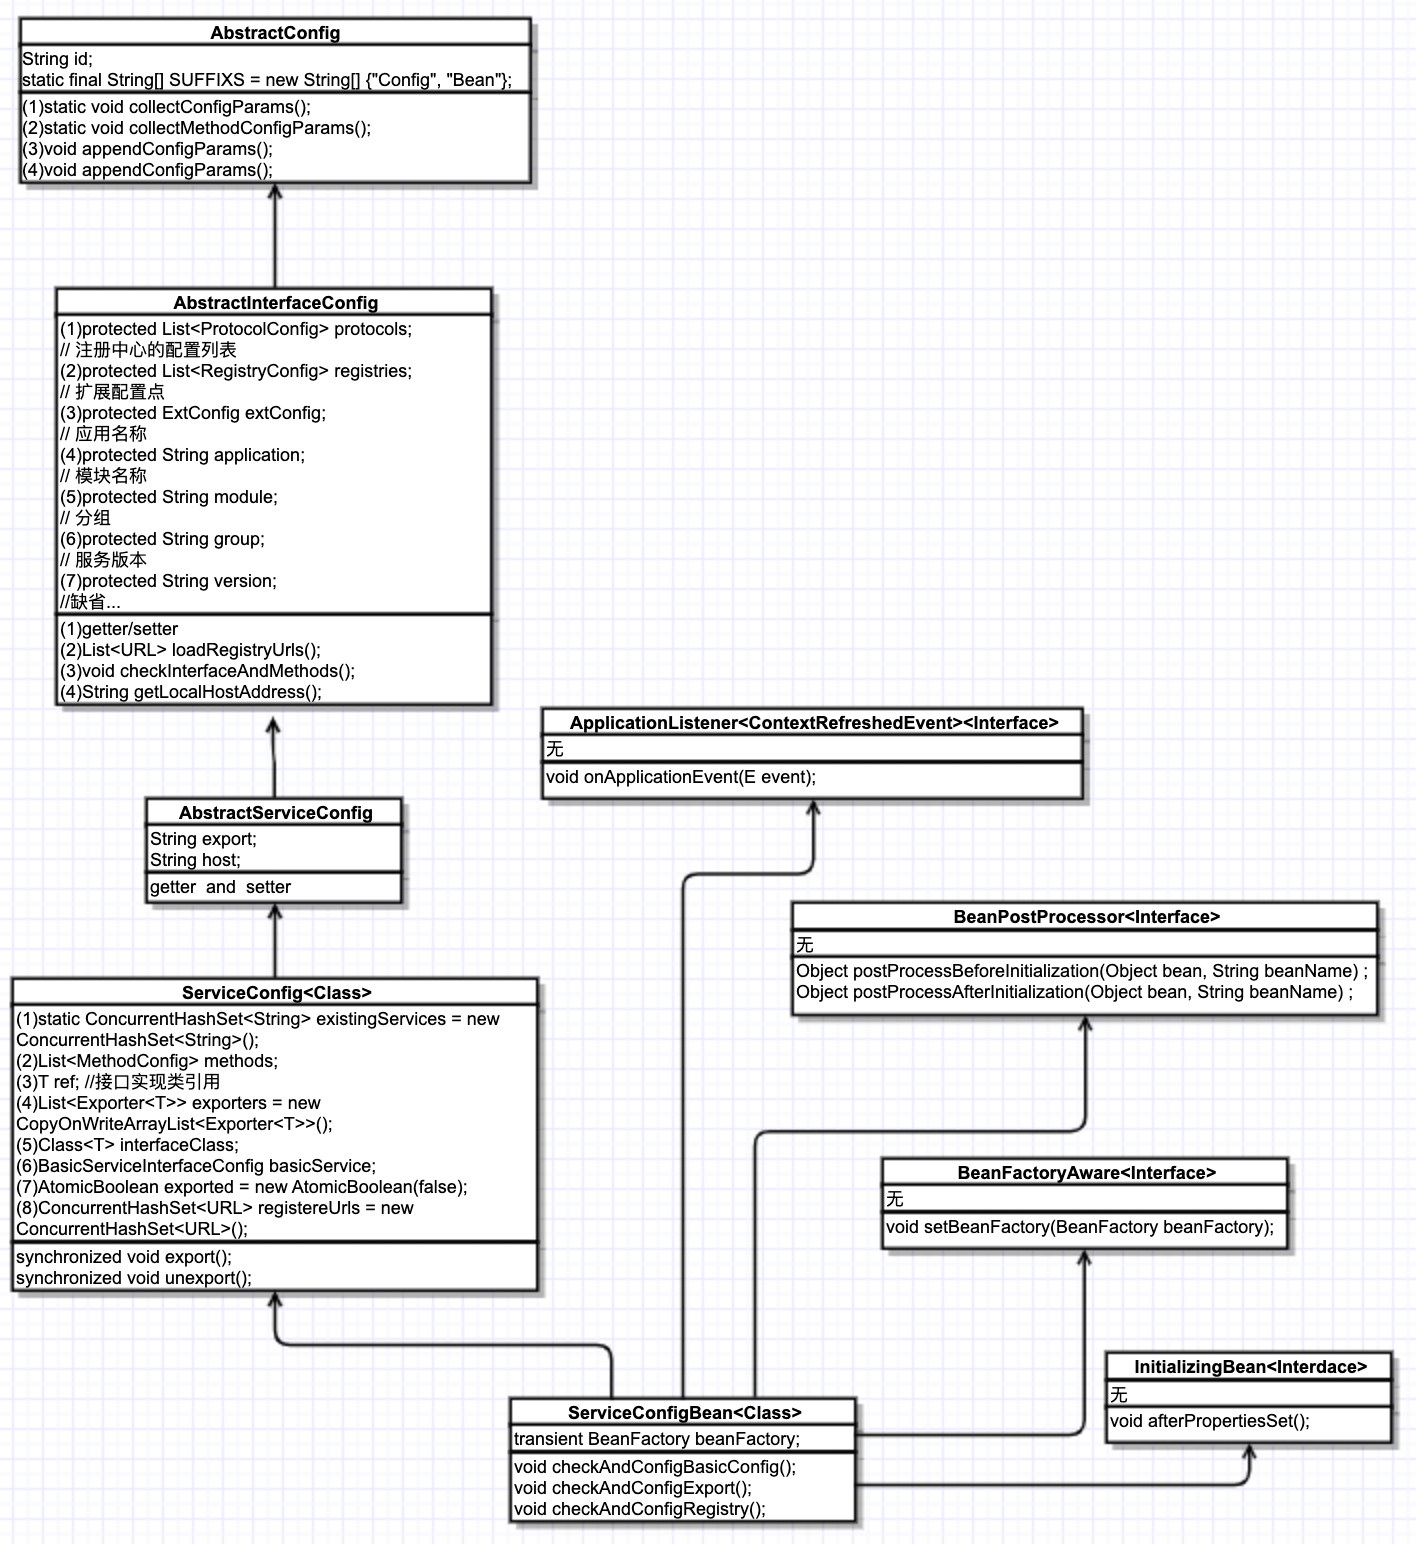
来看下 ServiceConfigBean。

Motan将配置信息封装到 ServiceConfigBean 后,调用了 afterPropertiesSet() 方法,由上图可知,这个方法是 InitializingBean 接口中抽象方法的实现。
    @Override
    public void afterPropertiesSet() throws Exception {

        // 注意:basicConfig需要首先配置,因为其他可能会依赖于basicConfig的配置
        checkAndConfigBasicConfig();
        // 检查是否已经装配export,如果没有则到basicConfig查找
        checkAndConfigExport();
        // 检查并配置registry
        checkAndConfigRegistry();
    }
- 检查配置解析过程后,ServiceConfigBean的
basicService属性是否为空,如果是空,需要重新解析并设置他的值。
如何重新设置他的值呢?从UML图中我们可以找到 basicService 的位置,在 ServiceConfig 类中的第7个Field。字段类型是 BasicServiceInterfaceConfig。这个检查其实就是找到当前Spring容器中所有 BasicServiceInterfaceConfig 类型的bean,如果只找到一个,就把这个赋值到 basicService 上,如果有多个,需要找到 BasicServiceInterfaceConfig 的 isDefault 属性为true的那个,并赋值。
- 检查
export的值是否已经设置,如果没有设置,到basicService中查找。
这一步其实是检查 protocol,也就是 motan、motan2这些协议是否已经设置好,export字段的格式为:protocol1:port1,protocol2:port2。对应到UML中,export字段在 AbstractServiceConfig 类中。 这里同时会将 export 的值解析到 AbstractInterfaceConfig 的 protocols 字段中。
- 检查注册中心的配置
例如 zookeeper、consul 这些是否已经配置好。如果是空的话,还是从 basicService 中查找,并将结果配置到 AbstractInterfaceConfig 的 registries 属性中。
这些都检查好以后,basicService、export、protocols、registries这些字段就初始化好了。然后会将新创建出来的这个 ServiceConfigBean 实例添加到 AnnotationBean 的 serviceConfigs 属性中。
至此 @MotanService 解析完成,可以准备发布并注册服务了。
4、服务的发布与注册
在上面的步骤中完成了 motan 几个关键属性(protocol、registry)的封装。然后调用 serviceConfig.export() 的发布。
public synchronized void export() { // 这里加了个并发的控制,锁使用的是 this
    // 如果已经发布过了,直接返回
    if (exported.get()) {
        LoggerUtil.warn(String.format("%s has already been expoted, so ignore the export request!", interfaceClass.getName()));
        return;
    }

    // 检查暴露服务的类是否是某个接口的实现,如果不是则抛出异常
    // 检查暴露的方法是否在接口中存在,如果没有则抛出异常
    checkInterfaceAndMethods(interfaceClass, methods);

    // 解析注册中心地址,并将host、port等参数封装到URL类中
    List<URL> registryUrls = loadRegistryUrls();
    if (registryUrls == null || registryUrls.size() == 0) {
        throw new IllegalStateException("Should set registry config for service:" + interfaceClass.getName());
    }

    // 解析协议和服务暴露的端口,默认为 `motan` 协议。Map的结构为:<协议, 端口>
    Map<String, Integer> protocolPorts = getProtocolAndPort();
    for (ProtocolConfig protocolConfig : protocols) {
        Integer port = protocolPorts.get(protocolConfig.getId());
        if (port == null) {
            throw new MotanServiceException(String.format("Unknow port in service:%s, protocol:%s", interfaceClass.getName(),
                    protocolConfig.getId()));
        }
        // 注册并暴露服务
        doExport(protocolConfig, port, registryUrls);
    }

    afterExport();
}
上述代码先初始化了暴露服务之前需要的一些数据:注册中心地址、服务协议、暴露端口等,真正执行服务注册的是 doExport 方法。这个方法较长,这里只贴出关键部分。
private void doExport(ProtocolConfig protocolConfig, int port, List<URL> registryURLs) {
    // ... 省略 ...
    // 省略部分代码主要作用是处理下面这行URL中的参数,例如:protocolName -> motan,hostAddress -> 本机IP,port -> 暴露端口 等
    // map是解析出来的配置,以及一些默认配置,例如:
    /*
    "haStrategy" -> "failover"
    "module" -> "ad-common"
    "check" -> "false"
    "nodeType" -> "service"
    "version" -> "1.1.0"
    "filter" -> "cafTracing,pepperProfiler,sentinelProfiler"
    "minWorkerThread" -> "20"
    "retries" -> "1"
    "protocol" -> "motan"
    "application" -> "ad-common"
    "maxWorkerThread" -> "200"
    "shareChannel" -> "true"
    "refreshTimestamp" -> "1571821305290"
    "id" -> "ad-commonBasicServiceConfigBean"
    "export" -> "ad-commonProtocolConfigBean:8022"
    "requestTimeout" -> "30000"
    "group" -> "ad-common"
     */
    URL serviceUrl = new URL(protocolName, hostAddress, port, interfaceClass.getName(), map);
    // 校验服务是否已经存在
    // 注册完成的服务会添加到一个set中,serviceExists方法就是检查这个set中是否已经包含了这个服务的描述符(描述符的格式大概是host、port、protocol、version、nodeType组合的字符串)
    // serviceUrl就是这个东西:motan://192.168.100.14:8022/com.coohua.ad.common.remote.api.AdCommonRPC?group=ad-common
    if (serviceExists(serviceUrl)) {
        LoggerUtil.warn(String.format("%s configService is malformed, for same service (%s) already exists ", interfaceClass.getName(),
                serviceUrl.getIdentity()));
        throw new MotanFrameworkException(String.format("%s configService is malformed, for same service (%s) already exists ",
                interfaceClass.getName(), serviceUrl.getIdentity()), MotanErrorMsgConstant.FRAMEWORK_INIT_ERROR);
    }

    List<URL> urls = new ArrayList<URL>();

    // injvm 协议只支持注册到本地,其他协议可以注册到local、remote
    if (MotanConstants.PROTOCOL_INJVM.equals(protocolConfig.getId())) {
        // ... 省略,主要关注下面的注册中心暴露服务
    } else {
        for (URL ru : registryURLs) {
            urls.add(ru.createCopy()); // 这里是一个浅拷贝,只是new了一个URL,具体字段用的还是之前的引用。
        }
    }

    // registereUrls 是注册中心的URL
    for (URL u : urls) {
        u.addParameter(URLParamType.embed.getName(), StringTools.urlEncode(serviceUrl.toFullStr()));
        registereUrls.add(u.createCopy());
    }

    ConfigHandler configHandler = ExtensionLoader.getExtensionLoader(ConfigHandler.class).getExtension(MotanConstants.DEFAULT_VALUE);

    // 到注册中心注册服务,urls是注册中心的地址
    exporters.add(configHandler.export(interfaceClass, ref, urls));
}
最后调用 configHandler.export 注册时,经过上面的解析过程,url的parameters参数中已经包含了注册需要用到的信息,例如:
"path" -> "com.weibo.api.motan.registry.RegistryService"
"address" -> "192.168.103.254:2181"
"application" -> null
"name" -> "direct"
"connectTimeout" -> "3000"
"id" -> "ad-commonRegistryConfigBean"
"refreshTimestamp" -> "1571821250310"
"embed" -> "motan%3A%2F%2F192.168.100.14%3A8022%2Fcom.coohua.ad.common.remote.api.AdCommonRPC%3FhaStrategy%3Dfailover%26module%3Dad-common%26check%3Dfalse%26nodeType%3Dservice%26version%3D1.1.0%26filter%3DcafTracing%2CpepperProfiler%2CsentinelProfiler%26minWorkerThread%3D20%26retries%3D1%26protocol%3Dmotan%26application%3Dad-common%26maxWorkerThread%3D200%26shareChannel%3Dtrue%26refreshTimestamp%3D1571821305290%26id%3Dad-commonBasicServiceConfigBean%26export%3Dad-commonProtocolConfigBean%3A8022%26requestTimeout%3D30000%26group%3Dad-common%26"
"requestTimeout" -> "1000"
接下来看一下 configHandler.export 做了什么事情。
public <T> Exporter<T> export(Class<T> interfaceClass, T ref, List<URL> registryUrls) {
    // 解码url -> motan://192.168.100.14:8022/com.coohua.ad.common.remote.api.AdCommonRPC?group=ad-common
    String serviceStr = StringTools.urlDecode(registryUrls.get(0).getParameter(URLParamType.embed.getName()));
    URL serviceUrl = URL.valueOf(serviceStr);

    // export service
    String protocolName = serviceUrl.getParameter(URLParamType.protocol.getName(), URLParamType.protocol.getValue());
    // SPI的方式拿到具体的Protocol实现,默认情况下拿到 motan 的 Protocol
    Protocol orgProtocol = ExtensionLoader.getExtensionLoader(Protocol.class).getExtension(protocolName);
    Provider<T> provider = getProvider(orgProtocol, ref, serviceUrl, interfaceClass);

    Protocol protocol = new ProtocolFilterDecorator(orgProtocol);
    // 在这里走Motan的filter chain,并启动服务,filter chain通过调用 ProtocolFilterDecorator 的 decorateWithFilter 方法实现
    // 走完filter chain后,会调用 orgProtocol 的 export 方法来暴露服务,这个方法的实现在 AbstractProtocol 类中
    Exporter<T> exporter = protocol.export(provider, serviceUrl);

    // 在注册中心中注册服务
    register(registryUrls, serviceUrl);

    return exporter;
}
在 AbstractProtocol 的 export 方法中会调用 createExporter 方法创建一个 Exporter 类的实例(具体来说是 DefaultRpcExporter),在这个创建过程中会调用 NettyEndpointFactory 的 createServer 方法创建一个Server出来,并存放在exporter的server变量中。
然后调用 exporter 的 init 方法,在 init 方法中又调用了 doInit 方法,这个方法调用了 server.open(),至此,服务启动,并监听在本机指定的端口上。
@Override
protected boolean doInit() {
    boolean result = server.open();

    return result;
}
server.open()中,就是netty启动监听端口了。
@Override
    public boolean open() {
        if (isAvailable()) {
            LoggerUtil.warn("NettyServer ServerChannel already Open: url=" + url);
            return state.isAliveState();
        }
        if (bossGroup == null) {
            bossGroup = new NioEventLoopGroup(1);
            workerGroup = new NioEventLoopGroup();
        }

        LoggerUtil.info("NettyServer ServerChannel start Open: url=" + url);
        boolean shareChannel = url.getBooleanParameter(URLParamType.shareChannel.getName(), URLParamType.shareChannel.getBooleanValue());
        final int maxContentLength = url.getIntParameter(URLParamType.maxContentLength.getName(), URLParamType.maxContentLength.getIntValue());
        int maxServerConnection = url.getIntParameter(URLParamType.maxServerConnection.getName(), URLParamType.maxServerConnection.getIntValue());
        int workerQueueSize = url.getIntParameter(URLParamType.workerQueueSize.getName(), URLParamType.workerQueueSize.getIntValue());

        int minWorkerThread, maxWorkerThread;

        if (shareChannel) {
            minWorkerThread = url.getIntParameter(URLParamType.minWorkerThread.getName(), MotanConstants.NETTY_SHARECHANNEL_MIN_WORKDER);
            maxWorkerThread = url.getIntParameter(URLParamType.maxWorkerThread.getName(), MotanConstants.NETTY_SHARECHANNEL_MAX_WORKDER);
        } else {
            minWorkerThread = url.getIntParameter(URLParamType.minWorkerThread.getName(), MotanConstants.NETTY_NOT_SHARECHANNEL_MIN_WORKDER);
            maxWorkerThread = url.getIntParameter(URLParamType.maxWorkerThread.getName(), MotanConstants.NETTY_NOT_SHARECHANNEL_MAX_WORKDER);
        }

        standardThreadExecutor = (standardThreadExecutor != null && !standardThreadExecutor.isShutdown()) ? standardThreadExecutor
                : new StandardThreadExecutor(minWorkerThread, maxWorkerThread, workerQueueSize, new DefaultThreadFactory("NettyServer-" + url.getServerPortStr(), true));
        standardThreadExecutor.prestartAllCoreThreads();

        channelManage = new NettyServerChannelManage(maxServerConnection);

        ServerBootstrap serverBootstrap = new ServerBootstrap();
        serverBootstrap.group(bossGroup, workerGroup)
                .channel(NioServerSocketChannel.class)
                .childHandler(new ChannelInitializer<SocketChannel>() {
                    @Override
                    protected void initChannel(SocketChannel ch) throws Exception {
                        ChannelPipeline pipeline = ch.pipeline();
                        pipeline.addLast("channel_manage", channelManage);
                        pipeline.addLast("decoder", new NettyDecoder(codec, NettyServer.this, maxContentLength));
                        pipeline.addLast("encoder", new NettyEncoder());
                        pipeline.addLast("handler", new NettyChannelHandler(NettyServer.this, messageHandler, standardThreadExecutor));
                    }
                });
        serverBootstrap.childOption(ChannelOption.TCP_NODELAY, true);
        serverBootstrap.childOption(ChannelOption.SO_KEEPALIVE, true);
        ChannelFuture channelFuture = serverBootstrap.bind(new InetSocketAddress(url.getPort()));
        channelFuture.syncUninterruptibly();
        serverChannel = channelFuture.channel();
        state = ChannelState.ALIVE;
        StatsUtil.registryStatisticCallback(this);
        LoggerUtil.info("NettyServer ServerChannel finish Open: url=" + url);
        return state.isAliveState();
    }
此时服务已经成功启动了,但还没注册到注册中心,所以还不能被发现。接下来,继续上面的代码,看一下 register(registryUrls, serviceUrl); 这行代码干了啥。
此时两个参数的值分别是:
- registryUrls:zookeeper://192.168.103.254:2181/com.weibo.api.motan.registry.RegistryService?group=default_rpc
- serviceUrl:motan://192.168.100.14:8022/com.coohua.ad.common.remote.api.AdCommonRPC?group=ad-common
这个方法的实现如下:
private void register(List<URL> registryUrls, URL serviceUrl) {

    for (URL url : registryUrls) {
        // 根据protocol的名称获取具体的 RegistryFactory ,这里以 zookeeper 为例
        RegistryFactory registryFactory = ExtensionLoader.getExtensionLoader(RegistryFactory.class).getExtension(url.getProtocol());
        if (registryFactory == null) {
            throw new MotanFrameworkException(new MotanErrorMsg(500, MotanErrorMsgConstant.FRAMEWORK_REGISTER_ERROR_CODE,
                    "register error! Could not find extension for registry protocol:" + url.getProtocol()
                            + ", make sure registry module for " + url.getProtocol() + " is in classpath!"));
        }
        // 尝试获取url对应registry已有的实例,如果没有,就创建一个
        // 这里zookeeper是用ZkClient管理的
        Registry registry = registryFactory.getRegistry(url);
        // 在zk中创建Node,完成服务的注册
        registry.register(serviceUrl);
    }
}
ZK中的注册结果:
[zk: localhost:2181(CONNECTED) 0] ls /motan/ad-common/com.coohua.ad.common.remote.api.AdCommonRPC/server
[192.168.100.14:8022]
至此,服务就可以被调用方发现了。


