安装OpenStack块存储服务cinder
一、块存储服务cinder的介绍
1. 块存储cinder概览
块存储服务(cinder)为实例提供块存储。存储的分配和消耗是由块存储驱动器,或者多后端配置的驱动器决定的。还有很多驱动程序可用:NAS/SAN,NFS,LVM,Ceph等。
OpenStack块存储服务(cinder)为虚拟机添加持久的存储,块存储提供一个基础设施为了管理卷以及和OpenStack计算服务交互,为实例提供卷。此服务也会激活管理卷的快照和卷类型的功能
2. 块存储服务通常包含下列组件
cinder-api:接受API请求,并将其路由到cinder-volume执行。即接收和响应外部有关块存储请求,
cinder-volume:提供存储空间。与块存储服务和例如cinder-scheduler的进程进行直接交互。它也可以与这些进程通过一个消息队列进行交互。cinder-volume服务响应送到块存储服务的读写请求来维持状态。它也可以和多种存储提供者在驱动架构下进行交互。
cinder-scheduler守护进程:选择最优存储提供节点来创建卷。其与nova-scheduler组件类似。即调度器,决定将要分配的空间由哪一个cinder-volume提供。
cinder-backup守护进程:备份卷。cinder-backup服务提供任何种类备份卷到一个备份存储提供者。就像cinder-volume服务,它与多种存储提供者在驱动架构下进行交互。
消息队列:在块存储的进程之间路由信息。
二、安装和配置块设备存储服务cinder
在控制节点上安装和配置块设备存储服务。
1. 先决条件
1)创建数据库
[root@controller ~]# mysql -uroot -p
Enter password:
Welcome to the MariaDB monitor.  Commands end with ; or \g.
Your MariaDB connection id is 453
Server version: 10.1.20-MariaDB MariaDB Server

Copyright (c) 2000, 2016, Oracle, MariaDB Corporation Ab and others.

Type 'help;' or '\h' for help. Type '\c' to clear the current input statement.

MariaDB [(none)]> CREATE DATABASE cinder;
Query OK, 1 row affected (0.01 sec)

MariaDB [(none)]> GRANT ALL PRIVILEGES ON cinder.* TO 'cinder'@'localhost' IDENTIFIED BY '123456';
Query OK, 0 rows affected (0.23 sec)

MariaDB [(none)]> GRANT ALL PRIVILEGES ON cinder.* TO 'cinder'@'%' IDENTIFIED BY '123456';
Query OK, 0 rows affected (0.00 sec)

MariaDB [(none)]> exit
Bye
2)获得 admin 凭证来获取只有管理员能执行的命令的访问权限
[root@controller ~]# source admin-openrc
3)创建服务证书
a.创建一个 cinder 用户
[root@controller ~]# openstack user create --domain default --password 123456 cinder
+-----------+----------------------------------+
| Field     | Value                            |
+-----------+----------------------------------+
| domain_id | efcc929416f1468299c302cb607305e0 |
| enabled   | True                             |
| id        | 6b0b7c05ccc34c1292058cd282515895 |
| name      | cinder                           |
+-----------+----------------------------------+
b.添加 admin 角色到 cinder 用户上
[root@controller ~]# openstack role add --project service --user cinder admin
3)创建 cinder 和 cinderv2 服务实体
[root@controller ~]# openstack service create --name cinder --description "OpenStack Block Storage" volume
+-------------+----------------------------------+
| Field       | Value                            |
+-------------+----------------------------------+
| description | OpenStack Block Storage          |
| enabled     | True                             |
| id          | 5ce9956d003a42d3a845eff54166b1f8 |
| name        | cinder                           |
| type        | volume                           |
+-------------+----------------------------------+
[root@controller ~]# openstack service create --name cinderv2 --description "OpenStack Block Storage" volumev2
+-------------+----------------------------------+
| Field       | Value                            |
+-------------+----------------------------------+
| description | OpenStack Block Storage          |
| enabled     | True                             |
| id          | 70ba60de155b4dce8a5ee18d94758c13 |
| name        | cinderv2                         |
| type        | volumev2                         |
+-------------+----------------------------------+
注:块设备存储服务要求两个服务实体
4)创建块设备存储服务的 API 入口点
注:块设备存储服务每个服务实体都需要端点
[root@controller ~]# openstack endpoint create --region RegionOne volume public http://controller:8776/v1/%\(tenant_id\)s
+--------------+-----------------------------------------+
| Field        | Value                                   |
+--------------+-----------------------------------------+
| enabled      | True                                    |
| id           | e28193621ca54e9faaafc88b26a6c8f9        |
| interface    | public                                  |
| region       | RegionOne                               |
| region_id    | RegionOne                               |
| service_id   | 5ce9956d003a42d3a845eff54166b1f8        |
| service_name | cinder                                  |
| service_type | volume                                  |
| url          | http://controller:8776/v1/%(tenant_id)s |
+--------------+-----------------------------------------+
[root@controller ~]# openstack endpoint create --region RegionOne volume internal http://controller:8776/v1/%\(tenant_id\)s
+--------------+-----------------------------------------+
| Field        | Value                                   |
+--------------+-----------------------------------------+
| enabled      | True                                    |
| id           | c2f103b543c74187aaffcaebec902a66        |
| interface    | internal                                |
| region       | RegionOne                               |
| region_id    | RegionOne                               |
| service_id   | 5ce9956d003a42d3a845eff54166b1f8        |
| service_name | cinder                                  |
| service_type | volume                                  |
| url          | http://controller:8776/v1/%(tenant_id)s |
+--------------+-----------------------------------------+
[root@controller ~]# openstack endpoint create --region RegionOne volume admin http://controller:8776/v1/%\(tenant_id\)s
+--------------+-----------------------------------------+
| Field        | Value                                   |
+--------------+-----------------------------------------+
| enabled      | True                                    |
| id           | 61716c3e8ebb4715a394a98f8ad649fa        |
| interface    | admin                                   |
| region       | RegionOne                               |
| region_id    | RegionOne                               |
| service_id   | 5ce9956d003a42d3a845eff54166b1f8        |
| service_name | cinder                                  |
| service_type | volume                                  |
| url          | http://controller:8776/v1/%(tenant_id)s |
+--------------+-----------------------------------------+
[root@controller ~]# openstack endpoint create --region RegionOne volumev2 public http://controller:8776/v2/%\(tenant_id\)s
+--------------+-----------------------------------------+
| Field        | Value                                   |
+--------------+-----------------------------------------+
| enabled      | True                                    |
| id           | 3fd334bead1c4472babd45e603bf161a        |
| interface    | public                                  |
| region       | RegionOne                               |
| region_id    | RegionOne                               |
| service_id   | 70ba60de155b4dce8a5ee18d94758c13        |
| service_name | cinderv2                                |
| service_type | volumev2                                |
| url          | http://controller:8776/v2/%(tenant_id)s |
+--------------+-----------------------------------------+
[root@controller ~]# openstack endpoint create --region RegionOne volumev2 internal http://controller:8776/v2/%\(tenant_id\)s
+--------------+-----------------------------------------+
| Field        | Value                                   |
+--------------+-----------------------------------------+
| enabled      | True                                    |
| id           | 9f68f2fee6274a77929d71df65cff017        |
| interface    | internal                                |
| region       | RegionOne                               |
| region_id    | RegionOne                               |
| service_id   | 70ba60de155b4dce8a5ee18d94758c13        |
| service_name | cinderv2                                |
| service_type | volumev2                                |
| url          | http://controller:8776/v2/%(tenant_id)s |
+--------------+-----------------------------------------+
[root@controller ~]# openstack endpoint create --region RegionOne volumev2 admin http://controller:8776/v2/%\(tenant_id\)s
+--------------+-----------------------------------------+
| Field        | Value                                   |
+--------------+-----------------------------------------+
| enabled      | True                                    |
| id           | b59b96df0ae64e4b9a42f97ad8ceb831        |
| interface    | admin                                   |
| region       | RegionOne                               |
| region_id    | RegionOne                               |
| service_id   | 70ba60de155b4dce8a5ee18d94758c13        |
| service_name | cinderv2                                |
| service_type | volumev2                                |
| url          | http://controller:8776/v2/%(tenant_id)s |
+--------------+-----------------------------------------+
2 安装配置
1)安装软件包
[root@controller ~]# yum install openstack-cinder -y
2)编辑 /etc/cinder/cinder.conf,同时完成如下动作
[root@controller ~]# cp /etc/cinder/cinder.conf{,.bak}
[root@controller ~]# grep -Ev '^$|#' /etc/cinder/cinder.conf.bak >/etc/cinder/cinder.conf
[root@controller ~]# cat /etc/cinder/cinder.conf
[DEFAULT]
[BACKEND]
[BRCD_FABRIC_EXAMPLE]
[CISCO_FABRIC_EXAMPLE]
[COORDINATION]
[FC-ZONE-MANAGER]
[KEYMGR]
[cors]
[cors.subdomain]
[database]
[keystone_authtoken]
[matchmaker_redis]
[oslo_concurrency]
[oslo_messaging_amqp]
[oslo_messaging_notifications]
[oslo_messaging_rabbit]
[oslo_middleware]
[oslo_policy]
[oslo_reports]
[oslo_versionedobjects]
[ssl]
a.在 [database] 部分,配置数据库访问
b.在 [DEFAULT]和 [oslo_messaging_rabbit]部分,配置 “RabbitMQ” 消息队列访问
c.在 “[DEFAULT]” 和 “[keystone_authtoken]” 部分,配置认证服务访问
d.在 [DEFAULT 部分,配置``my_ip`` 来使用控制节点的管理接口的IP 地址
e.在 [oslo_concurrency] 部分,配置锁路径
[root@controller ~]# openstack-config --set /etc/cinder/cinder.conf   DEFAULT  rpc_backend  rabbit
[root@controller ~]# openstack-config --set /etc/cinder/cinder.conf   DEFAULT  auth_strategy  keystone
[root@controller ~]# openstack-config --set /etc/cinder/cinder.conf   DEFAULT  my_ip  10.0.0.11
[root@controller ~]# openstack-config --set /etc/cinder/cinder.conf   database connection mysql+pymysql://cinder:123456@controller/cinder
[root@controller ~]# openstack-config --set /etc/cinder/cinder.conf   keystone_authtoken   auth_uri  http://controller:5000
[root@controller ~]# openstack-config --set /etc/cinder/cinder.conf   keystone_authtoken   auth_url  http://controller:35357
[root@controller ~]# openstack-config --set /etc/cinder/cinder.conf   keystone_authtoken   memcached_servers  controller:11211
[root@controller ~]# openstack-config --set /etc/cinder/cinder.conf   keystone_authtoken   auth_type  password
[root@controller ~]# openstack-config --set /etc/cinder/cinder.conf   keystone_authtoken   project_domain_name  default
[root@controller ~]# openstack-config --set /etc/cinder/cinder.conf   keystone_authtoken   user_domain_name  default
[root@controller ~]# openstack-config --set /etc/cinder/cinder.conf   keystone_authtoken   project_name  service
[root@controller ~]# openstack-config --set /etc/cinder/cinder.conf   keystone_authtoken   username  cinder
[root@controller ~]# openstack-config --set /etc/cinder/cinder.conf   keystone_authtoken   password  123456
[root@controller ~]# openstack-config --set /etc/cinder/cinder.conf   oslo_concurrency  lock_path  /var/lib/cinder/tmp
[root@controller ~]# openstack-config --set /etc/cinder/cinder.conf   oslo_messaging_rabbit  rabbit_host  controller
[root@controller ~]# openstack-config --set /etc/cinder/cinder.conf   oslo_messaging_rabbit  rabbit_userid  openstack
[root@controller ~]# openstack-config --set /etc/cinder/cinder.conf   oslo_messaging_rabbit  rabbit_password  123456
[root@controller ~]# cat /etc/cinder/cinder.conf
[DEFAULT]
rpc_backend = rabbit
auth_strategy = keystone
my_ip = 10.0.0.11
[BACKEND]
[BRCD_FABRIC_EXAMPLE]
[CISCO_FABRIC_EXAMPLE]
[COORDINATION]
[FC-ZONE-MANAGER]
[KEYMGR]
[cors]
[cors.subdomain]
[database]
connection = mysql+pymysql://cinder:123456@controller/cinder
[keystone_authtoken]
auth_uri = http://controller:5000
auth_url = http://controller:35357
memcached_servers = controller:11211
auth_type = password
project_domain_name = default
user_domain_name = default
project_name = service
username = cinder
password = 123456
[matchmaker_redis]
[oslo_concurrency]
lock_path = /var/lib/cinder/tmp
[oslo_messaging_amqp]
[oslo_messaging_notifications]
[oslo_messaging_rabbit]
rabbit_host = controller
rabbit_userid = openstack
rabbit_password = 123456
[oslo_middleware]
[oslo_policy]
[oslo_reports]
[oslo_versionedobjects]
[ssl]
3)初始化块设备服务的数据库
[root@controller ~]# su -s /bin/sh -c "cinder-manage db sync" cinder
[root@controller ~]# mysql -uroot -p123456 cinder
Reading table information for completion of table and column names
You can turn off this feature to get a quicker startup with -A

Welcome to the MariaDB monitor.  Commands end with ; or \g.
Your MariaDB connection id is 493
Server version: 10.1.20-MariaDB MariaDB Server

Copyright (c) 2000, 2016, Oracle, MariaDB Corporation Ab and others.

Type 'help;' or '\h' for help. Type '\c' to clear the current input statement.

MariaDB [cinder]> show tables;
+----------------------------+
| Tables_in_cinder           |
+----------------------------+
| backups                    |
| cgsnapshots                |
| consistencygroups          |
| driver_initiator_data      |
| encryption                 |
| image_volume_cache_entries |
| iscsi_targets              |
| migrate_version            |
| quality_of_service_specs   |
| quota_classes              |
| quota_usages               |
| quotas                     |
| reservations               |
| services                   |
| snapshot_metadata          |
| snapshots                  |
| transfers                  |
| volume_admin_metadata      |
| volume_attachment          |
| volume_glance_metadata     |
| volume_metadata            |
| volume_type_extra_specs    |
| volume_type_projects       |
| volume_types               |
| volumes                    |
+----------------------------+
25 rows in set (0.00 sec)

MariaDB [cinder]> exit
Bye
3. 配置计算服务以使用块设备存储
[root@controller ~]# openstack-config --set /etc/nova/nova.conf   cinder   os_region_name   RegionOne
[root@controller ~]# cat /etc/nova/nova.conf
[DEFAULT]
enabled_apis = osapi_compute,metadata
rpc_backend = rabbit
auth_strategy = keystone
my_ip = 10.0.0.11
use_neutron = True
firewall_driver = nova.virt.firewall.NoopFirewallDriver
[api_database]
connection = mysql+pymysql://nova:123456@controller/nova_api
[barbican]
[cache]
[cells]
[cinder]
os_region_name = RegionOne
[conductor]
[cors]
[cors.subdomain]
[database]
connection = mysql+pymysql://nova:123456@controller/nova
[ephemeral_storage_encryption]
[glance]
api_servers = http://computer2:9292
[guestfs]
[hyperv]
[image_file_url]
[ironic]
[keymgr]
[keystone_authtoken]
auth_uri = http://controller:5000
auth_url = http://controller:35357
memcached_servers = controller:11211
auth_type = password
project_domain_name = default
user_domain_name = default
project_name = service
username = nova
password = 123456
[libvirt]
[matchmaker_redis]
[metrics]
[neutron]
url = http://controller:9696
auth_url = http://controller:35357
auth_type = password
project_domain_name = default
user_domain_name = default
region_name = RegionOne
project_name = service
username = neutron
password = 123456
service_metadata_proxy = True
metadata_proxy_shared_secret = 123456
[osapi_v21]
[oslo_concurrency]
lock_path = /var/lib/nova/tmp
[oslo_messaging_amqp]
[oslo_messaging_notifications]
[oslo_messaging_rabbit]
rabbit_host = 10.0.0.11
rabbit_userid = openstack
rabbit_password = 123456
[oslo_middleware]
[oslo_policy]
[rdp]
[serial_console]
[spice]
[ssl]
[trusted_computing]
[upgrade_levels]
[vmware]
[vnc]
vncserver_listen = $my_ip
vncserver_proxyclient_address = $my_ip
[workarounds]
[xenserver]
4. 启动服务
1)重启计算api服务
[root@controller ~]#  systemctl restart openstack-nova-api.service
[root@controller ~]#  systemctl status openstack-nova-api.service
● openstack-nova-api.service - OpenStack Nova API Server
   Loaded: loaded (/usr/lib/systemd/system/openstack-nova-api.service; enabled; vendor preset: disabled)
   Active: active (running) since Sun 2020-11-22 21:19:34 CST; 2min 38s ago
 Main PID: 96253 (nova-api)
   CGroup: /system.slice/openstack-nova-api.service
           ├─96253 /usr/bin/python2 /usr/bin/nova-api
           ├─96410 /usr/bin/python2 /usr/bin/nova-api
           └─96445 /usr/bin/python2 /usr/bin/nova-api

Nov 22 21:18:53 controller systemd[1]: Starting OpenStack Nova API Server...
Nov 22 21:19:29 controller sudo[96413]:     nova : TTY=unknown ; PWD=/ ; USER=root ; COMMAND=/bin/nova-rootwrap /etc/nova/roo...save -c
Nov 22 21:19:32 controller sudo[96433]:     nova : TTY=unknown ; PWD=/ ; USER=root ; COMMAND=/bin/nova-rootwrap /etc/nova/roo...tore -c
Nov 22 21:19:34 controller systemd[1]: Started OpenStack Nova API Server.
Hint: Some lines were ellipsized, use -l to show in full.
2)启动块设备存储服务,并将其配置为开机自启
[root@controller ~]# systemctl enable openstack-cinder-api.service openstack-cinder-scheduler.service
Created symlink from /etc/systemd/system/multi-user.target.wants/openstack-cinder-api.service to /usr/lib/systemd/system/openstack-cinder-api.service.
Created symlink from /etc/systemd/system/multi-user.target.wants/openstack-cinder-scheduler.service to /usr/lib/systemd/system/openstack-cinder-scheduler.service.
[root@controller ~]# systemctl start openstack-cinder-api.service openstack-cinder-scheduler.service
[root@controller ~]# systemctl status openstack-cinder-api.service openstack-cinder-scheduler.service
● openstack-cinder-api.service - OpenStack Cinder API Server
   Loaded: loaded (/usr/lib/systemd/system/openstack-cinder-api.service; enabled; vendor preset: disabled)
   Active: active (running) since Sun 2020-11-22 21:23:13 CST; 9s ago
 Main PID: 97493 (cinder-api)
   CGroup: /system.slice/openstack-cinder-api.service
           └─97493 /usr/bin/python2 /usr/bin/cinder-api --config-file /usr/share/cinder/cinder-dist.conf --config-file /etc/cinder/c...

Nov 22 21:23:13 controller systemd[1]: Started OpenStack Cinder API Server.
Nov 22 21:23:13 controller systemd[1]: Starting OpenStack Cinder API Server...

● openstack-cinder-scheduler.service - OpenStack Cinder Scheduler Server
   Loaded: loaded (/usr/lib/systemd/system/openstack-cinder-scheduler.service; enabled; vendor preset: disabled)
   Active: active (running) since Sun 2020-11-22 21:23:13 CST; 8s ago
 Main PID: 97496 (cinder-schedule)
   CGroup: /system.slice/openstack-cinder-scheduler.service
           └─97496 /usr/bin/python2 /usr/bin/cinder-scheduler --config-file /usr/share/cinder/cinder-dist.conf --config-file /etc/ci...

Nov 22 21:23:13 controller systemd[1]: Started OpenStack Cinder Scheduler Server.
Nov 22 21:23:13 controller systemd[1]: Starting OpenStack Cinder Scheduler Server...
5. 检查
[root@controller ~]# cinder service-list
+------------------+------------+------+---------+-------+----------------------------+-----------------+
|      Binary      |    Host    | Zone |  Status | State |         Updated_at         | Disabled Reason |
+------------------+------------+------+---------+-------+----------------------------+-----------------+
| cinder-scheduler | controller | nova | enabled |   up  | 2020-11-22T13:30:31.000000 |        -        |
+------------------+------------+------+---------+-------+----------------------------+-----------------+
三、安装配置存储节点
目的:向实例提供卷
1.先决条件
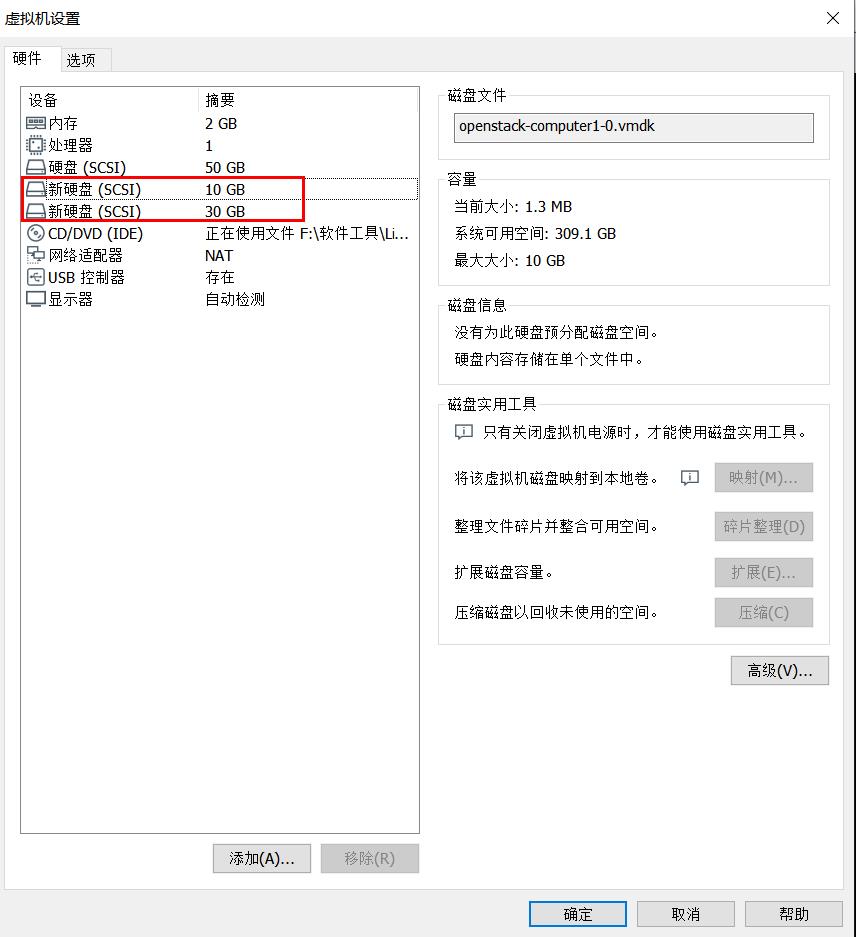
在安装和配置块存储服务之前,必须准备好存储设备(添加两块硬盘30G和10G)
1)安装支持的工具包
a.安装 LVM 包
[root@computer1 ~]# yum install lvm2 -y
[root@computer1 ~]# rpm -qa |grep lvm2
lvm2-2.02.171-8.el7.x86_64
lvm2-libs-2.02.171-8.el7.x86_64
b.启动LVM的metadata服务并且设置该服务随系统启动
[root@computer1 ~]# systemctl enable lvm2-lvmetad.service
Created symlink from /etc/systemd/system/sysinit.target.wants/lvm2-lvmetad.service to /usr/lib/systemd/system/lvm2-lvmetad.service.
[root@computer1 ~]# systemctl start lvm2-lvmetad.service
[root@computer1 ~]# systemctl status lvm2-lvmetad.service
● lvm2-lvmetad.service - LVM2 metadata daemon
   Loaded: loaded (/usr/lib/systemd/system/lvm2-lvmetad.service; enabled; vendor preset: enabled)
   Active: active (running) since Wed 2020-11-18 21:29:12 CST; 4 days ago
     Docs: man:lvmetad(8)
 Main PID: 376 (lvmetad)
   CGroup: /system.slice/lvm2-lvmetad.service
           └─376 /usr/sbin/lvmetad -f

Nov 18 21:29:12 computer1 systemd[1]: Started LVM2 metadata daemon.
Nov 18 21:29:12 computer1 systemd[1]: Starting LVM2 metadata daemon...
注:一些发行版默认包含了LVM
[root@computer1 ~]# fdisk -l

Disk /dev/sda: 53.7 GB, 53687091200 bytes, 104857600 sectors
Units = sectors of 1 * 512 = 512 bytes
Sector size (logical/physical): 512 bytes / 512 bytes
I/O size (minimum/optimal): 512 bytes / 512 bytes
Disk label type: dos
Disk identifier: 0x000a2c65

   Device Boot      Start         End      Blocks   Id  System
/dev/sda1            2048     4196351     2097152   82  Linux swap / Solaris
/dev/sda2   *     4196352   104857599    50330624   83  Linux
#系统重新扫描硬盘
[root@computer1 ~]# echo '- - -' >/sys/class/scsi_host/host0/scan

[root@computer1 ~]# fdisk -l

Disk /dev/sda: 53.7 GB, 53687091200 bytes, 104857600 sectors
Units = sectors of 1 * 512 = 512 bytes
Sector size (logical/physical): 512 bytes / 512 bytes
I/O size (minimum/optimal): 512 bytes / 512 bytes
Disk label type: dos
Disk identifier: 0x000a2c65

   Device Boot      Start         End      Blocks   Id  System
/dev/sda1            2048     4196351     2097152   82  Linux swap / Solaris
/dev/sda2   *     4196352   104857599    50330624   83  Linux

Disk /dev/sdc: 10.7 GB, 10737418240 bytes, 20971520 sectors
Units = sectors of 1 * 512 = 512 bytes
Sector size (logical/physical): 512 bytes / 512 bytes
I/O size (minimum/optimal): 512 bytes / 512 bytes


Disk /dev/sdb: 32.2 GB, 32212254720 bytes, 62914560 sectors
Units = sectors of 1 * 512 = 512 bytes
Sector size (logical/physical): 512 bytes / 512 bytes
I/O size (minimum/optimal): 512 bytes / 512 bytes
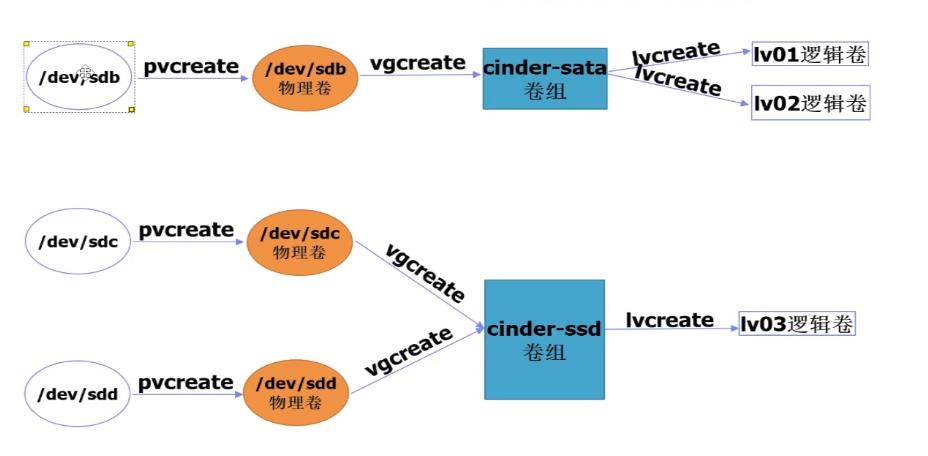
2)创建LVM 物理卷
[root@computer1 ~]# pvcreate /dev/sdb
  Physical volume "/dev/sdb" successfully created.
[root@computer1 ~]# pvcreate /dev/sdc
  Physical volume "/dev/sdc" successfully created.
[root@computer1 ~]# pvdisplay
  "/dev/sdc" is a new physical volume of "10.00 GiB"
  --- NEW Physical volume ---
  PV Name               /dev/sdc
  VG Name
  PV Size               10.00 GiB
  Allocatable           NO
  PE Size               0
  Total PE              0
  Free PE               0
  Allocated PE          0
  PV UUID               9xV3kt-ZnV1-NmgN-W3gf-nqQD-lWpx-xOUhK6

  "/dev/sdb" is a new physical volume of "30.00 GiB"
  --- NEW Physical volume ---
  PV Name               /dev/sdb
  VG Name
  PV Size               30.00 GiB
  Allocatable           NO
  PE Size               0
  Total PE              0
  Free PE               0
  Allocated PE          0
  PV UUID               07cx4b-Atmh-IxBW-VMxf-PEJa-lfSw-oBNvRB
[root@computer1 ~]# pvs
  PV         VG          Fmt  Attr PSize   PFree
  /dev/sdb   cinder-ssd  lvm2 a--  <30.00g <30.00g
  /dev/sdc   cinder-sata lvm2 a--  <10.00g <10.00g
3)创建 LVM 卷组
[root@computer1 ~]# vgcreate cinder-ssd /dev/sdb
  Volume group "cinder-ssd" successfully created
[root@computer1 ~]# vgcreate cinder-sata /dev/sdc
  Volume group "cinder-sata" successfully created
[root@computer1 ~]# vgdisplay
  --- Volume group ---
  VG Name               cinder-ssd
  System ID
  Format                lvm2
  Metadata Areas        1
  Metadata Sequence No  1
  VG Access             read/write
  VG Status             resizable
  MAX LV                0
  Cur LV                0
  Open LV               0
  Max PV                0
  Cur PV                1
  Act PV                1
  VG Size               <30.00 GiB
  PE Size               4.00 MiB
  Total PE              7679
  Alloc PE / Size       0 / 0
  Free  PE / Size       7679 / <30.00 GiB
  VG UUID               pmFOmJ-ZWcL-byUI-oyES-EMoT-EWXs-haozT7

  --- Volume group ---
  VG Name               cinder-sata
  System ID
  Format                lvm2
  Metadata Areas        1
  Metadata Sequence No  1
  VG Access             read/write
  VG Status             resizable
  MAX LV                0
  Cur LV                0
  Open LV               0
  Max PV                0
  Cur PV                1
  Act PV                1
  VG Size               <10.00 GiB
  PE Size               4.00 MiB
  Total PE              2559
  Alloc PE / Size       0 / 0
  Free  PE / Size       2559 / <10.00 GiB
  VG UUID               xJDIWs-CEzJ-wvtx-TljX-a8Th-3W5r-Uo9XGz
[root@computer1 ~]# vgs
  VG          #PV #LV #SN Attr   VSize   VFree
  cinder-sata   1   0   0 wz--n- <10.00g <10.00g
  cinder-ssd    1   0   0 wz--n- <30.00g <30.00g
4)编辑/etc/lvm/lvm.conf配置文件
注:重新配置LVM,让它只扫描包含``cinder-volume``卷组的设备,即130行下插入一行
[root@computer1 ~]# cp /etc/lvm/lvm.conf{,.bak}
[root@computer1 ~]# vim /etc/lvm/lvm.conf
[root@computer1 ~]# grep 'sdb' /etc/lvm/lvm.conf
    filter = [ "a/sdb/", "a/sdc/","r/.*/"]
2. 安装配置组件
1)安装软件包
[root@computer1 ~]# yum install openstack-cinder targetcli python-keystone -y
2)编辑 /etc/cinder/cinder.conf,同时完成如下动作
[root@computer1 ~]# cp /etc/cinder/cinder.conf{,.bak}
[root@computer1 ~]# grep -Ev '^$|#' /etc/cinder/cinder.conf.bak >/etc/cinder/cinder.conf
a.在 [database] 部分,配置数据库访问
b.在 “[DEFAULT]” 和 “[oslo_messaging_rabbit]”部分,配置 “RabbitMQ” 消息队列访问
c.在 “[DEFAULT]” 和 “[keystone_authtoken]” 部分,配置认证服务访问
d.在 [DEFAULT] 部分,配置 my_ip 选项
e.在``[lvm]``部分,配置LVM后端以LVM驱动结束,卷组``cinder-volumes`` ,iSCSI 协议和正确的 iSCSI服务
f.在 [DEFAULT] 部分,启用 LVM 后端
g.在 [DEFAULT] 区域,配置镜像服务 API 的位置
h.在 [oslo_concurrency] 部分,配置锁路径
[root@computer1 ~]# vim /etc/cinder/cinder.conf
[root@computer1 ~]# cat  /etc/cinder/cinder.conf
[DEFAULT]
rpc_backend = rabbit
auth_strategy = keystone
my_ip = 10.0.0.12
glance_api_servers = http://computer2:9292
enabled_backends = ssd,sata
[BACKEND]
[BRCD_FABRIC_EXAMPLE]
[CISCO_FABRIC_EXAMPLE]
[COORDINATION]
[FC-ZONE-MANAGER]
[KEYMGR]
[cors]
[cors.subdomain]
[database]
connection = mysql+pymysql://cinder:123456@controller/cinder
[keystone_authtoken]
auth_uri = http://controller:5000
auth_url = http://controller:35357
memcached_servers = controller:11211
auth_type = password
project_domain_name = default
user_domain_name = default
project_name = service
username = cinder
password = 123456
[matchmaker_redis]
[oslo_concurrency]
lock_path = /var/lib/cinder/tmp
[oslo_messaging_amqp]
[oslo_messaging_notifications]
[oslo_messaging_rabbit]
rabbit_host = controller
rabbit_userid = openstack
rabbit_password = 123456
[oslo_middleware]
[oslo_policy]
[oslo_reports]
[oslo_versionedobjects]
[ssl]
[ssd]
volume_driver = cinder.volume.drivers.lvm.LVMVolumeDriver
volume_group = cinder-ssd
iscsi_protocol = iscsi
iscsi_helper = lioadm
volume_backend_name = ssd
[sata]
volume_driver = cinder.volume.drivers.lvm.LVMVolumeDriver
volume_group = cinder-sata
iscsi_protocol = iscsi
iscsi_helper = lioadm
volume_backend_name = sata
3. 启动服务
启动块存储卷服务及其依赖的服务,并将其配置为随系统启动
[root@computer1 ~]# systemctl enable openstack-cinder-volume.service target.service
Created symlink from /etc/systemd/system/multi-user.target.wants/openstack-cinder-volume.service to /usr/lib/systemd/system/openstack-cinder-volume.service.
Created symlink from /etc/systemd/system/multi-user.target.wants/target.service to /usr/lib/systemd/system/target.service.
[root@computer1 ~]# systemctl start openstack-cinder-volume.service target.service
[root@computer1 ~]# systemctl status openstack-cinder-volume.service target.service
● openstack-cinder-volume.service - OpenStack Cinder Volume Server
   Loaded: loaded (/usr/lib/systemd/system/openstack-cinder-volume.service; enabled; vendor preset: disabled)
   Active: active (running) since Sun 2020-11-22 23:33:35 CST; 1min 1s ago
 Main PID: 76797 (cinder-volume)
   CGroup: /system.slice/openstack-cinder-volume.service
           ├─76797 /usr/bin/python2 /usr/bin/cinder-volume --config-file /usr/share/cinder/cinder-dist.conf --config-file /etc/cinde...
           ├─76839 /usr/bin/python2 /usr/bin/cinder-volume --config-file /usr/share/cinder/cinder-dist.conf --config-file /etc/cinde...
           └─76853 /usr/bin/python2 /usr/bin/cinder-volume --config-file /usr/share/cinder/cinder-dist.conf --config-file /etc/cinde...

Nov 22 23:34:26 computer1 cinder-volume[76797]: 2020-11-22 23:34:26.055 76839 INFO cinder.volume.manager [req-083a4b09-8ab0-40...fully.
Nov 22 23:34:26 computer1 cinder-volume[76797]: 2020-11-22 23:34:26.154 76853 INFO cinder.volume.manager [req-47d770db-e031-47...fully.
Nov 22 23:34:26 computer1 cinder-volume[76797]: 2020-11-22 23:34:26.456 76839 INFO cinder.volume.manager [req-083a4b09-8ab0-40...3.0.0)
Nov 22 23:34:26 computer1 cinder-volume[76797]: 2020-11-22 23:34:26.462 76853 INFO cinder.volume.manager [req-47d770db-e031-47...3.0.0)
Nov 22 23:34:26 computer1 sudo[76904]:   cinder : TTY=unknown ; PWD=/ ; USER=root ; COMMAND=/bin/cinder-rootwrap /etc/cinder/...der-ssd
Nov 22 23:34:26 computer1 sudo[76905]:   cinder : TTY=unknown ; PWD=/ ; USER=root ; COMMAND=/bin/cinder-rootwrap /etc/cinder/...er-sata
Nov 22 23:34:29 computer1 sudo[76912]:   cinder : TTY=unknown ; PWD=/ ; USER=root ; COMMAND=/bin/cinder-rootwrap /etc/cinder/...er-sata
Nov 22 23:34:29 computer1 sudo[76914]:   cinder : TTY=unknown ; PWD=/ ; USER=root ; COMMAND=/bin/cinder-rootwrap /etc/cinder/...der-ssd
Nov 22 23:34:29 computer1 cinder-volume[76797]: 2020-11-22 23:34:29.642 76853 INFO cinder.volume.manager [req-47d770db-e031-47...fully.
Nov 22 23:34:29 computer1 cinder-volume[76797]: 2020-11-22 23:34:29.667 76839 INFO cinder.volume.manager [req-083a4b09-8ab0-40...fully.

● target.service - Restore LIO kernel target configuration
   Loaded: loaded (/usr/lib/systemd/system/target.service; enabled; vendor preset: disabled)
   Active: active (exited) since Sun 2020-11-22 23:33:38 CST; 58s ago
  Process: 76798 ExecStart=/usr/bin/targetctl restore (code=exited, status=0/SUCCESS)
 Main PID: 76798 (code=exited, status=0/SUCCESS)

Nov 22 23:33:35 computer1 systemd[1]: Starting Restore LIO kernel target configuration...
Nov 22 23:33:38 computer1 target[76798]: No saved config file at /etc/target/saveconfig.json, ok, exiting
Nov 22 23:33:38 computer1 systemd[1]: Started Restore LIO kernel target configuration.
Hint: Some lines were ellipsized, use -l to show in full.
4. 检查
[root@controller ~]# cinder service-list
+------------------+----------------+------+---------+-------+----------------------------+-----------------+
|      Binary      |      Host      | Zone |  Status | State |         Updated_at         | Disabled Reason |
+------------------+----------------+------+---------+-------+----------------------------+-----------------+
| cinder-scheduler |   controller   | nova | enabled |   up  | 2020-11-22T15:36:29.000000 |        -        |
|  cinder-volume   | computer1@sata | nova | enabled |   up  | 2020-11-22T15:36:29.000000 |        -        |
|  cinder-volume   | computer1@ssd  | nova | enabled |   up  | 2020-11-22T15:36:29.000000 |        -        |
+------------------+----------------+------+---------+-------+----------------------------+-----------------+
四、验证
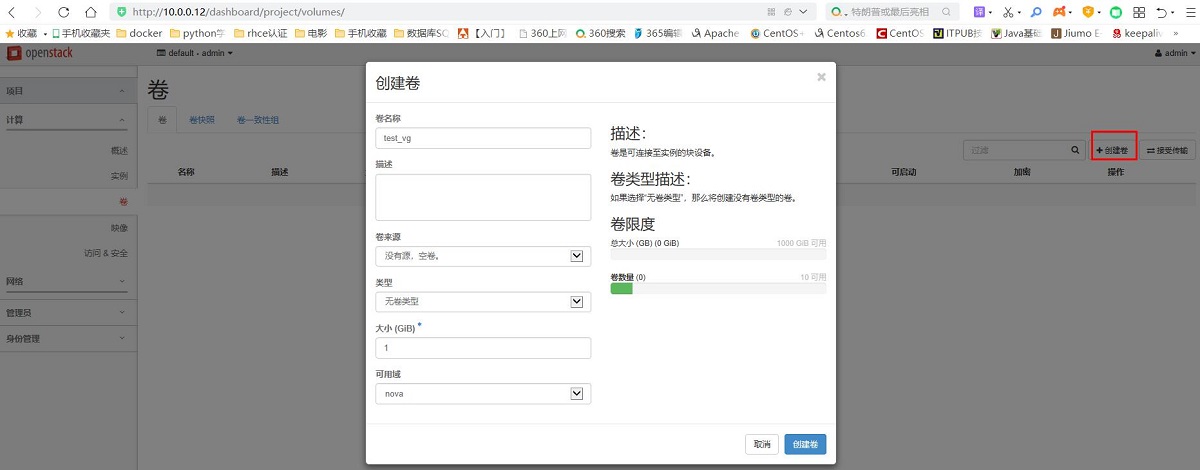
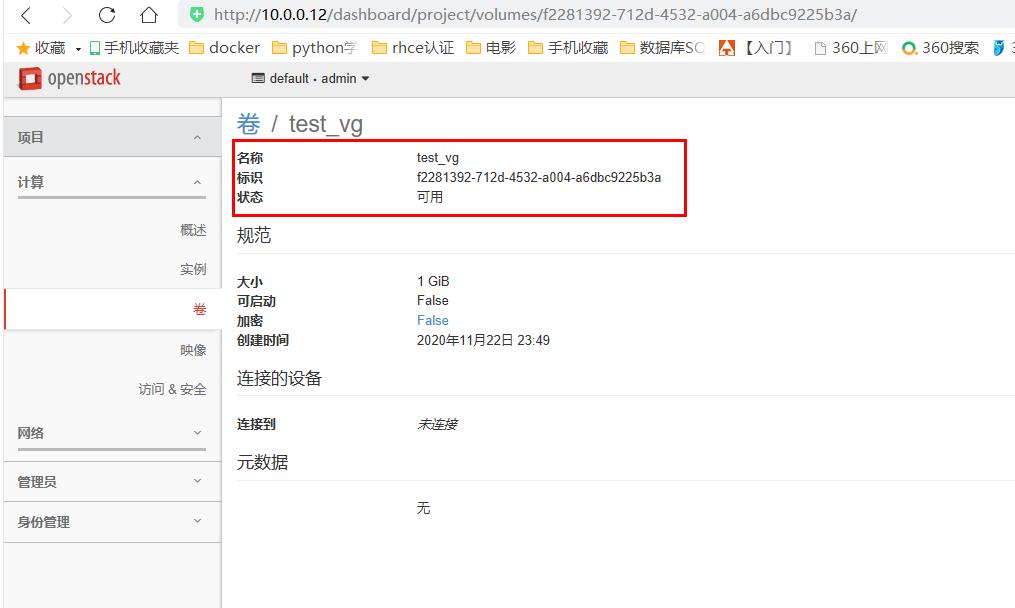
1. web页面创建卷,在实例中挂载卷
[root@computer1 ~]# lvs
  LV                                          VG         Attr       LSize Pool Origin Data%  Meta%  Move Log Cpy%Sync Convert
  volume-f2281392-712d-4532-a004-a6dbc9225b3a cinder-ssd -wi-a----- 1.00g
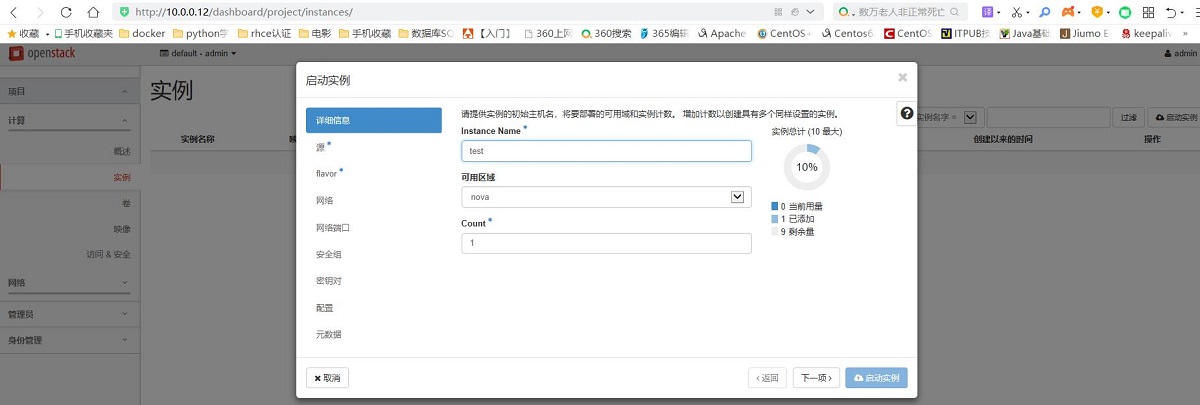
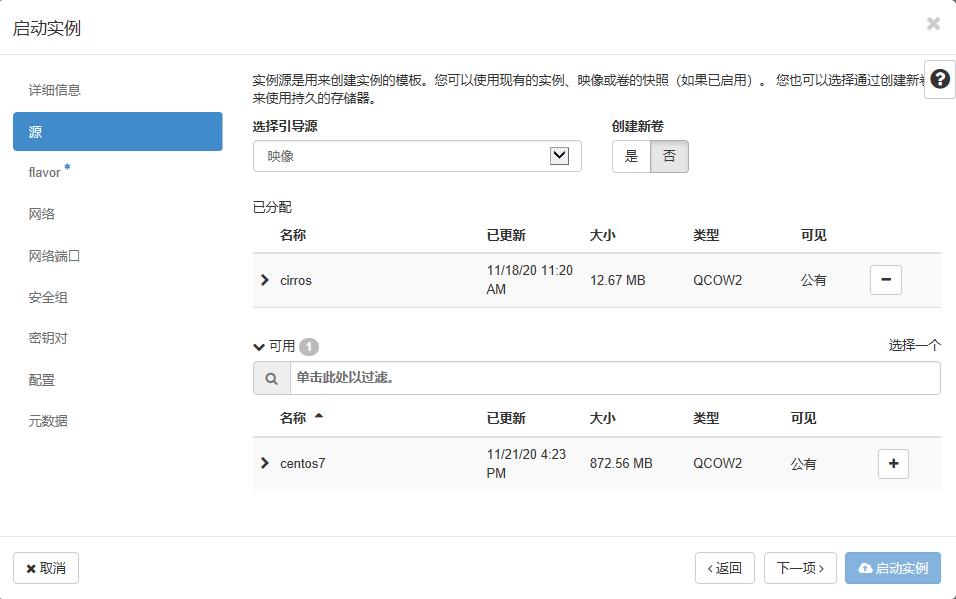
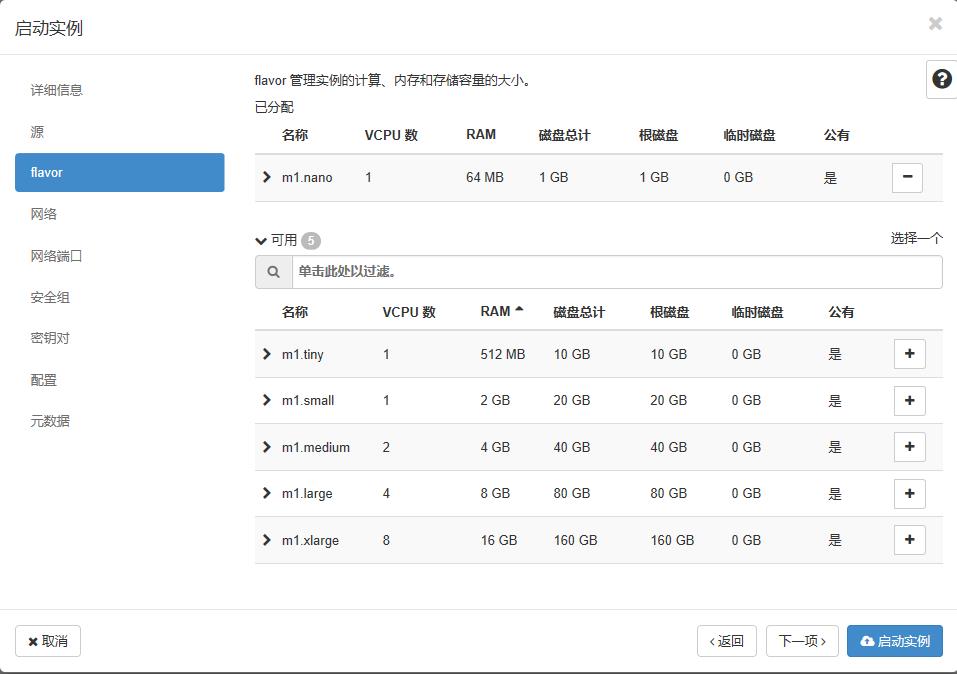
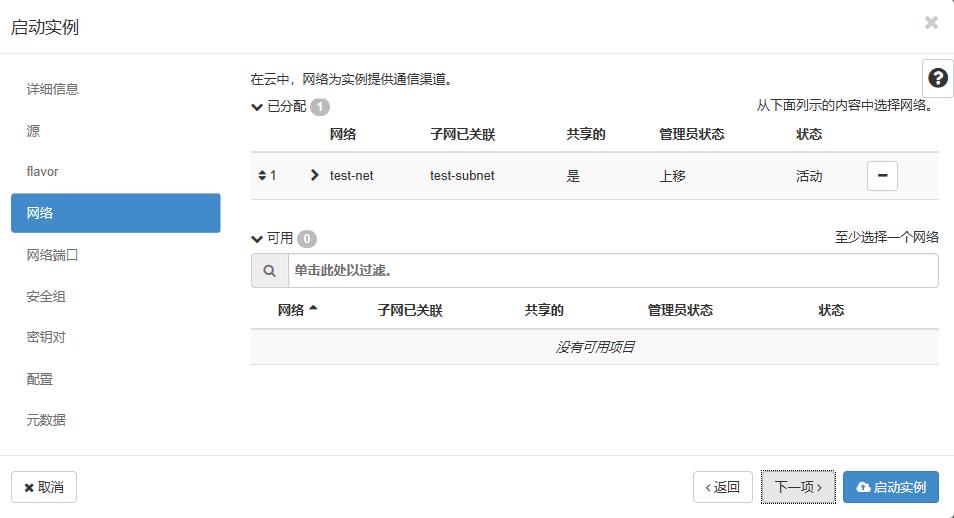
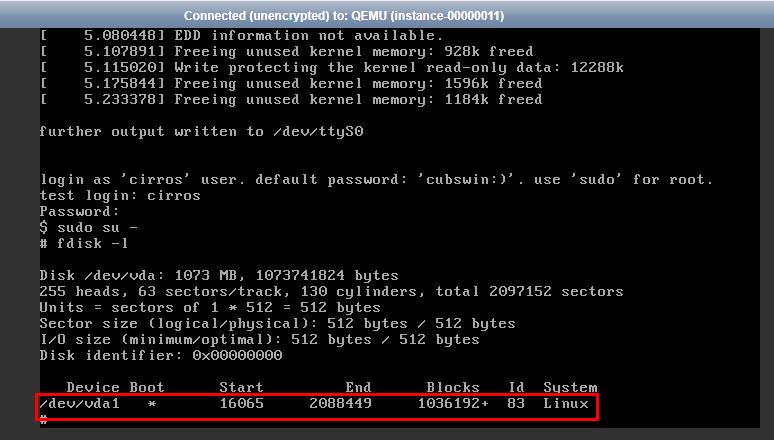
其他默认,启动实例


控制台登录,查看实例磁盘情况
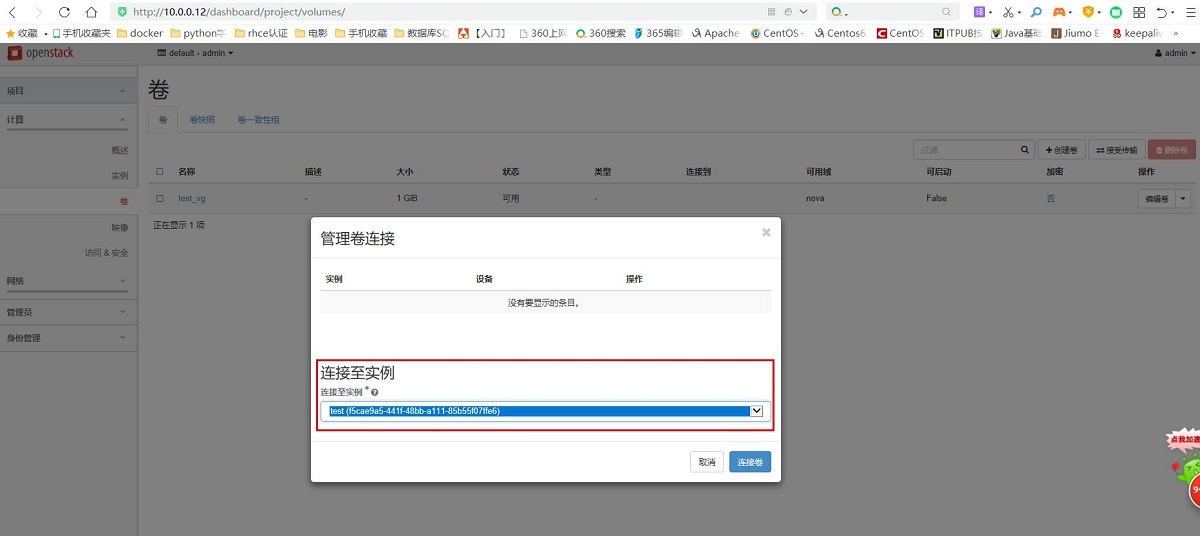
项目——>计算——>卷:管理连接


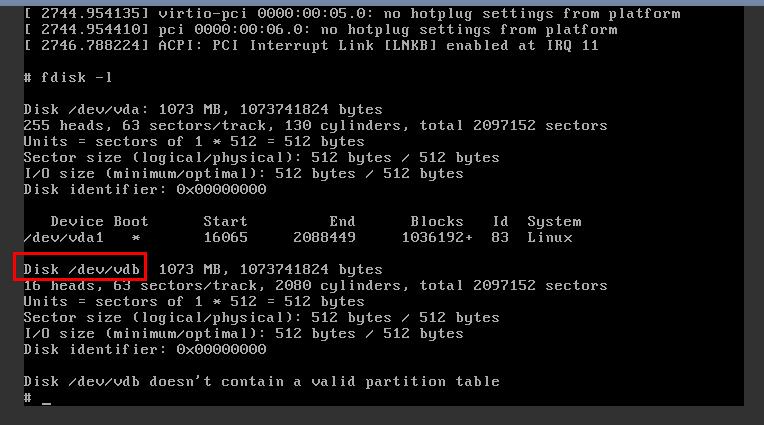
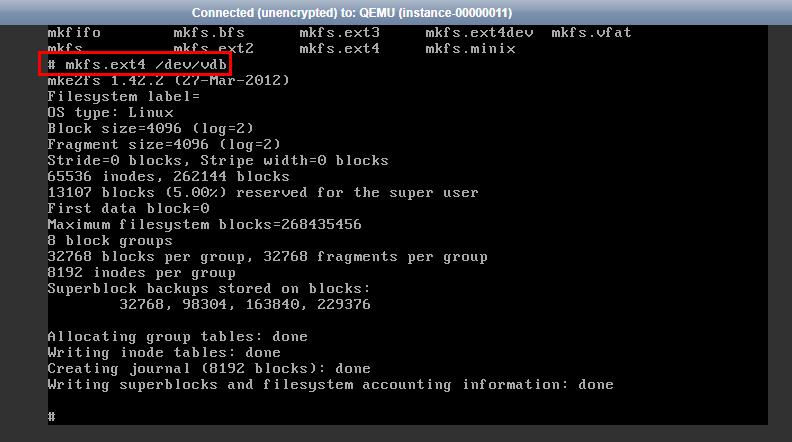
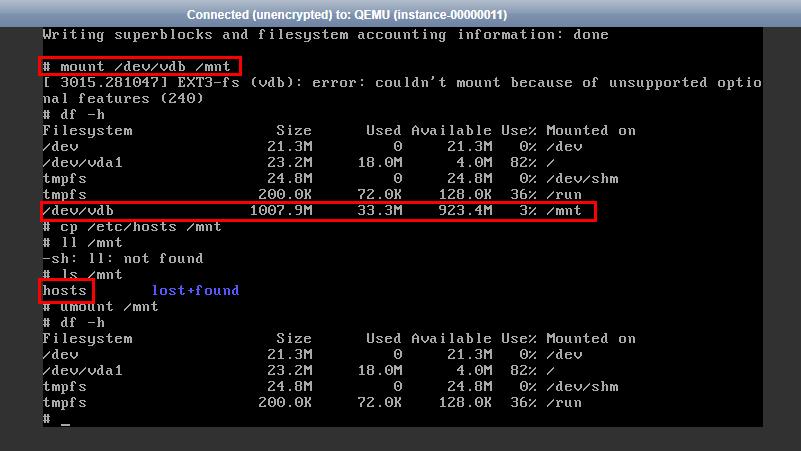
2. 扩容逻辑卷大小
分离卷——>扩展卷
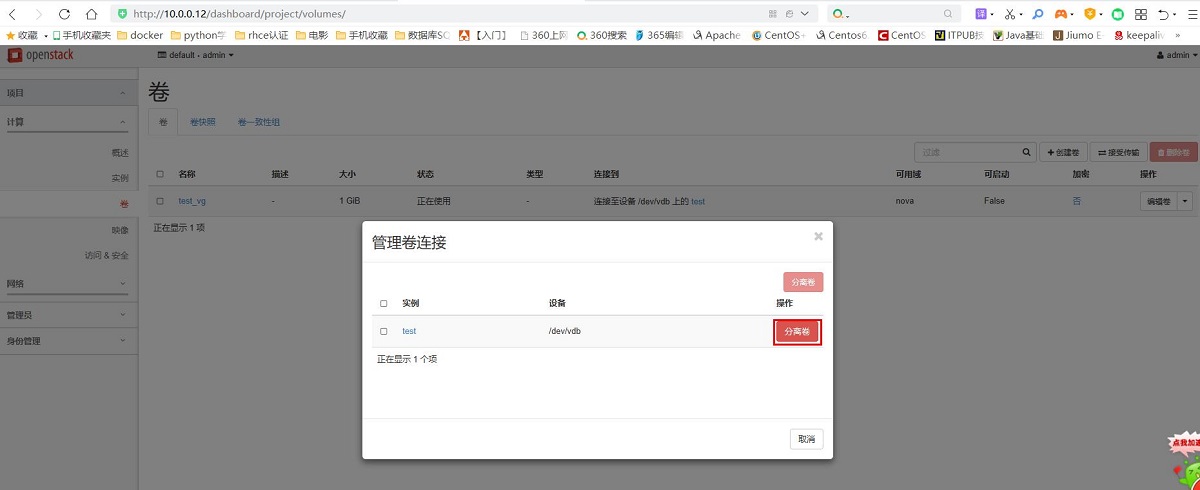


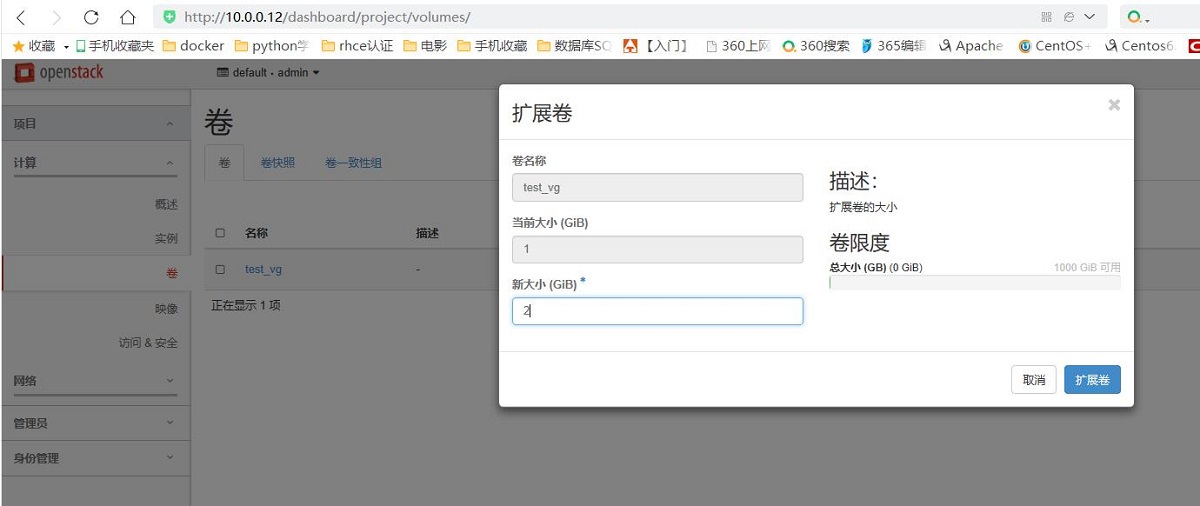


[root@computer1 ~]# lvs
  LV                                          VG         Attr       LSize Pool Origin Data%  Meta%  Move Log Cpy%Sync Convert
  volume-f2281392-712d-4532-a004-a6dbc9225b3a cinder-ssd -wi-a----- 2.00g
[root@computer1 ~]#
重新将卷挂载到实例上

在实例控制台查看
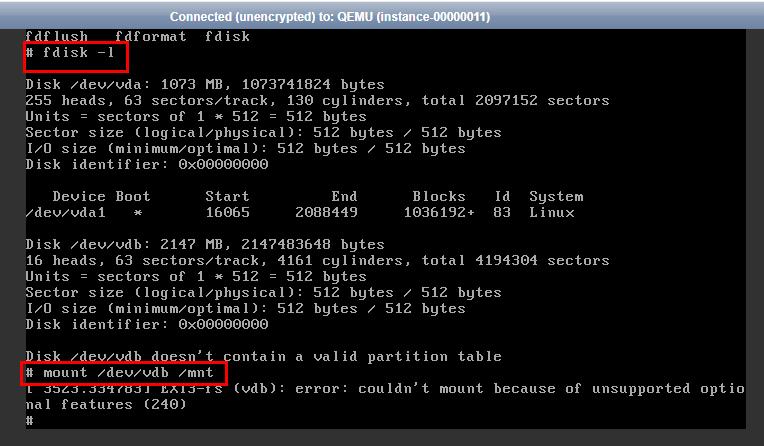
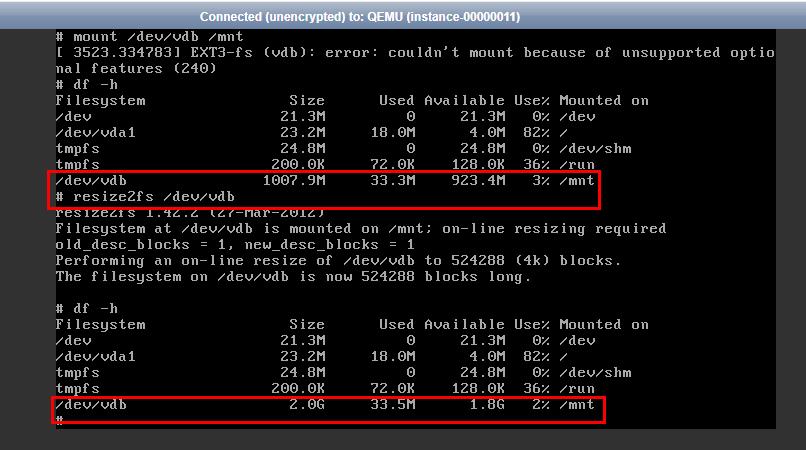
扩容成功!!!
3. 在存储节点查看逻辑卷
[root@computer1 ~]# cd /opt
[root@computer1 opt]# ls /dev/mapper/cinder--ssd-volume--f2281392--712d--4532--a004--a6dbc9225b3a
/dev/mapper/cinder--ssd-volume--f2281392--712d--4532--a004--a6dbc9225b3a
[root@computer1 opt]# dd if=/dev/mapper/cinder--ssd-volume--f2281392--712d--4532--a004--a6dbc9225b3a of=/opt/test.raw
4194304+0 records in
4194304+0 records out
2147483648 bytes (2.1 GB) copied, 747.684 s, 2.9 MB/s
[root@computer1 ~]# ll -h /opt
total 2.3G
-rw-r--r-- 1 root root 237M Nov 18 17:01 openstack_rpm.tar.gz
drwxr-xr-x 3 root root  36K Jul 19  2017 repo
-rw-r--r-- 1 root root 2.0G Nov 23 12:51 test.raw
[root@computer1 opt]# qemu-img info test.raw
image: test.raw
file format: raw
virtual size: 2.0G (2147483648 bytes)
disk size: 2.0G
查看数据
[root@computer1 ~]# mount -o loop /opt/test.raw /srv
[root@computer1 ~]# df -h
Filesystem      Size  Used Avail Use% Mounted on
/dev/sda2        48G  4.8G   44G  10% /
devtmpfs        983M     0  983M   0% /dev
tmpfs           993M     0  993M   0% /dev/shm
tmpfs           993M  8.7M  984M   1% /run
tmpfs           993M     0  993M   0% /sys/fs/cgroup
/dev/sr0        4.3G  4.3G     0 100% /mnt
tmpfs           199M     0  199M   0% /run/user/0
/dev/loop0      2.0G  1.6M  1.9G   1% /srv
[root@computer1 ~]# cd /srv/
[root@computer1 srv]# ll
total 20
-rw-r--r-- 1 root root    37 Nov 23 12:25 hosts
drwx------ 2 root root 16384 Nov 23 12:23 lost+found
注:云上的数据不安全


【推荐】国内首个AI IDE,深度理解中文开发场景,立即下载体验Trae
【推荐】编程新体验,更懂你的AI,立即体验豆包MarsCode编程助手
【推荐】抖音旗下AI助手豆包,你的智能百科全书,全免费不限次数
【推荐】轻量又高性能的 SSH 工具 IShell:AI 加持,快人一步
· Linux系列:如何用heaptrack跟踪.NET程序的非托管内存泄露
· 开发者必知的日志记录最佳实践
· SQL Server 2025 AI相关能力初探
· Linux系列:如何用 C#调用 C方法造成内存泄露
· AI与.NET技术实操系列(二):开始使用ML.NET
· 无需6万激活码!GitHub神秘组织3小时极速复刻Manus,手把手教你使用OpenManus搭建本
· C#/.NET/.NET Core优秀项目和框架2025年2月简报
· 葡萄城 AI 搜索升级:DeepSeek 加持,客户体验更智能
· 什么是nginx的强缓存和协商缓存
· 一文读懂知识蒸馏