


docker创建镜像
创建镜像的方法主要有三种:基于已有镜像的容器创建;基于本地模板导入创建;基于dockerfile创建
一、基于已有镜像的容器创建
该方法主要使用docker commit命令
制作docker镜像步骤:
1:启动容器,根据自定义操作(如安装相应的服务插件,编写相应的脚本,升级插件等)
2:将安装好服务的容器commit提交为镜像
3: 启动新容器来测试新提交的镜像
实践一:制作支持ssh远程登陆的docker镜像
1:启动容器安装软件服务
[root@web01 ~]# docker run -it -p 1022:22 --name test01 centos:6.8
[root@bd77560a40b4 /]# yum install openssh-server
#启动sshd服务
[root@bd77560a40b4 /]# /etc/init.d/sshd start
Generating SSH2 RSA host key: [ OK ]
Generating SSH1 RSA host key: [ OK ]
Generating SSH2 DSA host key: [ OK ]
Starting sshd: [ OK ]
#设置root密码
[root@bd77560a40b4 /]# passwd root
Changing password for user root.
New password:
BAD PASSWORD: it is too simplistic/systematic
BAD PASSWORD: is too simple
Retype new password:
passwd: all authentication tokens updated successfully.
#查看ip 地址
[root@bd77560a40b4 /]# ip a
1: lo: <LOOPBACK,UP,LOWER_UP> mtu 65536 qdisc noqueue state UNKNOWN qlen 1000
link/loopback 00:00:00:00:00:00 brd 00:00:00:00:00:00
inet 127.0.0.1/8 scope host lo
valid_lft forever preferred_lft forever
37: eth0@if38: <BROADCAST,MULTICAST,UP,LOWER_UP,M-DOWN> mtu 1500 qdisc noqueue state UP
link/ether 02:42:ac:11:00:02 brd ff:ff:ff:ff:ff:ff
inet 172.17.0.2/16 brd 172.17.255.255 scope global eth0
valid_lft forever preferred_lft forever
#远程登录测试
[root@web01 ~]# ssh root@172.17.0.2
The authenticity of host '172.17.0.2 (172.17.0.2)' can't be established.
RSA key fingerprint is SHA256:gKELun61ZIDK1TtLInt2C51S6MwaWem3lp7orb3f8LQ.
RSA key fingerprint is MD5:5a:dc:3e:23:96:1f:92:70:dd:f8:ab:5c:86:f4:98:ae.
Are you sure you want to continue connecting (yes/no)? yes
Warning: Permanently added '172.17.0.2' (RSA) to the list of known hosts.
root@172.17.0.2's password:
[root@bd77560a40b4 ~]# ip a
1: lo: <LOOPBACK,UP,LOWER_UP> mtu 65536 qdisc noqueue state UNKNOWN qlen 1000
link/loopback 00:00:00:00:00:00 brd 00:00:00:00:00:00
inet 127.0.0.1/8 scope host lo
valid_lft forever preferred_lft forever
37: eth0@if38: <BROADCAST,MULTICAST,UP,LOWER_UP,M-DOWN> mtu 1500 qdisc noqueue state UP
link/ether 02:42:ac:11:00:02 brd ff:ff:ff:ff:ff:ff
inet 172.17.0.2/16 brd 172.17.255.255 scope global eth0
valid_lft forever preferred_lft forever
2:将安装好服务的容器commit提交为镜像
[root@web01 ~]# docker commit test01 centos6-ssh:v1
sha256:9e007d4380591cc0b6915e7506537af14db24c392279122d47e01089f3dc728a
[root@web01 ~]# docker image ls centos6-ssh
REPOSITORY TAG IMAGE ID CREATED SIZE
centos6-ssh v1 9e007d438059 45 seconds ago 345MB
3: 启动新容器来测试新提交的镜像
[root@web01 ~]# docker run -d -p 2022:22 --name test02 centos6-ssh:v1 /usr/sbin/sshd -D
3d655687503eb790a8b5fd7b93cf7a13681fdeedb8e15178c9f207716f3f6760
[root@web01 ~]# docker ps
CONTAINER ID IMAGE COMMAND CREATED STATUS PORTS NAMES
3d655687503e centos6-ssh:v1 "/usr/sbin/sshd -D" 2 minutes ago Up 2 minutes 0.0.0.0:2022->22/tcp test02
#ssh远程登录
[root@web01 ~]# ssh root@10.0.0.7 -p 2022
The authenticity of host '[10.0.0.7]:2022 ([10.0.0.7]:2022)' can't be established.
RSA key fingerprint is SHA256:gKELun61ZIDK1TtLInt2C51S6MwaWem3lp7orb3f8LQ.
RSA key fingerprint is MD5:5a:dc:3e:23:96:1f:92:70:dd:f8:ab:5c:86:f4:98:ae.
Are you sure you want to continue connecting (yes/no)? yes
Warning: Permanently added '[10.0.0.7]:2022' (RSA) to the list of known hosts.
root@10.0.0.7's password:
Last login: Sun Sep 13 04:12:14 2020 from 172.17.0.1
[root@3d655687503e ~]# ip a
1: lo: <LOOPBACK,UP,LOWER_UP> mtu 65536 qdisc noqueue state UNKNOWN qlen 1000
link/loopback 00:00:00:00:00:00 brd 00:00:00:00:00:00
inet 127.0.0.1/8 scope host lo
valid_lft forever preferred_lft forever
39: eth0@if40: <BROADCAST,MULTICAST,UP,LOWER_UP,M-DOWN> mtu 1500 qdisc noqueue state UP
link/ether 02:42:ac:11:00:02 brd ff:ff:ff:ff:ff:ff
inet 172.17.0.2/16 brd 172.17.255.255 scope global eth0
valid_lft forever preferred_lft forever
实践二:制作支持ssh+httpd双服务的镜像
1:启动容器安装软件服务
[root@web01 ~]# docker run -it --name test03 centos:6.8
#安装服务
[root@15cb6f86790b /]# yum install httpd -y
[root@15cb6f86790b /]# yum install openssh-server -y
#启动服务
[root@15cb6f86790b /]# /etc/init.d/sshd start
Generating SSH2 RSA host key: [ OK ]
Generating SSH1 RSA host key: [ OK ]
Generating SSH2 DSA host key: [ OK ]
Starting sshd: [ OK ]
#设置密码
[root@15cb6f86790b /]# passwd root
Changing password for user root.
New password:
BAD PASSWORD: it is too simplistic/systematic
BAD PASSWORD: is too simple
Retype new password:
passwd: all authentication tokens updated successfully.
#查看ip地址
[root@15cb6f86790b /]# ip a
1: lo: <LOOPBACK,UP,LOWER_UP> mtu 65536 qdisc noqueue state UNKNOWN qlen 1000
link/loopback 00:00:00:00:00:00 brd 00:00:00:00:00:00
inet 127.0.0.1/8 scope host lo
valid_lft forever preferred_lft forever
47: eth0@if48: <BROADCAST,MULTICAST,UP,LOWER_UP,M-DOWN> mtu 1500 qdisc noqueue state UP
link/ether 02:42:ac:11:00:03 brd ff:ff:ff:ff:ff:ff
inet 172.17.0.3/16 brd 172.17.255.255 scope global eth0
valid_lft forever preferred_lft forever
#编写容器启动脚本
[root@15cb6f86790b /]# vi init.sh
[root@15cb6f86790b /]# cat init.sh
#!/bin/bash
/etc/init.d/httpd start
/usr/sbin/sshd -D
2:将安装好服务的容器commit提交为镜像
[root@web01 ~]# docker commit test03 centos6-ssh-httpd:v1
sha256:51f97f50b39d0f09e6faa6d1c2631477565d5ef255e0969e3ad23c2d793af350
[root@web01 ~]# docker image ls centos6-ssh-httpd:v1
REPOSITORY TAG IMAGE ID CREATED SIZE
centos6-ssh-httpd v1 51f97f50b39d 16 seconds ago 348MB
3:启动新容器来测试新提交的镜像
[root@web01 ~]# docker run -d -p 8080:80 -p 1122:22 --name test04 centos6-ssh-httpd:v1 /bin/bash /init.sh
fae0f8d7282649bc0639d0544761aee3ab7b931b71ab065600417ccc632dabfe
[root@web01 ~]# docker ps
CONTAINER ID IMAGE COMMAND CREATED STATUS PORTS NAMES
fae0f8d72826 centos6-ssh-httpd:v1 "/bin/bash /init.sh" 5 seconds ago Up 3 seconds 0.0.0.0:1122->22/tcp, 0.0.0.0:8080->80/tcp test04
15cb6f86790b centos:6.8 "/bin/bash" 18 minutes ago Up 4 minutes test03
3d655687503e centos6-ssh:v1 "/usr/sbin/sshd -D" 24 minutes ago Up 24 minutes 0.0.0.0:2022->22/tcp test02
#测试
[root@web01 ~]# ssh root@10.0.0.7 -p 1122
The authenticity of host '[10.0.0.7]:1122 ([10.0.0.7]:1122)' can't be established.
RSA key fingerprint is SHA256:xMRD5nOmEr8P+6ICYwE5lTYT+V2ueVvcUSW9/IJEizI.
RSA key fingerprint is MD5:8a:97:35:b5:0f:31:23:f0:cc:3f:7b:ce:40:9c:77:cc.
Are you sure you want to continue connecting (yes/no)? yes
Warning: Permanently added '[10.0.0.7]:1122' (RSA) to the list of known hosts.
root@10.0.0.7's password:
Last login: Sun Sep 13 04:30:06 2020 from 172.17.0.1
[root@fae0f8d72826 ~]# ip a
1: lo: <LOOPBACK,UP,LOWER_UP> mtu 65536 qdisc noqueue state UNKNOWN qlen 1000
link/loopback 00:00:00:00:00:00 brd 00:00:00:00:00:00
inet 127.0.0.1/8 scope host lo
valid_lft forever preferred_lft forever
49: eth0@if50: <BROADCAST,MULTICAST,UP,LOWER_UP,M-DOWN> mtu 1500 qdisc noqueue state UP
link/ether 02:42:ac:11:00:04 brd ff:ff:ff:ff:ff:ff
inet 172.17.0.4/16 brd 172.17.255.255 scope global eth0
valid_lft forever preferred_lft forever
二、基于本地模板导入
主要使用docker import命令。要直接导入一个镜像,可以使用OpenVZ提供模板来创建。OpenVZ模板下载地址为:http://openvz.org/Download/templates/precreated
1. 将下载好的模板导入
[root@web01 ~]# mkdir /images_template
[root@web01 ~]# cd /images_template/
[root@web01 images_template]# wget http://download.openvz.org/template/precreated/ubuntu-16.04-x86_64.tar.gz
[root@web01 images_template]# ll
total 182428
-rw-r--r-- 1 root root 186803364 Nov 27 2016 ubuntu-16.04-x86_64.tar.gz
#导入
[root@web01 images_template]# cat ubuntu-16.04-x86_64.tar.gz |docker import - ubuntu:16.04
sha256:4e21da1c8b2c613e5fa6eb64e4f52e95f695a42f902d54f63ee34895ca6d6754
2. 查看新导入的镜像
[root@web01 images_template]# docker image ls ubuntu
REPOSITORY TAG IMAGE ID CREATED SIZE
ubuntu 16.04 4e21da1c8b2c 25 seconds ago 505MB
三、基于Dockerfile创建
基于Dockerfile创建是最常见的方式。Dockerfile是一个文本文件,利用给定的指令描述基于某个父镜像创建新镜像的过程。
1. 使用dockerfile构建的镜像有以下优点:
1)dockerfile只有几kb,便于传输
2)使用dockerfile构建出来的镜像,在运行容器的时候,不用指定容器的初始命令
3)支持更多的自定义操作
2.dockerfile基本结构
dockerfile是由一行行命令语句组成,并且支持以#开头的注释行
一般而言,Dockerfile主体内容分为四部分:基础镜像信息,维护者信息,镜像操作指令和容器启动时执行指令
dockerfile常用指令如下:
FROM 指定基础镜像
MAINTAINER 指定维护者信息,可以没有
RUN 你想让它干啥(在命令前面加上RUN即可)
ADD 给它点创业资金(COPY文件,会自动解压)
WORKDIR 设置当前工作目录
VOLUME 设置卷,挂载主机目录
EXPOSE 指定对外的端口(-P 随机端口)
CMD 指定容器启动后的要干的事情(容易被替换)
dockerfile其他指令:
COPY 复制文件
ENV 环境变量
ENTRYPOINT 容器启动后执行的命令(无法被替换,启容器的时候指定的命令,会被当成参数)
3.实例操作
实践一:基于debian:stretch-slim镜像安装python 3环境,构建一个python:3镜像
1)编写dockerfile
[root@web01 ~]# mkdir Dockerfile
[root@web01 ~]# cd Dockerfile/
[root@web01 Dockerfile]# mkdir python
[root@web01 Dockerfile]# cd python/
[root@web01 python]# vim dockerfile
[root@web01 python]# cat dockerfile
FROM debian:stretch-slim
LABEL version="1.0" maintainer="docker user"
RUN apt-get update && \
apt-get install -y python3 && \
apt-get clean && \
rm -rf /var/lib/apt/lists/*
2)docker build构建镜像
[root@web01 python]# docker build -t python:3 .
Sending build context to Docker daemon 2.048kB
Step 1/3 : FROM debian:stretch-slim
---> 5e45a95672e1
Step 2/3 : LABEL version="1.0" maintainer="docker user"
---> Running in 3cd1b187ce0a
Removing intermediate container 3cd1b187ce0a
---> d262f1e9d0fd
Step 3/3 : RUN apt-get update && apt-get install -y python3 && apt-get clean && rm -rf /var/lib/apt/lists/*
---> Running in d7bf1db3ee7e
.....
Successfully built eddff3d30e67
Successfully tagged python:3
#查看镜像
[root@web01 python]# docker image ls python
REPOSITORY TAG IMAGE ID CREATED SIZE
python 3 eddff3d30e67 6 minutes ago 95.2MB
3)启动新容器来测试新构建的镜像
[root@web01 python]# docker run -it python:3 /bin/bash
root@3c8388a1110b:/# python3
Python 3.5.3 (default, Jul 9 2020, 13:00:10)
[GCC 6.3.0 20170516] on linux
Type "help", "copyright", "credits" or "license" for more information.
>>> exit()
root@3c8388a1110b:/# python3 -V
Python 3.5.3
实践二:dockerfile制作支持ssh服务的docker镜像
1)编写dockerfile
[root@web01 ~]# cd Dockerfile/
[root@web01 Dockerfile]# mkdir centos
[root@web01 Dockerfile]# cd centos/
[root@web01 centos]# vim dockerfile
[root@web01 centos]# cat dockerfile
FROM centos:6.8
RUN yum install openssh-server -y
RUN /etc/init.d/sshd start
RUN echo 123456|passwd --stdin root
CMD ["/usr/sbin/sshd","-D"]
2)docker build构建镜像
[root@web01 centos]# docker build -t centos6-ssh:v2 .
Sending build context to Docker daemon 2.048kB
Step 1/5 : FROM centos:6.8
---> 82f3b5f3c58f
Step 2/5 : RUN yum install openssh-server -y
---> Running in cc624e73089c
....
Complete!
Removing intermediate container cc624e73089c
---> 0146fb4cd12d
Step 3/5 : RUN /etc/init.d/sshd start
---> Running in 53acbbff7f8b
Generating SSH2 RSA host key: [ OK ]
Generating SSH1 RSA host key: [ OK ]
Generating SSH2 DSA host key: [ OK ]
Starting sshd: [ OK ]
Removing intermediate container 53acbbff7f8b
---> 57b3420bee64
Step 4/5 : RUN echo 123456|passwd --stdin root
---> Running in 2103057a755e
Changing password for user root.
passwd: all authentication tokens updated successfully.
Removing intermediate container 2103057a755e
---> 03bff9f469d1
Step 5/5 : CMD ["/usr/sbin/sshd","-D"]
---> Running in 71d2aed55e91
Removing intermediate container 71d2aed55e91
---> dfd1fdf89c94
Successfully built dfd1fdf89c94
Successfully tagged centos6-ssh:v2
#查看镜像
[root@web01 centos]# docker image ls centos6-ssh:v2
REPOSITORY TAG IMAGE ID CREATED SIZE
centos6-ssh v2 dfd1fdf89c94 35 seconds ago 345MB
3) 启动新容器来测试新构建的镜像
[root@web01 centos]# docker run -d -p 1322:22 --name test05 centos6-ssh:v2
3673720a5fe62663237270dc4002d6bb1423921838c88779034c9a51e70e046f
#测试
[root@web01 centos]# ssh root@10.0.0.7 -p 1322
The authenticity of host '[10.0.0.7]:1322 ([10.0.0.7]:1322)' can't be established.
RSA key fingerprint is SHA256:hKFoVpaZiD9a7BYzLtXdLcSlxwpc1cNGQVB24g6ekPI.
RSA key fingerprint is MD5:e1:f3:ca:2c:d6:f2:89:73:ef:9d:ed:ab:d3:26:dd:c3.
Are you sure you want to continue connecting (yes/no)? yes
Warning: Permanently added '[10.0.0.7]:1322' (RSA) to the list of known hosts.
root@10.0.0.7's password:
[root@3673720a5fe6 ~]# ip a
1: lo: <LOOPBACK,UP,LOWER_UP> mtu 65536 qdisc noqueue state UNKNOWN qlen 1000
link/loopback 00:00:00:00:00:00 brd 00:00:00:00:00:00
inet 127.0.0.1/8 scope host lo
valid_lft forever preferred_lft forever
59: eth0@if60: <BROADCAST,MULTICAST,UP,LOWER_UP,M-DOWN> mtu 1500 qdisc noqueue state UP
link/ether 02:42:ac:11:00:06 brd ff:ff:ff:ff:ff:ff
inet 172.17.0.6/16 brd 172.17.255.255 scope global eth0
valid_lft forever preferred_lft forever
[root@web01 ~]# ssh root@172.17.0.6
The authenticity of host '172.17.0.6 (172.17.0.6)' can't be established.
RSA key fingerprint is SHA256:hKFoVpaZiD9a7BYzLtXdLcSlxwpc1cNGQVB24g6ekPI.
RSA key fingerprint is MD5:e1:f3:ca:2c:d6:f2:89:73:ef:9d:ed:ab:d3:26:dd:c3.
Are you sure you want to continue connecting (yes/no)? yes
Warning: Permanently added '172.17.0.6' (RSA) to the list of known hosts.
root@172.17.0.6's password:
Last login: Sun Sep 13 05:22:54 2020 from 10.0.0.7
[root@3673720a5fe6 ~]# ip a
1: lo: <LOOPBACK,UP,LOWER_UP> mtu 65536 qdisc noqueue state UNKNOWN qlen 1000
link/loopback 00:00:00:00:00:00 brd 00:00:00:00:00:00
inet 127.0.0.1/8 scope host lo
valid_lft forever preferred_lft forever
59: eth0@if60: <BROADCAST,MULTICAST,UP,LOWER_UP,M-DOWN> mtu 1500 qdisc noqueue state UP
link/ether 02:42:ac:11:00:06 brd ff:ff:ff:ff:ff:ff
inet 172.17.0.6/16 brd 172.17.255.255 scope global eth0
valid_lft forever preferred_lft forever
实践三:dockerfile制作支持ssh-http服务的docker镜像
1)编写dockerfile和容器启动脚本
[root@web01 Dockerfile]# mkdir httpd
[root@web01 Dockerfile]# cd httpd/
[root@web01 httpd]# vim dockerfile
[root@web01 httpd]# cat dockerfile
FROM centos:6.8
RUN yum install openssh-server httpd -y
RUN /etc/init.d/sshd start
RUN echo 123456|passwd --stdin root
ADD init.sh /init.sh
CMD ["/bin/bash","/init.sh"]
[root@web01 httpd]# cat init.sh
#!/bin/bash
/etc/init.d/httpd start
/usr/sbin/sshd -D
2)docker build构建镜像
[root@web01 httpd]# docker build -t centos6-ssh-httpd:v2 .
Sending build context to Docker daemon 3.072kB
Step 1/6 : FROM centos:6.8
---> 82f3b5f3c58f
Step 2/6 : RUN yum install openssh-server httpd -y
---> Running in a179ce9e3b26
Loaded plugins: fastestmirror, ovl
Setting up Install Process
.....
Complete!
Removing intermediate container a179ce9e3b26
---> b4747032f182
Step 3/6 : RUN /etc/init.d/sshd start
---> Running in e6cb88f54be4
Generating SSH2 RSA host key: [ OK ]
Generating SSH1 RSA host key: [ OK ]
Generating SSH2 DSA host key: [ OK ]
Starting sshd: [ OK ]
Removing intermediate container e6cb88f54be4
---> 9b5e545125ac
Step 4/6 : RUN echo 123456|passwd --stdin root
---> Running in b16d09f6bc67
Changing password for user root.
passwd: all authentication tokens updated successfully.
Removing intermediate container b16d09f6bc67
---> 259230118b91
Step 5/6 : ADD init.sh /init.sh
---> ce9258940c58
Step 6/6 : CMD ["/bin/bash","/init.sh"]
---> Running in b1e0b9141bcc
Removing intermediate container b1e0b9141bcc
---> 1d514e6b8759
Successfully built 1d514e6b8759
Successfully tagged centos6-ssh-httpd:v2
#查看镜像
[root@web01 httpd]# docker image ls centos6-ssh-httpd:v2
REPOSITORY TAG IMAGE ID CREATED SIZE
centos6-ssh-httpd v2 1d514e6b8759 53 seconds ago 348MB
3)启动新容器来测试新提交的镜像
[root@web01 httpd]# docker run -d -p 8081:80 -p 2122:22 centos6-ssh-httpd:v2
a38c176b0ae3379fd2b4e7b25732fc3dfefc640b37c5d34c46a6dcb909854dd2
[root@web01 httpd]# docker ps -a -l
CONTAINER ID IMAGE COMMAND CREATED STATUS PORTS NAMES
a38c176b0ae3 centos6-ssh-httpd:v2 "/bin/bash /init.sh" 6 seconds ago Up 6 seconds 0.0.0.0:2122->22/tcp, 0.0.0.0:8081->80/tcp elated_albattani
#测试
[root@web01 ~]# curl -I 10.0.0.7:8081
HTTP/1.1 403 Forbidden
Date: Sun, 13 Sep 2020 06:09:21 GMT
Server: Apache/2.2.15 (CentOS)
Accept-Ranges: bytes
Content-Length: 4961
Connection: close
Content-Type: text/html; charset=UTF-8
[root@web01 httpd]# ssh root@10.0.0.7 -p 2122
The authenticity of host '[10.0.0.7]:2122 ([10.0.0.7]:2122)' can't be established.
RSA key fingerprint is SHA256:voAfUSH3qm+/YlqPpveuvB8i27RlJhdTY9vHTUiJo7s.
RSA key fingerprint is MD5:41:00:c7:41:ad:fb:aa:51:3e:d5:21:3d:98:87:4c:a8.
Are you sure you want to continue connecting (yes/no)? yes
Warning: Permanently added '[10.0.0.7]:2122' (RSA) to the list of known hosts.
root@10.0.0.7's password:
[root@a38c176b0ae3 ~]# ip a
1: lo: <LOOPBACK,UP,LOWER_UP> mtu 65536 qdisc noqueue state UNKNOWN qlen 1000
link/loopback 00:00:00:00:00:00 brd 00:00:00:00:00:00
inet 127.0.0.1/8 scope host lo
valid_lft forever preferred_lft forever
85: eth0@if86: <BROADCAST,MULTICAST,UP,LOWER_UP,M-DOWN> mtu 1500 qdisc noqueue state UP
link/ether 02:42:ac:11:00:05 brd ff:ff:ff:ff:ff:ff
inet 172.17.0.5/16 brd 172.17.255.255 scope global eth0
valid_lft forever preferred_lft forever

实践四:使用EXPOSE指令
声明镜像内服务监听的端口,只是起到声明的作用,并不会自动完成端口映射。
1)编写dockerfile
[root@web01 httpd]# vim dockerfile
[root@web01 httpd]# cat dockerfile
FROM centos:6.8
RUN yum install openssh-server httpd -y
RUN /etc/init.d/sshd start
RUN echo 123456|passwd --stdin root
ADD init.sh /init.sh
EXPOSE 22 80
CMD ["/bin/bash","/init.sh"]
2)docker build构建镜像
docker build -t centos6-ssh-httpd:v3
[root@web01 httpd]# docker build -t centos6-ssh-httpd:v3 .
Sending build context to Docker daemon 3.072kB
Step 1/7 : FROM centos:6.8
---> 82f3b5f3c58f
Step 2/7 : RUN yum install openssh-server httpd -y
---> Using cache
---> b4747032f182
Step 3/7 : RUN /etc/init.d/sshd start
---> Using cache
---> 9b5e545125ac
Step 4/7 : RUN echo 123456|passwd --stdin root
---> Using cache
---> 259230118b91
Step 5/7 : ADD init.sh /init.sh
---> Using cache
---> ce9258940c58
Step 6/7 : EXPOSE 22 80
---> Running in 37dc69136436
Removing intermediate container 37dc69136436
---> 6152f90a6cf2
Step 7/7 : CMD ["/bin/bash","/init.sh"]
---> Running in 23172e2f96bf
Removing intermediate container 23172e2f96bf
---> 56cde14f8497
Successfully built 56cde14f8497
Successfully tagged centos6-ssh-httpd:v3
#查看镜像
[root@web01 httpd]# docker image ls centos6-ssh-httpd:v3
REPOSITORY TAG IMAGE ID CREATED SIZE
centos6-ssh-httpd v3 56cde14f8497 45 seconds ago 348MB
3)启动新容器来测试新提交的镜像
[root@web01 httpd]# docker run -d -P centos6-ssh-httpd:v3
7007796e9fe5faee547ea64eb6fda4060ce727572e068ad562cf4b9b46b53676
[root@web01 httpd]# docker ps -a -l
CONTAINER ID IMAGE COMMAND CREATED STATUS PORTS NAMES
7007796e9fe5 centos6-ssh-httpd:v3 "/bin/bash /init.sh" 8 seconds ago Up 6 seconds 0.0.0.0:32769->22/tcp, 0.0.0.0:32768->80/tcp pensive_shirley
[root@web01 httpd]# ssh root@10.0.0.7 -p 32769
The authenticity of host '[10.0.0.7]:32769 ([10.0.0.7]:32769)' can't be established.
RSA key fingerprint is SHA256:voAfUSH3qm+/YlqPpveuvB8i27RlJhdTY9vHTUiJo7s.
RSA key fingerprint is MD5:41:00:c7:41:ad:fb:aa:51:3e:d5:21:3d:98:87:4c:a8.
Are you sure you want to continue connecting (yes/no)? yes
Warning: Permanently added '[10.0.0.7]:32769' (RSA) to the list of known hosts.
root@10.0.0.7's password:
[root@7007796e9fe5 ~]# ip a
1: lo: <LOOPBACK,UP,LOWER_UP> mtu 65536 qdisc noqueue state UNKNOWN qlen 1000
link/loopback 00:00:00:00:00:00 brd 00:00:00:00:00:00
inet 127.0.0.1/8 scope host lo
valid_lft forever preferred_lft forever
87: eth0@if88: <BROADCAST,MULTICAST,UP,LOWER_UP,M-DOWN> mtu 1500 qdisc noqueue state UP
link/ether 02:42:ac:11:00:07 brd ff:ff:ff:ff:ff:ff
inet 172.17.0.7/16 brd 172.17.255.255 scope global eth0
valid_lft forever preferred_lft forever

实践五:使用WORKDIR指令
为RUN CMD ENTRYPOINT 指令配置工作目录,推荐使用绝对路径
1)修改dockerfile文件
[root@web01 httpd]# vim dockerfile
[root@web01 httpd]# cat dockerfile
FROM centos:6.8
RUN yum install openssh-server httpd -y
RUN /etc/init.d/sshd start
RUN echo 123456|passwd --stdin root
ADD init.sh /init.sh
EXPOSE 22 80
WORKDIR /root
CMD ["/bin/bash","/init.sh"]
2)docker build构建镜像
[root@web01 httpd]# docker build -t centos6-ssh-httpd:v4 .
Sending build context to Docker daemon 3.072kB
Step 1/8 : FROM centos:6.8
---> 82f3b5f3c58f
Step 2/8 : RUN yum install openssh-server httpd -y
---> Using cache
---> b4747032f182
Step 3/8 : RUN /etc/init.d/sshd start
---> Using cache
---> 9b5e545125ac
Step 4/8 : RUN echo 123456|passwd --stdin root
---> Using cache
---> 259230118b91
Step 5/8 : ADD init.sh /init.sh
---> Using cache
---> ce9258940c58
Step 6/8 : EXPOSE 22 80
---> Using cache
---> 6152f90a6cf2
Step 7/8 : WORKDIR /root
---> Running in eda2d6671095
Removing intermediate container eda2d6671095
---> 93f1819713d2
Step 8/8 : CMD ["/bin/bash","/init.sh"]
---> Running in 42666c2e6935
Removing intermediate container 42666c2e6935
---> 5beafa6d7a5a
Successfully built 5beafa6d7a5a
Successfully tagged centos6-ssh-httpd:v4
#查看镜像
[root@web01 httpd]# docker image ls centos6-ssh-httpd:v4
REPOSITORY TAG IMAGE ID CREATED SIZE
centos6-ssh-httpd v4 5beafa6d7a5a 40 seconds ago 348MB
3)启动新容器来测试新提交的镜像
[root@web01 ~]# docker ps -a -l
CONTAINER ID IMAGE COMMAND CREATED STATUS PORTS NAMES
9a55882b5747 centos6-ssh-httpd:v4 "/bin/bash /init.sh" 6 seconds ago Up 5 seconds 0.0.0.0:32773->22/tcp, 0.0.0.0:32772->80/tcp wizardly_bhaskara
[root@web01 ~]# docker exec -it wizardly_bhaskara /bin/bash
[root@9a55882b5747 ~]# pwd
/root
实践六:ENV指令使用
指定环境变量,在镜像生成过程中被后续RUN指令使用,在镜像启动的容器中也会存在
ENV <key> <value> 或ENV <key>=<value>
1)修改dockerfile文件
[root@web01 httpd]# cat dockerfile
FROM centos:6.8
RUN yum install openssh-server httpd -y
RUN /etc/init.d/sshd start
RUN echo 123456|passwd --stdin root
ADD init.sh /init.sh
EXPOSE 22 80
WORKDIR /root
ENV SSH_PASSWD=123456
CMD ["/bin/bash","/init.sh"]
[root@web01 httpd]# cat init.sh
#!/bin/bash
echo $SSH_PASSWD |passwd --stdin root
/etc/init.d/httpd start
/usr/sbin/sshd -D
2)docker build构建镜像
[root@web01 httpd]# docker build -t centos6-ssh-httpd:v5 .
Sending build context to Docker daemon 3.072kB
Step 1/9 : FROM centos:6.8
---> 82f3b5f3c58f
Step 2/9 : RUN yum install openssh-server httpd -y
---> Using cache
---> b4747032f182
Step 3/9 : RUN /etc/init.d/sshd start
---> Using cache
---> 9b5e545125ac
Step 4/9 : RUN echo 123456|passwd --stdin root
---> Using cache
---> 259230118b91
Step 5/9 : ADD init.sh /init.sh
---> 95334b4f373c
Step 6/9 : EXPOSE 22 80
---> Running in 1f00c12419d9
Removing intermediate container 1f00c12419d9
---> 9d9e1090f601
Step 7/9 : WORKDIR /root
---> Running in 1f5564a72f95
Removing intermediate container 1f5564a72f95
---> 09ab589a22ae
Step 8/9 : ENV SSH_PASSWD=123456
---> Running in d09b406afd22
Removing intermediate container d09b406afd22
---> 59b114db2dbf
Step 9/9 : CMD ["/bin/bash","/init.sh"]
---> Running in 1e93ec2f626b
Removing intermediate container 1e93ec2f626b
---> e924854e3410
Successfully built e924854e3410
Successfully tagged centos6-ssh-httpd:v5
#查看镜像
[root@web01 httpd]# docker image ls centos6-ssh-httpd:v5
REPOSITORY TAG IMAGE ID CREATED SIZE
centos6-ssh-httpd v5 e924854e3410 16 seconds ago 348MB
3)启动新容器来测试新提交的镜像
[root@web01 httpd]# docker run -d -P centos6-ssh-httpd:v5
433186fc098378331b86cea4cfcdc7423483d3aa9d6b2727b1ec28c8a63f6fb2
[root@web01 httpd]# docker ps -a -l
CONTAINER ID IMAGE COMMAND CREATED STATUS PORTS NAMES
433186fc0983 centos6-ssh-httpd:v5 "/bin/bash /init.sh" 4 seconds ago Up 4 seconds 0.0.0.0:32775->22/tcp, 0.0.0.0:32774->80/tcp clever_wing
[root@web01 httpd]# ssh root@10.0.0.7 -p 32775
The authenticity of host '[10.0.0.7]:32775 ([10.0.0.7]:32775)' can't be established.
RSA key fingerprint is SHA256:voAfUSH3qm+/YlqPpveuvB8i27RlJhdTY9vHTUiJo7s.
RSA key fingerprint is MD5:41:00:c7:41:ad:fb:aa:51:3e:d5:21:3d:98:87:4c:a8.
Are you sure you want to continue connecting (yes/no)? yes
Warning: Permanently added '[10.0.0.7]:32775' (RSA) to the list of known hosts.
root@10.0.0.7's password:
实践七:使用ENTRYPOINT指令
指定镜像的默认入口命令,该入口命令会在启动容器时作为根命令执行,所有传入值作为该命令的参数
ENTRYPOTIN command param1 param2:shell中执行
每个dockerfile中只能有一个ENTRYPOINT,当指定多个时,只有最后一个起作用。
1)编写dockerfile文件
[root@web01 httpd]# cat dockerfile
FROM centos:6.8
RUN yum install openssh-server httpd -y
RUN /etc/init.d/sshd start
RUN echo 123456|passwd --stdin root
ADD init.sh /init.sh
EXPOSE 22 80
WORKDIR /root
ENV SSH_PASSWD=2345678
ENTRYPOINT ["/bin/bash","/init.sh"]
2)docker build 构建镜像
[root@web01 httpd]# docker build -t centos6-ssh-httpd:v7 .
Sending build context to Docker daemon 3.072kB
Step 1/9 : FROM centos:6.8
---> 82f3b5f3c58f
Step 2/9 : RUN yum install openssh-server httpd -y
---> Using cache
---> b4747032f182
Step 3/9 : RUN /etc/init.d/sshd start
---> Using cache
---> 9b5e545125ac
Step 4/9 : RUN echo 123456|passwd --stdin root
---> Using cache
---> 259230118b91
Step 5/9 : ADD init.sh /init.sh
---> Using cache
---> 95334b4f373c
Step 6/9 : EXPOSE 22 80
---> Using cache
---> 9d9e1090f601
Step 7/9 : WORKDIR /root
---> Using cache
---> 09ab589a22ae
Step 8/9 : ENV SSH_PASSWD=2345678
---> Using cache
---> 4bc44e49986d
Step 9/9 : ENTRYPOINT ["/bin/bash","/init.sh"]
---> Running in 558241fd2614
Removing intermediate container 558241fd2614
---> b8eaf40d7cdb
Successfully built b8eaf40d7cdb
Successfully tagged centos6-ssh-httpd:v7
[root@web01 httpd]# docker image ls centos6-ssh-httpd:v7
REPOSITORY TAG IMAGE ID CREATED SIZE
centos6-ssh-httpd v7 b8eaf40d7cdb 24 seconds ago 348MB
3)启动新容器来测试新提交的镜像
[root@web01 httpd]# docker run -d -P centos6-ssh-httpd:v7 sleep 10
e7d92bcf2dfaab091243f45bb9bb7204dfadd1f3807ad3c6a2e8496912143e16
[root@web01 httpd]# docker ps -a -l --no-trunc
CONTAINER ID IMAGE COMMAND CREATED STATUS PORTS NAMES
e7d92bcf2dfaab091243f45bb9bb7204dfadd1f3807ad3c6a2e8496912143e16 centos6-ssh-httpd:v7 "/bin/bash /init.sh sleep 10" 18 seconds ago Up 16 seconds 0.0.0.0:32779->22/tcp, 0.0.0.0:32778->80/tcp stoic_cerf
#初始命令不会被覆盖掉
四 dockerfile构建php项目
项目:可道云网盘kodexplorer
需要的环境:httpd+php或者nginx+php
php所需模块:未知
基础镜像:centos:6.8
项目下载地址: http://static.kodcloud.com/update/download/kodexplorer4.37.zip
项目官网:https://kodcloud.com/download/
把项目封装成docker镜像的步骤:
1:先运行一个基础容器,手动制作docker镜像
[root@web01 ~]# docker run -it centos:6.8
[root@a3c4cedacfa0 /]# yum install httpd php php-cli wget unzip -y
[root@a3c4cedacfa0 /]# cd /var/www/html
[root@a3c4cedacfa0 html]# wget http://static.kodcloud.com/update/download/kodexplorer4.37.zip
[root@a3c4cedacfa0 html]# unzip kodexplorer4.37.zip
[root@a3c4cedacfa0 html]# chmod -R 777 /var/www/html/
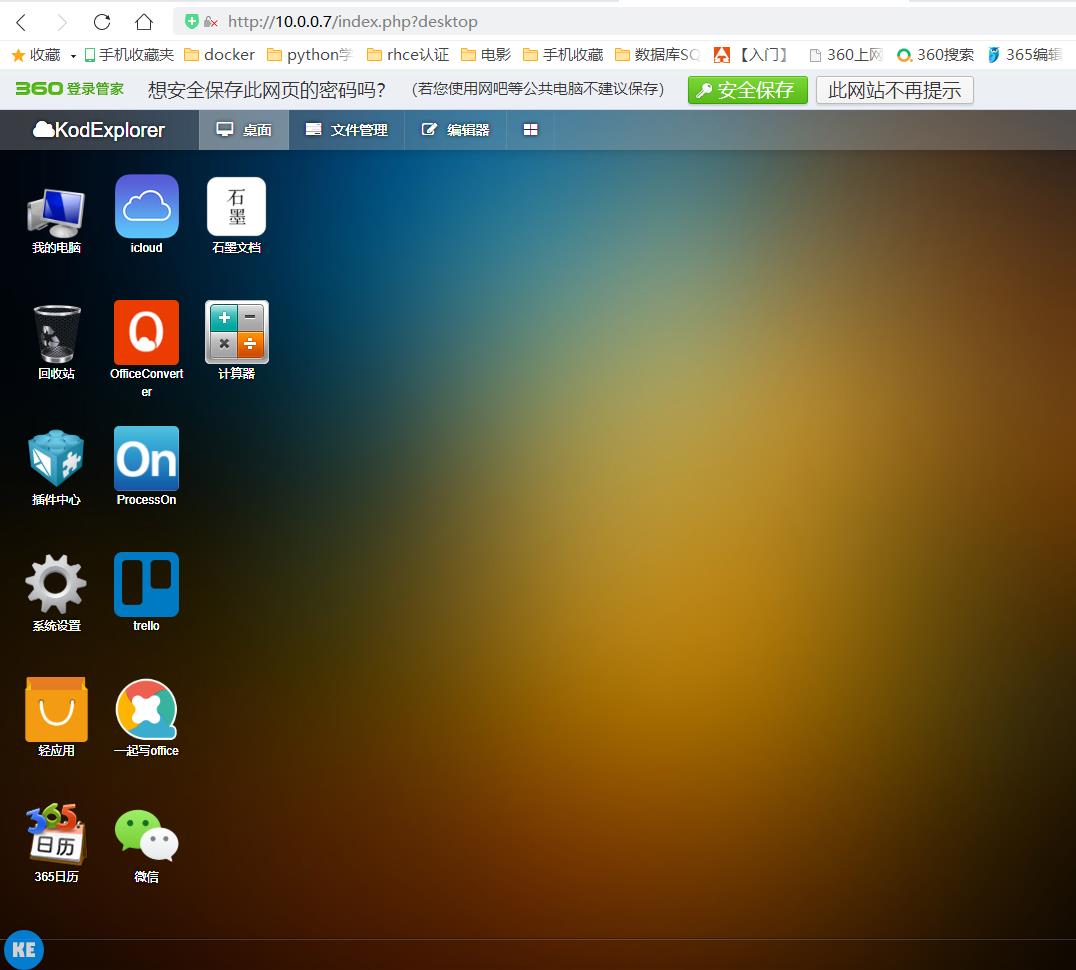
#查看web页面
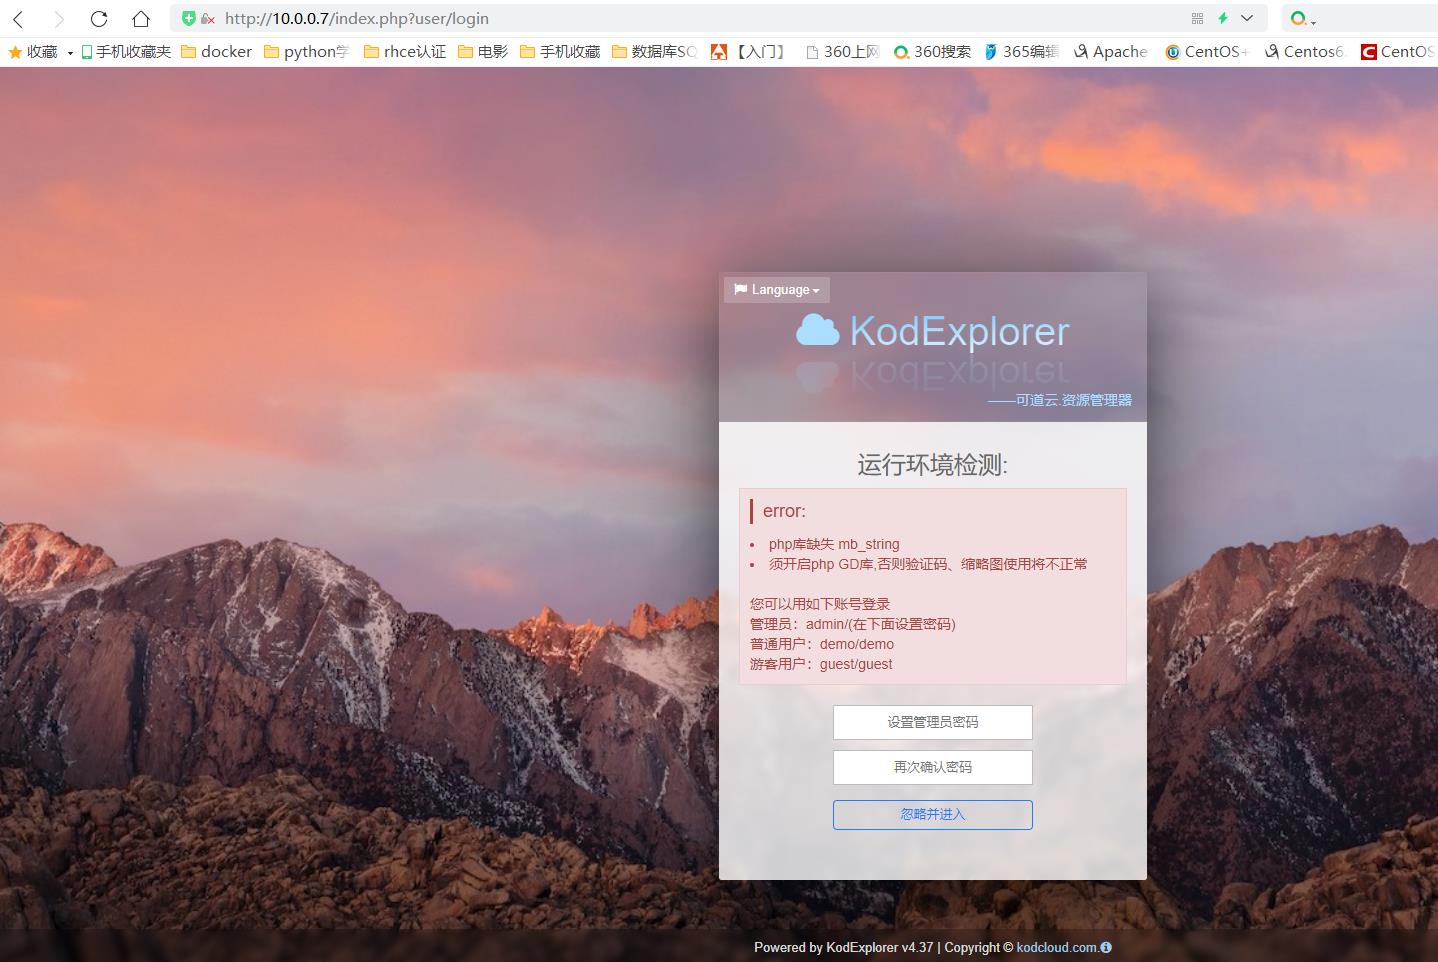
#报错,解决办法,安装以下包
[root@a3c4cedacfa0 html]# yum install php-gd php-mbstring -y
#重启httpd服务
[root@a3c4cedacfa0 html]# /etc/init.d/httpd restart
Stopping httpd: [ OK ]
Starting httpd: httpd: Could not reliably determine the server's fully qualified domain name, using 172.17.0.2 for ServerName
[ OK ]
[root@a3c4cedacfa0 html]#
#再次刷新页面


[root@web01 ~]# docker ps -a
CONTAINER ID IMAGE COMMAND CREATED STATUS PORTS NAMES
a3c4cedacfa0 centos:6.8 "/bin/bash" 4 minutes ago Up 4 minutes 0.0.0.0:80->80/tcp focused_brattain
2:编写dockerfile,构建镜像
[root@web01 Dockerfile]# mkdir kod
[root@web01 Dockerfile]# cd kod/
[root@web01 kod]# vim dockerfile
[root@web01 kod]# cat dockerfile
FROM centos:6.8
RUN yum install httpd php php-cli wget unzip php-gd php-mbstring -y
WORKDIR /var/www/html
COPY kodexplorer4.37.zip .
RUN unzip kodexplorer4.37.zip && chmod -R 777 /var/www/html
ADD init.sh /init.sh
EXPOSE 80
CMD ["/bin/bash", "/init.sh"]
#编写容器启动脚本
[root@web01 kod]# vim init.sh
[root@web01 kod]# cat init.sh
#!/bin/bash
/etc/init.d/httpd start
tail -F /var/log/httpd/access_log
#构建镜像
[root@web01 kod]# docker build -t kod:v1 .
Sending build context to Docker daemon 13.85MB
Step 1/8 : FROM centos:6.8
---> 82f3b5f3c58f
Step 2/8 : RUN yum install httpd php php-cli wget unzip php-gd php-mbstring -y
---> Running in 2ae3a641432f
Loaded plugins: fastestmirror, ovl
Setting up Install Process
....
Removing intermediate container aab8a89d4cb2
---> 76bb73852c0c
Step 6/8 : ADD init.sh /init.sh
---> fae5ed3ea37c
Step 7/8 : EXPOSE 80
---> Running in d6c3afa923d9
Removing intermediate container d6c3afa923d9
---> 3e729f2f397b
Step 8/8 : CMD ["/bin/bash", "/init.sh"]
---> Running in 6edfa9fecf90
Removing intermediate container 6edfa9fecf90
---> 5deb1a6897f5
Successfully built 5deb1a6897f5
Successfully tagged kod:v1
#查看镜像
[root@web01 kod]# docker image ls kod:v1
REPOSITORY TAG IMAGE ID CREATED SIZE
kod v1 5deb1a6897f5 4 minutes ago 429MB
3:测试运行
[root@web01 kod]# docker run -d -P --name test_kod kod:v1
3f0ffa25ad8083bbc8f143e878ecc74b339bed51dbcb72f3653e4b419dabc819
[root@web01 kod]# docker ps -a -l
CONTAINER ID IMAGE COMMAND CREATED STATUS PORTS NAMES
3f0ffa25ad80 kod:v1 "/bin/bash /init.sh" 5 seconds ago Up 5 seconds 0.0.0.0:32768->80/tcp test_kod

五、dockerfile镜像的分层
1. docker镜像的分层结构
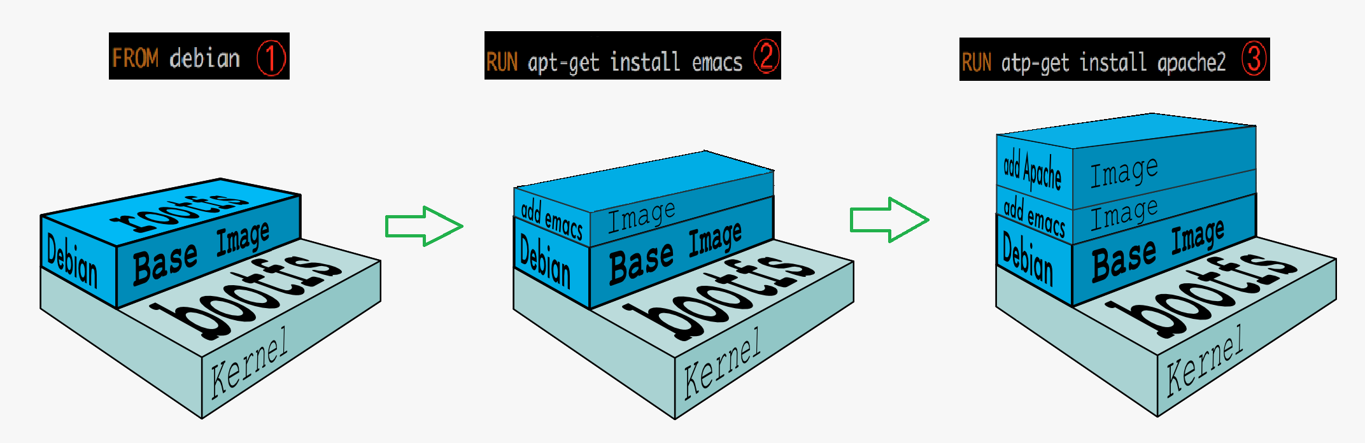
2. docker镜像分层的优点
分层的好处:共享资源,节省资源
有多个镜像都从相同的 base 镜像构建而来,那么 Docker Host 只需在磁盘上保存一份 base 镜像;同时内存中也只需加载一份 base 镜像,就可以为所有容器服务了。
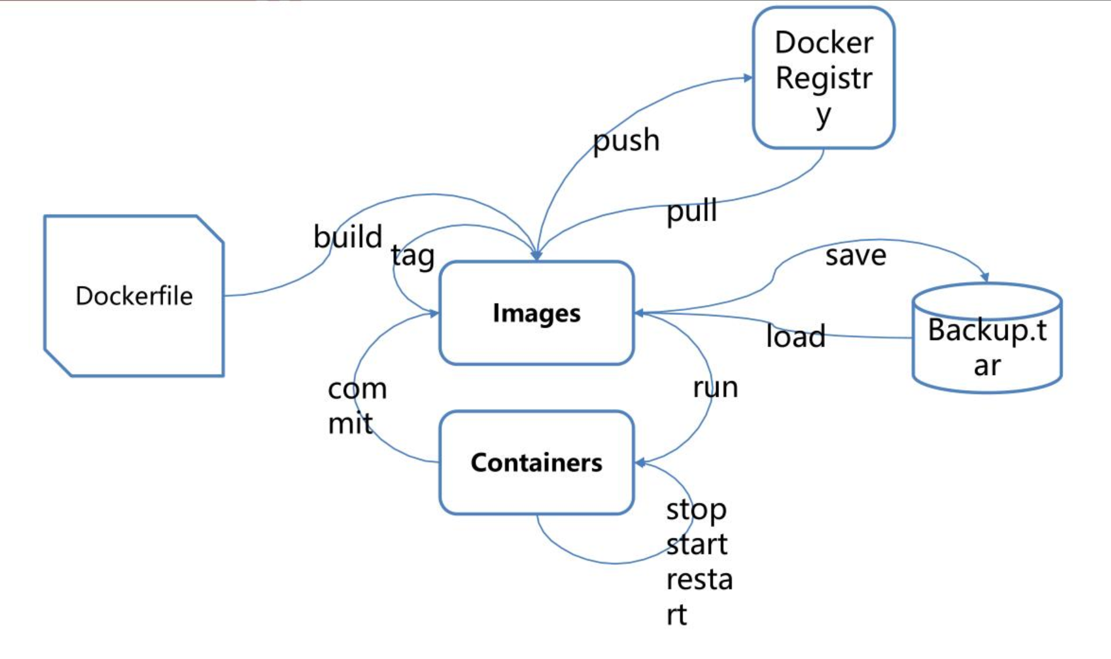
3. docker中镜像,容器,仓库之间的关系图


【推荐】国内首个AI IDE,深度理解中文开发场景,立即下载体验Trae
【推荐】编程新体验,更懂你的AI,立即体验豆包MarsCode编程助手
【推荐】抖音旗下AI助手豆包,你的智能百科全书,全免费不限次数
【推荐】轻量又高性能的 SSH 工具 IShell:AI 加持,快人一步
· Linux系列:如何用heaptrack跟踪.NET程序的非托管内存泄露
· 开发者必知的日志记录最佳实践
· SQL Server 2025 AI相关能力初探
· Linux系列:如何用 C#调用 C方法造成内存泄露
· AI与.NET技术实操系列(二):开始使用ML.NET
· 无需6万激活码!GitHub神秘组织3小时极速复刻Manus,手把手教你使用OpenManus搭建本
· C#/.NET/.NET Core优秀项目和框架2025年2月简报
· 葡萄城 AI 搜索升级:DeepSeek 加持,客户体验更智能
· 什么是nginx的强缓存和协商缓存
· 一文读懂知识蒸馏