spring boot+mybatis+quartz项目的搭建完整版
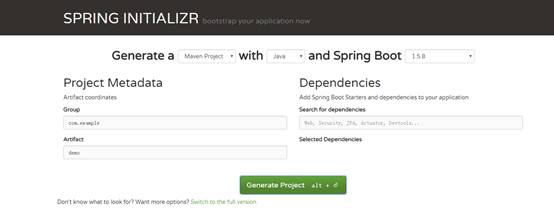
1. 利用spring boot提供的工具(http://start.spring.io/)自动生成一个标准的spring boot项目架构

2. 因为这里我们是搭建spring boot+mybatis+quartz架构,故在pom.xml文件中配置相关依赖
<dependencies>
		<dependency>
			<groupId>org.springframework.boot</groupId>
			<artifactId>spring-boot</artifactId>
			<version>1.5.8.RELEASE</version>
		</dependency>

		<dependency>
			<groupId>org.springframework.boot</groupId>
			<artifactId>spring-boot-starter</artifactId>
			<version>1.5.8.RELEASE</version>
		</dependency>

		<dependency>
			<groupId>org.springframework.boot</groupId>
			<artifactId>spring-boot-starter-web</artifactId>
			<version>1.5.8.RELEASE</version>
		</dependency>

		<dependency>
			<groupId>org.springframework.boot</groupId>
			<artifactId>spring-boot-starter-test</artifactId>
			<version>1.5.8.RELEASE</version>
			<scope>test</scope>
		</dependency>

		<dependency>
			<groupId>org.mybatis.spring.boot</groupId>
			<artifactId>mybatis-spring-boot-starter</artifactId>
			<version>1.0.0</version>
		</dependency>

		<!-- https://mvnrepository.com/artifact/mysql/mysql-connector-java -->
		<dependency>
			<groupId>mysql</groupId>
			<artifactId>mysql-connector-java</artifactId>
			<version>5.1.44</version>
		</dependency>

		<dependency>
			<groupId>com.alibaba</groupId>
			<artifactId>druid</artifactId>
			<version>1.0.11</version>
		</dependency>

		<dependency>
			<groupId>org.quartz-scheduler</groupId>
			<artifactId>quartz</artifactId>
			<version>1.8.5</version>
		</dependency>

		<dependency>
			<groupId>org.slf4j</groupId>
			<artifactId>slf4j-api</artifactId>
			<version>1.7.21</version>
		</dependency>

	</dependencies>
3. spring boot的理念是做到零配置,所以这里没有web.xml,只有一个application.yml的配置,这个时配置数据源及mybatis的mapper扫描路径
spring:
  datasource:
    url: jdbc:mysql://192.168.253.128/scheduler?useUnicode=true&characterEncoding=utf-8&autoReconnect=true&autoReconnectForPools=true
    username: sche
    password: sche
    # 使用druid数据源
    type: com.alibaba.druid.pool.DruidDataSource
    driver-class-name: com.mysql.jdbc.Driver
    filters: stat
    maxActive: 20
    initialSize: 1
    maxWait: 60000
    minIdle: 1
    timeBetweenEvictionRunsMillis: 60000
    minEvictableIdleTimeMillis: 300000
    validationQuery: select 'x'
    testWhileIdle: true
    testOnBorrow: false
    testOnReturn: false
    poolPreparedStatements: true
    maxOpenPreparedStatements: 20
  jobFactory:
    type: com.gary.operation.jobdemo.demo1.MyJobFactory

mybatis:
  mapper-locations: classpath:mapper/*.xml
  type-aliases-package: com.hq.dispach.entity
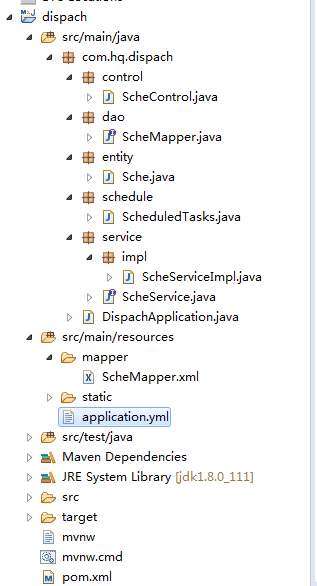
4. 这些基本的配置完成之后项目的结构如下

这里static目录是存放HTML,JavaScript等前端代码的
5. Spring boot web是不需要部署在Tomcat下的,因为自带了Tomcat,只需要执行主程序Application的main方法就可以了。但需要做些重要的配置
package com.hq.dispach;

import org.mybatis.spring.annotation.MapperScan;
import org.springframework.boot.SpringApplication;
import org.springframework.boot.autoconfigure.EnableAutoConfiguration;
import org.springframework.boot.autoconfigure.SpringBootApplication;

@SpringBootApplication
@EnableAutoConfiguration
@MapperScan("com.hq.dispach.dao")
public class DispachApplication {

	public static void main(String[] args) {
		SpringApplication.run(DispachApplication.class, args);
	}
}
这里的配置@SpringBootApplication是默认,注意第二个和第三个配置,如果缺少@MapperScan("com.hq.dispach.dao")配置则会出现dao无法注入到service的情况,如果@EnableAutoConfiguration缺少则会出现quartz任务调度里无法注入service,这里建议不管是什么应用程序都最好加上这个配置。
5. 接下来就是control,service,dao,mapper,scheduleTask的代码编写了
Control:
package com.hq.dispach.control;

import org.springframework.beans.factory.annotation.Autowired;
import org.springframework.web.bind.annotation.GetMapping;
import org.springframework.web.bind.annotation.PathVariable;
import org.springframework.web.bind.annotation.RequestMapping;
import org.springframework.web.bind.annotation.RestController;

import com.hq.dispach.entity.Sche;
import com.hq.dispach.service.ScheService;

@RestController
@RequestMapping("/scheControl")
public class ScheControl {
	@Autowired
	private ScheService scheService;

	@GetMapping("/addSche/{name}/{password}")
	public Sche findScheByNameAndPassword(@PathVariable("name") String name,
			@PathVariable("password") String password) {
		return scheService.findScheByNameAndPassword(name, password);
	}
}
Sevice:
package com.hq.dispach.service;

import com.hq.dispach.entity.Sche;

public interface ScheService {
	public Sche findScheByNameAndPassword(String name,String password);
	public String test();

}
Service实现
package com.hq.dispach.service.impl;

import org.springframework.beans.factory.annotation.Autowired;
import org.springframework.stereotype.Service;

import com.hq.dispach.dao.ScheMapper;
import com.hq.dispach.entity.Sche;
import com.hq.dispach.service.ScheService;

@Service("scheService")
public class ScheServiceImpl implements ScheService{
	@Autowired
	private ScheMapper scheMapper;

	public Sche findScheByNameAndPassword(String name, String password) {
		return scheMapper.findScheByNameAndPassword(name, password);
	}

	public String test() {
		return "schedules run";
	}
}
Dao:
package com.hq.dispach.dao;

import org.apache.ibatis.annotations.Param;

import com.hq.dispach.entity.Sche;

public interface ScheMapper {
	public Sche findScheByNameAndPassword(@Param("name") String name, @Param("password") String password);
}
Mapper:
<?xml version="1.0" encoding="UTF-8"?>
<!DOCTYPE mapper PUBLIC "-//mybatis.org//DTD Mapper 3.0//EN" "http://mybatis.org/dtd/mybatis-3-mapper.dtd" >
<mapper namespace="com.hq.dispach.dao.ScheMapper">

    <select id="findScheByNameAndPassword" resultType="com.hq.dispach.entity.Sche">
			SELECT t.`age`,t.`department`,t.`gendar`,t.`id`,t.`name`,t.`password`
			FROM sche t
			WHERE t.`name`=#{name} AND t.`password`=#{password}
    </select>

</mapper>
ScheduleTask:
package com.hq.dispach.schedule;

import org.springframework.beans.factory.annotation.Autowired;
import org.springframework.beans.factory.annotation.Configurable;
import org.springframework.scheduling.annotation.EnableScheduling;
import org.springframework.scheduling.annotation.Scheduled;
import org.springframework.stereotype.Component;

import com.hq.dispach.service.ScheService;

@Component
@Configurable
@EnableScheduling
public class ScheduledTasks{
	@Autowired
	private ScheService scheService;

    //每1分钟执行一次
    @Scheduled(cron = "0 */1 *  * * * ")
    public void reportCurrentByCron(){
    	System.out.println(scheService.test());
    }
}
Entity:
package com.hq.dispach.entity;

public class Sche {
	private String id;
	private String name;
	private String password;
	private String age;
	private String department;
	private String gendar;
	public String getId() {
		return id;
	}
	public void setId(String id) {
		this.id = id;
	}
	public String getName() {
		return name;
	}
	public void setName(String name) {
		this.name = name;
	}
	public String getPassword() {
		return password;
	}
	public void setPassword(String password) {
		this.password = password;
	}
	public String getAge() {
		return age;
	}
	public void setAge(String age) {
		this.age = age;
	}
	public String getDepartment() {
		return department;
	}
	public void setDepartment(String department) {
		this.department = department;
	}
	public String getGendar() {
		return gendar;
	}
	public void setGendar(String gendar) {
		this.gendar = gendar;
	}
}


【推荐】编程新体验,更懂你的AI,立即体验豆包MarsCode编程助手
【推荐】凌霞软件回馈社区,博客园 & 1Panel & Halo 联合会员上线
【推荐】抖音旗下AI助手豆包,你的智能百科全书,全免费不限次数
【推荐】博客园社区专享云产品让利特惠,阿里云新客6.5折上折
【推荐】轻量又高性能的 SSH 工具 IShell:AI 加持,快人一步