
创建自己的springboot starter
1.为什么要自定义starter
在日常开发工作中,有些功能独立于业务模块,比如发短信,发邮件等功能,这些模块可能在不同的项目中使用,如果每次用到这些功能时都要复制这些代码的比较麻烦,所以我们可以将这些功能独立出来,提供给业务模块引用,springboot为我们提供了一种非常简便的方式去实现.
2.创建自定义starter步骤
2.1创建两个模块 email-config 和 email-spring-boot-starter
starter模块的依赖如下
    <dependencies>
        <dependency>
            <groupId>org.springframework.boot</groupId>
            <artifactId>spring-boot-starter</artifactId>
        </dependency>

<!--        spring自动配置-->
        <dependency>
            <groupId>org.springframework.boot</groupId>
            <artifactId>spring-boot-autoconfigure</artifactId>
        </dependency>

<!--        邮件模块-->
        <dependency>
            <groupId>com.example</groupId>
            <artifactId>han-email-config</artifactId>
            <version>0.0.1-SNAPSHOT</version>
        </dependency>
    </dependencies>
spring-boot-autoconfigure 这个依赖是spring扫描自动配置需要的,没有这个依赖的话bean不会加载到spring容器,
spring-boot-configuration-processor 这个依赖是用于yml文件的自动提示,不加也没事

email-config 模块的目录结果如下:
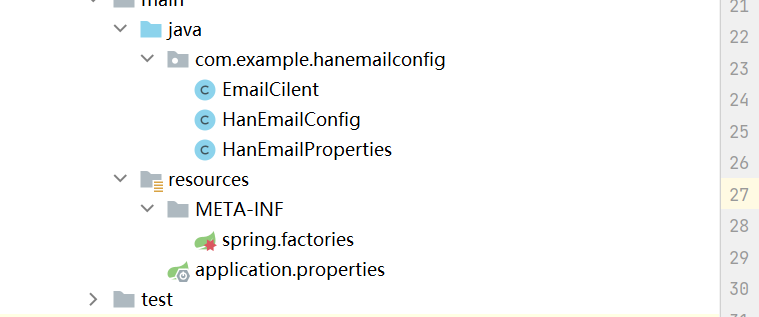
spring.factories这个文件是spring自动装配配置的文件,它指定了spring要自动加载的配置类路径;代码如下
org.springframework.boot.autoconfigure.EnableAutoConfiguration=\
com.example.hanemailconfig.HanEmailConfig
依赖如下:
    <dependencies>
        <dependency>
            <groupId>org.springframework.boot</groupId>
            <artifactId>spring-boot-starter</artifactId>
        </dependency>

        <dependency>
            <groupId>org.springframework.boot</groupId>
            <artifactId>spring-boot-configuration-processor</artifactId>
        </dependency>

    </dependencies>
spring-boot-configuration-processor 这个依赖是用于yml文件的自动提示,不加也没事
EmailCilent这个类是发送邮件的客户端:
package com.example.hanemailconfig;

public class EmailCilent {

    private String username;

    private String password;

    public void sendMsg(String msg){
        System.out.println(msg);
    }

    public String getUsername() {
        return username;
    }

    public void setUsername(String username) {
        this.username = username;
    }

    public String getPassword() {
        return password;
    }

    public void setPassword(String password) {
        this.password = password;
    }
}
HanEmailProperties 这个类是配置类,比如我们需要存邮箱的账号密码等配置信息,通过这个类可以将外部yml的配置信息绑定
package com.example.hanemailconfig;

import org.springframework.boot.context.properties.ConfigurationProperties;

@ConfigurationProperties(prefix = "hantech.email")
public class HanEmailProperties {
    private String username = "hantech";

    private String password = "123456";


    public String getUsername() {
        return username;
    }

    public void setUsername(String username) {
        this.username = username;
    }

    public String getPassword() {
        return password;
    }

    public void setPassword(String password) {
        this.password = password;
    }
}
@ConfigurationProperties(prefix = "hantech.email")这个注解会将yml配置生成bean对象,它必须与
@EnableConfigurationProperties注解搭配使用,后者的作用是使前者生效
HanEmailConfig类代码如下
package com.example.hanemailconfig;

import org.springframework.boot.context.properties.EnableConfigurationProperties;
import org.springframework.context.annotation.Bean;
import org.springframework.context.annotation.Configuration;

@Configuration
@EnableConfigurationProperties(HanEmailProperties.class)
public class HanEmailConfig {

    @Bean
    public EmailCilent getEmailClien(HanEmailProperties properties){
        EmailCilent emailCilent = new EmailCilent();
        emailCilent.setPassword(properties.getPassword());
        emailCilent.setUsername(properties.getUsername());
        return emailCilent;
    }
}
@Configuration 注解修饰表示该类为配置类,会注入到容器中
做完这些后导入依赖试试
package com.example.enable;

import com.example.hanemailconfig.EmailCilent;
import org.springframework.boot.SpringApplication;
import org.springframework.boot.autoconfigure.SpringBootApplication;
import org.springframework.context.ApplicationContext;
import org.springframework.context.ConfigurableApplicationContext;
import redis.clients.jedis.Jedis;

@SpringBootApplication
public class EnableApplication {

    public static void main(String[] args) {
        ConfigurableApplicationContext context = SpringApplication.run(EnableApplication.class, args);
//        Jedis jedis = context.getBean(Jedis.class);
//        System.out.println(jedis);

        EmailCilent emailCilent = context.getBean(EmailCilent.class);
        System.out.println(emailCilent.getPassword());
        System.out.println(emailCilent.getUsername());
        emailCilent.sendMsg("hello word");

    }

}
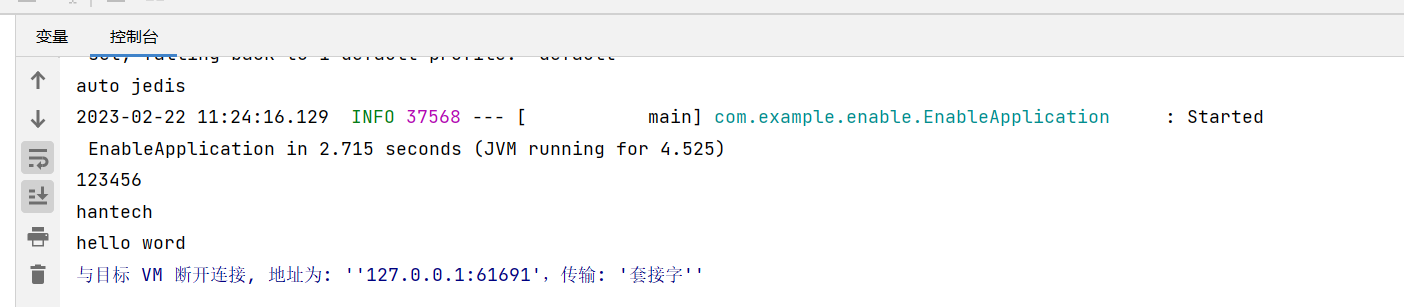
成功

