


今天介绍下FFmpeg在Linux下安装编译过程,总体过程比较顺利,就是在ffmpeg等的时间稍长点,仅当记录。
关于FFmpeg
FFmpeg是一个开源免费跨平台的视频和音频流方案,属于自由软件,采用LGPL或GPL许可证(依据你选择的组件)。它提供了录制、转换以及流化音视频的完整解决方案。它包含了非常先进的音频/视频编解码库libavcodec,为了保证高可移植性和编解码质量,libavcodec里很多codec都是从头开发的。
FFmpeg配置
在安装ffmpeg之前,首先要安装yasm
1.安装yasm
yasm是一个完全重写的NASM汇编。目前,它支持x86和AMD64指令集,接受NASM和气体汇编语法,产出二进制, ELF32 , ELF64 , COFF , Mach - O的( 32和64 ) , RDOFF2 ,的Win32和Win64对象的格式,并生成STABS 调试信息的来源,DWARF 2 ,CodeView 8格式。之所以在FFmpeg中用这个,主要是支持编译ffmpeg-x264.
1.下载yasm-1.3.0.tar.gz这个版本:
wget http://www.tortall.net/projects/yasm/releases/yasm-1.3.0.tar.gz如下:
jiangzhaowei@ubuntu$ wget http://www.tortall.net/projects/yasm/releases/yasm-1.3.0.tar.gz
--2018-01-11 19:00:40--  http://www.tortall.net/projects/yasm/releases/yasm-1.3.0.tar.gz
正在解析主机 www.tortall.net (www.tortall.net)... 69.55.226.36
正在连接 www.tortall.net (www.tortall.net)|69.55.226.36|:80... 已连接。
已发出 HTTP 请求,正在等待回应... 302 Found
位置:http://211.162.127.5/files/30290000043CE033/www.tortall.net/projects/yasm/releases/yasm-1.3.0.tar.gz [跟随至新的 URL]
--2018-01-11 19:00:41--  http://211.162.127.5/files/30290000043CE033/www.tortall.net/projects/yasm/releases/yasm-1.3.0.tar.gz
正在连接 211.162.127.5:80... 已连接。
已发出 HTTP 请求,正在等待回应... 200 OK
长度: 1492156 (1.4M) [application/octet-stream]
正在保存至: “yasm-1.3.0.tar.gz”

100%[=============================================================================================================>] 1,492,156   7.26MB/s   用时 0.2s

2018-01-11 19:00:41 (7.26 MB/s) - 已保存 “yasm-1.3.0.tar.gz” [1492156/1492156])
2.下载完成后,用开始解压
tar xzvf yasm-1.3.0.tar.gzjiangzhaowei@ubuntu$ tar xzvf yasm-1.3.0.tar.gz
yasm-1.3.0/modules/objfmts/elf/tests/elfabssect.asm yasm-1.3.0/modules/objfmts/elf/tests/curpos-err.asm yasm-1.3.0/modules/objfmts/elf/tests/elfglobext2.asm yasm-1.3.0/modules/objfmts/elf/tests/elfvisibility.errwarn yasm-1.3.0/modules/objfmts/elf/tests/curpos.hex yasm-1.3.0/modules/objfmts/elf/tests/elf-x86id.hex yasm-1.3.0/modules/objfmts/elf/tests/gas32/ yasm-1.3.0/modules/objfmts/elf/tests/gas32/Makefile.inc yasm-1.3.0/modules/objfmts/elf/tests/gas32/elf_gas32_got.hex yasm-1.3.0/modules/objfmts/elf/tests/gas32/elf_gas32_ssym.hex yasm-1.3.0/modules/objfmts/elf/tests/gas32/elf_gas32_test.sh yasm-1.3.0/modules/objfmts/elf/tests/gas32/elf_gas32_got.asm yasm-1.3.0/modules/objfmts/elf/tests/gas32/elf_gas32_ssym.asm yasm-1.3.0/modules/objfmts/elf/tests/elfcond.hex yasm-1.3.0/modules/objfmts/elf/tests/elfglobext2.hex yasm-1.3.0/modules/objfmts/elf/tests/elf_test.sh yasm-1.3.0/modules/objfmts/elf/Makefile.inc yasm-1.3.0/modules/objfmts/elf/CMakeLists.txt yasm-1.3.0/modules/objfmts/elf/elf-machine.h yasm-1.3.0/modules/objfmts/elf/elf-objfmt.c yasm-1.3.0/modules/objfmts/elf/elf-x86-x32.c
3.进入目录,开始编译
cd yasm-1.3.0
./configure
make
depbase=`echo frontends/yasm/yasm.o | sed 's|[^/]*$|.deps/&|;s|\.o$||'`;\
        gcc -std=gnu99 -DHAVE_CONFIG_H -I.     -g -O2 -MT frontends/yasm/yasm.o -MD -MP -MF $depbase.Tpo -c -o frontends/yasm/yasm.o frontends/yasm/yasm.c &&\
        mv -f $depbase.Tpo $depbase.Po
depbase=`echo frontends/yasm/yasm-options.o | sed 's|[^/]*$|.deps/&|;s|\.o$||'`;\
        gcc -std=gnu99 -DHAVE_CONFIG_H -I.     -g -O2 -MT frontends/yasm/yasm-options.o -MD -MP -MF $depbase.Tpo -c -o frontends/yasm/yasm-options.o frontends/yasm/yasm-options.c &&\
        mv -f $depbase.Tpo $depbase.Po
gcc -std=gnu99  -g -O2   -o yasm frontends/yasm/yasm.o frontends/yasm/yasm-options.o libyasm.a
depbase=`echo frontends/tasm/tasm.o | sed 's|[^/]*$|.deps/&|;s|\.o$||'`;\
        gcc -std=gnu99 -DHAVE_CONFIG_H -I.     -g -O2 -MT frontends/tasm/tasm.o -MD -MP -MF $depbase.Tpo -c -o frontends/tasm/tasm.o frontends/tasm/tasm.c &&\
        mv -f $depbase.Tpo $depbase.Po
depbase=`echo frontends/tasm/tasm-options.o | sed 's|[^/]*$|.deps/&|;s|\.o$||'`;\
        gcc -std=gnu99 -DHAVE_CONFIG_H -I.     -g -O2 -MT frontends/tasm/tasm-options.o -MD -MP -MF $depbase.Tpo -c -o frontends/tasm/tasm-options.o frontends/tasm/tasm-options.c &&\
        mv -f $depbase.Tpo $depbase.Po
gcc -std=gnu99  -g -O2   -o ytasm frontends/tasm/tasm.o frontends/tasm/tasm-options.o libyasm.a
depbase=`echo frontends/vsyasm/vsyasm.o | sed 's|[^/]*$|.deps/&|;s|\.o$||'`;\
        gcc -std=gnu99 -DHAVE_CONFIG_H -I.     -g -O2 -MT frontends/vsyasm/vsyasm.o -MD -MP -MF $depbase.Tpo -c -o frontends/vsyasm/vsyasm.o frontends/vsyasm/vsyasm.c &&\
        mv -f $depbase.Tpo $depbase.Po
gcc -std=gnu99  -g -O2   -o vsyasm frontends/vsyasm/vsyasm.o frontends/yasm/yasm-options.o libyasm.a
make[2]:正在离开目录 `/kk/jiangzhaowei/share/ffmpeg/yasm-1.3.0'
make[1]:正在离开目录 `/kk/jiangzhaowei/share/ffmpeg/yasm-1.3.0'
4.安装
sudo make install完成后如图:
Making install in .
make[2]: 正在进入目录 `/kk/jiangzhaowei/share/ffmpeg/yasm-1.3.0'
make[3]: 正在进入目录 `/kk/jiangzhaowei/share/ffmpeg/yasm-1.3.0'
 /bin/mkdir -p '/usr/local/bin'
  /usr/bin/install -c yasm ytasm vsyasm '/usr/local/bin'
 /bin/mkdir -p '/usr/local/lib'
 /usr/bin/install -c -m 644  libyasm.a '/usr/local/lib'
 ( cd '/usr/local/lib' && ranlib libyasm.a )
make  install-exec-hook
make[4]: 正在进入目录 `/kk/jiangzhaowei/share/ffmpeg/yasm-1.3.0'
make[4]: 没有什么可以做的为 `install-exec-hook'。
make[4]:正在离开目录 `/kk/jiangzhaowei/share/ffmpeg/yasm-1.3.0'
 /bin/mkdir -p '/usr/local/include'
 /usr/bin/install -c -m 644 libyasm.h '/usr/local/include'
 /bin/mkdir -p '/usr/local/share/man/man1'
 /bin/mkdir -p '/usr/local/share/man/man1'
 /usr/bin/install -c -m 644 yasm.1 '/usr/local/share/man/man1'
 /bin/mkdir -p '/usr/local/share/man/man7'
 /usr/bin/install -c -m 644 yasm_arch.7 yasm_parsers.7 yasm_dbgfmts.7 yasm_objfmts.7 '/usr/local/share/man/man7'
 /bin/mkdir -p '/usr/local/share/man/man7'
 /bin/mkdir -p '/usr/local/include/libyasm'
 /usr/bin/install -c -m 644 libyasm/arch.h libyasm/assocdat.h libyasm/bitvect.h libyasm/bytecode.h libyasm/compat-queue.h libyasm/coretype.h libyasm/dbgfmt.h libyasm/errwarn.h libyasm/expr.h libyasm/file.h libyasm/floatnum.h libyasm/hamt.h libyasm/insn.h libyasm/intnum.h libyasm/inttree.h libyasm/linemap.h libyasm/listfmt.h libyasm/md5.h libyasm/module.h libyasm/objfmt.h libyasm/parser.h libyasm/phash.h libyasm/preproc.h libyasm/section.h libyasm/symrec.h libyasm/valparam.h libyasm/value.h '/usr/local/include/libyasm'
 /bin/mkdir -p '/usr/local/include'
 /usr/bin/install -c -m 644 libyasm-stdint.h '/usr/local/include'
make[3]:正在离开目录 `/kk/jiangzhaowei/share/ffmpeg/yasm-1.3.0'
make[2]:正在离开目录 `/kk/jiangzhaowei/share/ffmpeg/yasm-1.3.0'
make[1]:正在离开目录 `/kk/jiangzhaowei/share/ffmpeg/yasm-1.3.0'
5.开始下载FFmpeg,这里下载3.1.3 release ffmpeg的版本
jiangzhaowei@ubuntu$ wget http://ffmpeg.org/releases/ffmpeg-3.1.3.tar.gz
--2018-01-11 19:07:58--  http://ffmpeg.org/releases/ffmpeg-3.1.3.tar.gz
正在解析主机 ffmpeg.org (ffmpeg.org)... 79.124.17.100
正在连接 ffmpeg.org (ffmpeg.org)|79.124.17.100|:80... 已连接。
已发出 HTTP 请求,正在等待回应... 200 OK
长度: 11645295 (11M) [application/x-gzip]
正在保存至: “ffmpeg-3.1.3.tar.gz”

100%[=============================================================================================================>] 11,645,295  93.1KB/s   用时 94s

2018-01-11 19:09:33 (120 KB/s) - 已保存 “ffmpeg-3.1.3.tar.gz” [11645295/11645295])
6.下载完成后,用开始解压
tar -zxvf ffmpeg-3.1.3.tar.gz
或者其它压缩格式:
tar jxvf ffmpeg-3.4.1.tar.bz2
7.进入目录,开始编译
cd ffmpeg-3.1.3
./configure
make -j
X86ASM libavcodec/x86/simple_idct.o STRIP libavcodec/x86/vp8dsp_loopfilter.o STRIP libavcodec/x86/hevc_deblock.o STRIP libavcodec/x86/vp9itxfm.o AR libavcodec/libavcodec.a LD ffmpeg_g LD ffprobe_g LD ffserver_g STRIP ffserver STRIP ffmpeg STRIP ffprobe
8.安装
sudo make install
FFmpeg HTTP媒体播放服务器:
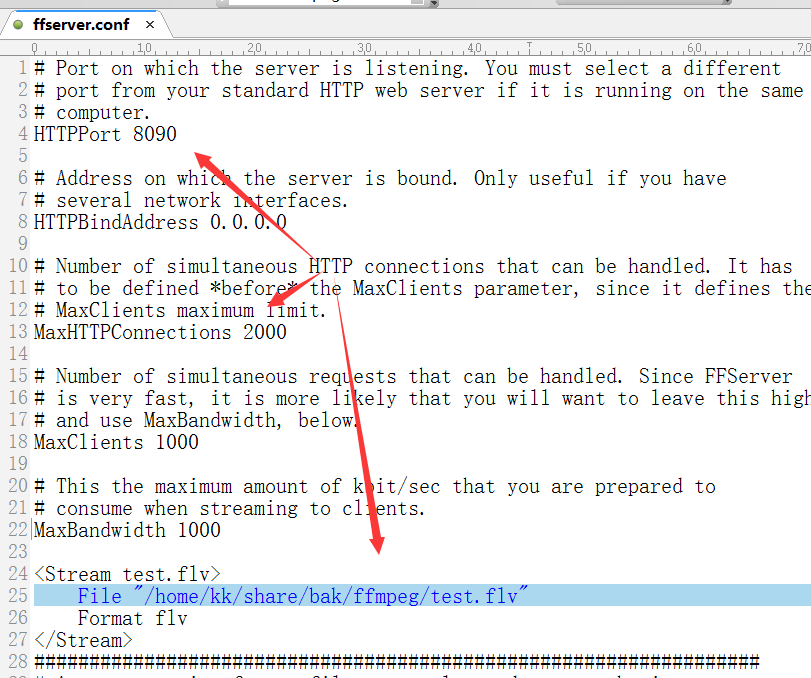
1.“ffserver.conf”配置服务器端口、最大连接数以及媒体本地路径。
2. 启动FFmpeg服务器:
kk@ubuntu:~/share/bak/ffmpeg$ ffserver -f ffserver.conf
ffserver version 3.4.1 Copyright (c) 2000-2017 the FFmpeg developers
  built with gcc 4.6 (Ubuntu/Linaro 4.6.3-1ubuntu5)
  configuration:
  libavutil      55. 78.100 / 55. 78.100
  libavcodec     57.107.100 / 57.107.100
  libavformat    57. 83.100 / 57. 83.100
  libavdevice    57. 10.100 / 57. 10.100
  libavfilter     6.107.100 /  6.107.100
  libswscale      4.  8.100 /  4.  8.100
  libswresample   2.  9.100 /  2.  9.100
ffserver.conf:164: Setting default value for video bit rate tolerance = 21333. Use NoDefaults to disable it.
ffserver.conf:164: Setting default value for video rate control equation = tex^qComp. Use NoDefaults to disable it.
ffserver.conf:164: Setting default value for video max rate = 128000. Use NoDefaults to disable it.
ffserver.conf:219: Setting default value for audio sample rate = 22050. Use NoDefaults to disable it.
ffserver.conf:219: Setting default value for audio channel count = 1. Use NoDefaults to disable it.
ffserver.conf:219: Setting default value for video bit rate tolerance = 64000. Use NoDefaults to disable it.
ffserver.conf:219: Setting default value for video rate control equation = tex^qComp. Use NoDefaults to disable it.
ffserver.conf:219: Setting default value for video max rate = 512000. Use NoDefaults to disable it.
Thu Jan 11 01:12:14 2018 Opening feed file '/home/kk/share/bak/ffmpeg/test.flv' for stream 'test.flv'          //表示已经接收到播放请求
Thu Jan 11 01:12:14 2018 [ffm @ 0x9a85c20]Using AVStream.codec to pass codec parameters to muxers is deprecated, use AVStream.codecpar instead.
Thu Jan 11 01:12:14 2018 [ffm @ 0x9a85c20]Using AVStream.codec to pass codec parameters to muxers is deprecated, use AVStream.codecpar instead.
Thu Jan 11 01:12:14 2018 [ffm @ 0x9a85c20]Using AVStream.codec to pass codec parameters to muxers is deprecated, use AVStream.codecpar instead.
Thu Jan 11 01:12:14 2018 [ffm @ 0x9a85c20]Using AVStream.codec to pass codec parameters to muxers is deprecated, use AVStream.codecpar instead.
Thu Jan 11 01:12:14 2018 FFserver started.
Thu Jan 11 01:12:58 2018 [flv @ 0x9a97d20]Using AVStream.codec to pass codec parameters to muxers is deprecated, use AVStream.codecpar instead.
Thu Jan 11 01:12:58 2018 [flv @ 0x9a97d20]Using AVStream.codec to pass codec parameters to muxers is deprecated, use AVStream.codecpar instead.
Thu Jan 11 01:15:16 2018 192.168.199.141 - - [GET] "/test.flv HTTP/1.1" 200 23121984
Thu Jan 11 01:24:32 2018 192.168.199.141 - - [GET] "/test.flv HTTP/1.1" 200 3148385
Thu Jan 11 01:26:36 2018 192.168.199.164 - - [GET] "/test.flv HTTP/1.1" 200 11771070
Thu Jan 11 01:31:24 2018 192.168.199.164 - - [GET] "/test.flv HTTP/1.1" 200 3707111
Thu Jan 11 01:46:58 2018 192.168.199.164 - - [GET] "/test.flv HTTP/1.1" 200 146509
Thu Jan 11 02:13:11 2018 192.168.199.164 - - [GET] "/test.flv HTTP/1.1" 200 23121984
Thu Jan 11 02:14:26 2018 192.168.199.164 - - [GET] "/test.flv HTTP/1.1" 200 176099
Thu Jan 11 02:27:17 2018 192.168.199.164 - - [GET] "/test.flv HTTP/1.1" 200 2324539
Thu Jan 11 02:28:39 2018 192.168.199.164 - - [GET] "/test.flv HTTP/1.1" 200 23121984
Thu Jan 11 02:29:04 2018 192.168.199.164 - - [GET] "/test.flv HTTP/1.1" 200 23121984
Thu Jan 11 02:29:15 2018 192.168.199.164 - - [GET] "/test.flv HTTP/1.1" 200 8393075
Thu Jan 11 02:36:37 2018 192.168.199.164 - - [GET] "/test.flv HTTP/1.1" 200 23121984
Thu Jan 11 02:36:55 2018 192.168.199.164 - - [GET] "/test.flv HTTP/1.1" 200 170610
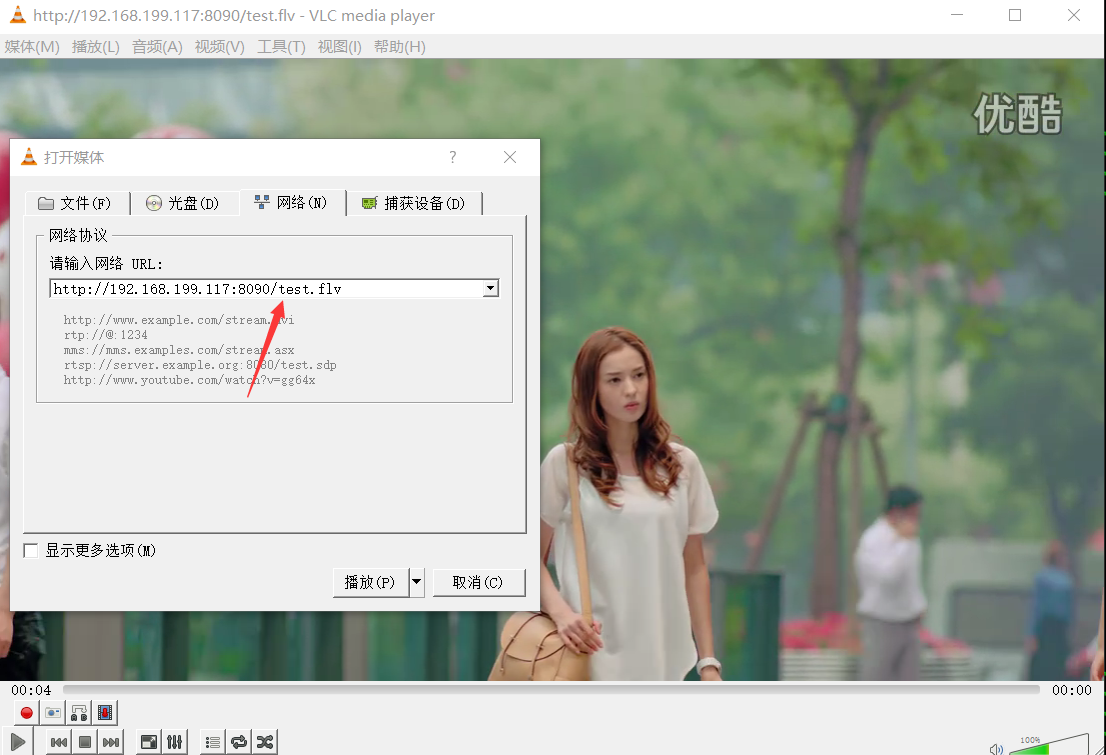
3.另外一台客户端PC,使用VLC可以测试FFmpeg服务器
VLC菜单栏->媒体->打开网络串流,就可以正常播放HTTP服务器流媒体了。
或者外网测试:

实例用法
编译完成后,自然希望能我们有所作用,否则也不会没事编译ffmpeg。
1.把视频的前120帧转换成一个gif图,大小指定为230*450:
ffmpeg -i device-2016-08-25-193402.mp4 -vframes 120 -s 230x405 -y -f gif Super3.gif
2.调用ffmpeg命令将一个视频转成3gp格式:
ffmpeg -i device-2016-08-25-193402.mp4 -y -b 20 -s sqcif -r 10 -acodec amr_wb -ab 23.85 -ac 1 -ar 16000 video.3gp
其他FFmpeg使用
语法:ffmpeg [[options][`-i’ input_file]]… {[options] output_file}…
-
截取一张352x240尺寸大小的,格式为jpg的图片
ffmpeg -i test.asf -y -f image2 -t 0.001 -s 352x240 s.jpg -
截取指定时间的缩略图
ffmpeg -i test.avi -y -f image2 -ss 8 -t 0.001 -s 350x240 test.jpg
-ss后跟的时间单位为秒 -
转换文件为3GP格式
ffmpeg -y -i test.mpeg -bitexact -vcodec h263 -b 128 -r 15 -s 176x144
-acodec aac -ac 2 -ar 22500 -ab 24 -f 3gp test.3gp
或 ffmpeg -y -i test.wmv -ac 1 -acodec libamr_nb -ar 8000 -ab 12200 -s 176x144 -b 128 -r 15 test.3gp -
视频格式转换
如何使用 ffmpeg 编码得到高质量的视频
ffmpeg.exe -i “c:device-2016-08-25-193402.mp4” -target film-dvd -s 720x352
-padtop 64 -padbottom 64 -maxrate 7350000 -b 3700000 -sc_threshold 1000000000
-trellis -cgop -g 12 -bf 2 -qblur 0.3 -qcomp 0.7 -me full -dc 10 -mbd 2
-aspect 16:9 -pass 2 -passlogfile “D:Videoffmpegencode” -an -f mpeg2video “D:Fearless.m2v” -
转换指定格式文件到FLV格式
ffmpeg.exe -i meng.mp3 -ab 56 -ar 22050 -b 500 -r 15 -s 320x240 f:/device-2016-09.flv
ffmpeg.exe -i meng.wmv -ab 56 -ar 22050 -b 500 -r 15 -s 320x240 f:/device-2016-09.flv -
转换文件为MP4格式
ffmpeg -y -i input.wmv -f mp4 -async 1-s 480x320 -acodec libfaac -vcodec libxvid -qscale 7 -dts_delta_threshold 1 output.mp4
ffmpeg -y -i source_video.avi input -acodec libfaac -ab 128000 -vcodec mpeg4 -b 1200000 -mbd 2 -flags +4mv+trell -aic 2 -cmp 2 -subcmp 2 -s 320x180 -title X final_video.mp4 -
使用ffmpeg录像屏幕
ffmpeg -vcodec mpeg4 -b 1000 -r 10 -g 300 -vd x11:0,0 -s 1024x768 ~/device-2016-09-02-193402.avi
:其中,-vd x11:0,0 指录制所使用的偏移为 x=0 和 y=0,-s 1024×768 指录制视频的大小为 1024×768。录制的视频文件为 test.avi,将保存到用户主目录中
如果你只想录制一个应用程序窗口或者桌面上的一个固定区域,那么可以指定偏移位置和区域大小。使用xwininfo -frame命令可以完成查找上述参数。 -
重新调整视频尺寸大小
ffmpeg -vcodec mpeg4 -b 1000 -r 10 -g 300 -i ~/device-2016-08-25-193402.avi -s 800×600 ~/device-2016-08-25-193402-800-600.avi
注:ffmpeg的屏幕录制功能只能在Linux环境下有效。 -
视频采集
把摄像头的实时视频录制下来,存储为文件
ffmpeg -f video4linux -s 320*240 -r 10 -i /dev/video0 test.asf
