如何发布Maven依赖到中央仓库
如何发布Maven依赖到中央仓库
平时我们都是从Maven中央仓库下载依赖,如果我们想发布我们自己写的Maven依赖到中央仓库供别人下载使用应该怎么办?这里以上传自己写的simian-maven-plugin(https://github.com/jiangxincode/simian-maven-plugin)的实际过程为例说明如何发布Maven依赖到中央仓库。
开始之前,请注意几个地址:
1、工单管理:https://issues.sonatype.org/secure/Dashboard.jspa
说明:注册账号、创建和管理issue,依赖的发布是以解决issue的方式起步的。
2、缓存仓库:https://oss.sonatype.org/#stagingRepositories
说明:当我们发布非SNAPSHOT版本时,会先将依赖上传到该过渡仓库,之后才能正式发布到中央仓库。
创建工单
访问工单管理的网址:https://issues.sonatype.org/secure/Dashboard.jspa。
如果之前没有注册过sonatype账号,需要先注册一个账号,注册过程本文不在赘述,务必记住用户名和密码。
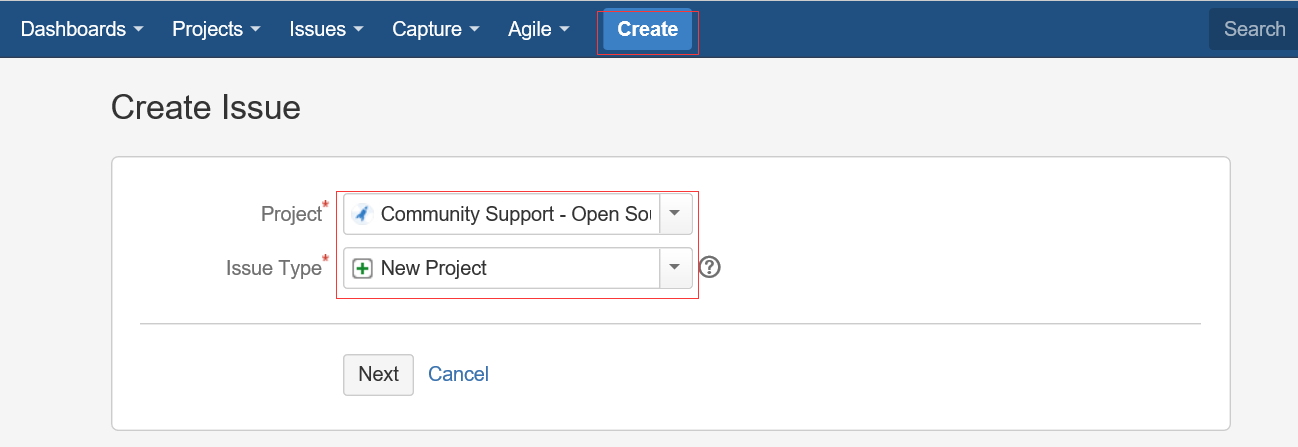
Create Issue 填写内容说明:

Step 1
- Project:Community Support - Open Source Project Repository Hosting
- Issue Type:New Project
Step 2
- Summary:依赖名称,如:simian-maven-plugin
- Group Id:对应你的依赖的groupId,如com.github.jiangxincode
- Project URL:项目站点,如:https://github.com/jiangxincode/simian-maven-plugin
- SCM url:项目源码仓库,如:https://github.com/jiangxincode/simian-maven-plugin.git
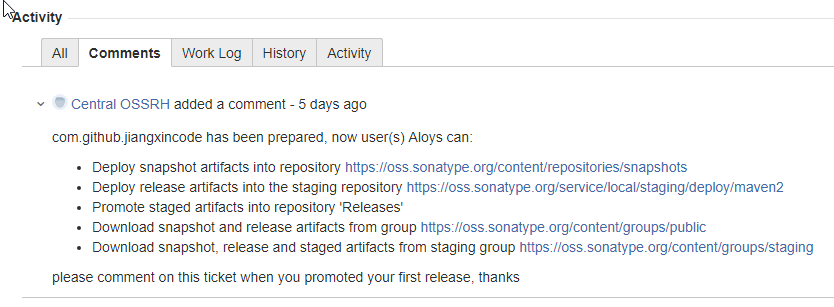
其他内容不用填写,创建Issue后需要等待一小段时间,Sonatype的工作人员审核处理,速度还是很快的,一般一个工作日以内,当Issue的Status变为RESOLVED后,就可以进行下一步操作了。


配置pom.xml
在工程的pom.xml文件中,引入Sonatype官方的一个通用配置oss-parent,这样做的好处是很多pom.xml的发布配置不需要自己配置了:
    <parent>
        <groupId>org.sonatype.oss</groupId>
        <artifactId>oss-parent</artifactId>
        <version>7</version>
    </parent>
并增加Licenses、SCM、Developers信息:
    <licenses>
        <license>
            <name>The Apache Software License, Version 2.0</name>
            <url>http://www.apache.org/licenses/LICENSE-2.0.txt</url>
            <distribution>repo</distribution>
        </license>
    </licenses>
    <scm>
        <tag>master</tag>
        <url>git@github.com:jiangxincode/simian-maven-plugin.git</url>
        <connection>scm:git:git@github.com:jiangxincode/simian-maven-plugin.git</connection>
        <developerConnection>scm:git:git@github.com:jiangxincode/simian-maven-plugin.git</developerConnection>
    </scm>
    <developers>
        <developer>
            <name>Aloys</name>
            <email>jiangxinnju@163.com</email>
            <organization>Github</organization>
        </developer>
    </developers>
修改maven配置文件settings.xml,在servers中增加server配置。
  <servers>
    <server>
      <id>sonatype-nexus-snapshots</id>
      <username>Sonatype 账号</username>
      <password>Sonatype 密码</password>
    </server>
    <server>
      <id>sonatype-nexus-staging</id>
      <username>Sonatype 账号</username>
      <password>Sonatype 密码</password>
    </server>
  </servers>
配置gpg-key
sonatype为了验证上传的依赖是我本人操作或者我授权其他人操作,需要验证上传依赖的签名,这样的话就需要一对密钥,我们保留私钥并进行签名,同时把公钥上传到公钥服务器,sonatype通过公钥验证上传的依赖是否是我本人操作。sonatype现在支持gpg对称加密方式,有关gpg的更多内容可以访问阮一峰老师的博客:
http://www.ruanyifeng.com/blog/2013/07/gpg.html
以Windows为例,如果你安装了Git(https://git-scm.com/)则已经有了gpg工具,如果没有可以单独下载gpg4win(https://www.gpg4win.org/download.html)。以Git自带的gpg工具为例,生成密钥方式如下:
jiang@windows MINGW64 /d/temp/Java/simian-maven-plugin (master)
$ gpg --gen-key
gpg (GnuPG) 1.4.22; Copyright (C) 2015 Free Software Foundation, Inc.
This is free software: you are free to change and redistribute it.
There is NO WARRANTY, to the extent permitted by law.

gpg: directory `/c/Users/jiang/.gnupg' created
gpg: new configuration file `/c/Users/jiang/.gnupg/gpg.conf' created
gpg: WARNING: options in `/c/Users/jiang/.gnupg/gpg.conf' are not yet active during this run
gpg: keyring `/c/Users/jiang/.gnupg/secring.gpg' created
gpg: keyring `/c/Users/jiang/.gnupg/pubring.gpg' created
Please select what kind of key you want:
   (1) RSA and RSA (default)
   (2) DSA and Elgamal
   (3) DSA (sign only)
   (4) RSA (sign only)
Your selection?
RSA keys may be between 1024 and 4096 bits long.
What keysize do you want? (2048)
Requested keysize is 2048 bits
Please specify how long the key should be valid.
         0 = key does not expire
      <n>  = key expires in n days
      <n>w = key expires in n weeks
      <n>m = key expires in n months
      <n>y = key expires in n years
Key is valid for? (0)
Key does not expire at all
Is this correct? (y/N) y

You need a user ID to identify your key; the software constructs the user ID
from the Real Name, Comment and Email Address in this form:
    "Heinrich Heine (Der Dichter) <heinrichh@duesseldorf.de>"

Real name: Aloys
Email address: jiangxinnju@163.com
Comment: for sonatype
You selected this USER-ID:
    "Aloys (for sonatype) <jiangxinnju@163.com>"

Change (N)ame, (C)omment, (E)mail or (O)kay/(Q)uit? C
Comment: JiangXin
You selected this USER-ID:
    "Aloys (JiangXin) <jiangxinnju@163.com>"

Change (N)ame, (C)omment, (E)mail or (O)kay/(Q)uit? O
You need a Passphrase to protect your secret key.    **********

We need to generate a lot of random bytes. It is a good idea to perform
some other action (type on the keyboard, move the mouse, utilize the
disks) during the prime generation; this gives the random number
generator a better chance to gain enough entropy.
........+++++
...........+++++
We need to generate a lot of random bytes. It is a good idea to perform
some other action (type on the keyboard, move the mouse, utilize the
disks) during the prime generation; this gives the random number
generator a better chance to gain enough entropy.
.+++++
+++++
gpg: /c/Users/jiang/.gnupg/trustdb.gpg: trustdb created
gpg: key 2AB935A0 marked as ultimately trusted
public and secret key created and signed.

gpg: checking the trustdb
gpg: 3 marginal(s) needed, 1 complete(s) needed, PGP trust model
gpg: depth: 0  valid:   1  signed:   0  trust: 0-, 0q, 0n, 0m, 0f, 1u
pub   2048R/2AB935A0 2018-10-28
      Key fingerprint = A5C1 8750 A311 0057 671C  D8B7 A14C A7F2 2AB9 35A0
uid                  Aloys (JiangXin) <jiangxinnju@163.com>
sub   2048R/94B6D362 2018-10-28
过程中需要填写名字、邮箱等,其他步骤可以使用默认值,其中需要出入Passphase,这个相当于是是密钥的密码,请务必记住该密码,之后发布过程中会用到。
操作之后打开命令行窗口,查看gpg key并上传到第三方的key验证库:
jiang@windows MINGW64 /d/temp/Java/simian-maven-plugin (master)
$ gpg --list-keys
/c/Users/jiang/.gnupg/pubring.gpg
---------------------------------
pub   2048R/2AB935A0 2018-10-28
uid                  Aloys (JiangXin) <jiangxinnju@163.com>
sub   2048R/94B6D362 2018-10-28


jiang@windows MINGW64 /d/temp/Java/simian-maven-plugin (master)
$ gpg --keyserver hkp://keyserver.ubuntu.com:11371 --send-keys 2AB935A0
gpg: sending key 2AB935A0 to hkp server keyserver.ubuntu.com
我们可以验证下是否上传成功:
jiang@windows MINGW64 /d/temp/Java/simian-maven-plugin (master)
$ gpg --keyserver hkp://keyserver.ubuntu.com:11371 --recv-keys 94B6D362
gpg: requesting key 94B6D362 from hkp server keyserver.ubuntu.com
gpg: key 2AB935A0: "Aloys (JiangXin) <jiangxinnju@163.com>" not changed
gpg: Total number processed: 1
gpg:              unchanged: 1
部署依赖到stagingRepositories
执行如下命令部署插件,中途会要求输入密钥的密码:
mvn clean deploy -P sonatype-oss-release
如果使用eclipse的mvn插件发布的话,配置如下:

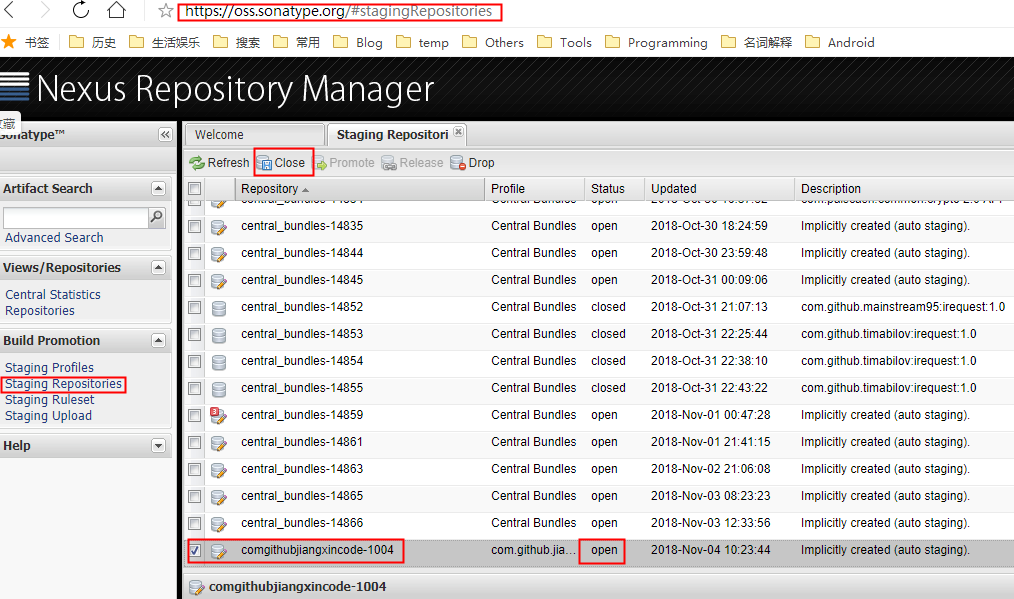
如果发布成功,就可以到stagingRepositories(https://oss.sonatype.org/#stagingRepositories)中查看了。
发布到中央仓库
进入stagingRepositories查看发布好的构件,点击左侧的Staging
Repositories,一般最后一个就是刚刚发布的依赖,此时的构件状态为open。

选中刚才发布的构件,并点击上方的Close–>Confirm,在下边的Activity选项卡中查看状态,当状态变成closed后,执行Release–>Confirm,并在下边的Activity选项卡中查看状态,成功后构件自动删除,一小段时间(约10分钟)后即可同步到maven的中央仓库,再过1-2个小时就可以搜索到该依赖了(https://search.maven.org)。
其它问题
配置pom.xml时,为什么没有配置仓库的地址?
为什么我只是在settings.xml中配置了id,又没有配置这个id对应的服务器地址,Maven是如果找到我想上传的服务器地址?
还记的之前我们在pom.xml中配置的<parent>节点么?这个节点中有如下内容:
    <distributionManagement>
        <snapshotRepository>
            <id>sonatype-nexus-snapshots</id>
            <name>Sonatype Nexus Snapshots</name>
            <url>${sonatypeOssDistMgmtSnapshotsUrl}</url>
        </snapshotRepository>
        <repository>
            <id>sonatype-nexus-staging</id>
            <name>Nexus Release Repository</name>
            <url>https://oss.sonatype.org/service/local/staging/deploy/maven2/</url>
        </repository>
    </distributionManagement>
我们的项目相当于继承了这个配置,所以Maven根据我们在settings.xml中配置的id找到pom.xml中配置的url来上传依赖。
其实我们完全可以不配置<parent>节点,而是根据实际需要自己配置对应的内容,只不过麻烦些,对新手不太友好。
我上传的依赖会自动签名么?
会的,别忘了之前配置的<parent>,里面有如下插件:
<plugin>
    <groupId>org.apache.maven.plugins</groupId>
    <artifactId>maven-gpg-plugin</artifactId>
    <version>1.5</version>
    <executions>
        <execution>
            <phase>verify</phase>
            <goals>
                <goal>sign</goal>
            </goals>
        </execution>
    </executions>
</plugin>
在执行mvn clean deploy -P
sonatype-oss-release时每次需要我们输入密钥的密码,比较麻烦,你可以在settings.xml或者pom.xml的做如下配置:
<plugin>
    <groupId>org.apache.maven.plugins</groupId>
    <artifactId>maven-gpg-plugin</artifactId>
    <version>1.5</version>
    <executions>
        <execution>
            <phase>verify</phase>
            <goals>
                <goal>sign</goal>
            </goals>
        </execution>
    </executions>
</plugin>
此时执行mvn clean deploy -P sonatype-oss-release就不用输入密码了。但是此时文件中会有密码存储,不太安全,不推荐。建议随便配个字符串,然后在执行命令时覆盖:
mvn clean deploy -P sonatype-oss-release -Darguments="gpg.passphrase=password"
安全和方便总是不可兼得,各取所需。
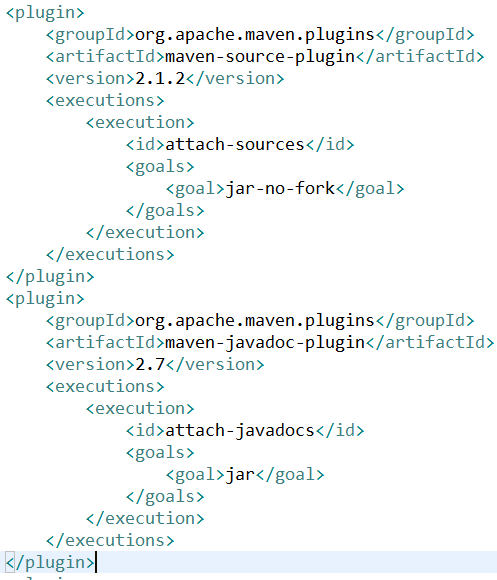
如何配置生成javadoc和sources?
只要按照之前的章节配置了<parent>节点,就不需要单独配置,因为已经继承了如下内容:

如果不符合想要的效果,可以在pom.xml中覆盖修改。
Snapshot/Staging/Release仓库的地址分别是什么?
其中sonatype-nexus-snapshots和sonatype-nexus-staging仓库的地址可以在
sonatype-nexus-snapshots:
https://oss.sonatype.org/content/repositories/snapshots/
sonatype-nexus-staging:
https://oss.sonatype.org/service/local/staging/deploy/maven2/
sonatype-nexus-release:
https://repo1.maven.org/maven2
Maven怎么知道把我的依赖上传到哪个仓库?
maven会根据模块的版本号中是否带有-SNAPSHOT来判断是快照版本还是正式版本。如果是快照版本,那么在mvn
deploy时会自动发布到快照版本库中,而使用快照版本的模块,在不更改版本号的情况下,直接编译打包时,maven会自动从镜像服务器上下载最新的快照版本。如果是正式发布版本,那么在mvn
deploy时会自动发布到正式版本库中,而使用正式版本的模块,在不更改版本号的情况下,编译打包时如果本地已经存在该版本的模块则不会主动去镜像服务器上下载。
所以,我们在开发阶段,可以将公用库的版本设置为快照版本,而被依赖组件则引用快照版本进行开发,在公用库的快照版本更新后,我们也不需要修改pom文件提示版本号来下载新的版本,直接mvn执行相关编译、打包命令即可重新下载最新的快照库了,从而也方便了我们进行开发。
每次发布,如果要切换发布仓库都要修改版本号,有没有办法简化?
在pom.xml中做如下配置:
    <groupId>com.github.jiangxincode</groupId>
    <artifactId>simian-maven-plugin</artifactId>
    <version>${project.release.version}</version>
    <packaging>maven-plugin</packaging>
    <name>Simian Maven Plugin</name>
    <url>https://github.com/jiangxincode/simian-maven-plugin</url>
    <properties>
        <project.release.version>0.0.5-SNAPSHOT</project.release.version>
    </properties>
    <profiles>
        <profile>
            <id>sonatype-oss-release</id>
        <properties>
            <project.release.version>0.0.5</project.release.version>
        </properties>
        </profile>
    </profiles>
首先我们看到pom文件中version的定义是采用占位符的形式,这样的好处是可以根据不同的profile来替换版本信息。
如果在发布时使用mvn deploy -P sonatype-oss-release
的命令,那么会自动使用0.0.5作为发布版本,那么根据maven处理snapshot和release的规则,由于版本号后不带-SNAPSHOT故当成是正式发布版本,会被发布到release仓库;
如果发布时使用mvn
deploy命令,那么就会使用默认的版本号0.0.5-SNAPSHOT,此时maven会认为是快照版本,会自动发布到快照版本库。
部署到snapshot仓库时,jar包会带上时间戳,怎么办?

这没关系,maven会自动取相应版本最新的jar包;
提交到release仓库是,报错怎么办?
报错信息如下:
Failed to execute goal org.apache.maven.plugins:maven-deploy-plugin:2.8.2:deploy
(default-deploy) on project simian-maven-plugin: Failed to deploy artifacts:
Could not transfer artifact...from/to release...
这是因为elease的部署策略是【disable
redeploy】,不允许覆盖更新组件。修改一下版本号,再提交即可。
如何在Github项目中添加maven版本badge?
如果你想达到下图的效果,只需要在README.md中添加如下内容,注意根据实际情况修改:

如何上传非开源Jar包到Maven中央仓库
假设我们的groupId为com.github.jiangxincode,artifact为simian,版本为2.5.10。那么首先我们会有一个simian-2.5.10.jar,然后新建一个README文件和License文件,内容可以为空也可以根据实际情况填写,利用如下命令打包成simian-2.5.10-sources.jar:
jar -cvf simian-2.5.10-javadoc.jar license.pdf README
同理生成simian-2.5.10-sources.jar,那么我们现在有如下三个包了:
simian-2.5.10.jar
simian-2.5.10-sources.jar
simian-2.5.10-javadoc.jar
然后我们需要编辑一个pom文件,名称为simian-2.5.10.pom:
<project
    xmlns="http://maven.apache.org/POM/4.0.0"
    xmlns:xsi="http://www.w3.org/2001/XMLSchema-instance" xsi:schemaLocation="http://maven.apache.org/POM/4.0.0 http://maven.apache.org/xsd/maven-4.0.0.xsd">
    <modelVersion>4.0.0</modelVersion>
    <groupId>com.github.jiangxincode</groupId>
    <artifactId>simian</artifactId>
    <version>2.5.10</version>
    <packaging>jar</packaging>
    <name>Simian</name>
    <description>Simian (Similarity Analyser) identifies duplication in Java, C#, C, C++, COBOL, Ruby, JSP, ASP, HTML, XML, Visual Basic, Groovy source code and even plain text files. In fact, simian can be used on any human readable files such as ini files, deployment descriptors, you name it.</description>
    <url>http://www.harukizaemon.com/simian/index.html</url>
    <licenses>
        <license>
            <name>Simian Software License Agreement</name>
            <url>http://www.harukizaemon.com/simian/license.pdf</url>
        </license>
    </licenses>
    <scm>
        <url>git@harukizaemon.com:simian/simian-git.git</url>
        <connection>scm:git:git@harukizaemon.com:simian/simian-git.git</connection>
        <developerConnection>scm:git:git@harukizaemon.com:simian/simian-git.git</developerConnection>
    </scm>
    <developers>
        <developer>
            <name>haruki_zaemon</name>
            <email>haruki_zaemon@mac.com</email>
        </developer>
    </developers>
</project>
以上pom文件根据实际内容填写,注意groupId,artifactId,version不能有错误,其次是packaging要填jar。scm节点中填写一个git地址,和代码没关系也行。
完成这一步后我们有四个文件分别为:
- simian-2.5.10.jar
- simian-2.5.10-sources.jar
- simian-2.5.10-javadoc.jar
- simian-2.5.10.pom
然后依次运行gpg命令签名这四个文件,以pom文件为例:
gpg -ab simian-2.5.10.pom
然后会得到对应的asc文件,最后文件列表为
- simian-2.5.10.jar
- simian-2.5.10.jar.asc
- simian-2.5.10-sources.jar
- simian-2.5.10-sources.jar.asc
- simian-2.5.10-javadoc.jar
- simian-2.5.10-javadoc.jar.asc
- simian-2.5.10.pom
- simian-2.5.10.pom.asc
接下来需要把八个文件打成一个bundle.jar,命令示例:
jar -cvf bundle.jar simian-2.5.10\*
打开并登陆https://oss.sonatype.org/#welcome,点击Staging
Upload选项
点击Staging Upload后,在Upload Mode后有个下拉选框,选择Artifact
bundle,然后select bundle,找到之前生成的bundle.jar,点击上传按钮。

上传后会在上图的Staging
Repositories中有显示。之后的步骤就不在赘述了,和上传开源依赖是完全一样的。
参考内容
- Github开源Java项目(IJPay)上传到Maven Central
详细介绍:https://blog.csdn.net/zyw_java/article/details/77802615


