Windows平台下安装Eclipse插件,开发Hadoop应用
欢迎和大家交流技术相关问题:
邮箱: jiangxinnju@163.com
博客园地址: http://www.cnblogs.com/jiangxinnju
GitHub地址: https://github.com/jiangxincode
知乎地址: https://www.zhihu.com/people/jiangxinnju
安装插件
将hadoop安装包hadoop\contrib\eclipse-plugin\hadoop-0.20.2-eclipse-plugin.jar拷贝到eclipse的插件目录plugins下。
需要注意的是插件版本(及后面开发导入的所有jar包)与运行的hadoop一致,否则可能会出现EOFException异常。
重启eclipse,打开windows->open perspective->other->map/reduce 可以看到map/reduce开发视图。
设置连接参数
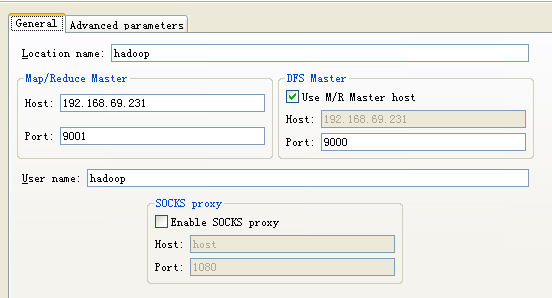
打开windows->show view->other-> map/reduce Locations视图,在点击大象后弹出的对话框(General tab)进行参数的添加:

参数说明如下:
- Location name:任意
- map/reduce master:与mapred-site.xml里面mapred.job.tracker设置一致。
- DFS master:与core-site.xml里fs.default.name设置一致。
- User name: 服务器上运行hadoop服务的用户名。
然后是打开“Advanced parameters”设置面板,修改相应参数。上面的参数填写以后,也会反映到这里相应的参数,主要关注下面几个参数:
- fs.defualt.name:与core-site.xml里fs.default.name设置一致。
- mapred.job.tracker:与mapred-site.xml里面mapred.job.tracker设置一致。
- dfs.replication:与hdfs-site.xml里面的dfs.replication一致。
- hadoop.tmp.dir:与core-site.xml里hadoop.tmp.dir设置一致。
- hadoop.job.ugi:并不是设置用户名与密码。是用户与组名,所以这里填写hadoop,hadoop。
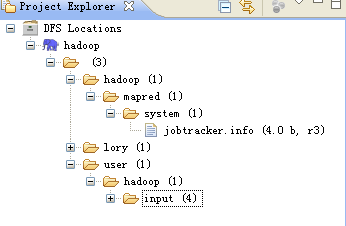
说明:第一次设置的时候可能是没有hadoop.job.ugi和dfs.replication参数的,不要紧,确认保存。打开Project Explorer中DFS Locations目录,应该可以年看到文件系统中的结构了。但是在/hadoop/mapred/system下却没有查看权限,如下图:

而且删除文件的时候也会报错:

这个原因是我使用地本用户Administrator(我是用管理员用户登陆来地windows系统的)进行远程hadoop系统操作,没有权限。
此时再打开“Advanced parameters”设置面板,应该可以看到hadoop.job.ugi了,这个参数默认是本地操作系统的用户名,如果不幸与远程hadoop用户不一致,那就要改过来了,将hadoop加在第一个,并用逗号分隔。如:

保存配置后,重新启动eclipse。/hadoop/mapred/system下就一目了然了,删除文件也OK。

运行hadoop程序
首先将hadoop安装包下面的所有jar包都导到eclipse工程里。然后建立一个类:DFSOperator.java,该类写了四个基本方法:创建文件,删除文件,把文件内容读为字符串,将字符串写入文件。同时有个main函数,可以修改测试:
package com.kingdee.hadoop;

import java.io.BufferedReader;
import java.io.IOException;
import java.io.InputStream;
import java.io.InputStreamReader;

import org.apache.hadoop.conf.Configuration;
import org.apache.hadoop.fs.FSDataOutputStream;
import org.apache.hadoop.fs.FileSystem;
import org.apache.hadoop.fs.Path;

/**
 *
 * The utilities to operate file on hadoop hdfs.
 *
 * @author luolihui 2011-07-18
 *
 */
public class DFSOperator {

	private static final String ROOT_PATH = "hdfs:///";
	private static final int BUFFER_SIZE = 4096;

	/**
	 * construct.
	 */
	public DFSOperator(){}

     /**
     * Create a file on hdfs.The root path is /.<br>
     * for example: DFSOperator.createFile("/lory/test1.txt", true);
	 * @param path  the file name to open
	 * @param overwrite if a file with this name already exists, then if true, the file will be
	 * @return true if delete is successful else IOException.
	 * @throws IOException
	 */
	public static boolean createFile(String path, boolean overwrite) throws IOException
	{
		//String uri = "hdfs://192.168.1.100:9000";
		//FileSystem fs1 = FileSystem.get(URI.create(uri), conf);

		Configuration conf = new Configuration();
		FileSystem fs = FileSystem.get(conf);
		Path f = new Path(ROOT_PATH + path);
		fs.create(f, overwrite);
		fs.close();
		return true;
	}

    /**
     * Delete a file on hdfs.The root path is /. <br>
     * for example: DFSOperator.deleteFile("/user/hadoop/output", true);
     * @param path the path to delete
     * @param recursive  if path is a directory and set to true, the directory is deleted else throws an exception. In case of a file the recursive can be set to either true or false.
     * @return true if delete is successful else IOException.
     * @throws IOException
     */
	public static boolean deleteFile(String path, boolean recursive) throws IOException
	{
		//String uri = "hdfs://192.168.1.100:9000";
		//FileSystem fs1 = FileSystem.get(URI.create(uri), conf);

		Configuration conf = new Configuration();
		FileSystem fs = FileSystem.get(conf);
		Path f = new Path(ROOT_PATH + path);
		fs.delete(f, recursive);
		fs.close();
		return true;
	}

	/**
	 * Read a file to string on hadoop hdfs. From stream to string. <br>
	 * for example: System.out.println(DFSOperator.readDFSFileToString("/user/hadoop/input/test3.txt"));
	 * @param path the path to read
	 * @return true if read is successful else IOException.
	 * @throws IOException
	 */
	public static String readDFSFileToString(String path) throws IOException
	{
		Configuration conf = new Configuration();
		FileSystem fs = FileSystem.get(conf);
		Path f = new Path(ROOT_PATH + path);
		InputStream in = null;
		String str = null;
		StringBuilder sb = new StringBuilder(BUFFER_SIZE);
		if (fs.exists(f))
		{
			in = fs.open(f);
			BufferedReader bf = new BufferedReader(new InputStreamReader(in));

			while ((str = bf.readLine()) != null)
			{
				sb.append(str);
				sb.append("\n");
			}

			in.close();
			bf.close();
			fs.close();
			return sb.toString();
		}
		else
		{
			return null;
		}

	}
	/**
	 * Write string to a hadoop hdfs file. <br>
	 * for example: DFSOperator.writeStringToDFSFile("/lory/test1.txt", "You are a bad man.\nReally!\n");
	 * @param path the file where the string to write in.
	 * @param string the context to write in a file.
	 * @return true if write is successful else IOException.
	 * @throws IOException
	 */
	public static boolean writeStringToDFSFile(String path, String string) throws IOException
	{
		Configuration conf = new Configuration();
		FileSystem fs = FileSystem.get(conf);
		FSDataOutputStream os = null;
		Path f = new Path(ROOT_PATH + path);
		os = fs.create(f,true);
		os.writeBytes(string);

		os.close();
		fs.close();
		return true;
	}

	public static void main(String[] args)
	{
		try {
			DFSOperator.createFile("/lory/test1.txt", true);
			DFSOperator.deleteFile("/dfs_operator.txt", true);
			DFSOperator.writeStringToDFSFile("/lory/test1.txt", "You are a bad man.\nReally?\n");
			System.out.println(DFSOperator.readDFSFileToString("/lory/test1.txt"));
		} catch (IOException e) {
			// TODO Auto-generated catch block
			e.printStackTrace();
		}
		System.out.println("===end===");
	}
}
然后Run As->Run on Hadoop->Choose an exitsing server from the list below->finish.
结果很简单(那个警告不管):
11/07/16 18:44:32 WARN conf.Configuration: DEPRECATED: hadoop-site.xml found in the classpath. Usage of hadoop-site.xml is deprecated. Instead use core-site.xml, mapred-site.xml and hdfs-site.xml to override properties of core-default.xml, mapred-default.xml and hdfs-default.xml respectively
You are a bad man.
Really?

===end===
也可以运行hadoop自带的WorkCount程序,找到其源代码导进来,然后设置输入输出参数,然后同样“Run on hadoop”。具体步骤不再示范。
每“Run on hadoop”都会在workspace.metadata.plugins\org.apache.hadoop.eclipse下生成临时jar包。不过第一次需要Run on hadoop,以后只需要点击那运行的绿色按钮了。
错误及处理
安全模式问题
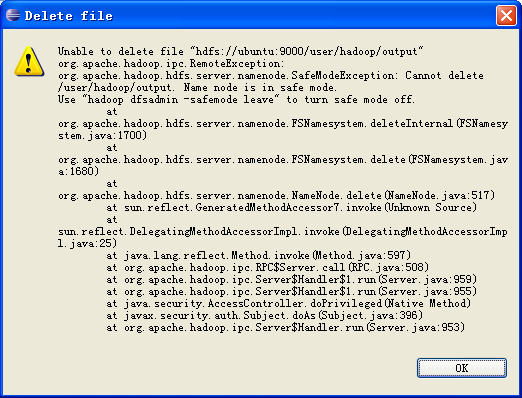
我在eclipse上删除DFS上的文件夹时,出现下面错误:

错误提示说得也比较明示,是NameNode在安全模式中,其解决方案也一并给出。类似的运行hadoop程序时,有时候会报以下错误:
org.apache.hadoop.dfs.SafeModeException: Cannot delete /user/hadoop/input. Name node is in safe mode
解除安全模式:
bin/hadoop dfsadmin -safemode leave
用户可以通过dfsadmin -safemode value 来操作安全模式,参数value的说明如下:
- enter - 进入安全模式
- leave - 强制NameNode离开安全模式
- get - 返回安全模式是否开启的信息
- wait - 等待,一直到安全模式结束。
开发时报错Permission denied
org.apache.hadoop.security.AccessControlException: org.apache.hadoop.security.AccessControlException: Permission denied: user=Administrator, access=WRITE, inode="test1.txt":hadoop:supergroup:rw-r--r--
	at sun.reflect.NativeConstructorAccessorImpl.newInstance0(Native Method)
	at sun.reflect.NativeConstructorAccessorImpl.newInstance(NativeConstructorAccessorImpl.java:39)
	at sun.reflect.DelegatingConstructorAccessorImpl.newInstance(DelegatingConstructorAccessorImpl.java:27)
	at java.lang.reflect.Constructor.newInstance(Constructor.java:513)
	at org.apache.hadoop.ipc.RemoteException.instantiateException(RemoteException.java:96)
	at org.apache.hadoop.ipc.RemoteException.unwrapRemoteException(RemoteException.java:58)
	at org.apache.hadoop.hdfs.DFSClient$DFSOutputStream.<init>(DFSClient.java:2710)
	at org.apache.hadoop.hdfs.DFSClient.create(DFSClient.java:492)
	at org.apache.hadoop.hdfs.DistributedFileSystem.create(DistributedFileSystem.java:195)
	at org.apache.hadoop.fs.FileSystem.create(FileSystem.java:484)
	at org.apache.hadoop.fs.FileSystem.create(FileSystem.java:465)
	at org.apache.hadoop.fs.FileSystem.create(FileSystem.java:372)
	at com.kingdee.hadoop.DFSOperator.createFile(DFSOperator.java:46)
	at com.kingdee.hadoop.DFSOperator.main(DFSOperator.java:134)
解决方法是,在“Advanced parameters”设置面板,设置hadoop.job.ugi参数,将hadoop用户加上去。

变为:

然后重新在运行中”Run on hadoop”。另一方法是改变要操作的文件的权限。
Permission denied: user=Administrator, access=WRITE, inode="test1.txt":hadoop:supergroup:rw-r--r--
上面的意思是:test1.txt文件的访问权限是rw-r--r--,归属组是supergroup,归属用户是hadoop,现在使用Administrator用户对test1.txt文件进行WRITE方式访问,被拒绝了。所以可以改变下test1.txt文件的访问权限:
$ hadoop fs –chmod 777 /lory/test1.txt
$ hadoop fs –chmod 777 /lory     #或者上一级文件夹
当然使用-chown命令也可以。


