SSH整合案例
1.Hibernate框架
Hibernate是一个开放源代码的对象关系映射框架,它对JDBC进行了非常轻量级的对象封装,它将POJO与数据库表建立映射关系,是一个全自动的orm框架,hibernate可以自动生成SQL语句,自动执行,使得Java程序员可以随心所欲的使用对象编程思维来操纵数据库。
1. Hibernate的核心配置文件
1.1 数据库信息、连接池配置
加载数据库驱动配置,配置连接池,这里用的是mysq数据库,在使用hibernate时,必须要有数据库驱动包
mysql驱动包:
 <session-factory>
        <property name="connection.driver_class">com.mysql.jdbc.Driver</property><!-- 数据库驱动类 -->
        <property name="connection.url">jdbc:mysql://localhost:3306/数据库名称</property><!-- 数据库连接地址 -->
        <property name="connection.username">root</property>数据库用户名
        <property name="connection.password">admin</property>数据库密码 -->
        <property name="dialect">org.hibernate.dialect.MySQLDialect</property><!--数据库方言,不同数据库有不同的数据库方言-->
 </session-factory
1.2 Hibernate信息
1.3 映射配置
这里对数据承载类的一些映射配置
<mapping resource="com/fly/entity/User.hbm.xml"/><!-- 示例:需要映射的xml文件路径 -->
1.4 Hibernate核心配置文件
2.status2框架
1. Action相关的操作
1.1 action创建三种方式:
写一个POJO,并在其中写上 public String execute();方法
创建一个类并实现Action接口
使用的最多的方法是集成类ActionSupport
1.2 配置action访问路径
创建struts.xml配置文件,这个文件名称和位置固定src下面
1.3 配置访问action的多个方法
使用通配符的方式配置比较常见
1.4 在action获取表单提交数据
获取request对象,Struts2提供的API有ActionContext和ServletActionContext
属性封装
模型驱动,要实现ModelDriven接口
1.5 在action中操作域对象
使用ServletActionContext获取域对象
1.6 在web.xml中配置Struts提供的过滤器
2. 值栈
值栈在开发中用得不多,掌握两点:
2.1 向值栈中放数据
set方法
push方法
定义变量生成get方法
2.2 从值栈中获取数据
在jsp中使用struts2标签+ognl获取
  1 <s:property>
  2
  3 <s:iterator>
3. 拦截器
3.1 AOP和责任链
3.2 自定义拦截器
自定义拦截器可以通过继承MethodFilerInterceptor创建
3.spring框架
1. Spring框架核心配置文件
1.1 名称和位置没有固定要求,官方推荐使用applicationContext.xml作为配置文件名
1.2 在Spring核心配置文件中引入Schema约束
2. 创建对象
2.1 xml配置方式:<bean id="" class="" />
2.2 注解方式:四个注解,Component,Service,Controller,Repository
3. 注入属性
3.1 xml配置方式
3.2 注解方式:两个直接,Resource,Autowired
4. 使用ServletContext对象和监听器实现
4.1 在服务器启动的时候,加载Spring,监听器的配置在web.xml中
4.2 配置Spring的监听器
4.3 指定Spring配置文件的位置
4.4 要导入一个Spring整合web项目的jar包
5. AOP的思想以及JdbcTemplate的使用
4.SSH整合
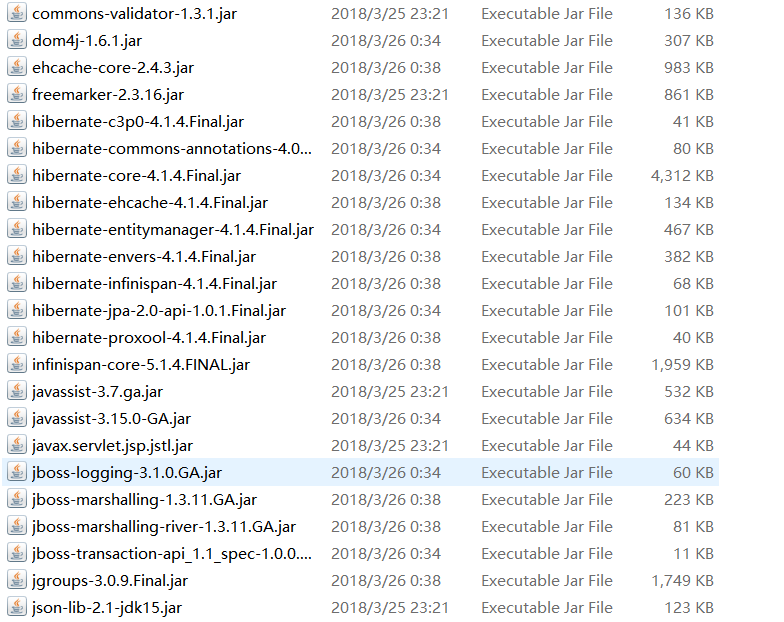
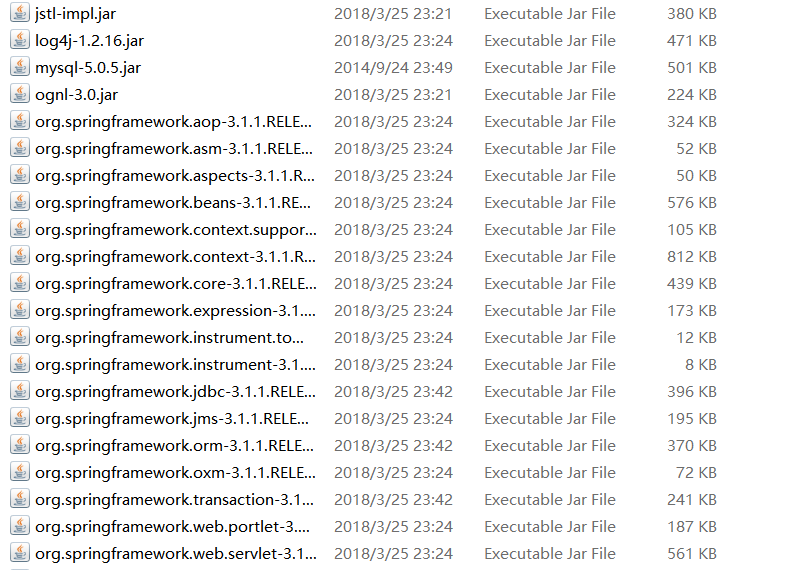
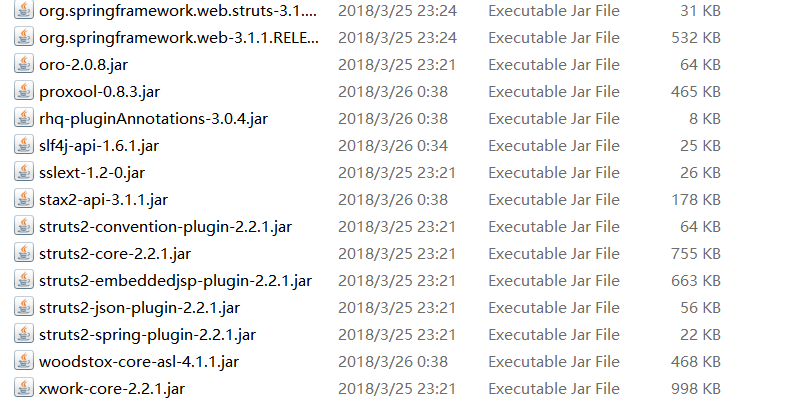
整合所需要的jar包:这是所有包

springxml核心配置:
1.c3p0创建连接池配置方式
<?xml version="1.0" encoding="UTF-8"?>
<beans xmlns="http://www.springframework.org/schema/beans"
	xmlns:xsi="http://www.w3.org/2001/XMLSchema-instance" xmlns:p="http://www.springframework.org/schema/p"
	xmlns:context="http://www.springframework.org/schema/context"
	xmlns:aop="http://www.springframework.org/schema/aop" xmlns:tx="http://www.springframework.org/schema/tx"
	xsi:schemaLocation="http://www.springframework.org/schema/beans http://www.springframework.org/schema/beans/spring-beans-3.0.xsd
	http://www.springframework.org/schema/context http://www.springframework.org/schema/context/spring-context-3.0.xsd
	http://www.springframework.org/schema/tx http://www.springframework.org/schema/tx/spring-tx-3.0.xsd
	http://www.springframework.org/schema/aop http://www.springframework.org/schema/aop/spring-aop-3.0.xsd">
	<!-- 开启注解扫描  base-package 所要创建对象的包名称-->
	<context:component-scan base-package="spring.com.anno"></context:component-scan>
	<!-- 数据库加载驱动创建连接 此处使用才c3p0的方式创建连接池 -->
	<bean id="datasouce" class="com.mchange.v2.c3p0.ComboPooledDataSource">
	<!-- 属性注入 -->
	   <property name="driverClass" value="com.mysql.jdbc.Driver"></property>
	   <property name="jdbcUrl" value="jdbc:mysql://localhost:3306/数据库名称"></property>
	   <property name="user" value="root"></property>
	   <property name="password" value="admin"></property>
	</bean>
	<!-- sessionFactory创建 -->
	<bean id="sessionFactory" class="org.springframework.orm.hibernate4.LocalSessionFactoryBean">
		<!-- 配置数据库连接池 -->
		<property name="dataSource" ref="datasouce"></property>
		<!-- 指定hibernate核心部分配置文件 -->
		<property name="configLocation" value="classpath:hibernate.cfg.xml"></property>
	</bean>
	<!-- 配置action -->
	<bean id="userAction" class="com.fly.action.UserAction" scope="prototype"></bean><!--此处对action的配置得配置scope="prototype" action是个多例的-->
</beans>
2.dbcp创建连接池配置方式
<?xml version="1.0" encoding="UTF-8"?>
<beans xmlns="http://www.springframework.org/schema/beans"
	xmlns:xsi="http://www.w3.org/2001/XMLSchema-instance" xmlns:p="http://www.springframework.org/schema/p"
	xmlns:context="http://www.springframework.org/schema/context"
	xmlns:aop="http://www.springframework.org/schema/aop" xmlns:tx="http://www.springframework.org/schema/tx"
	xsi:schemaLocation="http://www.springframework.org/schema/beans http://www.springframework.org/schema/beans/spring-beans-3.0.xsd
	http://www.springframework.org/schema/context http://www.springframework.org/schema/context/spring-context-3.0.xsd
	http://www.springframework.org/schema/tx http://www.springframework.org/schema/tx/spring-tx-3.0.xsd
	http://www.springframework.org/schema/aop http://www.springframework.org/schema/aop/spring-aop-3.0.xsd">
	<!-- 开启注解扫描 base-package 所要创建对象的包名称 -->
	<context:component-scan base-package="spring.com.anno"></context:component-scan>
	<!-- 加载配置文件 -->
	<bean id="datasource2" class="org.springframework.beans.factory.config.PropertyPlaceholderConfigurer">
            <property name="locations">
            <!-- 在src根目录下建jdbc.properties配置文件 -->
            <value>classpath:jdbc.properties</value>
                </property>
     </bean>
     <!-- 数据库加载驱动创建连接 -->
     <!-- dbcp連接池 ,根据上边的配置去配置文件去读取配置-->
        <bean id="dataSource" class="org.apache.commons.dbcp.BasicDataSource" destroy-method="close">
              <property name="driverClassName" value="${jdbc.driverClassName}" />
              <property name="url" value="${jdbc.url}" />
              <property name="username" value="${jdbc.username}" />
              <property name="password" value="${jdbc.password}" />
              <property name="initialSize" value="5"/>
              <property name="maxActive" value="20"/>
        </bean>
	<!-- sessionFactory创建 -->
	<bean id="sessionFactory" class="org.springframework.orm.hibernate4.LocalSessionFactoryBean">
		<!-- 配置数据库连接池 -->
		<property name="dataSource" ref="dataSource"></property>
		<!-- 指定hibernate核心部分配置文件 -->
		<property name="configLocation" value="classpath:hibernate.cfg.xml"></property>
	</bean>
	<!-- 配置action -->
	<bean id="userAction" class="com.fly.action.UserAction" scope="prototype"></bean>

</beans>
jdbc.properties数据库配置文件
#######################  DB Connection Config  #######################


###----------------- DB Type -----------------
#the database of the application:mysql|sqlserver|oracle
databaseType=mysql
#databaseType=sqlserver
#databaseType=oracle


###----------------- MySQL5+ -----------------
jdbc.driverClassName=com.mysql.jdbc.Driver
jdbc.url=jdbc:mysql://localhost:3306/xiaoxi?useUnicode=true&characterEncoding=utf-8
jdbc.username=root
jdbc.password=admin
hibernate.dialect=org.hibernate.dialect.MySQLDialect


###----------------- SqlServer2005+ -----------------
#jdbc.driverClassName=com.microsoft.sqlserver.jdbc.SQLServerDriver
#jdbc.url=jdbc:sqlserver://localhost:1433;DatabaseName=sampledb
#jdbc.username=sa
#jdbc.password=123456
#hibernate.dialect=org.hibernate.dialect.SQLServerDialect


###----------------- Oracle10g+ -----------------
#jdbc.driverClassName=oracle.jdbc.driver.OracleDriver
#jdbc.url=jdbc:oracle:thin:@localhost:1521:orac10g
#jdbc.username=scott
#jdbc.password=scott123
#hibernate.dialect=org.hibernate.dialect.OracleDialect


###----------------- JNDI -----------------
#jndi.name=myjndi123


###----------------- Hibernate -----------------
hibernate.show_sql=true
hibernate.format_sql=true
hibernate.hbm2ddl.auto=update
hibernate.jdbc.fetch_size=100
hibernate.jdbc.batch_size=20

hibernate.cache.use_second_level_cache=true
hibernate.cache.use_query_cache=true
hibernate.memcached.cacheTimeSeconds=10800
#Hibernate4
hibernate.cache.region.factory_class=org.hibernate.cache.EhCacheRegionFactory
#Hibernate3
#hibernate.cache.region.factory_class=org.hibernate.cache.EhCacheProvider


###----------------- C3P0 -----------------
c3p0.maxPoolSize=50
c3p0.minPoolSize=1
c3p0.initialPoolSize=1
c3p0.maxIdleTime=20


###----------------- DBCP -----------------
dbcp.maxActive=50
dbcp.maxIdle=50
dbcp.minIdle=1
dbcp.maxWait=10000
dbcp.initialSize=1
