Spring Security权限控制
Spring Security官网 : https://projects.spring.io/spring-security/
Spring Security简介:
Spring Security是一个能够为基于Spring的企业应用系统提供声明式的安全访问控制解决方案的安全框架。它提供了一组可以在Spring应用上下文中配置的Bean,充分利用了Spring IoC,DI(控制反转Inversion of Control ,DI:Dependency Injection 依赖注入)和AOP(面向切面编程)功能,为应用系统提供声明式的安全访问控制功能,减少了为企业系统安全控制编写大量重复代码的工作。

spring security认证:
Basic:
客户端以“ : ”连接用户名和密码后,再经BASE64加密通过Authorization请求头发送该密文至服务端进行验证,每次请求都需要重复发送该密文。可见Basic认证过程简单,安全性也低,存在泄露个人账号信息以及其他诸多安全问题。
Digest:
TTP协议规范的另一种认证模式是Digest模式,在HTTP1.1时被提出来,它主要是为了解决Basic模式安全问题,用于替代原来的Basic认证模式,Digest认证也是采用challenge/response认证模式,基本的认证流程比较类似,整个过程如下:
①浏览器发送http报文请求一个受保护的资源。
②服务端的web容器将http响应报文的响应码设为401,响应头部比Basic模式复杂,WWW-Authenticate: Digest realm=”myTomcat”,qop="auth",nonce="xxxxxxxxxxx",opaque="xxxxxxxx" 。其中qop的auth表示鉴别方式;nonce是随机字符串;opaque服务端指定的值,客户端需要原值返回。
③浏览器弹出对话框让用户输入用户名和密码,浏览器对用户名、密码、nonce值、HTTP请求方法、被请求资源URI等组合后进行MD5运算,把计算得到的摘要信息发送给服务端。请求头部类似如下,Authorization: Digest username="xxxxx",realm="myTomcat",qop="auth",nonce="xxxxx",uri="xxxx",cnonce="xxxxxx",nc=00000001,response="xxxxxxxxx",opaque="xxxxxxxxx" 。其中username是用户名;cnonce是客户端生成的随机字符串;nc是运行认证的次数;response就是最终计算得到的摘要。
④服务端web容器获取HTTP报文头部相关认证信息,从中获取到username,根据username获取对应的密码,同样对用户名、密码、nonce值、HTTP请求方法、被请求资源URI等组合进行MD5运算,计算结果和response进行比较,如果匹配则认证成功并返回相关资源,否则再执行②,重新进行认证。
⑤以后每次访问都要带上认证头部。
X.509:
X.509格式证书是被广泛使用的数字证书标准,是用于标志通讯各方身份信息的一系列数据。
LDAP:
和利用数据库进行验证类似,LDAP中也是利用登陆名和密码进行验证,LDAP中会定义一个属性password,用来存放用户密码,而登陆名使用较多的都是mail地址。那怎么样才能正确的用LDAP进行身份验证呢,下面是一个正确而又通用的步骤:
1. 从客户端得到登陆名和密码。注意这里的登陆名和密码一开始并没有被用到。
2. 先匿名绑定到LDAP服务器,如果LDAP服务器没有启用匿名绑定,一般会提供一个默认的用户,用这个用户进行绑定即可。
3. 之前输入的登陆名在这里就有用了,当上一步绑定成功以后,需要执行一个搜索,而filter就是用登陆名来构造,形如: "(|(uid=$login)(mail=$login))" ,这里的login就是登陆名。搜索执行完毕后,需要对结果进行判断,如果只返回一个entry,这个就是包含了该用户信息的entry,可以得到该entry的DN,后面使用。如果返回不止一个或者没有返回,说明用户名输入有误,应该退出验证并返回错误信息。
4. 如果能进行到这一步,说明用相应的用户,而上一步执行时得到了用户信息所在的entry的DN,这里就需要用这个DN和第一步中得到的password重新绑定LDAP服务器。
5. 执行完上一步,验证的主要过程就结束了,如果能成功绑定,那么就说明验证成功,如果不行,则应该返回密码错误的信息。
这5大步就是基于LDAP的一个 “两次绑定” 验证方法。
Form:
上面介绍的几种模式都属于HTTP协议规范范畴,由于它的规范使得很多东西无法自定义,例如登录窗口、错误展示页面。所以需要另外一种模式提供更加灵活的认证,也就是基于Form的认证模式。
Form模式的认证流程如下:
①浏览器发送http报文请求一个受保护的资源。
②服务端的web容器判断此uri为受保护资源,于是将请求重定向到自定义的登陆页面上,例如login.html页面,可以自定义登陆页面的样式,但要遵守的约定是表单的action必须以j_security_check结尾,即<form action='xxxxxx/j_security_check' method='POST'>。用户名和密码输入框元素的name必须为'j_username' 和'j_password'。
③浏览器展示自定义的登陆页面让用户输入用户名和密码,然后提交表单。
④服务端web容器获取表单的用户名和密码,匹配此用户名与密码是否正确,是否有相应资源的权限,如果认证成功则返回相关资源,否则再执行②,重新进行认证。
⑤后面在同个会话期间的访问都不用再进行认证,因为认证的结果已经保存在服务端的session里面。
Form模式跳出了HTTP规范提供了自定义的更加灵活的认证模式,但由于Form模式属于J2EE范畴,一般出现在java体系中,而且它也存在密码明文传输安全问题。
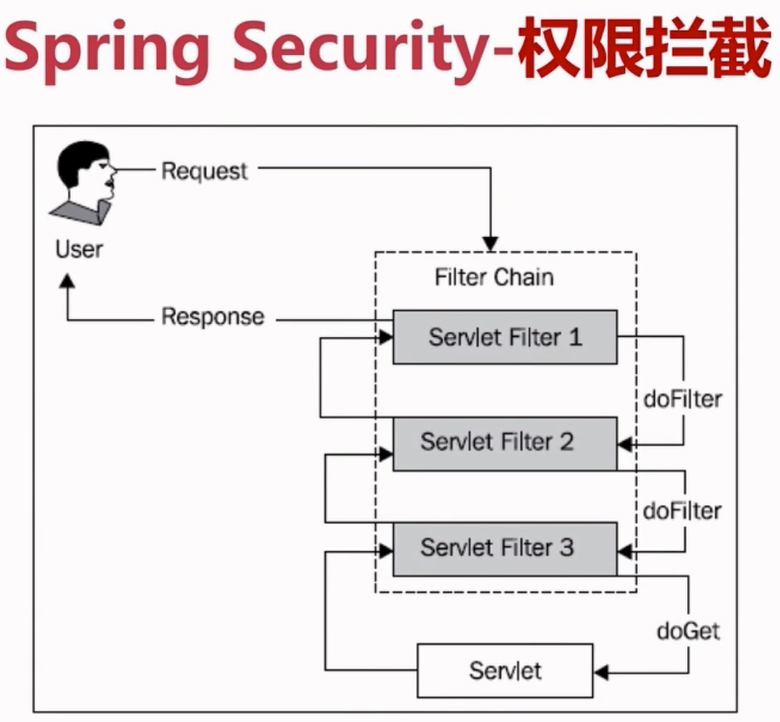
Spring Security的几个Filter
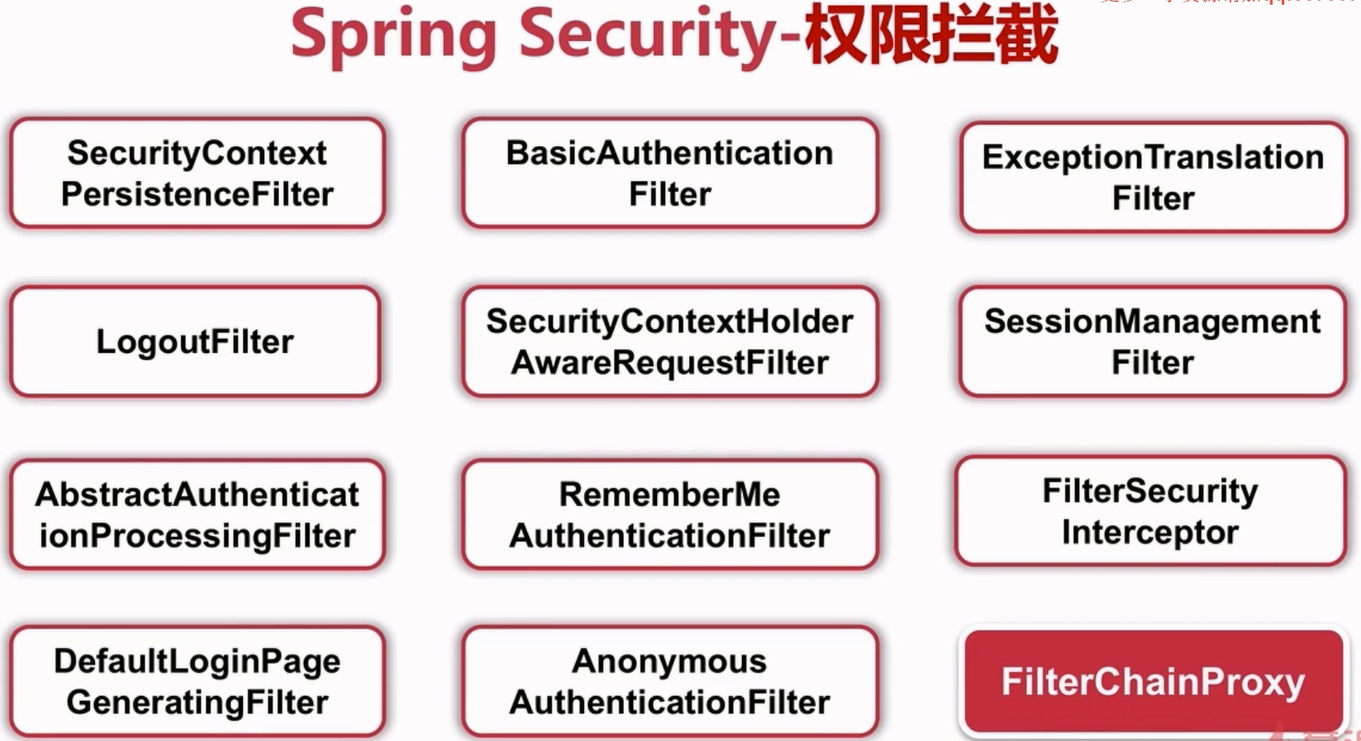
Spring Security已经定义了一些Filter,不管实际应用中你用到了哪些,它们应当保持如下顺序。
(1)ChannelProcessingFilter,如果你访问的channel错了,那首先就会在channel之间进行跳转,如http变为https。
(2)SecurityContextPersistenceFilter,这样的话在一开始进行request的时候就可以在SecurityContextHolder中建立一个SecurityContext,然后在请求结束的时候,任何对SecurityContext的改变都可以被copy到HttpSession。
(3)ConcurrentSessionFilter,因为它需要使用SecurityContextHolder的功能,而且更新对应session的最后更新时间,以及通过SessionRegistry获取当前的SessionInformation以检查当前的session是否已经过期,过期则会调用LogoutHandler。
(4)认证处理机制,如UsernamePasswordAuthenticationFilter,CasAuthenticationFilter,BasicAuthenticationFilter等,以至于SecurityContextHolder可以被更新为包含一个有效的Authentication请求。
(5)SecurityContextHolderAwareRequestFilter,它将会把HttpServletRequest封装成一个继承自HttpServletRequestWrapper的SecurityContextHolderAwareRequestWrapper,同时使用SecurityContext实现了HttpServletRequest中与安全相关的方法。
(6)JaasApiIntegrationFilter,如果SecurityContextHolder中拥有的Authentication是一个JaasAuthenticationToken,那么该Filter将使用包含在JaasAuthenticationToken中的Subject继续执行FilterChain。
(7)RememberMeAuthenticationFilter,如果之前的认证处理机制没有更新SecurityContextHolder,并且用户请求包含了一个Remember-Me对应的cookie,那么一个对应的Authentication将会设给SecurityContextHolder。
(8)AnonymousAuthenticationFilter,如果之前的认证机制都没有更新SecurityContextHolder拥有的Authentication,那么一个AnonymousAuthenticationToken将会设给SecurityContextHolder。
(9)ExceptionTransactionFilter,用于处理在FilterChain范围内抛出的AccessDeniedException和AuthenticationException,并把它们转换为对应的Http错误码返回或者对应的页面。
(10)FilterSecurityInterceptor,保护Web URI,并且在访问被拒绝时抛出异常。
与数据库管理不同的是,Spring Security提供了一个实现了可以缓存UserDetailService的实现类,这个类的名字是CachingUserDetailsService
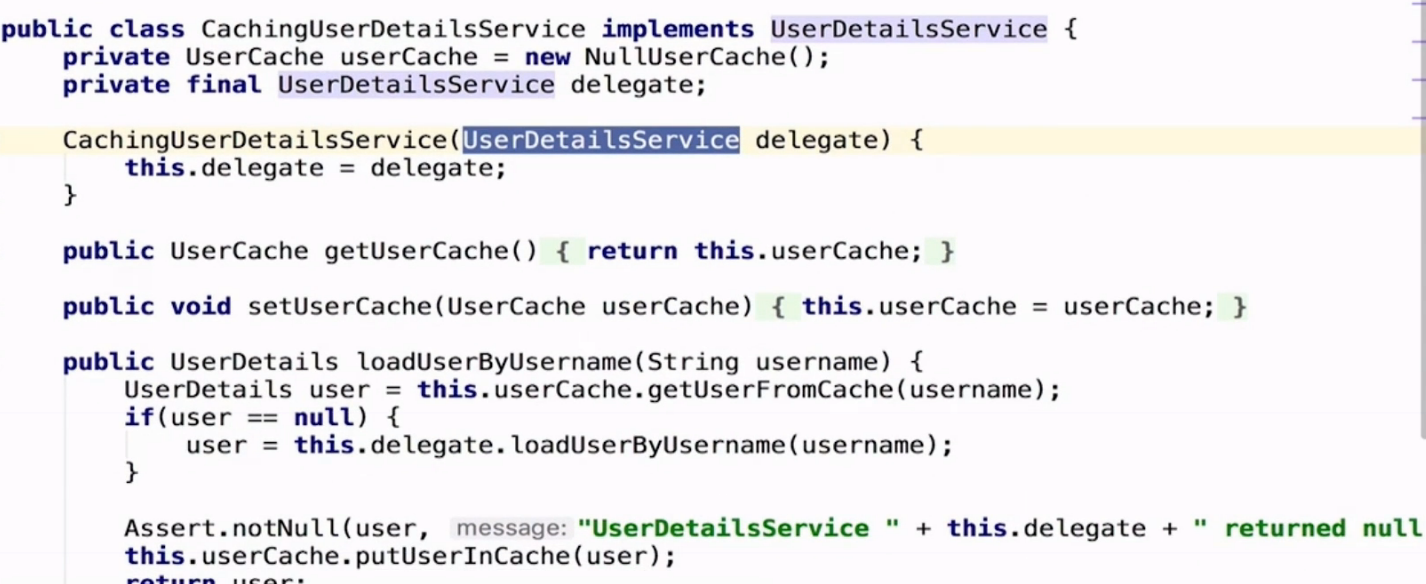
该类的构造接收了一个用于真正加载UserDetails的UserDetailsService实现类,当需要加载UserDetails时,会首先从缓存中获取。如果缓存中没有对应的UserDetails,则使用UserDetailsService实现类进行加载,然后将加载后的结果存在缓存中。UserDetais与缓存的交互是通过UserCache实现的。CachingUserDetailsService默认有一个UserCache的空引用。
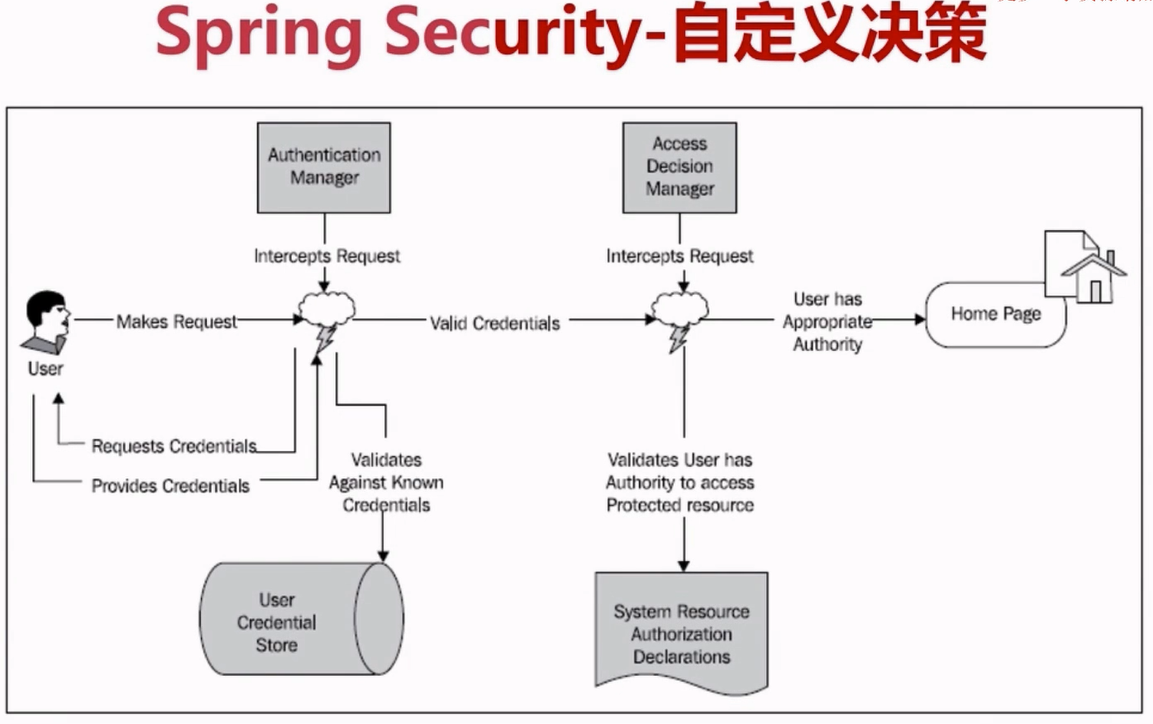
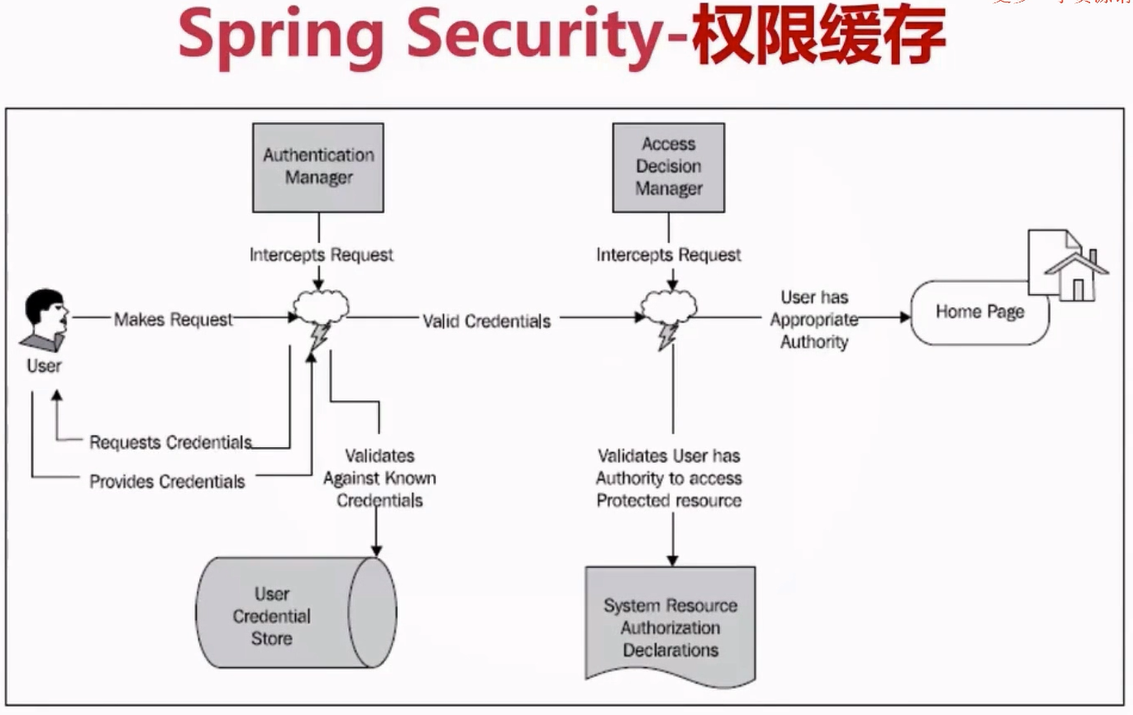
Spring的决策管理器,其接口为AccessDecisionManager,抽象类为AbstractAccessDecisionManager。而我们要自定义决策管理器的话一般是继承抽象类而不去直接实现接口。
在Spring中引入了投票器(AccessDecisionVoter)的概念,有无权限访问的最终觉得权是由投票器来决定的,最常见的投票器为RoleVoter,在RoleVoter中定义了权限的前缀,先看下Spring在RoleVoter中是怎么处理授权的。
public int vote(Authentication authentication, Object object, Collection<ConfigAttribute> attributes) {
    int result = ACCESS_ABSTAIN;
    Collection<? extends GrantedAuthority> authorities = extractAuthorities(authentication);

    for (ConfigAttribute attribute : attributes) {
        if (this.supports(attribute)) {
            result = ACCESS_DENIED;

            // Attempt to find a matching granted authority
            for (GrantedAuthority authority : authorities) {
                if (attribute.getAttribute().equals(authority.getAuthority())) {
                    return ACCESS_GRANTED;
                }
            }
        }
    }

    return result;
}

Collection<? extends GrantedAuthority> extractAuthorities(Authentication authentication) {
    return authentication.getAuthorities();
}
Authentication中是用户及用户权限信息,attributes是访问资源需要的权限,然后循环判断用户是否有访问资源需要的权限,如果有就返回ACCESS_GRANTED,通俗的说就是有权限。
Spring提供了3个决策管理器,至于这三个管理器是如何工作的请查看SpringSecurity源码
AffirmativeBased 一票通过,只要有一个投票器通过就允许访问
ConsensusBased 有一半以上投票器通过才允许访问资源
UnanimousBased 所有投票器都通过才允许访问
下面来实现一个简单的自定义决策管理器,这个决策管理器并没有使用投票器
public class DefaultAccessDecisionManager extends AbstractAccessDecisionManager {

    public void decide( Authentication authentication, Object object,
            Collection<ConfigAttribute> configAttributes)
        throws AccessDeniedException, InsufficientAuthenticationException{

        SysUser user = (SysUser)authentication.getPrincipal();
        logger.info("访问资源的用户为"+user.getUsername());

        //如果访问资源不需要任何权限则直接通过
        if( configAttributes == null ) {
            return ;
        }

        Iterator<ConfigAttribute> ite = configAttributes.iterator();
        //遍历configAttributes看用户是否有访问资源的权限
        while( ite.hasNext()){

            ConfigAttribute ca = ite.next();
            String needRole = ((SecurityConfig)ca).getAttribute();

            //ga 为用户所被赋予的权限。 needRole 为访问相应的资源应该具有的权限。
            for( GrantedAuthority ga: authentication.getAuthorities()){

                if(needRole.trim().equals(ga.getAuthority().trim())){

                    return;
                }
            }
        }

        throw new AccessDeniedException("");

    }
}
可以直接在Spring官网生成带Web和Security的基于Maven管理的Spring Boot项目,
下载项目,创建 SpringSecurityConfig 类继承 WebSecurityConfigurerAdapter 类,
SpringSecurityConfig类中设置放开静态资源,设置Http请求的拦截,
@Configuration
@EnableWebSecurity//打开web支持
public class SpringSecurityConfig extends WebSecurityConfigurerAdapter {
/**
     * 设置http请求放开与拦截
     * @param http
     * @throws Exception
     */
    @Override
    protected void configure(HttpSecurity http) throws Exception {
        http.authorizeRequests()
                .antMatchers("/").permitAll()//根目录可以直接访问
                .anyRequest().authenticated()//其他路径不能直接访问
                .and()
                .logout().permitAll()//注销任何权限都可以访问
                .and()
                .formLogin();//允许表单登录
        http.csrf().disable();//关闭默认的csrf的认证
    }

    /**
     * 设置静态资源放开
     * @param web
     * @throws Exception
     */
    @Override
    public void configure(WebSecurity web) throws Exception {
        web.ignoring().antMatchers("/js/**", "/css/**", "/images/**");
    }
}
简单的登录功能:
在 SpringSecurityConfig 类中
    @Override
    protected void configure(AuthenticationManagerBuilder auth) throws Exception {
//        设置可以登录的用户名和密码
        auth.inMemoryAuthentication().withUser("admin").password("123456").roles("ADMIN");
    }
这样在需要登录的,没有放行的功能中就需输入以上用户名和密码才可以进入。
这样可以设置多个用户和不同的权限。
    @Override
    protected void configure(AuthenticationManagerBuilder auth) throws Exception {
//        设置可以登录的用户名和密码
        auth.inMemoryAuthentication().withUser("admin").password("123456").roles("ADMIN");
        auth.inMemoryAuthentication().withUser("zhangsan").password("zhangsan").roles("ADMIN");
        auth.inMemoryAuthentication().withUser("demo").password("demo").roles("USER");

    }
给方法设置权限:
   @PreAuthorize("hasRole('ROLE_ADMIN')")
    @RequestMapping("/roleAuth")
    public String role() {
        return "admin auth";
    }
这样User权限的用户demo就不能访问该方法,只有admin角色的用户可以访问。
也可以从数据库中获取用户和权限信息:
定义MyUserService类,实现UserDetailsService接口,使用去提供的loadUserByUsername方法:
    @Override
    public UserDetails loadUserByUsername(String username) throws UsernameNotFoundException {
        return null;
    }
    @Autowired
    private MyUserService myUserService;

    @Override
    protected void configure(AuthenticationManagerBuilder auth) throws Exception {
//        设置可以登录的用户名和密码
//        auth.inMemoryAuthentication().withUser("admin").password("123456").roles("ADMIN");
//        auth.inMemoryAuthentication().withUser("zhangsan").password("zhangsan").roles("ADMIN");
//        auth.inMemoryAuthentication().withUser("demo").password("demo").roles("USER");
//
        auth.userDetailsService(myUserService)
                .passwordEncoder(new MyPasswordEncoder());//使用自己定义的验证器

        //默认的Security数据库验证,如果使用,需要使用给定的数据库表结构
        auth.jdbcAuthentication().usersByUsernameQuery("").authoritiesByUsernameQuery("").passwordEncoder(new MyPasswordEncoder());
    }
定义自己的密码验证规则:
public class MyPasswordEncoder implements PasswordEncoder {

    private final static String SALT = "123456";

    /**
     * 密码加密
     * @param rawPassword
     * @return
     */
    @Override
    public String encode(CharSequence rawPassword) {
        Md5PasswordEncoder encoder = new Md5PasswordEncoder();
        return encoder.encodePassword(rawPassword.toString(), SALT);
    }

    /**
     * 密码匹配
     * @param rawPassword
     * @param encodedPassword
     * @return
     */
    @Override
    public boolean matches(CharSequence rawPassword, String encodedPassword) {
        Md5PasswordEncoder encoder = new Md5PasswordEncoder();
        return encoder.isPasswordValid(encodedPassword, rawPassword.toString(), SALT);
    }
}
基于表达式的权限控制
    @PreAuthorize("#id<10 and principal.username.equals(#username) and #user.username.equals('abc')")
    @PostAuthorize("returnObject%2==0")//返回的值是偶数,对2取余为0,此注解用于对返回值进行过滤,在方法完成后进行权限检查
    @RequestMapping("/test")
    public Integer test(Integer id, String username, User user) {
        // ...
        return id;
    }

    @PreFilter("filterObject%2==0")//传入的过滤
    @PostFilter("filterObject%4==0")//返回的过滤
    @RequestMapping("/test2")
    public List<Integer> test2(List<Integer> idList) {
        // ...
        return idList;
    }
总结:
优点:
1.提供了一套可用的安全框架
2.提供了很多用户认证功能,实现相关接口即可,节约了大量工作
3.基于Spring,易于集成到Spring项目中去,封装了许多方法
缺点:
1.配置文件过多,角色被“编码”到配置文件和源文件中,RBAC不明显
2.对于系统中的用户、角色、权限没有可操作的界面
3.大数据量的情况下几乎不可用


