vue-router 介绍
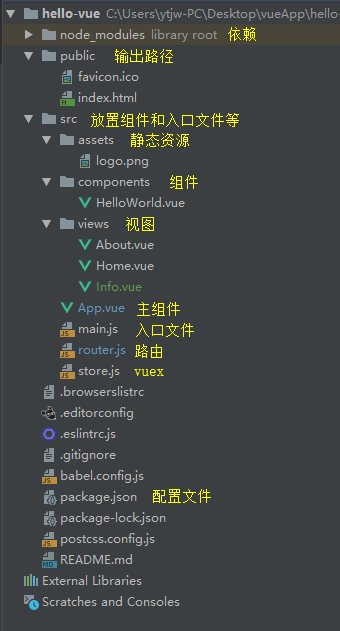
vue-router是官方的路由管理工具,用于组建单页面应用很方便快捷。还记得我们在上一篇文章中,使用vue-cli创建的hello-vue的那个项目吗?打开项目,我们先看下目录结构:

看了上面的目录结构,其实路由主要就是配置router.js文件,由于我们用的脚手架创建的文件,router.js文件基础的内容都配置好了,我们只需要修改和添加路由配置项就可以啦,我把配置路由整理为一下四步:引入组件 ——> 配置路径 ——> 创建组件 ——> 添加入口路径。
首先,我们在router.js文件中,添加一个新的组件Info.vue,并引入:
import Info from './views/Info.vue';
然后,还是在router.js文件中,配置一下Info.vue的路径信息:
{
      path: '/info',
      name: 'info',
      component: Info,
}
看下router.js文件:
import Vue from 'vue';
import Router from 'vue-router';
import Home from './views/Home.vue';
import Info from './views/Info.vue';

Vue.use(Router);

export default new Router({
  mode: 'history',
  base: process.env.BASE_URL,
  routes: [
    {
      path: '/',
      name: 'home',
      component: Home,
    },
    {
      path: '/info',
      name: 'info',
      component: Info,
    },
    {
      path: '/about',
      name: 'about',
      // route level code-splitting
      // this generates a separate chunk (about.[hash].js) for this route
      // which is lazy-loaded when the route is visited.
      component: () => import(/* webpackChunkName: "about" */ './views/About.vue'),
    },
  ],
});
下面,我们在views目录下,新建Info.vue文件:
<template>
  <div class="about">
    <h1>This is an info page</h1>
  </div>
</template>
最后,打开App.vue文件,添加Info.vue组件的链接地址:
<template>
  <div id="app">
    <div id="nav">
      <router-link to="/">Home</router-link> |
      <router-link to="/about">About</router-link> |
      <router-link to="/info">Info</router-link>
    </div>
    <router-view/>
  </div>
</template>

<style lang="scss">
#app {
  font-family: 'Avenir', Helvetica, Arial, sans-serif;
  -webkit-font-smoothing: antialiased;
  -moz-osx-font-smoothing: grayscale;
  text-align: center;
  color: #2c3e50;
}
#nav {
  padding: 30px;
  a {
    font-weight: bold;
    color: #2c3e50;
    &.router-link-exact-active {
      color: #42b983;
    }
  }
}
</style>
下面我们命令行运行一下项目:npm run serve,项目启动后,会看到如下效果,PS因为今天是三八妇女节,我悄悄加了一个妇女节快乐的组件哟~):

很简单的我们实现了路由功能。
