
PyTables 教程(一)入门,浏览对象树,将数据提交到表和数组
翻译自http://www.pytables.org/usersguide/tutorials.html
教程
Seràs la clau que obre tots els panys, seràs la llum, la llum il.limitada, seràs confí on l’aurora comença, seràs forment, escala il.luminada!
—Lyrics: Vicent Andrés i Estellés. Music: Ovidi Montllor, Toti Soler, M’aclame a tu
本章包括了一系列简单而全面的教程,使您能够理解PyTables的主要功能。如果您想了解有关某个特定实例变量、全局函数或方法的更多信息,请查看文档字符串或转到Library Reference中的库引用。
请注意,在本文档中,如下术语将混用:column和field(列和字段),row和record(行和记录)。
入门
本节主要介绍如何用Python定义记录,并将它们的集合(即表table)保存到文件中。然后,我们将使用Python cuts选择表中的一些数据,并创建NumPy数组以将此选择存储为树中的单独对象。
在examples/tutorial1-1.py中,您将找到本节中所有代码。尽管如此,编写本教程系列的目的是让您能够在Python交互控制台中重现它。我鼓励您在本教程中进行测试!
1. 导入tables对象
开始之前,需要导入tables包中的公共对象:
>>> import tables
如果您不想污染命名空间,这是导入表的推荐方法。但是,由于PyTables 包含了一组第一级原语(first-level primitives),因此可以考虑使用替代方法:
>>> from tables import *
如果要使用 NumPy 数组(通常情况下),您还需要从 numpy 包中导入函数。所以大多数 PyTables程序以如下语句开头:
>>> import tables   # but in this tutorial we use "from tables import \*"
>>> import numpy as np
2. 定义列描述符(对象类)
假设有一个粒子探测器的数据,我们想要创建一个表对象来保存它得到的数据。
首先需要定义表、列数、每列中包含数据类型等。
粒子探测器包含的数据如下:
动态范围为 8 位的 TDC(时间到数字转换器)计数器:定义变量TDCcount ;
16 位的 ADC(模拟到数字转换器):定义变量ADCcount;
粒子的网格位置:定义变量grid_i 和 grid_j ;
粒子的压力(单精度):
粒子的和能量(双精度):
粒子的种类:name 16位字符串
存储粒子的编号:idnumber 64位整数
确定了列及其类型后,现在声明一个新的Particle类,该类将包含所有这些信息:
>>> from tables import *
>>> class Particle(IsDescription):
...     name      = StringCol(16)   # 16-character String
...     idnumber  = Int64Col()      # Signed 64-bit integer
...     ADCcount  = UInt16Col()     # Unsigned short integer
...     TDCcount  = UInt8Col()      # unsigned byte
...     grid_i    = Int32Col()      # 32-bit integer
...     grid_j    = Int32Col()      # 32-bit integer
...     pressure  = Float32Col()    # float  (single-precision)
...     energy    = Float64Col()    # double (double-precision)
>>>
这个类的定义是不言自明的。基本上,您需要为每个字段声明一个类变量。根据定义的列类型(数据类型、长度、形状等),将相应的Col子类的实例指定值。有关这些子类的完整描述,请参见The Col class and its descendants。有关Col构造函数支持的数据类型列表,请参见Supported data types in PyTables。
现在,我们可以使用Particle实例作为探测器数据表的描述符。首先,我们要创建一个文件,以便存储这些数据。
3. 创建PyTables文件
使用顶层的 open_file()函数创建 PyTables 文件:
>>> h5file = open_file("tutorial1.h5", mode="w", title="Test file")
上述语句表示,在当前目录中下使用“w”rite模式创建一个名为“tutorial1.h5”的文件,并带有一个描述性标题字符串(“Test file”)。open_file() 函数是由`from tables import *` 语句导入的对象之一。此函数尝试打开文件,如果成功,则返回文件(请参见The File Class)对象实例。
4. 创建一个新的组
对文件h5file,调用File.create_group()方法,创建一个分支于“/”,名称为detector 的组(参见 The Group class)。组的名称为group:
>>> group = h5file.create_group("/", 'detector', 'Detector information')
5. 创建一个新的表
现在,调用 h5file 对象的File.create_table() 方法,在group下创建一个节点名为“readout”的表(参见The Table class),表的类型为Particle类,表的标题为“Readout example”。这个表用table表示。
>>> table = h5file.create_table(group, 'readout', Particle, "Readout example")
检查输出:
>>> print(h5file)
tutorial1.h5 (File) 'Test file'
Last modif.: 'Wed Mar  7 11:06:12 2007'
Object Tree:
/ (RootGroup) 'Test file'
/detector (Group) 'Detector information'
/detector/readout (Table(0,)) 'Readout example'
如您所见,很容易看到我们刚刚创建的组和表对象。如果需要更多信息,只需键入包含文件实例的变量:
>>> h5file
File(filename='tutorial1.h5', title='Test file', mode='w', root_uep='/', filters=Filters(complevel=0, shuffle=False, bitshuffle=False, fletcher32=False))
/ (RootGroup) 'Test file'
/detector (Group) 'Detector information'
/detector/readout (Table(0,)) 'Readout example'
description := {
  "ADCcount": UInt16Col(shape=(), dflt=0, pos=0),
  "TDCcount": UInt8Col(shape=(), dflt=0, pos=1),
  "energy": Float64Col(shape=(), dflt=0.0, pos=2),
  "grid_i": Int32Col(shape=(), dflt=0, pos=3),
  "grid_j": Int32Col(shape=(), dflt=0, pos=4),
  "idnumber": Int64Col(shape=(), dflt=0, pos=5),
  "name": StringCol(itemsize=16, shape=(), dflt='', pos=6),
  "pressure": Float32Col(shape=(), dflt=0.0, pos=7)}
  byteorder := 'little'
  chunkshape := (87,)
将显示有关树中每个对象的更详细信息。请注意,我们的表类型Particle是作为readout表描述信息的一部分打印的。
用一些值填充这个表。首先,获得一个指向表中各行(参见 The Row class)的指针:
>>> particle = table.row
table的row属性指向用于表中的行。我们只需将每一行的值分配给row,就像它是一个字典一样(尽管它实际上是一个扩展类),并使用列名作为键来编写数据。
下面是如何写入行的示例:
>>> for i in range(10):
...     particle['name']  = f'Particle: {i:6d}'
...     particle['TDCcount'] = i % 256
...     particle['ADCcount'] = (i * 256) % (1 << 16)
...     particle['grid_i'] = i
...     particle['grid_j'] = 10 - i
...     particle['pressure'] = float(i*i)
...     particle['energy'] = float(particle['pressure'] ** 4)
...     particle['idnumber'] = i * (2 ** 34)
...     # Insert a new particle record
...     particle.append()
>>>
循环中各行只是将值赋给行particle中的各列(请参见The Row class)。调用append()方法会将此信息写入表I/O缓冲区。
处理完所有数据后,需要调用table.flush()方法,刷新表的I/O缓冲区,从而将这些数据写入磁盘:
>>> table.flush()
刷新表是一个非常重要的步骤,它不仅有助于保持文件的完整性,还将释放内存资源(即内部缓冲区)。
6. 读取(和选择)表中的数据
现在我们需要访问它并从特定列中选择我们感兴趣的值,参见下面的示例:
>>> table = h5file.root.detector.readout
>>> pressure = [x['pressure'] for x in table.iterrows() if x['TDCcount'] > 3 and 20 <= x['pressure'] < 50]
>>> pressure
[25.0, 36.0, 49.0]
第一行,创建了一个指向readout表的快捷方式。此处是使用自然命名的方式访问这个表。我们也可以使用 h5file.get_node() 方法,我们稍后会这样做。
后两行代码为 Python的列表推导特性。它们是通过Table.iterrows()迭代器循环遍历table中的行。这些行使用如下条件筛选:
x['TDCcount'] > 3 and 20 <= x['pressure'] < 50
所以,我们从筛选的记录中选取了'pressure'列,从而创建最终的列表并将它赋值给pressure变量。
也可以使用常规的for循环实现同样目的,但是,采用复杂的语句可以变得更加紧凑和优雅。
PyTables还提供其他更强大的执行选择的方法,如果你的表非常大,或者需要非常高的查询速度,这些方法可能更合适。这些方法被叫做嵌入内核(in-kernel )和索引化(indexed ) 的查询,它们可以通过Table.where() 和其他相关方法实现。
我们使用一个嵌入内核的选择方法来实现前面相同的选取:
>>> names = [ x['name'] for x in table.where("""(TDCcount > 3) & (20 <= pressure) & (pressure < 50)""") ]
>>> names
['Particle:      5', 'Particle:      6', 'Particle:      7']
嵌入内核和索引的查询不仅速度更快,而且看起来写法更加紧凑,他们是PyTables众多特性中最强大的特性之一,所以尽肯能多地使用它们。关于嵌入内核和索引化选择,参见 Condition Syntax 和 Accelerating your searches 。
注意
当查询条件包括字符串文字时,应特别小心。实际上,Python2的字符串文字是字节字符串,而Python3字符串是unicode对象(文本字符串)。
关于上述Particle定义,必须注意的是,“name”列的类型不会因使用的Python版本而改变(当然),它始终对应于字节字符串。
所以,任何涉及“name”列的条件都应该使用适当类型的来编写,从而避免TypeError。
假设我们需要得到的对应于particle name的特定的行。下面的代码对Python2起作用,但对Python3会返回TypeError:
>>> condition = '(name == "Particle:      5") | (name == "Particle:      7")'
>>> for record in table.where(condition):  # TypeError in Python3
...     # do something with "record"
原因就是对于Python 3,“condition” 表示字节字符串(“name”列的内容)和一个unicode文本的比较。
正确的方式是:
>>> condition = '(name == b"Particle: 5") | (name == b"Particle: 7")'
下一节将向您展示如何将这些选定结果保存到文件中。
7. 创建新的数组对象
为了将所选数据与大量的检测器数据分离,我们将创建一个新的组列,该组列从root组分支。然后,在该组下,我们将创建两个包含所选数据的数组。首先,我们创建一个组:
>>> gcolumns = h5file.create_group(h5file.root, "columns", "Pressure and Name")
请注意,这次我们使用自然命名 (h5file.root) 而不是绝对路径字符串 (“/”) 来指定第一个参数。
现在,创建我们刚才提到的两个数组对象中的第一个:
>>> h5file.create_array(gcolumns, 'pressure', np.array(pressure), "Pressure column selection")
/columns/pressure (Array(3,)) 'Pressure column selection'
  atom := Float64Atom(shape=(), dflt=0.0)
  maindim := 0
  flavor := 'numpy'
  byteorder := 'little'
  chunkshape := None
我们已经知道 File.create_array()方法的前两个参数(与create_table中的前两个相同):它们是创建数组的父组和数组实例名称。第三个参数是要保存到磁盘的对象。在本例中,它是一个NumPy数组,它是根据我们之前创建的选择列表构建的。第四个参数是标题。
现在,我们将保存第二个数组。它包含我们之前选择的字符串列表:我们按原样保存此对象,无需进一步转换:
>>> h5file.create_array(gcolumns, 'name', names, "Name column selection")
/columns/name (Array(3,)) 'Name column selection'
  atom := StringAtom(itemsize=16, shape=(), dflt='')
  maindim := 0
  flavor := 'python'
  byteorder := 'irrelevant'
  chunkshape := None
如您所见, File.create_array()允许使用names名称(这是一个常规Python列表)作为对象参数。实际上,它接受各种不同常规类型的对象(参见create_array())作为参数。flavor属性(参见上面的输出)保存的了对象的原始类型。基于这个flavor,PyTables稍后将能够从磁盘检索同一的对象。
>>> print(h5file)
tutorial1.h5 (File) 'Test file'
Last modif.: 'Wed Mar  7 19:40:44 2007'
Object Tree:
/ (RootGroup) 'Test file'
/columns (Group) 'Pressure and Name'
/columns/name (Array(3,)) 'Name column selection'
/columns/pressure (Array(3,)) 'Pressure column selection'
/detector (Group) 'Detector information'
/detector/readout (Table(10,)) 'Readout example'
8. 关闭文件并查看其内容
最后,我们使用close方法在退出Python之前关闭文件:
>>> h5file.close()
>>> ^D
$
您现在已经创建了您的第一个 PyTables 文件,其中包含一个表和两个数组。您可以使用任何通用 HDF5 工具(例如 h5dump 或 h5ls)检查它。这是使用 h5ls 程序读取的 tutorial1.h5 的样子。
$ h5ls -rd tutorial1.h5
/columns                 Group
/columns/name            Dataset {3}
    Data:
        (0) "Particle:      5", "Particle:      6", "Particle:      7"
/columns/pressure        Dataset {3}
    Data:
        (0) 25, 36, 49
/detector                Group
/detector/readout        Dataset {10/Inf}
    Data:
        (0) {0, 0, 0, 0, 10, 0, "Particle:      0", 0},
        (1) {256, 1, 1, 1, 9, 17179869184, "Particle:      1", 1},
        (2) {512, 2, 256, 2, 8, 34359738368, "Particle:      2", 4},
        (3) {768, 3, 6561, 3, 7, 51539607552, "Particle:      3", 9},
        (4) {1024, 4, 65536, 4, 6, 68719476736, "Particle:      4", 16},
        (5) {1280, 5, 390625, 5, 5, 85899345920, "Particle:      5", 25},
        (6) {1536, 6, 1679616, 6, 4, 103079215104, "Particle:      6", 36},
        (7) {1792, 7, 5764801, 7, 3, 120259084288, "Particle:      7", 49},
        (8) {2048, 8, 16777216, 8, 2, 137438953472, "Particle:      8", 64},
        (9) {2304, 9, 43046721, 9, 1, 154618822656, "Particle:      9", 81}
以下是“ptdump”PyTables实用程序(位于utils/目录中)显示的输出。
$ ptdump tutorial1.h5
/ (RootGroup) 'Test file'
/columns (Group) 'Pressure and Name'
/columns/name (Array(3,)) 'Name column selection'
/columns/pressure (Array(3,)) 'Pressure column selection'
/detector (Group) 'Detector information'
/detector/readout (Table(10,)) 'Readout example'
如果您想要更详细的信息,可以将 -v 或 -d 选项传递给 ptdump。试试看!
此外,在Figure 1中,您使用 ViTables图形界面来查看tutorial1.h5文件。
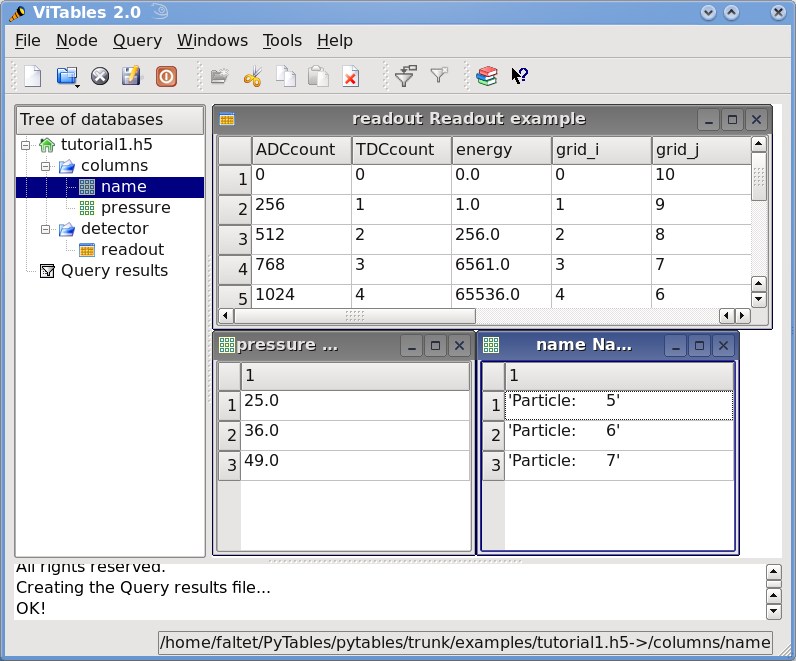
Figure 1. 图 1. 教程 1 的数据文件的初始版本,带有数据对象的视图。
浏览对象树
在本节中,我们将学习如何浏览树并检索数据以及有关实际数据的元信息。
在examples/tutorial1-2.py 中,您将找到本节中所有代码的工作版本。和以前一样,我们鼓励您在教程过程中使用 python shell 并检查对象树。
1. 遍历对象树
让我们先打开上一节教程中创建的文件:
>>> h5file = open_file("tutorial1.h5", "a")
这一次,我们以“a”ppend 模式打开了文件。我们使用这种模式向文件添加更多信息。
PyTables 遵循 Python 传统,提供强大的内省功能,即您可以轻松地查询有关对象树的任何组件的信息以及搜索树。
首先,您可以通过简单地打印现有的 File 实例来初步了解对象树:
>>> print(h5file)
tutorial1.h5 (File) 'Test file'
Last modif.: 'Wed Mar  7 19:50:57 2007'
Object Tree:
/ (RootGroup) 'Test file'
/columns (Group) 'Pressure and Name'
/columns/name (Array(3,)) 'Name column selection'
/columns/pressure (Array(3,)) 'Pressure column selection'
/detector (Group) 'Detector information'
/detector/readout (Table(10,)) 'Readout example'
看起来我们所有的对象都在那里。现在让我们使用 File 迭代器来看看如何列出对象树中的所有节点:
>>> for node in h5file:
...     print(node)
/ (RootGroup) 'Test file'
/columns (Group) 'Pressure and Name'
/detector (Group) 'Detector information'
/columns/name (Array(3,)) 'Name column selection'
/columns/pressure (Array(3,)) 'Pressure column selection'
/detector/readout (Table(10,)) 'Readout example'
我们可以使用 File 类的 File.walk_groups()方法来仅列出树上的组:
>>> for group in h5file.walk_groups():
...     print(group)
/ (RootGroup) 'Test file'
/columns (Group) 'Pressure and Name'
/detector (Group) 'Detector information'
请注意,File.walk_groups()实际上返回一个迭代器,而不是对象列表。将此迭代器与list_nodes() 方法结合使用是一个强大的组合。让我们看一个树中所有数组的示例列表:
>>> for group in h5file.walk_groups("/"):
...     for array in h5file.list_nodes(group, classname='Array'):
...         print(array)
/columns/name (Array(3,)) 'Name column selection'
/columns/pressure (Array(3,)) 'Pressure column selection'
File.list_nodes() 返回一个列表,其中包含挂起特定Group的所有节点。如果指定了classname关键字,该方法将过滤掉所有不是该类后代的实例。在此例中,我们只选取了用Array实例。此外,还有一个名为File.iter_nodes()的迭代器对应项,在某些情况下(如在处理后面有大量节点的组时)可能很方便。
我们可以通过使用 File 对象的File.walk_nodes()特殊方法来组合这两个调用。例如:
>>> for array in h5file.walk_nodes("/", "Array"):
...     print(array)
/columns/name (Array(3,)) 'Name column selection'
/columns/pressure (Array(3,)) 'Pressure column selection'
当以交互方式工作时,这是一个很好的快捷方式。
最后,我们将在/detector组中列出所有叶,即Table和Array实例(有关叶类的详细信息,请参见The Leaf class)。请注意,在该组中只会选择一个表类实例(即读数):
>>> for leaf in h5file.root.detector._f_walknodes('Leaf'):
...     print(leaf)
/detector/readout (Table(10,)) 'Readout example'
我们使用自然命名路径规范调用对Group._f_walknodes()方法,
当然,您可以使用这些强大的方法进行更复杂的节点选择。但首先,让我们看看一些重要的PyTables对象实例变量。
2. 设置和获取用户属性
PyTables通过使用AttributeSet类(请参见The AttributeSet class)来设置节点对象的属性。可以通过叶节点中的标准属性attrs和组节点中的_v_attrs访问此对象。
假设我们需要保存在/decetor/readout中的数据的日期,以及收集过程中的温度:
>>> table = h5file.root.detector.readout
>>> table.attrs.gath_date = "Wed, 06/12/2003 18:33"
>>> table.attrs.temperature = 18.4
>>> table.attrs.temp_scale = "Celsius"
现在,在/detector组中设置一个更复杂的属性:
>>> detector = h5file.root.detector
>>> detector._v_attrs.stuff = [5, (2.3, 4.5), "Integer and tuple"]
请注意因为detector是一个组节点, AttributeSet 实例是通过 _v_attrs 属性访问的。通常,可以将任何标准 Python 数据结构保存为属性节点。有关如何将它们序列化以导出到磁盘的更详细说明,请参阅 The AttributeSet class 。
检索属性:
>>> table.attrs.gath_date
'Wed, 06/12/2003 18:33'
>>> table.attrs.temperature
18.399999999999999
>>> table.attrs.temp_scale
'Celsius'
>>> detector._v_attrs.stuff
[5, (2.2999999999999998, 4.5), 'Integer and tuple']
删除属性:
>>> del table.attrs.gath_date
查看 /detector/table 的当前用户属性集(如果在 rlcompleter 模块处于活动状态的 Unix Python 控制台上,请尝试按 TAB 键两次):
>>> table.attrs
/detector/readout._v_attrs (AttributeSet), 23 attributes:
    [CLASS := 'TABLE',
     FIELD_0_FILL := 0,
     FIELD_0_NAME := 'ADCcount',
     FIELD_1_FILL := 0,
     FIELD_1_NAME := 'TDCcount',
     FIELD_2_FILL := 0.0,
     FIELD_2_NAME := 'energy',
     FIELD_3_FILL := 0,
     FIELD_3_NAME := 'grid_i',
     FIELD_4_FILL := 0,
     FIELD_4_NAME := 'grid_j',
     FIELD_5_FILL := 0,
     FIELD_5_NAME := 'idnumber',
     FIELD_6_FILL := '',
     FIELD_6_NAME := 'name',
     FIELD_7_FILL := 0.0,
     FIELD_7_NAME := 'pressure',
     FLAVOR := 'numpy',
     NROWS := 10,
     TITLE := 'Readout example',
     VERSION := '2.6',
     temp_scale := 'Celsius',
     temperature := 18.399999999999999]
我们已经获得了所有属性(包括系统属性)。您可以使用 _f_list() 方法获取所有属性或仅用户或系统属性的列表:
>>> print(table.attrs._f_list("all"))
['CLASS', 'FIELD_0_FILL', 'FIELD_0_NAME', 'FIELD_1_FILL', 'FIELD_1_NAME',
'FIELD_2_FILL', 'FIELD_2_NAME', 'FIELD_3_FILL', 'FIELD_3_NAME', 'FIELD_4_FILL',
'FIELD_4_NAME', 'FIELD_5_FILL', 'FIELD_5_NAME', 'FIELD_6_FILL', 'FIELD_6_NAME',
'FIELD_7_FILL', 'FIELD_7_NAME', 'FLAVOR', 'NROWS', 'TITLE', 'VERSION',
'temp_scale', 'temperature']
>>> print(table.attrs._f_list("user"))
['temp_scale', 'temperature']
>>> print(table.attrs._f_list("sys"))
['CLASS', 'FIELD_0_FILL', 'FIELD_0_NAME', 'FIELD_1_FILL', 'FIELD_1_NAME',
'FIELD_2_FILL', 'FIELD_2_NAME', 'FIELD_3_FILL', 'FIELD_3_NAME', 'FIELD_4_FILL',
'FIELD_4_NAME', 'FIELD_5_FILL', 'FIELD_5_NAME', 'FIELD_6_FILL', 'FIELD_6_NAME',
'FIELD_7_FILL', 'FIELD_7_NAME', 'FLAVOR', 'NROWS', 'TITLE', 'VERSION']
重命名属性:
>>> table.attrs._f_rename("temp_scale","tempScale")
>>> print(table.attrs._f_list())
['tempScale', 'temperature']
从 PyTables 2.0 开始,您还可以设置、删除或重命名系统属性:
>>> table.attrs._f_rename("VERSION", "version")
>>> table.attrs.VERSION
Traceback (most recent call last):
    File "<stdin>", line 1, in <module>
    File "tables/attributeset.py", line 222, in __getattr__
        (name, self._v__nodepath)
AttributeError: Attribute 'VERSION' does not exist in node: '/detector/readout'
>>> table.attrs.version
'2.6'
用户注意:您在修改系统属性时必须小心,因为您可能最终会欺骗 PyTables 并最终获得不需要的行为。仅当您知道自己在做什么时才使用它。因此,鉴于上述警告,我们将继续恢复 VERSION 属性的原始名称:
>>> table.attrs._f_rename("version", "VERSION")
>>> table.attrs.VERSION
'2.6'
好的,这样更好。如果您现在要终止会话,请使用 h5ls 命令从写入磁盘的文件中读取 /detector/readout 属性。
$ h5ls -vr tutorial1.h5/detector/readout
Opened "tutorial1.h5" with sec2 driver.
/detector/readout        Dataset {10/Inf}
    Attribute: CLASS     scalar
        Type:      6-byte null-terminated ASCII string
        Data:  "TABLE"
    Attribute: VERSION   scalar
        Type:      4-byte null-terminated ASCII string
        Data:  "2.6"
    Attribute: TITLE     scalar
        Type:      16-byte null-terminated ASCII string
        Data:  "Readout example"
    Attribute: NROWS     scalar
        Type:      native long long
        Data:  10
    Attribute: FIELD_0_NAME scalar
        Type:      9-byte null-terminated ASCII string
        Data:  "ADCcount"
    Attribute: FIELD_1_NAME scalar
        Type:      9-byte null-terminated ASCII string
        Data:  "TDCcount"
    Attribute: FIELD_2_NAME scalar
        Type:      7-byte null-terminated ASCII string
        Data:  "energy"
    Attribute: FIELD_3_NAME scalar
        Type:      7-byte null-terminated ASCII string
        Data:  "grid_i"
    Attribute: FIELD_4_NAME scalar
        Type:      7-byte null-terminated ASCII string
        Data:  "grid_j"
    Attribute: FIELD_5_NAME scalar
        Type:      9-byte null-terminated ASCII string
        Data:  "idnumber"
    Attribute: FIELD_6_NAME scalar
        Type:      5-byte null-terminated ASCII string
        Data:  "name"
    Attribute: FIELD_7_NAME scalar
        Type:      9-byte null-terminated ASCII string
        Data:  "pressure"
    Attribute: FLAVOR    scalar
        Type:      5-byte null-terminated ASCII string
        Data:  "numpy"
    Attribute: tempScale scalar
        Type:      7-byte null-terminated ASCII string
        Data:  "Celsius"
    Attribute: temperature scalar
        Type:      native double
        Data:  18.4
    Location:  0:1:0:1952
    Links:     1
    Modified:  2006-12-11 10:35:13 CET
    Chunks:    {85} 3995 bytes
    Storage:   470 logical bytes, 3995 allocated bytes, 11.76% utilization
    Type:      struct {
                    "ADCcount"         +0    native unsigned short
                    "TDCcount"         +2    native unsigned char
                    "energy"           +3    native double
                    "grid_i"           +11   native int
                    "grid_j"           +15   native int
                    "idnumber"         +19   native long long
                    "name"             +27   16-byte null-terminated ASCII string
                    "pressure"         +43   native float
                } 47 bytes
属性是一种向数据添加持久(元)信息的有用机制。
3. 得到对象的元数据
PyTables 中的每个对象都有关于文件中数据的元数据信息。通常可以通过节点实例变量访问此元信息。让我们看一些例子:
>>> print("Object:", table)
Object: /detector/readout (Table(10,)) 'Readout example'
>>> print("Table name:", table.name)
Table name: readout
>>> print("Table title:", table.title)
Table title: Readout example
>>> print("Number of rows in table:", table.nrows)
Number of rows in table: 10
>>> print("Table variable names with their type and shape:")
Table variable names with their type and shape:
>>> for name in table.colnames:
...     print(name, ':= %s, %s' % (table.coldtypes[name], table.coldtypes[name].shape))
ADCcount := uint16, ()
TDCcount := uint8, ()
energy := float64, ()
grid_i := int32, ()
grid_j := int32, ()
idnumber := int64, ()
name := |S16, ()
pressure := float32, ()
在这里,Table 对象的 name、title、nrows、colnames 和 Coldtypes 属性(请参阅 Table 以获取完整的属性列表)为我们提供了有关表数据的大量信息。
您可以通过寻求帮助以交互方式检索有关 PyTables 中公共对象的一般信息:
>>> help(table)
Help on Table in module tables.table:
class Table(tableextension.Table, tables.leaf.Leaf)
|  This class represents heterogeneous datasets in an HDF5 file.
|
|  Tables are leaves (see the `Leaf` class) whose data consists of a
|  unidimensional sequence of *rows*, where each row contains one or
|  more *fields*.  Fields have an associated unique *name* and
|  *position*, with the first field having position 0.  All rows have
|  the same fields, which are arranged in *columns*.
[snip]
|
|  Instance variables
|  ------------------
|
|  The following instance variables are provided in addition to those
|  in `Leaf`.  Please note that there are several `col` dictionaries
|  to ease retrieving information about a column directly by its path
|  name, avoiding the need to walk through `Table.description` or
|  `Table.cols`.
|
|  autoindex
|      Automatically keep column indexes up to date?
|
|      Setting this value states whether existing indexes should be
|      automatically updated after an append operation or recomputed
|      after an index-invalidating operation (i.e. removal and
|      modification of rows).  The default is true.
[snip]
|  rowsize
|      The size in bytes of each row in the table.
|
|  Public methods -- reading
|  -------------------------
|
|  * col(name)
|  * iterrows([start][, stop][, step])
|  * itersequence(sequence)
* itersorted(sortby[, checkCSI][, start][, stop][, step])
|  * read([start][, stop][, step][, field][, coords])
|  * read_coordinates(coords[, field])
* read_sorted(sortby[, checkCSI][, field,][, start][, stop][, step])
|  * __getitem__(key)
|  * __iter__()
|
|  Public methods -- writing
|  -------------------------
|
|  * append(rows)
|  * modify_column([start][, stop][, step][, column][, colname])
[snip]
尝试获取其他对象文档的帮助:
>>> help(h5file)
>>> help(table.remove_rows)
检查 /columns/pressure Array 对象中的元数据:
>>> pressureObject = h5file.get_node("/columns", "pressure")
>>> print("Info on the object:", repr(pressureObject))
Info on the object: /columns/pressure (Array(3,)) 'Pressure column selection'
  atom := Float64Atom(shape=(), dflt=0.0)
  maindim := 0
  flavor := 'numpy'
  byteorder := 'little'
  chunkshape := None
>>> print("  shape: ==>", pressureObject.shape)
  shape: ==> (3,)
>>> print("  title: ==>", pressureObject.title)
  title: ==> Pressure column selection
>>> print("  atom: ==>", pressureObject.atom)
  atom: ==> Float64Atom(shape=(), dflt=0.0)
请注意,。 File.get_node()的优点是它可以从路径名字符串中获取节点(如本例所示),还可以充当过滤器以仅显示特定位置中作为类名称实例的节点。但是,总的来说,我认为自然命名更优雅且更易于使用,尤其是当您使用交互式控制台中存在的名称自动补全功能时。
如果查看 pressureObject 对象的 type 属性,可以验证它是一个“float64”数组。通过查看它的 shape 属性,你可以推断出磁盘上的数组是一维的,有 3 个元素。有关完整的 Array 属性列表,请参阅 Array 或内部文档字符串。
4. 从数组对象中读取数据
找到所需的 Array 后,使用 Array 对象的read()方法检索其数据:
>>> pressureArray = pressureObject.read()
>>> pressureArray
array([ 25.,  36.,  49.])
>>> print("pressureArray is an object of type:", type(pressureArray))
pressureArray is an object of type: <type 'numpy.ndarray'>
>>> nameArray = h5file.root.columns.name.read()
>>> print("nameArray is an object of type:", type(nameArray))
nameArray is an object of type: <type 'list'>
>>>
>>> print("Data on arrays nameArray and pressureArray:")
Data on arrays nameArray and pressureArray:
>>> for i in range(pressureObject.shape[0]):
...     print(nameArray[i], "-->", pressureArray[i])
Particle:      5 --> 25.0
Particle:      6 --> 36.0
Particle:      7 --> 49.0
可以发现Array.read()方法为 pressureObject 实例返回一个真实的 NumPy 对象,read() 方法为nameArray 对象实例返回的是Python(字符串) 列表。
此外,有一个名为FAVOR的HDF5属性记录了保存对象的数据类型,可以通过Array.attrs.FLAVOR 变量访问这个属性。保存的对象类型存储,就像一个HDF5保存的对象类型存储为磁盘上对象的 HDF5 属性(名为 FLAVOR)。然后将此属性作为 Array 元信息读取(可通过 ),从而使读取的数组能够转换为原始对象。这提供了一种将大量对象保存为数组的方法,并保证您以后能够以原始形式恢复它们。有关 Array 对象类支持的对象的完整列表,请参阅File.create_array()。
将数据提交到表和数组
现在让我们研究 PyTables 最强大的功能之一,即如何修改已创建的表和数组1
1. 将数据追加到现有表
现在,让我们看看如何向磁盘上的现有表添加记录。让我们为readout表对象附加一些新值:
>>> table = h5file.root.detector.readout
>>> particle = table.row
>>> for i in range(10, 15):
...     particle['name']  = f'Particle: {i:6d}'
...     particle['TDCcount'] = i % 256
...     particle['ADCcount'] = (i * 256) % (1 << 16)
...     particle['grid_i'] = i
...     particle['grid_j'] = 10 - i
...     particle['pressure'] = float(i*i)
...     particle['energy'] = float(particle['pressure'] ** 4)
...     particle['idnumber'] = i * (2 ** 34)
...     particle.append()
>>> table.flush()
这与我们用来填充新表的方法相同。 PyTables 知道该表在磁盘上,当您添加新记录时,它们会追加到表的末尾2。
如果您仔细查看代码,您将看到我们使用 table.row 属性创建了一个table行并用新值填充它。每次调用其 append() 方法时,实际行都会提交到输出缓冲区,并且行指针会递增以指向下一个表记录。当缓冲区已满时,将数据保存在磁盘上,并在下一个循环中再次重复使用缓冲区。
注意事项:不要忘记在写操作后总是调用flush()方法,否则你的表不会被更新!
让我们看看修改后的表中的一些行,并验证我们的新数据是否已附加:
>>> for r in table.iterrows():
...     print("%-16s | %11.1f | %11.4g | %6d | %6d | %8d \|" % \\
...         (r['name'], r['pressure'], r['energy'], r['grid_i'], r['grid_j'],
...         r['TDCcount']))
Particle:      0 |         0.0 |           0 |      0 |     10 |        0 |
Particle:      1 |         1.0 |           1 |      1 |      9 |        1 |
Particle:      2 |         4.0 |         256 |      2 |      8 |        2 |
Particle:      3 |         9.0 |        6561 |      3 |      7 |        3 |
Particle:      4 |        16.0 |   6.554e+04 |      4 |      6 |        4 |
Particle:      5 |        25.0 |   3.906e+05 |      5 |      5 |        5 |
Particle:      6 |        36.0 |    1.68e+06 |      6 |      4 |        6 |
Particle:      7 |        49.0 |   5.765e+06 |      7 |      3 |        7 |
Particle:      8 |        64.0 |   1.678e+07 |      8 |      2 |        8 |
Particle:      9 |        81.0 |   4.305e+07 |      9 |      1 |        9 |
Particle:     10 |       100.0 |       1e+08 |     10 |      0 |       10 |
Particle:     11 |       121.0 |   2.144e+08 |     11 |     -1 |       11 |
Particle:     12 |       144.0 |     4.3e+08 |     12 |     -2 |       12 |
Particle:     13 |       169.0 |   8.157e+08 |     13 |     -3 |       13 |
Particle:     14 |       196.0 |   1.476e+09 |     14 |     -4 |       14 |
2. 修改表中的数据
好的,到目前为止,我们只是在我们的表中读取和写入(追加)值。但有时我们需要修改数据,让我们看看如何修改保存在现有表中的值。我们将开始修改Particle表第一行中的单个单元格:
>>> print("Before modif-->", table[0])
Before modif--> (0, 0, 0.0, 0, 10, 0L, 'Particle:      0', 0.0)
>>> table.cols.TDCcount[0] = 1
>>> print("After modifying first row of ADCcount-->", table[0])
After modifying first row of ADCcount--> (0, 1, 0.0, 0, 10, 0L, 'Particle:      0', 0.0)
>>> table.cols.energy[0] = 2
>>> print("After modifying first row of energy-->", table[0])
After modifying first row of energy--> (0, 1, 2.0, 0, 10, 0L, 'Particle:      0', 0.0)
我们也可以修改完整的列范围:
>>> table.cols.TDCcount[2:5] = [2,3,4]
>>> print("After modifying slice [2:5] of TDCcount-->", table[0:5])
After modifying slice [2:5] of TDCcount-->
[(0, 1, 2.0, 0, 10, 0L, 'Particle:      0', 0.0)
 (256, 1, 1.0, 1, 9, 17179869184L, 'Particle:      1', 1.0)
 (512, 2, 256.0, 2, 8, 34359738368L, 'Particle:      2', 4.0)
 (768, 3, 6561.0, 3, 7, 51539607552L, 'Particle:      3', 9.0)
 (1024, 4, 65536.0, 4, 6, 68719476736L, 'Particle:      4', 16.0)]
>>> table.cols.energy[1:9:3] = [2,3,4]
>>> print("After modifying slice [1:9:3] of energy-->", table[0:9])
After modifying slice [1:9:3] of energy-->
[(0, 1, 2.0, 0, 10, 0L, 'Particle:      0', 0.0)
 (256, 1, 2.0, 1, 9, 17179869184L, 'Particle:      1', 1.0)
 (512, 2, 256.0, 2, 8, 34359738368L, 'Particle:      2', 4.0)
 (768, 3, 6561.0, 3, 7, 51539607552L, 'Particle:      3', 9.0)
 (1024, 4, 3.0, 4, 6, 68719476736L, 'Particle:      4', 16.0)
 (1280, 5, 390625.0, 5, 5, 85899345920L, 'Particle:      5', 25.0)
 (1536, 6, 1679616.0, 6, 4, 103079215104L, 'Particle:      6', 36.0)
 (1792, 7, 4.0, 7, 3, 120259084288L, 'Particle:      7', 49.0)
 (2048, 8, 16777216.0, 8, 2, 137438953472L, 'Particle:      8', 64.0)]
检查值是否已正确修改!
提示
记住 TDCcount 是第二列,能量是第三列。在 Column.__setitem__()中查找有关修改列的更多信息。
PyTables 还允许您同时修改完整的行集。作为这些功能的演示,请参见下一个示例:
>>> table.modify_rows(start=1, step=3,
...                 rows=[(1, 2, 3.0, 4, 5, 6L, 'Particle:   None', 8.0),
...                       (2, 4, 6.0, 8, 10, 12L, 'Particle: None*2', 16.0)])
2
>>> print("After modifying the complete third row-->", table[0:5])
After modifying the complete third row-->
[(0, 1, 2.0, 0, 10, 0L, 'Particle:      0', 0.0)
 (1, 2, 3.0, 4, 5, 6L, 'Particle:   None', 8.0)
 (512, 2, 256.0, 2, 8, 34359738368L, 'Particle:      2', 4.0)
 (768, 3, 6561.0, 3, 7, 51539607552L, 'Particle:      3', 9.0)
 (2, 4, 6.0, 8, 10, 12L, 'Particle: None*2', 16.0)]
如您所见, modify_rows() 调用修改了第二行和第五行,并返回了修改行数。
除了 Table.modify_rows()之外,还有另一种方法,称为Table.modify_column()来修改特定的列。
最后,还有另一种修改表格的方法,通常比上述方法更方便。这种新方法使用附加到每个表的 Row 实例的 Row.update() 方法,因此它旨在用于表迭代器。看看下面的例子:
>>> for row in table.where('TDCcount <= 2'):
...     row['energy'] = row['TDCcount']*2
...     row.update()
>>> print("After modifying energy column (where TDCcount <=2)-->", table[0:4])
After modifying energy column (where TDCcount <=2)-->
[(0, 1, 2.0, 0, 10, 0L, 'Particle:      0', 0.0)
 (1, 2, 4.0, 4, 5, 6L, 'Particle:   None', 8.0)
 (512, 2, 4.0, 2, 8, 34359738368L, 'Particle:      2', 4.0)
 (768, 3, 6561.0, 3, 7, 51539607552L, 'Particle:      3', 9.0)]
注意:作者发现这种更新表格的方式(即使用 Row.update())既方便又高效。请确保广泛使用它。
注意事项:目前,如果循环被 break 语句破坏,Row.update()将不起作用(表不会更新)。一种可能的解决方法是通过在 break 语句之前调用 row._flushModRows() 手动刷新行内部缓冲区。
3. 修改数组中的数据
如何修改数组对象中的数据。执行此操作的基本方法是使用Array.__setitem__()特殊方法。让我们看看如何修改 pressureObject 数组上的数据:
>>> pressureObject = h5file.root.columns.pressure
>>> print("Before modif-->", pressureObject[:])
Before modif--> [ 25.  36.  49.]
>>> pressureObject[0] = 2
>>> print("First modif-->", pressureObject[:])
First modif--> [  2.  36.  49.]
>>> pressureObject[1:3] = [2.1, 3.5]
>>> print("Second modif-->", pressureObject[:])
Second modif--> [ 2.   2.1  3.5]
>>> pressureObject[::2] = [1,2]
>>> print("Third modif-->", pressureObject[:])
Third modif--> [ 1.   2.1  2. ]
一般而言,您可以使用(多维)扩展切片的任意组合。
唯一的例外是您不能使用负值作为 step 来引用要修改的索引。有关如何在 PyTables 对象中使用扩展切片的更多示例,请参阅Array.__getitem__()。
同样,对于字符串数组:
>>> nameObject = h5file.root.columns.name
>>> print("Before modif-->", nameObject[:])
Before modif--> ['Particle:      5', 'Particle:      6', 'Particle:      7']
>>> nameObject[0] = 'Particle:   None'
>>> print("First modif-->", nameObject[:])
First modif--> ['Particle:   None', 'Particle:      6', 'Particle:      7']
>>> nameObject[1:3] = ['Particle:      0', 'Particle:      1']
>>> print("Second modif-->", nameObject[:])
Second modif--> ['Particle:   None', 'Particle:      0', 'Particle:      1']
>>> nameObject[::2] = ['Particle:     -3', 'Particle:     -5']
>>> print("Third modif-->", nameObject[:])
Third modif--> ['Particle:     -3', 'Particle:      0', 'Particle:     -5']
4. 如何删除表中的行
从表中删除一些行。假设我们要删除第 5 到第 9 行(包括):
>>> table.remove_rows(5,10)
5
Table.remove_rows() 删除范围(开始、停止)中的行。它返回有效删除的行数。
完成后不要忘记关闭文件:
>>> h5file.close()
>>> ^D
$
在Figure 2中,您可以看到包含我们刚刚创建的数据集的 PyTables 文件的图形视图。在Figure 3, /detector/readout 表的一般属性。显示表 /detector/readout的一般属性。
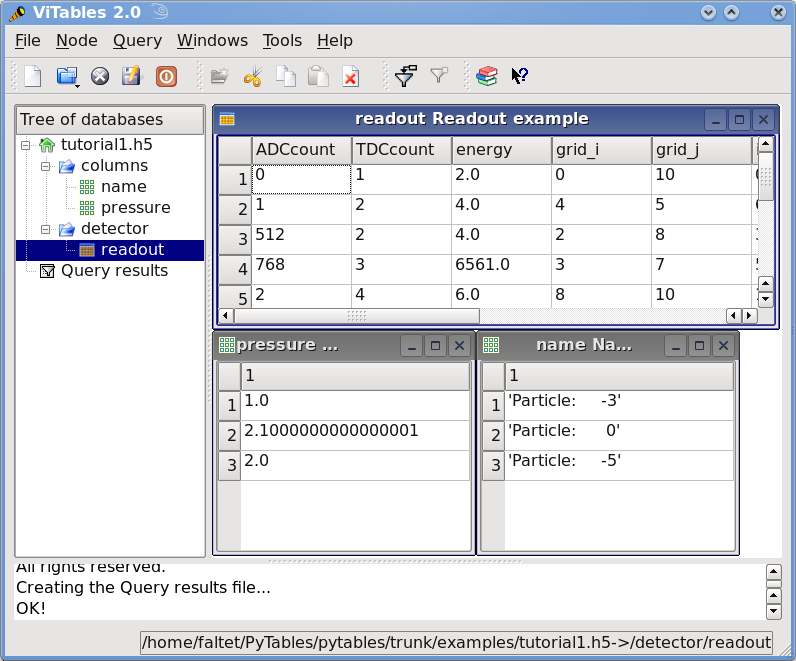
Figure 2. 教程 1 的数据文件的最终版本。
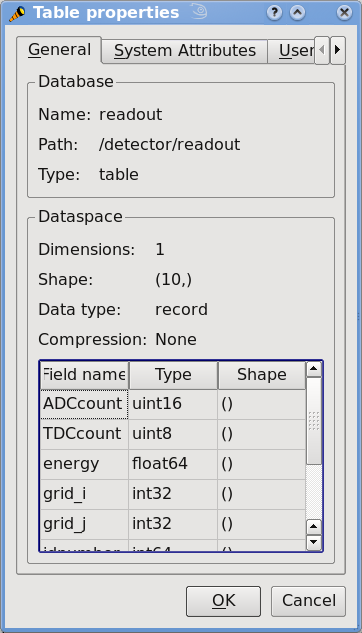
Figure 3. 图 3. /detector/readout 表的一般属性。

 浙公网安备 33010602011771号