

IOS开发-代码创建UI控件并修改控件属性(代码创建UIButton、UILabel)
一. 概述:
在IOS开发的界面搭建步骤中,Storyboard中的所有操作都可以通过代码实现,Storyboard的实质是xcode根据Storyboard文件的描述帮我们转换为代码,总之代码是万能的,那么什么时候适合使用Storyboard什么时候使用代码创建按钮呢?一般一个界面中位置是固定不变的,程序运行时一直是可见的这样一般用Storyboard即可,但是有些控件需要做某些操作时才会出现,这时候一般就会使用代码创建。
二. 代码创建控件的步骤
1. 使用要用控件的类创建控件对象,比如创建按钮控件:
1 // 创建默认类型的按钮
2 UIButton *delete = [[UIButton alloc] init];
3 // 创建custom类型按钮
4 UIButton *btn = [UIButton buttonWithType:UIButtonTypeCustom];
2.设置控件的各种属性,包括位置尺寸、显示的文字、背景颜色等等,总之在sotryBoard中可以设置的属性代码完全可以做到:

// 设置按钮位置尺寸
btn.frame = CGRectMake(20, 0, ROWH , ROWH);
// 设置按钮背景颜色
btn.backgroundColor = [UIColor clearColor];
3. 添加控件到父控件中
// 将按钮添加到当前视图控制器管理的视图中
[self.view addSubview:btn];
4. 如果是按钮还要设置监听事件
// 设置按钮点击后执行deleteClick方法
[delete addTarget:self action:@selector(deleteClick:) forControlEvents:UIControlEventTouchUpInside];

- (void)deleteClick:(UIButton *)btn
{
    NSLog(@"delete btn click");
}
三. 代码创建控件使用实例-联系人管理
下面通过联系人个管理这个简单的应用熟悉代码创建控件,此应用结合了storyboard和代码两种方式创建界面。
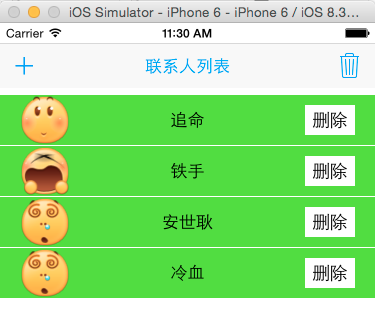
本实例的UIToolbar由于位置固定是在storyboard创建,初始状态删除按钮时disable状态。

本程序主要的方法有UIToolbar中增加和删除两个按钮的监听和联系人这一行的创建。


 1 @interface ViewController ()
 2 {
 3     NSArray *_names; // 存储姓名
 4 }
 5 /** UIToolbar中的删除按钮 */
 6 @property (weak, nonatomic) IBOutlet UIBarButtonItem *removeButton;
 7 /** UIToolbar中增加联系人按钮的监听 */
 8 - (IBAction)add:(UIBarButtonItem *)sender;
 9 /** UIToolbar中删除联系人按钮的监听 会删除最后一行 */
10 - (IBAction)removeLast:(UIBarButtonItem *)sender;
11
12 @end
  1 @implementation ViewController
  2 #pragma mark 启动时加载一次
  3 - (void)viewDidLoad {
  4     [super viewDidLoad];
  5
  6     // 创建名字数组
  7     _names = @[@"无情",@"铁手",@"追命",@"冷血",@"安世耿"];
  8 }
  9
 10 #pragma mark 创建一行
 11 - (UIView *)createRow
 12 {
 13     /** 1.创建一行UIView 此行作为父控件,包含了:头像(UIButton) 姓名(UILabel) 删除按钮(UIButton)*/
 14     UIView *newView = [[UIView alloc] init];
 15
 16     /** 2.设置一行的背景颜色为绿色 */
 17     newView.backgroundColor = [UIColor greenColor];
 18
 19     /** 3.设置一行的姓名 使用UILabel */
 20     // 创建lable控件
 21     UILabel *label = [[UILabel alloc] init];
 22     // 设置label控件的位置和尺寸
 23     label.frame = CGRectMake(0, 0, self.view.frame.size.width, ROWH);
 24
 25     // label控件的字体相关的属性,考虑的几个方面
 26     // 1. 文字内容,通过arc4random_uniform(u_int32_t x)方法得到小于x的随机数
 27     int nameIndex = arc4random_uniform((u_int32_t)_names.count);
 28     // 随机去一个名字并赋给label
 29     label.text = _names[nameIndex];
 30
 31     // 2. 字体位置居中 初学者不知道就看sb文件的右侧对应的属性名字
 32     label.textAlignment = NSTextAlignmentCenter;
 33     // 2.背景颜色
 34     label.backgroundColor = [UIColor clearColor];
 35     // 给label绑定一个tag
 36     label.tag = 10;
 37
 38     // 将label添加到父控件(一行)中并显示
 39     [newView addSubview:label];
 40
 41
 42     /** 4. 设置一行的图像 使用UIButton */
 43     // 创建button
 44     UIButton *btn = [UIButton buttonWithType:UIButtonTypeCustom];
 45
 46     // 图片的原点以自己父控件(一行)左上角为原点,不是整个屏幕
 47     btn.frame = CGRectMake(20, 0, ROWH , ROWH);
 48     // 设置button的背景颜色为无色
 49     btn.backgroundColor = [UIColor clearColor];
 50
 51     // 产生小于9的随机数
 52     int num = arc4random_uniform(9);
 53     // 随机产生一个图片名
 54     NSString *imageName = [NSString stringWithFormat:@"01%d",num];
 55     // 设置button的Normal状态背景图片
 56     [btn setImage:[UIImage imageNamed:imageName] forState:UIControlStateNormal];
 57
 58     // 添加图像点击监听事件 */
 59     [btn addTarget:self action:@selector(iconClick:) forControlEvents:UIControlEventTouchUpInside];
 60
 61     // 将button添加到父控件(一行)中并显示
 62     [newView addSubview:btn];
 63
 64     /** 5.为每行添加删除按钮 */
 65     UIButton *delete = [[UIButton alloc] init];
 66     delete.frame = CGRectMake(self.view.frame.size.width - 70, 10, 50, 30);
 67     // 设置按钮的文字为“删除”
 68     [delete setTitle:@"删除" forState:UIControlStateNormal];
 69
 70     // 设置button的Normal状态的文字颜色
 71     [delete setTitleColor:[UIColor blackColor] forState:UIControlStateNormal];
 72
 73     // 设置删除按钮的背景颜色为白色
 74     [delete setBackgroundColor:[UIColor whiteColor]];
 75
 76     // 设置监听事件
 77     [delete addTarget:self action:@selector(deleteClick:) forControlEvents:UIControlEventTouchUpInside];
 78
 79     // 将删除按钮添加到一行中
 80     [newView addSubview:delete];
 81
 82     return newView;
 83 }
 84 #pragma mark 删除自己所在的一行
 85 /** 删除自己所在的一行 */
 86 - (void)deleteClick:(UIButton *)btn
 87 {
 88     // 获取父控件
 89     UIView *delete = [btn superview];
 90     /** 动画方式删除本行所有内容 */
 91     [UIView animateWithDuration:0.5 animations:^{
 92         // 取出frame
 93         CGRect TempFrame = delete .frame;
 94         // 改写frame
 95         TempFrame.origin.x = self.view.frame.size.width;
 96         // 重新写回
 97         delete .frame = TempFrame;
 98     } completion:^(BOOL finished) {
 99         // 获取当前删除按钮的父控件的索引
100         int index = (int)[self.view.subviews indexOfObject:delete];
101         // 从父控件中删除
102         [delete removeFromSuperview];
103
104         _removeButton.enabled = self.view.subviews.count > 1;
105
106         [UIView animateWithDuration:0.5 animations:^{
107             // 将下面的行上移
108             for (int i = index; i < self.view.subviews.count; i++)
109             {
110                 //UIView *tempView = [self.view viewWithTag:i];
111                 UIView *tempView = self.view.subviews[i];
112                 CGRect tempF = tempView.frame;
113                 tempF.origin.y -= (ROWH + 1);
114                 tempView.frame = tempF;
115
116             }
117         }];
118
119     }];
120
121 }
122 // 每个头像被点击都会调用此方法
123 - (void)iconClick:(UIButton *)btn
124 {
125     UILabel *name = (UILabel *)[btn.superview viewWithTag:10];
126     NSLog(@"name.text %@",name.text);
127 }
128 #pragma mark 添加一行
129 - (IBAction)add:(UIBarButtonItem *)sender
130 {
131     NSLog(@"add");
132
133     // 0.取出最后一个控件,根据此控件设置添加的下一个控件的坐标
134     UIView *last = self.view.subviews.lastObject;
135
136     // 调用createRow创建一行这个控件
137     UIView *newView = [self createRow];
138
139     // 设置初始坐标,最开始为隐藏的(使整个控件出现在屏幕最右侧) 之后动画形式展示出来,从右向左慢慢移动
140     CGFloat rowY = last.frame.origin.y + ROWH + 1;
141     // x设置为在屏幕右侧
142     CGFloat rowX = last.frame.size.width;
143     newView.frame = CGRectMake(rowX, rowY, last.frame.size.width, ROWH);
144
145     /** 添加到面板 */
146     [self.view addSubview:newView];
147
148     /** 使能UIToolBar中删除按钮 */
149     _removeButton.enabled = YES;
150
151     //开始透明的
152     newView.alpha = 0;
153     [UIView animateWithDuration:0.5 animations:^{
154         // 改变一行的位置从最右侧看不见的位置移动到左侧
155         newView.frame = CGRectMake(0, rowY, last.frame.size.width, ROWH);
156         // 透明度动画
157         newView.alpha = 1;
158     } completion:^(BOOL finished) {
159         NSLog(@"添加完毕");
160     }];
161
162 }
163 #pragma mark 删除最后一个联系人信息
164 - (IBAction)removeLast:(UIBarButtonItem *)sender
165 {
166     NSLog(@"remove");
167     /** 判断要删除的是否是自己(toolBar)防止删除自己,有两种方式 */
168
169     /**  方式1 根据当前子控件个数
170      *    如果大于一个子控件则使能ToolBar中的删除按钮,如果只有一个子控件就
171      *    是toolbar,不能删除
172      */
173     // 取出最后一个子控件
174     UIView *last = self.view.subviews.lastObject;
175
176       /* 开始执行动画 */
177       // 1. 取出当前的fram付给临时值
178       CGRect tempF = last.frame;
179       // 2.改变frame
180       tempF.origin.x = last.frame.size.width;
181       // 3.重写frame并执行动画
182       [UIImageView animateWithDuration:0.5 animations:^{
183           last.frame = tempF;
184       } completion:^(BOOL finished) {// 动画执行完毕之后删除这个对象
185           [last removeFromSuperview];
186           // 判断子控件的个数大于1置为使能状态
187           _removeButton.enabled = self.view.subviews.count > 1;
188       }];
189
190 //
191       /** 方式2 根据要删除控件的类是否和UItoolBar这个类相等 */
192 //    // 取出UItoolBar这个类
193 //    Class c = [UIToolbar class];
194       // 判断最后一个控件的类是否是UIToolbar
195 //    UIView *last2 = self.view.subviews.lastObject;
196 //    if([last2 isKindOfClass:c])
197 //    {
198 //        _removeButton.enabled  = NO;
199 //    }
200
201 }
202 @end
小结:
1.关于颜色的获取与设置
1)一个UIColor代表一种颜色,通过UIColor的类方法,可以获得很多常用的颜色,每种颜色的方法如下:
 1 + (UIColor *)blackColor;      // 0.0 white
 2 + (UIColor *)darkGrayColor;   // 0.333 white
 3 + (UIColor *)lightGrayColor;  // 0.667 white
 4 + (UIColor *)whiteColor;      // 1.0 white
 5 + (UIColor *)grayColor;       // 0.5 white
 6 + (UIColor *)redColor;        // 1.0, 0.0, 0.0 RGB
 7 + (UIColor *)greenColor;      // 0.0, 1.0, 0.0 RGB
 8 + (UIColor *)blueColor;       // 0.0, 0.0, 1.0 RGB
 9 + (UIColor *)cyanColor;       // 0.0, 1.0, 1.0 RGB
10 + (UIColor *)yellowColor;     // 1.0, 1.0, 0.0 RGB
11 + (UIColor *)magentaColor;    // 1.0, 0.0, 1.0 RGB
12 + (UIColor *)orangeColor;     // 1.0, 0.5, 0.0 RGB
13 + (UIColor *)purpleColor;     // 0.5, 0.0, 0.5 RGB
14 + (UIColor *)brownColor;      // 0.6, 0.4, 0.2 RGB
15 + (UIColor *)clearColor;      // 0.0 white, 0.0 alpha
2)将控件背景颜色设为绿色的示例
UIView *newView = [[UIView alloc] init];
// 设置背景颜色为绿色
newView.backgroundColor = [UIColor greenColor];
2.UIViewController的 - (void)viewDidLoad方法使用
1》 这是控制器的一个方法
2》当控制器的view创建完毕的时候会调用一次,仅此一次。
一般在此方法中加载app的数据。
3. 随机数的获取
// 产生一个随机数
u_int32_t    arc4random(void);
// 产生小于所传参数的随机数
u_int32_t arc4random_uniform(u_int32_t /*upper_bound*/)
4.控制器的宽度和高度的获取
开发中为了适应不同的屏幕尺寸要经常使用当前屏幕的宽度和高度,可通过UIView的frame.size得到
1 // 宽度获取
2 CGFloat width = self.view.frame.size.width;
3 // 高度获取
4 CGFloat height = self.view.frame.size.height;
