spring boot 项目的创建
一. 进入https://start.spring.io 快速创建项目
二. 利用eclipse sts插件创建项目
1. 安装sts插件
- 进入https://spring.io/tools3/sts/all????????spring 选择对应的sts版本下载
- 要连外网才可以安装
三.创建spring boot 项目详细步骤
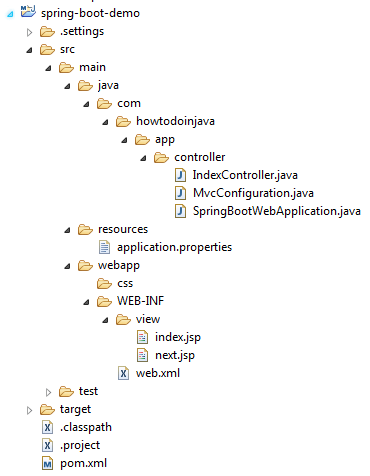
1.目录结构


2.pom.xml 依赖
<?xml version="1.0" encoding="UTF-8"?>
<project xmlns="http://maven.apache.org/POM/4.0.0" xmlns:xsi="http://www.w3.org/2001/XMLSchema-instance"
    xsi:schemaLocation="http://maven.apache.org/POM/4.0.0 http://maven.apache.org/xsd/maven-4.0.0.xsd">
    <modelVersion>4.0.0</modelVersion>
    <parent>
        <groupId>org.springframework.boot</groupId>
        <artifactId>spring-boot-starter-parent</artifactId>
        <version>2.1.5.RELEASE</version>
        <relativePath/> <!-- lookup parent from repository -->
    </parent>
    <groupId>com.example</groupId>
    <artifactId>jjsp</artifactId>
    <version>0.0.1-SNAPSHOT</version>
    <packaging>war</packaging>
    <name>jjsp</name>
    <description>jsp project for Spring Boot</description>

    <properties>
        <java.version>1.8</java.version>
    </properties>

    <dependencies>
        <dependency>
            <groupId>org.springframework.boot</groupId>
            <artifactId>spring-boot-starter-web</artifactId>
        </dependency>

        <dependency>
            <groupId>org.springframework.boot</groupId>
            <artifactId>spring-boot-starter-tomcat</artifactId>
            <scope>provided</scope>
        </dependency>
        <dependency>
            <groupId>org.springframework.boot</groupId>
            <artifactId>spring-boot-starter-test</artifactId>
            <scope>test</scope>
        </dependency>
        <dependency>
            <groupId>javax.servlet</groupId>
            <artifactId>jstl</artifactId>
        </dependency>
        <!-- To compile JSP files -->
        <dependency>
            <groupId>org.apache.tomcat.embed</groupId>
            <artifactId>tomcat-embed-jasper</artifactId>
            <scope>provided</scope>
            </dependency>
    </dependencies>

    <build>
        <plugins>
            <plugin>
                <groupId>org.springframework.boot</groupId>
                <artifactId>spring-boot-maven-plugin</artifactId>
            </plugin>
        </plugins>
    </build>

</project>
3.Spring Boot应用程序初始化程序
生成可部署war文件的第一步是提供SpringBootServletInitializer子类并覆盖其configure()方法。这利用了Spring Framework的Servlet 3.0支持,并允许您在servlet容器启动时配置应用程序。
package com.example.jjsp.controller;

import org.springframework.boot.SpringApplication;
import org.springframework.boot.autoconfigure.SpringBootApplication;

@SpringBootApplication
public class JjspApplicatio1n {

        public static void main(String[] args) {
                SpringApplication.run(JjspApplicatio1n.class, args);
        }
}
package com.example.jjsp.controller;

import org.springframework.boot.builder.SpringApplicationBuilder;
import org.springframework.boot.web.servlet.support.SpringBootServletInitializer;

public class ServletInitializer extends SpringBootServletInitializer {

    @Override
    protected SpringApplicationBuilder configure(SpringApplicationBuilder application) {
        return application.sources(JjspApplicatio1n.class);
    }

}
4. spring controller
package com.example.jjsp.controller;

import java.util.Map;

import org.springframework.stereotype.Controller;
import org.springframework.web.bind.annotation.RequestMapping;

@Controller
public class IndexController {

    @RequestMapping("/")
    public String home(Map<String, Object> model) {
        model.put("message", "HowToDoInJava Reader !!");
        return "index";
    }

    @RequestMapping("/next")
    public String next(Map<String, Object> model) {
        model.put("message", "You are in new page !!");
        return "next";
    }

}
5.Spring Boot JSP ViewResolver配置
要解析JSP文件位置,可以使用两种方法。
1)在application.properties中添加条目
spring.mvc.view.prefix=/WEB-INF/view/
spring.mvc.view.suffix=.jsp

logging.level.org.springframework=TRACK
logging.level.com=TRACK
2)配置InternalResourceViewResolver以提供JSP页面
package com.example.jjsp.controller;

import org.springframework.context.annotation.ComponentScan;
import org.springframework.context.annotation.Configuration;
import org.springframework.web.servlet.config.annotation.EnableWebMvc;
import org.springframework.web.servlet.config.annotation.ViewResolverRegistry;
import org.springframework.web.servlet.config.annotation.WebMvcConfigurerAdapter;
import org.springframework.web.servlet.view.InternalResourceViewResolver;
import org.springframework.web.servlet.view.JstlView;

@Configuration
@EnableWebMvc
@ComponentScan
public class MvcConfiguration extends WebMvcConfigurerAdapter
{
    @Override
    public void configureViewResolvers(ViewResolverRegistry registry) {
        InternalResourceViewResolver resolver = new InternalResourceViewResolver();
        resolver.setPrefix("/WEB-INF/view/");
        resolver.setSuffix(".jsp");
        resolver.setViewClass(JstlView.class);
        registry.viewResolver(resolver);
    }
}


