springboot快速入门(三)——Controller的使用
一、概述
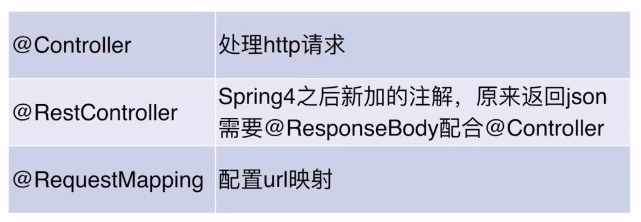
controller的分类:
相关的使用方式和springMVC的类似了,细节不再赘述
二、Controller使用
1.使用@controller注解
@Controller
public class HelloController {

    @RequestMapping(value = "/hello", method = RequestMethod.GET)
    public String hello() {
        return "Hi";
    }
}
直接使用会报一个错:
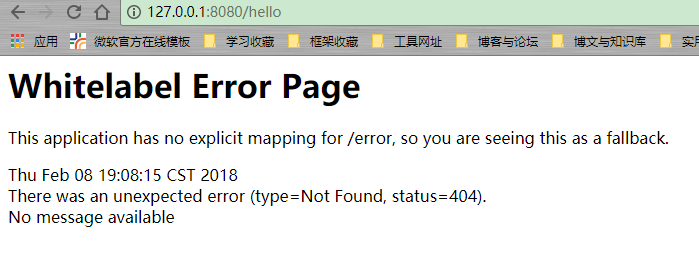
原因是缺少了模板的渲染,springboot支持的模板如下:
- Thymeleaf
- FreeMarker
- Velocity
- Groovy
- Mustache
// 应当避免使用JSP,不然会丧失很多springboot特性!
2.Thymeleaf模板的使用
使用官方推荐的这个模板,先引入依赖:
<dependency>
    <groupId>org.springframework.boot</groupId>
    <artifactId>spring-boot-starter-thymeleaf</artifactId>
</dependency>
// 关于模板的详细使用,将会另开随笔介绍,这里不再赘述
模板的默认位置是生成的:src/main/resources/templates
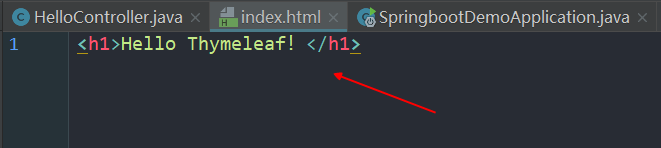
我们在此位置下新建一个HTML文件:index.html:
在代码中返回进行视图渲染:
@Controller
public class HelloController {

    @RequestMapping(value = "/hello", method = RequestMethod.GET)
    public String hello() {
        return "index";
    }
}
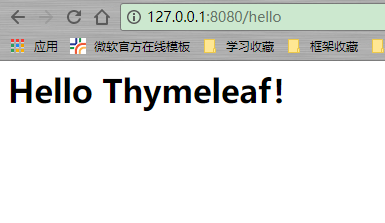
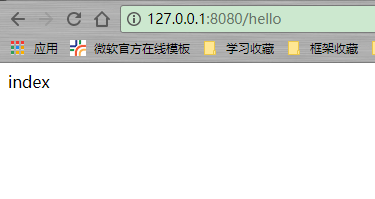
重新访问:
// 和web之前的struts2类似,不过由于thymeleaf是HTML模板,故直接根据文件名.html映射
再者由于现在很多都是前后端分离了,使用模板也可能带来性能上的损耗,所以这里暂时不进行深入
3.@RestController的使用
这里就不再赘述了,就是相当于之前的@Controller加上@ResponseBody的组合
@RestController
public class HelloController {

    @RequestMapping(value = "/hello", method = RequestMethod.GET)
    public String hello() {
        return "index";
    }
}
直接返回了字符串,而不进行视图解析
4.@RequestMapping的使用
使用一个进行映射的场景上面已经有示例,这里介绍其他的特性:
多个url映射
@RequestMapping(value = {"/hello", "/hi"}, method = RequestMethod.GET)
    public String hello() {
        return "index";
    }
在类上使用,用于窄化映射
@RestController
@RequestMapping(value = "/say")
public class HelloController {

    @RequestMapping(value = {"/hello", "/hi"}, method = RequestMethod.GET)
    public String hello() {
        return "index";
    }
}

当然,其实这些映射关系在日志中都会显示,必要时可以进行查看

request的访问方式:
// 测试POST可以通过postman进行
三、请求参数的使用
基本上和springMVC是一致的:

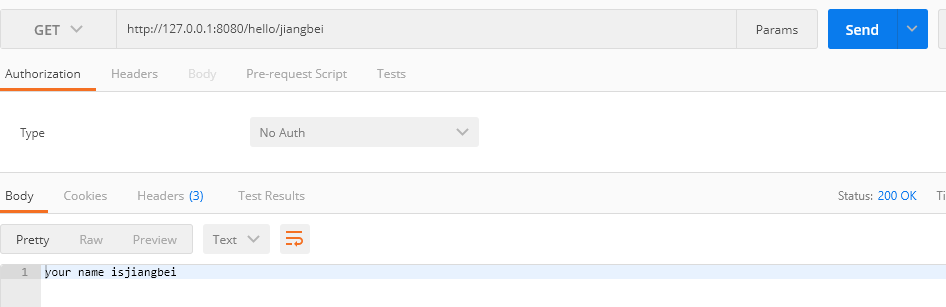
1.@PathVariable注解
@RestController
public class HelloController {

    @RequestMapping(value = "/hello/{name}", method = RequestMethod.GET)
    public String hello(@PathVariable("name") String name) {
        return "your name is" + name;
    }
}
使用postman测试(现在postman的chrome插件已经放弃更新了,使用插件形式可以在桌面创建它的快捷方式启动,当然也可以下载独立软件)
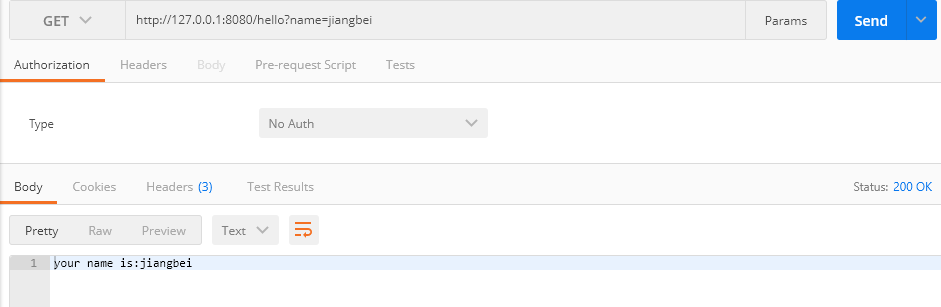
2.@RequestParam注解
这个就是传统的?=xxx形式的了:
@RestController
public class HelloController {

    @RequestMapping(value = "/hello", method = RequestMethod.GET)
    public String hello(@RequestParam("name") String name) {
        return "your name is:" + name;
    }
}
当然,还可以有一些其他的常用特性,例如是否必须、给出默认值:
@RestController
public class HelloController {

    @RequestMapping(value = "/hello", method = RequestMethod.GET)
    public String hello(@RequestParam(value = "name", required = false, defaultValue = "jiangbei") String name) {
        return "your name is:" + name;
    }
}
3.GetMapping形式的组合注解
其实也就是组合了method=RequestMethod.GET,进行了简化,相应的还有配套的PostMapping等!
@RestController
public class HelloController {

   // @RequestMapping(value = "/hello", method = RequestMethod.GET)
    @GetMapping(value = "/hello")
    public String hello(@RequestParam(value = "name", required = false, defaultValue = "jiangbei") String name) {
        return "your name is:" + name;
    }
}

 浙公网安备 33010602011771号