框架

一  spring

    1.Ioc/Di

       IOC/DI的内容参考博客:

       https://www.cnblogs.com/Mr-Rocker/p/7721824.html

     (1)理解IOC/DI

            (a)Ioc—Inversion of Control

                            即“控制反转”,不是什么技术,而是一种设计思想。在Java开发中,Ioc意味着将你设计好的对象(这里的对

                     象不只是java对象,指一切外部资源,如图片、文本等)交给容器控制,而不是传统的在你的对象内部直接控制。

                     理解IOC要弄清楚两个概念:

                     概念一:有反转就有正转,那么什么是正转?什么是反转(反转的含义)

                                    正转,就是传统应用程序是由我们自己在对象中主动控制去直接获取依赖对象。

                                    反转:就是由容器来帮忙创建及注入依赖对象。

                     概念二:谁控制谁,又控制什么?(控制的含义)

                                           传统的应用中程序是通过new主动创建依赖对象,而IoC是有专门一个容器来创建这些对象。所以

                                    是由IOC容器控制所依赖的对象。

​                                    

            (b)DI—Dependency Injection

                            即“依赖注入”组件之间依赖关由容器在运行期决定,形象的说,即由容器动态的将某个依赖关系注入

                     到组件之中。依赖注入的目的并非为软件系统带来更多功能,而是为了提升组件重用的频率,并为系统搭建一

                     个灵活、可扩展的平台。

                     首先要清楚,DI是怎么来的?

                            由于控制反转概念比较含糊(可能只是理解为容器控制对象这一个层面,很难让人想到谁来维护对象关系

                     ),所以2004年大师级人物Martin Fowler又给出了一个新的名字:“依赖注入”,相对IoC 而言,“依赖注入”明确

                     描述了“被注入对象依赖IoC容器配置依赖对象”。

                     其次弄清楚:谁依赖谁,为什么需要依赖,谁注入谁,注入了什么

                            -- 谁依赖于谁:应用程序依赖于IoC容器;

                       -- 为什么需要依赖:应用程序需要IoC容器来提供对象需要的外部资源;

                       -- 谁注入谁:IoC容器注入应用程序某个对象,应用程序依赖的对象;

                       -- 注入了什么:就是注入某个对象所需要的外部资源(包括对象、资源、常量数据)。

     (2)依赖注入和控制反转是同一概念吗?

                     不是同一概念, 但是它们两个描述的是同一件事件,但是是从不同的角度来说,控制反转是从IoC/DI容器的角

              度;依赖注入是从应用程序的角度。

              控制反转的描述:IoC/DI容器反过来控制应用程序,控制应用程序锁所需要的外部资源(比如:外部资源)

              依赖注入的描述:应用程序依赖IoC/DI容器,依赖它注入所需要的外部资源。

     (3)IOC/DI给我们带来的好处

                     IoC 不是一种技术,只是一种思想,一个重要的面向对象编程的法则,它能指导我们如何设计出松耦合、更优良

              的程序。传统应用程序都是由我们在类内部主动创建依赖对象,从而导致类与类之间高耦合,难于测试;有了IoC容

              器后,把创建和查找依赖对象的控制权交给了容器,由容器进行注入组合对象,所以对象与对象之间是松散耦合,这

              样也方便测试,利于功能复用,更重要的是使得程序的整个体系结构变得非常灵活。

              个人总结:它把对象创建和对象实例的注入分离出来,由Spring去做,使得架构更精良。

        (4)Ioc/Di原理

                 没有找到答案,网上都在放屁,如果面试问道就回答由容器管理bean实现依赖注入、反射之类云云。

    2.Spring Aop

     (1)了解为什么会有Aop,Aop是为了解决什么问题而产生的,浏览下面的文章

           https://blog.csdn.net/javazejian/article/details/56267036

     (2)Aop原理

                     Aop的原理是使用了代理模式。代理模式可以做到在不修改目标对象的功能前提下,对目标功能扩展。

              Spring Aop使用的代理是jdk动态代理和Cglib代理。

              http://blog.csdn.net/javazejian/article/details/56267036(简单易懂的文档)。该文档可以在阅读下文前看也可以在阅

              读下文之后看。

            (a)静态代理,直接看例子

/**
 * 接口
 */
public interface IUserDao {

    void save();
}

/**
 * 接口实现
 * 目标对象
 */
public class UserDao implements IUserDao {
    public void save() {
        System.out.println("----已经保存数据!----");
    }
}


/**
 * 代理对象,静态代理
 */
public class UserDaoProxy implements IUserDao{
    //接收保存目标对象
    private IUserDao target;
    public UserDaoProxy(IUserDao target){
        this.target=target;
    }


    public void save() {
        System.out.println("开始事务...");
        target.save();//执行目标对象的方法
        System.out.println("提交事务...");
    }
}


/**
 * 测试类
 */
public class App {
    public static void main(String[] args) {
        //目标对象
        UserDao target = new UserDao();
        //代理对象,把目标对象传给代理对象,建立代理关系
        UserDaoProxy proxy = new UserDaoProxy(target);
        proxy.save();//执行的是代理的方法
    }
}

                   静态代理缺点:因为代理对象需要与目标对象实现一样的接口,所以会有很多代理类,同时一旦接口增加方法,目

                                            标对象与代理对象都要维护,所以有了下面的动态代理。

            (b) 动态代理

                      动态代理也叫jdk代理,不用实现接口。

                      代理对象的生成,是利用JDK的API,动态的在内存中构建代理对象(需要我

                      们指定创建代理对象/目标对象实现的接口的类型)。

                      所在包:java.lang.reflect.Proxy

                      使用方法:static Object newProxyInstance(ClassLoader loader, Class<?>[] interfaces, InvocationHandler h )   

                      ClassLoader loader:指定当前目标对象使用类加载器,获取加载器的方法是固定的。

                      Class<?>[] interfaces:目标对象实现的接口的类型,使用泛型方式确认类型。

                      InvocationHandler h:事件处理,执行目标对象的方法时,会触发事件处理器的方法,会把当前执行目标对象的

                                                         方法作为参数传入。

                      下面看动态代理的例子: 

/**
*接口
*/
public interface Say {
    void sayHello(String words);
}


/**
*实现类
**/
public class SayImpl implements Say {
    @Override
    public void sayHello(String words) {
        System.out.println("hello:" + words);
    }
}


/**
 * 创建动态代理对象 动态代理不需要实现接口,但是需要指定接口类型
 */

public class TestInvocationHandler implements InvocationHandler {

    private Object target;
    public TestInvocationHandler(Object target) {
        this.target=target;
    }

    @Override
    public Object invoke(Object proxy, Method method, Object[] args) throws Throwable {
        System.out.println("invoke begin");
        System.out.println("method :"+ method.getName()+" is invoked!");
        method.invoke(target,args);
        System.out.println("invoke end");
        return null;
    }
}


/**
*测试类
**/
public static void main(String[] args) {

        TestInvocationHandler testInvocationHandler = 
        new TestInvocationHandler(new SayImpl());
        Say say = (Say)Proxy.newProxyInstance(SayImpl.class.getClassLoader(), 
        SayImpl.class.getInterfaces(), testInvocationHandler );
        say.sayHello("my dear");
    }


执行结果:
invoke begin
method :sayHello is invoked!
hello:my dear
invoke end

                  静态代理和动态代理区别之简单说法:

                         静态代理:编译时就确认了代理类

                         动态代理:运行时由反射确认代理类,并且能代理各种类型的对象

                  静态代理和动态代理的区别之详细说法:

                          静态代理源码由程序员创建,再编译代理类。所谓静态也就是在程序运行前就已经存在 代理类的字节码文件,

                          代理类和委托类的关系在运行前就确定了;动态代理类的源码是在程序运行期间由JVM根据反射等机制动态

                          的生成,所以不存在代理类的字节码文件。代理类和委托类的关系是在程序运行时确定。  

            (c)Cglib代理

                           上面的静态代理和动态代理模式都是要求目标对象是实现一个接口的目标对象,但是有时候目标对象只是一

                    个单独的对象,并没有实现任何的接口,这个时候就可以使用以目标对象子类的方式类实现代理,这种方法就叫

                    做Cglib代理。例子如下: 

/**
* 目标对象,没有实现任何接口
*/
public class UserDao {
public void save() {
        System.out.println("----已经保存数据!----");
    }
}


/**
* Cglib子类代理工厂
* 对UserDao在内存中动态构建一个子类对象
*/
public class ProxyFactory implements MethodInterceptor{
    //维护目标对象
    private Object target;


    public ProxyFactory(Object target) {
        this.target = target;
    }


    //给目标对象创建一个代理对象
    public Object getProxyInstance(){
        //1.工具类
        Enhancer en = new Enhancer();
        //2.设置父类
        en.setSuperclass(target.getClass());
        //3.设置回调函数
        en.setCallback(this);
        //4.创建子类(代理对象)
        return en.create();


    }


    @Override
    public Object intercept(Object obj, Method method, Object[] args, MethodProxy proxy) throws Throwable {
        System.out.println("开始事务...");


        //执行目标对象的方法
        Object returnValue = method.invoke(target, args);


        System.out.println("提交事务...");


        return returnValue;
    }
}

                    Cglib代理和JDK动态代理的区别:

                           JDK动态代理只能对实现了接口的类生成代理,而不能针对类;CGLIB是针对类实现代理,主要是对指定的

                    类生成一个子类,覆盖其中的方法(继承)当Bean实现接口时,Spring就会用JDK的动态代理;当Bean没有实现

                    接口时,Spring使用CGlib是实现;可以强制使用CGlib(在spring配置中加入

                    <aop:aspectj-autoproxy proxy-target-class="true"/>)CGlib比JDK快 使用CGLib实现动态代理,CGLib底层采用

                    ASM字节码生成框架,使用字节码技术生成代理类,比使用Java反射效率要高。唯一需要注意的是,CGLib不能对

                    声明为final的方法进行代理,因为CGLib原理是动态生成被代理类的子类。在对JDK动态代理与CGlib动态代理的代

                    码实验中看,1W次执行下,JDK7及8的动态代理性能比CGlib要好20%左右。  


      (3)Aop中术语

               配合:https://blog.csdn.net/yuanlaijike/article/details/79493801

                          https://www.jianshu.com/p/5015f212e4e4

                          http://www.cnblogs.com/hongwz/p/5764917.html(主要看其中对Aop术

                          语的解释,结合本篇博客整理的,可以容易理解术语)

            (a)关注点

                           又“名横切关注点”,是影响应用多处的功能(安全、事务、日志)我的理解:是我们所关心的共性的功能,比

                    如用户日志记录、用户的验证

           (b)切面

                          横切关注点被模块化为特殊的类,这些类称为切面。类是对物体特征的抽象,切面就是对横切关注点的抽象。

                          我的理解:关注点的模块化,就像类一种抽象概念。比如我们把日志记录、用户验证等功能抽象出来进行设

                                            计。面向对像是对事务属性和行为进行抽象。而面向切面是对共性功能进行抽象,所以说是oop的

                                            一种补充。

                          这样做的好处

                           --  关注点在需要增加或删除这些共性功能的时候不需对目标模块进行修改,实现了快速插拔

                           --  使得系统架构更优良,分而治之,关注点只需要关注自身要实现的共性的功能,服务模块只需要关注自身

                               的核心功能,这样设计胜过共性功能糅杂进服务模块

           (c)连接点

                           程序执行的某个特定位置:如类开始初始化前、类初始化后、类某个方法调用前、调用后、方法抛出异常后。

                           一个类或一段程序代码拥有一些具有边界性质的特定点,这些点中的特定点就称为“连接点”。Spring仅支持

                           方法的连接点,即仅能在方法调用前、方法调用后、方法抛出异常时以及方法调用前后这些程序执行点织入

                           增强。连接点由两个信息确定:第一是用方法表示的程序执行点;第二是用相对点表示的方位。

                                  连接点是一个应用执行过程中能够插入一个切面的点。连接点可以是调用方法时、抛出异常时、甚至修

                           改字段时、切面代码可以利用这些点插入到应用的正规流程中程序执行过程中能够应用通知的所有点。

                                 解释:所谓连接点,也就是目标对象或者代理对象之中的方法(方法调用前、方法调用后、方法抛出异常

                                            时以及方法调用前后这些程序执行点)。为什么说2个都 可以呢?因为如果是jdk实现的动态代理的

                                            话,那么目标对象和代理对象要实现共同的接口,如果是cglib实现的动态代理的话,那么代理对象

                                            类是目标对象类的子类。都是一个方法啦。所以这么理解就OK的啦。

           (d)切入点

                           对连接点进行拦截的定义。上面说的连接点的基础上,来定义切入点,你的一个类里,有15个方法,那就有几

                           十个连接点了对把,但是你并不想在所有方法附近都使用通知(使用叫织入,以后再说),你只想让其中的几

                           个,在调用这几个方法之前,之后或者抛出异常时干点什么,那么就用切点来定义这几个方法,让切点来筛选

                           连接点,选中那几个你想要的方法。连接点相当于数据库中的记录,而切点相当于查询条件。切点和连接点不

                           是一对一的关系,一个切点可以匹配多个连接点。

           (e)引入

                          引入允许我们向现有的类中添加方法或属性。

           (f)织入

                         织入是将切面应用到目标对象来创建的代理对象过程.

           (g)通知

                           所谓通知指的就是指拦截到连接点之后要执行的代码。执行的代码就是切面要完成的工作,在 AOP 术语中,切

                           面的工作被称为通知。

                           工作内容:通知定义了切面是什么以及何时使用。除了描述切面要完成的工作,通知还解决何时执行这个工作。

                                   Spring 切面可应用的 5 种通知类型:

                                      Before——在方法调用之前调用通知。

                                      After——在方法完成之后调用通知,无论方法执行成功与否。

                                      After-returning——在方法执行成功之后调用通知。

                                      After-throwing——在方法抛出异常后进行通知。

                                      Around——通知包裹了被通知的方法,在被通知的方法调用之前和调用之后执行自定义的行为。

           (h)最后上一张图,配合上面(a)、(b)、(c)、(d)、(e)、(f)一起理解。

                    参考文章:

                    http://blog.csdn.net/github_34889651/article/details/51321499

                    http://blog.csdn.net/qq_27093465/article/details/53351403

    (4)Spring中如何使用Aop,下面是一些例子    

             XML的实现方式

                    例一,基于Spring的AOP简单实现

                               定义一个接口:

public interface HelloWorld
{
    void printHelloWorld();
    void doPrint();
}

                               定义两个实现类:

public class HelloWorldImpl1 implements HelloWorld
{
    public void printHelloWorld()
    {
        System.out.println("Enter HelloWorldImpl1.printHelloWorld()");
    }
    
    public void doPrint()
    {
        System.out.println("Enter HelloWorldImpl1.doPrint()");
        return ;
    }
}
public class HelloWorldImpl2 implements HelloWorld
{
    public void printHelloWorld()
    {
        System.out.println("Enter HelloWorldImpl2.printHelloWorld()");
    }
    
    public void doPrint()
    {
        System.out.println("Enter HelloWorldImpl2.doPrint()");
        return ;
    }
}

                               横切关注点,这里是打印时间:

public class TimeHandler
{
    public void printTime()
    {
        System.out.println("CurrentTime = " + System.currentTimeMillis());
    }
}

                               aop.xml

<?xml version="1.0" encoding="UTF-8"?>
<beans xmlns="http://www.springframework.org/schema/beans"
    xmlns:xsi="http://www.w3.org/2001/XMLSchema-instance"
    xmlns:aop="http://www.springframework.org/schema/aop"
    xmlns:tx="http://www.springframework.org/schema/tx"
    xsi:schemaLocation="http://www.springframework.org/schema/beans
        http://www.springframework.org/schema/beans/spring-beans-4.2.xsd
        http://www.springframework.org/schema/aop
        http://www.springframework.org/schema/aop/spring-aop-4.2.xsd">
        
        <bean id="helloWorldImpl1" class="com.xrq.aop.HelloWorldImpl1" />
        <bean id="helloWorldImpl2" class="com.xrq.aop.HelloWorldImpl2" />
        <bean id="timeHandler" class="com.xrq.aop.TimeHandler" />
        
        <aop:config>
            <aop:aspect id="time" ref="timeHandler">
                <aop:pointcut id="addAllMethod" expression="execution(* com.xrq.aop.HelloWorld.*(..))" />
                <aop:before method="printTime" pointcut-ref="addAllMethod" />
                <aop:after method="printTime" pointcut-ref="addAllMethod" />
            </aop:aspect>
        </aop:config>
</beans>

                               写一个main函数调用一下: 

public static void main(String[] args)
{
    ApplicationContext ctx = 
            new ClassPathXmlApplicationContext("aop.xml");
        
    HelloWorld hw1 = (HelloWorld)ctx.getBean("helloWorldImpl1");
    HelloWorld hw2 = (HelloWorld)ctx.getBean("helloWorldImpl2");
    hw1.printHelloWorld();
    System.out.println();
    hw1.doPrint();
    
    System.out.println();
    hw2.printHelloWorld();
    System.out.println();
    hw2.doPrint();
}


运行结果:

CurrentTime = 1446129611993
Enter HelloWorldImpl1.printHelloWorld()
CurrentTime = 1446129611993

CurrentTime = 1446129611994
Enter HelloWorldImpl1.doPrint()
CurrentTime = 1446129611994

CurrentTime = 1446129611994
Enter HelloWorldImpl2.printHelloWorld()
CurrentTime = 1446129611994

CurrentTime = 1446129611994
Enter HelloWorldImpl2.doPrint()
CurrentTime = 1446129611994

                               例二,增加一个横切关注点,打印日志,Java类为

public class LogHandler
{
    public void LogBefore()
    {
        System.out.println("Log before method");
    }
    
    public void LogAfter()
    {
        System.out.println("Log after method");
    }
}
<?xml version="1.0" encoding="UTF-8"?>
<beans xmlns="http://www.springframework.org/schema/beans"
    xmlns:xsi="http://www.w3.org/2001/XMLSchema-instance"
    xmlns:aop="http://www.springframework.org/schema/aop"
    xmlns:tx="http://www.springframework.org/schema/tx"
    xsi:schemaLocation="http://www.springframework.org/schema/beans
        http://www.springframework.org/schema/beans/spring-beans-4.2.xsd
        http://www.springframework.org/schema/aop
        http://www.springframework.org/schema/aop/spring-aop-4.2.xsd">
        
        <bean id="helloWorldImpl1" class="com.xrq.aop.HelloWorldImpl1" />
        <bean id="helloWorldImpl2" class="com.xrq.aop.HelloWorldImpl2" />
        <bean id="timeHandler" class="com.xrq.aop.TimeHandler" />
        <bean id="logHandler" class="com.xrq.aop.LogHandler" />
        
        <aop:config>
            <aop:aspect id="time" ref="timeHandler" order="1">
                <aop:pointcut id="addTime" expression="execution(* com.xrq.aop.HelloWorld.*(..))" />
                <aop:before method="printTime" pointcut-ref="addTime" />
                <aop:after method="printTime" pointcut-ref="addTime" />
            </aop:aspect>
            <aop:aspect id="log" ref="logHandler" order="2">
                <aop:pointcut id="printLog" expression="execution(* com.xrq.aop.HelloWorld.*(..))" />
                <aop:before method="LogBefore" pointcut-ref="printLog" />
                <aop:after method="LogAfter" pointcut-ref="printLog" />
            </aop:aspect>
        </aop:config>
</beans>

                            测试类不变,打印结果: 

 
CurrentTime = 1446130273734
Log before method
Enter HelloWorldImpl1.printHelloWorld()
Log after method
CurrentTime = 1446130273735

CurrentTime = 1446130273736
Log before method
Enter HelloWorldImpl1.doPrint()
Log after method
CurrentTime = 1446130273736

CurrentTime = 1446130273736
Log before method
Enter HelloWorldImpl2.printHelloWorld()
Log after method
CurrentTime = 1446130273736

CurrentTime = 1446130273737
Log before method
Enter HelloWorldImpl2.doPrint()
Log after method
CurrentTime = 1446130273737

                               要想让logHandler在timeHandler前使用有两个办法:

                             (a)aspect里面有一个order属性,order属性的数字就是横切关注点的顺序。

                             (b)把logHandler定义在timeHandler前面,Spring默认以aspect的定义顺序作为织入顺序。

                     例三,我只想织入接口中的某些方法,修改一下pointcut的expression就好了。

<?xml version="1.0" encoding="UTF-8"?>
<beans xmlns="http://www.springframework.org/schema/beans"
    xmlns:xsi="http://www.w3.org/2001/XMLSchema-instance"
    xmlns:aop="http://www.springframework.org/schema/aop"
    xmlns:tx="http://www.springframework.org/schema/tx"
    xsi:schemaLocation="http://www.springframework.org/schema/beans
        http://www.springframework.org/schema/beans/spring-beans-4.2.xsd
        http://www.springframework.org/schema/aop
        http://www.springframework.org/schema/aop/spring-aop-4.2.xsd">
        
        <bean id="helloWorldImpl1" class="com.xrq.aop.HelloWorldImpl1" />
        <bean id="helloWorldImpl2" class="com.xrq.aop.HelloWorldImpl2" />
        <bean id="timeHandler" class="com.xrq.aop.TimeHandler" />
        <bean id="logHandler" class="com.xrq.aop.LogHandler" />
        
        <aop:config>
            <aop:aspect id="time" ref="timeHandler" order="1">
                <aop:pointcut id="addTime" expression="execution(* com.xrq.aop.HelloWorld.print*(..))" />
                <aop:before method="printTime" pointcut-ref="addTime" />
                <aop:after method="printTime" pointcut-ref="addTime" />
            </aop:aspect>
            <aop:aspect id="log" ref="logHandler" order="2">
                <aop:pointcut id="printLog" expression="execution(* com.xrq.aop.HelloWorld.do*(..))" />
                <aop:before method="LogBefore" pointcut-ref="printLog" />
                <aop:after method="LogAfter" pointcut-ref="printLog" />
            </aop:aspect>
        </aop:config>
</beans>

         强制使用CGLIB生成代理

                前面说过Spring使用动态代理或是CGLIB生成代理是有规则的,高版本的Spring会自动选择是使用动态代理还是

                CGLIB生成代理内容,当然我们也可以强制使用CGLIB生成代理,那就是<aop:config>里面有一个

                "proxy-target-class"属性,这个属性值如果被设置为true,那么基于类的代理将起作用,如果proxy-target-class被

                设置为false或者这个属性被省略,那么基于接口的代理将起作用。

    4.Spring事务

    (1)首先看下数据库的事务

           (a)A、C、I、D。

                   原子性(Atomic):指事务由原子的操作序列组成,所有的操作要么全部成功要么全部失败回滚。

                   一致性(Consistent):事务的执行不能破坏数据库的完整性和一致性,一个事务在执行前和执行后数据库都必

                                                    须处于一致性状态,例如在做多表操作时,多个表要么都是事务后新值要么都是事务后

                                                    的旧值。

                   隔离性(Isolated):并发执行的事务彼此无法看到对方的中间状态。

                   持久性(Durable):事务完成后所做的改动都会被持久化,即使发生灾难性的失败。通过日志和同步备份可以在故

                                                障发生后重建数据。

                   关于原子性和一致性的区别:

                          张三给李四转账100元,需要先重张三的账户上减去100元,在给李四的账户上增加100元,如果张三减去

                          100失败那么整个事物就回滚,这就是原子性的体现;假设张三李四的账户在转账前都是1000元,那么转账

                          后张三账户为900元,李四账户为1100元,这就是一致性的体现。

           (b)事务的隔离级别

                     MySql默认的隔离级别是REPEATABLE-READ

                           Read uncommit(读未提交 )

                                      可以读取到其它事务未提交的内容,这是最低的隔离级别。在这个隔离级别三个事务并发

                                      的问题都有可能会发生。

                                      幻读、不可重复读和脏读都允许

                           Read commit(读已提交)

                                      就是只能读取到其它事务已提交的数据,这个隔离级别可以解决胀读问题

                                      允许幻读、不可重复读,不允许脏读

                           Repeatable read(可重复读)

                                      可以保证整个数据过程中对事物的多次数据读取结果是相同的,这个级别可以解决脏读和

                                      不可重复读的问题。该级别是MySql 默认的隔离级别。

                                      允许幻读,不允许不可重复读和脏读

                           Serializable(串行化)

                                      所有事物操作都依次顺序执行,这个级别会导致并发度下降性能最差,不过这个级别可以

                                      解决前面提到的所有性能问题

                                      幻读、不可重复读和脏读都不允许

                            幻读

                                  是指一个事务中执行两次完全的查询第二次查询返回的结果集和第一次查询不同,与不可重复读的

                                  区别是不可重复读是读同一条记录两次读取的指不同,而幻读是记录的增加或者删除导致两次想同

                                  条件获取的记过记录数不同。事务发生了新增或删除。  

                           脏读

                                  一个事务在处理过程中读取了另外一个事务未提交的数据。例如账户A转账给B 500元,B 余额增加

                                  后但事务还未完成提交,此时另外的请求中获取到的是B增加的余额,这就发生了脏读。

                           不可重复读

                                  是指对于数据库中的某个数据,一个事务范围内多次查询返回了不同的数据值,这是因为多次查询

                                  之间有其它事务修改了数据并进行了提交。事务发生了修改。


     (2)Spring事务

            (a)Spring事务的原理

                     Spring事务的本质其实就是数据库对事务的支持,没有数据库的事务支持,

                     Spring是无法提供事务功能的。对于纯JDBC操作数据库,想要用到事务,

                     可以按照以下步骤进行:

                   (i)获取连接 Connection con = DriverManager.getConnection()

                   (ii)开启事务con.setAutoCommit(true/false);

                   (iii)执行CRUD

                   (iv)提交事务/回滚事务 con.commit() / con.rollback();

                   (v)关闭连接 conn.close();

                     使用Spring的事务管理功能后,我们可以不再写步骤(ii)和(iv)的代码,而是由Spirng 自动完成。那么

                     Spring是如何在我们书写的 CRUD 之前和之后开启事务和关闭事务的呢?解决这个问题,也就可以从整体

                     上理解Spring的事务管理实现原理了。下面简单地介绍下,注解方式为例子
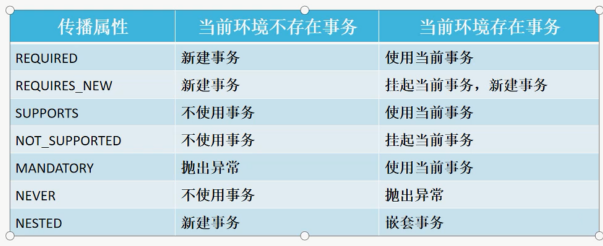
            (b)Spring 事务的传播

                     REQUIRED:业务方法需要在一个容器里运行。如果方法运行时,已经处在一个事务中,那么加入到这个

                                            事务,否则自己新建一个新的事务(默认,和SUPPORTS一起记)

                     SUPPORTS:该方法在某个事务范围内被调用,则方法成为该事务的一部分。如果方法在该事务范围外被

                                            调用,该方法就在没有事务的环境下执行(和默认分一类吧,暂叫它默认2吧)。 

                     REQUIRESNEW:总会发起一个新得事务。不管是否存在事务,该方法总会为自己发起一个新的事 务。如

                                                    果方法已经运行在一个事务中,则原有事务挂起,新的事务被创建(新事务,零碎没组)。

                     NOT_SUPPORTED:声明方法不需要事务。如果方法没有关联到一个事务,容器不会为他开启事务,如果

                                                        方法在一个事务中被调用,该事务会被挂起,调用结束后,原先的事务会恢复执行(

                                                        不需要事务,零碎没组)。

                     MANDATORY:该方法只能在一个已经存在的事务中执行,业务方法不能发起自己的事务。如果在没有事

                                               务的环境下被调用,容器抛出例外(必须要在有事务的环境中执行,和NEVER一起记)。                                       

                     NEVER:该方法绝对不能在事务范围内执行。如果在就抛例外。只有该方法没有关联到任何事务,才正常

                                     执行(必须要在没有有事务的环境中执行)。

                     NESTED:如果一个活动的事务存在,则运行在一个嵌套的事务中。如果没有活动事务,则按REQUIRED属

                                       性执行。它使用了一个单独的事务,这个事务拥有多个可以回滚的保存点。内部事务的回滚不会

                                       对外部事务造成影响。它只对DataSourceTransactionManager事务管理器起效。


    5.spring 常用标签

      (1)@Controller、@Service、@Respository,分别是Controller、Service、Dao的注解。

     (2)@Component

              @component就是说把这个类交给Spring管理。是一个泛化的概念,仅仅表示一个组件 (Bean) ,可以作用在任何

              层次。因为在持久层、业务层和控制层中,分别采用@Repository、@Service和@Controller对分层中的类进行注

              解,而用@Component对那些比较中立的类进行注解。

     (3)@Resource和@Autowired

              两者均做bean注入时使用的,@Resource的作用相当于@Autowired。@Resource是按name进行注入,而

              @Autowired是按type进行注入,

              @Resource示例如下:

public class TestServiceImpl {

              @Resource(name="userDao")

              private UserDao userDao; // 用于字段上

              @Resource(name="userDao")

              public void setUserDao(UserDao userDao) { 

              this.userDao = userDao;

                注:将Resource放在set方法上更符合面向对象的思想,对set方法操作而不是直接对属性进行操作。

     (3)@PostConstruct 和 @PreDestroy 

              用于实现初始化和销毁bean之前进行的操作   

    6.Spring Bean的生命周期

       购写本节,参考文章:

       https://blog.csdn.net/w_linux/article/details/80086950

       https://blog.csdn.net/fuzhongmin05/article/details/73389779

     (1)最简单的说法,为了方便记忆(2)看一下,(2)才是重点

            (a)bean定义

                     在配置文件里面用<bean></bean>来进行定义。

            (b)bean初始化

                     有两种方式初始化:

                     在配置文件中通过指定init-method属性来完成

                     实现org.springframwork.beans.factory.InitializingBean接口

            (c)bean调用

                     有三种方式可以得到bean实例,并进行调用

            (d)bean销毁

                     销毁有两种方式

                     使用配置文件指定的destroy-method属性

                     实现org.springframwork.bean.factory.DisposeableBean接口

     (2)简单版,重点,面试的时候按照这个答

​              

            (a)实例化bean对象(通过构造方法或者工厂方法,这里有点费解,为什么没有通过setter方法)

            (b)设置对象属性(setter等)(依赖注入)

            (c)检查Aware接口,设置相关依赖。如果Bean实现了BeanNameAware接口,spring将bean的id传给

                     setBeanName()方法;如果Bean实现了BeanFactoryAware接口,spring将调用setBeanFactory方法,将

                     BeanFactory实例传进来。

            (d)将Bean实例传递给Bean的前置处理器的

                     postProcessBeforeInitialization(Object bean, String beanname)方法

            (e)调用Bean的初始化方法。(初始化bean有两种方式,在配置文件中通过指定init-method属性来完成和实现

                     org.springframwork.beans.factory.InitializingBean接口。图上有画)

            (f)将Bean实例传递给Bean的后置处理器的

                     postProcessAfterInitialization(Object bean, String beanname)方法使用Bean。

            (g)使用。此时bean已经准备就绪,可以被应用程序使用了,他们将一直驻留在应用上下文中,直到该应用上

                     下文被销毁。

            (h)容器关闭之前,调用Bean的销毁方法(bean的销毁方法有两种:使用

                     配置文件指定的destroy-method属性和实现org.springframwork.bean.factory.DisposeableBean接口。图上

                     有画)

     (2)详细版,闲的蛋疼时候在看

      ​

               bean的生命周期流程图:

​            

            (a)Spring对bean进行实例化,默认bean是单例;

            (b)Spring对bean进行依赖注入;

            (c)如果bean实现了BeanNameAware接口,spring将bean的id传给setBeanName()方法;

            (d)如果bean实现了BeanFactoryAware接口,spring将调用setBeanFactory方法,将BeanFactory实例传进

                     来;如果bean实现了 ApplicationContextAware接口,它的setApplicationContext()方法将被调用,将应

                     用上下文的引用传入到bean中;

            (e)如果bean实现了BeanPostProcessor接口,它的postProcessBeforeInitialization方法将被调用;

            (f)如果bean实现了InitializingBean接口,spring将调用它的afterPropertiesSet接口方法,类似的如果bean使

                    用了init-method属性声明了初始化方法,该方法也会被调用;

            (g)如果bean实现了BeanPostProcessor接口,它的postProcessAfterInitialization接口方法将被调用;

            (h)此时bean已经准备就绪,可以被应用程序使用了,他们将一直驻留在应用上下文中,直到该应用上下文

                     被销毁;

            (i)若bean实现了DisposableBean接口,spring将调用它的distroy()接口方法。同样的,如果bean使用了

                    destroy-method属性声明了销毁方法,则该方法被调用;


    7.bean的作用域

       Spring Bean共有五种作用域,其中request、session、global session三种作用域仅在基于web的应用中使用(不必

       关心你所采用的是什么web应用框架),只能用在基于web的Spring ApplicationContext环境。

     (1)singleton

              当一个bean的作用域为singleton,那么Spring IoC容器中只会存在一个共享的bean实例,并且所有对bean的请

              求,只要id与该bean定义相匹配,则只会返回bean的同一实例。

     (2)prototype

              Prototype作用域的bean会导致在每次对该bean请求(将其注入到另一个bean中,或者以程序的方式调用容器

              的getBean() 方法)时都会创建一个新的bean实例。根据经验,对所有有状态的bean应该使用prototype作用域,

              而对无状态的bean则应该使用 singleton作用域

     (3)request

              在一次HTTP请求中,一个bean定义对应一个实例;即每次HTTP请求将会有各自的bean实例, 它们依据某个

              bean定义创建而成。该作用域仅在基于web的Spring ApplicationContext情形下有效。

     (4)session

              在一个HTTP Session中,一个bean定义对应一个实例。该作用域仅在基于web的Spring ApplicationContext情形

              下有效。

     (5)global session

              global session作用域类似于标准的HTTP Session作用域,不过它仅仅在基于portlet的web应用中才有意义。

              Portlet规范定义了全局Session的概念,它被所有构成某个 portlet web应用的各种不同的portlet所共享。在

              global session作用域中定义的bean被限定于全局portlet Session的生命周期范围内。如果你在web中使用

              global session作用域来标识bean,那么web会自动当成session类型来使用。

      8.Spring 注入方式

       (1)setter注入

       (2)构造器注入

       (3)静态工厂方法注入

       (4)实例工厂方法注入

    10.比较重要的一些面试题

     (1)BeanFactory 接口和 ApplicationContext 接口有什么区别 ?

            (a)ApplicationContext 接口继承BeanFactory接口,Spring核心工厂是BeanFactory,BeanFactory采取延迟加载,第

                     一次getBean时才会初始化Bean,ApplicationContext是会在加载配置文件时初始化Bean。

            (b)ApplicationContext是对BeanFactory扩展,它可以进行国际化处理、事件传递和bean自动装配以及各种不同应用

                     层的Context实现。开发中基本都在使用ApplicationContext,web项目使用WebApplicationContext ,很少用到BeanFactory。

     (2)spring配置bean实例化有哪些方式?

            (a)使用类构造器实例化(默认无参数)

            (b)使用静态工厂方法实例化(简单工厂模式)

            (c)使用实例工厂方法实例化(工厂方法模式)

    11.Spring Quartz、Spring Task、elastic-job

       (1)Spring Quartz的特点: 

                https://blog.csdn.net/mseeworld/article/details/53331197

      (2)当当的elastic-job

二  Spring MVC

    1.Spring MVC原理

     (1)概述

              Spring MVC是基于Servlet的。

              若基于某个框架开发一个模型2的应用程序,我们要负责编写一个

              Dispatcher Servlet(如果忘记该例子书上找)。其中Dispatcher Servlet必须能

              够做如下事情:

            (a)根据URI调用相应的action。

            (b)实例化正确的控制器类

            (c)根据请求参数来构造表单bean

            (d)调用控制器对象的相应方法

            (e)转向到一个视图(JSP页面)

              Spring MVC是一个包含了Dispatcher Servlet的MVC框架,它调用控制器方法

              并转发到视图。这是使用Spring MVC的第一个好处:不需要编写Dispatcher

              Servlet。以下是Spring MVC具有的能加速开发的功能列表:

            (a)Spring MVC提供了一个Dispatcher Servlet,无需额外开发

            (b)Spring MVC实例化控制器,并根据用户输入来构造bean。

            (c)Spring MVC可以自动绑定用户输入,并正确转换数据类型。例如

                     Spring MVC能自动解析字符串,并设置float或decimal类型的属性

            (d)Spring MVC支持国际化和本地化。支持根据用户区域显示多国语言。

            (e)Spring MVC支持多种视图技术。如JSP、Velocity和FreeMarker。

            (f)Spring MVC提供校验用户输入功能。

            (g)Spring MVC中使用基于XML的配置文件,可以编辑,二无需重新编译应

                       用程序。

            (h)Spring MVC是Spring框架的一部分,可以利用Spring提供的其它能力。

     (2)Spring MVC原理和工作流程 

​             

            (a)简单版

                   (i)客户端请求提交到DispatcherServlet

                   (ii)由DispatcherServlet控制器查询一个或多个HandlerMapping,找到

                            处理请求的Controller

                   (iii)DispatcherServlet将请求提交到Controller

                   (iv)Controller调用业务逻辑处理后,返回ModelAndView

                   (v)DispatcherServlet查询一个或多个ViewResoler视图解析器,找到

                            ModelAndView指定的视图

                   (vi)视图负责将结果显示到客户端

            (b)完整版

                   (1)发起请求到前端控制器(DispatcherServlet);

                   (2)前端控制器请求HandlerMapping查找Handler,可以根据xml配置、

                            注解进行查找;

                   (3)处理器映射器HandlerMapping向前端控制器返回Handler;

                   (4)前端控制器调用处理器适配器去执行Handler;

                   (5)处理器适配器去执行Handler;

                   (6)Handler执行完成给适配器返回ModelAndView;

                   (7)处理器适配器向前端控制器返回ModelAndView(是springmvc框架

                            的一个底层对象,包括Model和View);

                   (8)前端控制器请求视图解析器去进行视图解析,根据逻辑视图名称解

                            析真正的视图(jsp...);

                   (9)视图解析器向前端控制器返回View;

                   (10)前端控制器进行视图渲染,视图渲染就是将模型数据(在

                            ModelAndView对象中)填充到request域中。

                   (11)前端控制器向用户响应结果。

    2.Spring MVC功能介绍

     (1)DispatcherServlet

              org.springframework.web.servlet.DispatcherServlet。要使用这个Servlet需要

              它配置在web.xml中

  <!--  Spring MVC 的Servlet,它将加载WEB-INF/springDispatcherServlet-servlet.xml 的配置文件,以启动Spring MVC模块-->    
    <servlet>
        <servlet-name>springmvc</servlet-name>
        <servlet-class>org.springframework.web.servlet.DispatcherServlet</servlet-class>
        <load-on-startup>1</load-on-startup>
    </servlet>

    <servlet-mapping>
        <servlet-name>springDispatcherServlet</servlet-name>
        <url-pattern>*.do</url-pattern>
    </servlet-mapping>

                        DispatcherServlet会使用Spring MVC诸多默认组件,此外,初始化时它

                       会寻找一个在应用程序WEB-INF目录下的配置文件,该配置文件的命名

                       规则如下:

                              servletName-servlet.xml

                       其中,servletName是web.xml中DispatcherServlet的名称,按上例,应

                       该为:SpringMVC-servlet.xml(上文中servlet的名字是springmvc,是否

                       不区分大小写有机会验证一下,一般都是写成spring-mvc.xml)。此外也

                       可以把Spring MVC的配置文件放到应用程序目录的任何地方,用servlet

                       的<init-param>指定,示例如下:

<servlet>
    <servlet-name>DispatcherServlet</servlet-name>
    <servlet-class>
        org.springframework.web.servlet.DispatcherServlet
    </servlet-class>
    <init-param>
        <param-name>contextConfigLocation</param-name>
        <param-value>classpath*:spring/abc.xml</param-value>
    </init-param>
    <load-on-startup>1</load-on-startup>
</servlet>

                       其中“classpath*:spring/abc.xml”,也可以换成绝对路径。

     (2)Controller接口

              在Spring2.5以前,开发一个控制器的唯一方法是实现

              org.springframework.web.servlet.mvc.Controller接口,这个接口公开了一个

              handleRequest方法。下面是该方法的签名:

public ModelAndView handleRequest(HttpServletRequest request,HttpServletResponse response)throws Exception;  

              Controller接口的实现类只能处理一个动作,而一个基于注解的控制器可以同时

              支持多个请求处理动作,并且无需实现任何接口,使用@Controller注解。

     (3)View Resolver(视图解析器)

              Spring MVC中的视图解析器负责解析视图,可以通过在配置文件中定义一个

              View Resolver来配置视图解析器,示例如下:

<bean id="viewResolver" class="org.springframework.web.servlet.view.InternalResourceViewResolver">
    <property key="prefix" value="/WEB-INF/jsp/"/>
    <property key="suffix" value=".jsp" />
</bean> 

              通过上面的方法就可以将视图路径由原理的“/WEB-INF/jsp/myPage.jsp”改写成

              “myPage”。ViewResolver接口其内部只有一个接口方法,具体如下:

View resolveViewName(String viewName, Locale locale) throws Exception;

              由上可知其是通过解析ViewName来得到View视图对象。

              注:InternalResourceViewResolver只是视图解析器中的一种,JSP+JSTL这一

                     套用它,但是其它视图如Fremakker、velocity。

     (4)Spring MVC支持的返回方式

              * ModelAndView

              * Model

              * ModelMap

              * Map

              * View

              * String

              * void

            (a)Model和ModelAndView

                   (i)Model

                           Model是每次请求中都存在的默认参数,利用其addAttribute()方法即可

                           将服务器的值传递到jsp页面中;Model的生命周期只是一个请求的处理

                           过程,请求处理完,Model也就销毁了。

                   (ii)ModelAndView

                            包含model和view两部分,使用时需要自己实例化,利用ModelMap用

                            来传值,也可以设置view的名称

                            例一,使用Model传值

 public String getAllBooks(Model model){  
        logger.error("/list-books");  
        List<Book> books= bookService.getAllBooks();  
        model.addAttribute("books", books);  
        return "BookList";  
 }

                            例二,使用ModelAndView来传值。

                                       使用ModelAndView传递值有两种方法,不同方法在jsp页面的

                                       取值方式不同,同时设置了view的名称

public ModelAndView resolveException(HttpServletRequest request, HttpServletResponse response,
                                         Object handler, Exception ex) {
        LibraryException le=null;
        if(ex instanceof LibraryException){
            le=(LibraryException)ex;
        }else{
            le=new LibraryException("系统未知异常!");
        }
 
        ModelAndView modelAndView=new ModelAndView();
        modelAndView.addObject("exception",le.getMessage());
        modelAndView.getModel().put("exception",le.getMessage());
        modelAndView.setViewName("error");
 
        return modelAndView;
 }

                         jsp中${requestScope.exception1}可以取出exception1的值;

                         jsp中${exception2}可以取出exception2的值

                         关于Model和ModelAndView的区别想进一步了解可以查看博客:

                         https://blog.csdn.net/wangmeng951011/article/details/53121483

                         通过ModelAndView构造方法可以指定返回的页面名称,也可以通过

                         setViewName()方法跳转到指定的页面。上面的例子是通过

                         setViewName()方法指定跳转页面,通过构造函数指定跳转页面示例

                         如下:     

@RequestMapping("/hello")
public ModelAndView helloWorld() { 
    String message = "Hello World, Spring 3.x!";
    return new ModelAndView("hello", "message", message);
}

            (b)Map

 
@RequestMapping("/demo2/show") 
public Map<String, String> getMap() { 
  Map<String, String> map = new HashMap<String, String>(); 
  map.put("key1", "value-1"); 
  map.put("key2", "value-2"); 
  return map; 
} 

                         在jsp页面中可直通过${key1}获得到值, map.put()相当于

                         request.setAttribute方法。

            (c)View

                     可以返回pdf excel等,暂时没详细了解。

            (d)String

                     指定返回的视图页面名称,结合设置的返回地址路径加上页面名称后缀

                     即可访问到。

                     注意:如果方法声明了注解@ResponseBody ,则会直接将返回值输出

                                到页面。

@RequestMapping(value="/showdog")
public String hello1(){
        return "hello";
}
@RequestMapping(value="/print")
@ResponseBody
public String print(){
  String message = "Hello World, Spring MVC!";
  return message;
}

                     返回json的例子(使用Jackson):

 
@RequestMapping("/load1")
@ResponseBody
public String load1(@RequestParam String name,@RequestParam String password) throws IOException{
        System.out.println(name+" : "+password);  
        //return name+" : "+password;
        MyDog dog=new MyDog();
        dog.setName("小哈");dog.setAge("1岁");dog.setColor("深灰");
        ObjectMapper objectMapper = new ObjectMapper();
        String jsonString=objectMapper.writeValueAsString(dog);
        System.out.println(jsonString);
        return jsonString;
}

            (d)如果返回值为空,则响应的视图页面对应为访问地址

 
@RequestMapping("/index")
public void index() {
        return;
}

                     对应的逻辑视图名为"index"。

     (5)重定向和转发

            (a)转发,较简单,略

            (b)重定向

                     Spring3.1版本开始使用Flash属性进行转发,并且还需要做下面两件事

                   (i)在Spring MVC配置文件中需要添加一个<annotation-driven/>元素

                   (ii)添加一个

                            org.springframework.web.servlet.mvc.support.RedirectAttributes

                            类型的参数。

                     例子如下: 

@RequestMapping(value="/testa", method=RequestMethod.GET)
 public String inputData(){
  return "testa"; //Spring框架找到对应的View并渲染
 }

 @RequestMapping(value="/testa", method=RequestMethod.POST)
 public String outputData(HttpServletRequest request, RedirectAttributes redirectAttributes){
  String userName = request.getParameter("name");
  String password = request.getParameter("pwd");
  request.setAttribute("name", userName);
  request.setAttribute("pwd", password);
  //重定向到 /testb 的Controller方法(即outputDataY)上
  //重定向传递参数的两种方法
  redirectAttributes.addAttribute("name", userName);
  redirectAttributes.addFlashAttribute("pwd", password);

  return "redirect:/testb"; 
 }

 @RequestMapping(value="/testb", method=RequestMethod.POST)
 public String outputDataX(HttpServletRequest request){
  return "testb";
 }

 @RequestMapping(value="/testb", method=RequestMethod.GET)
 public String outputDataY(HttpServletRequest request){
  String userName = request.getParameter("name");
  request.setAttribute("name", userName);
  return "testb";
 }

     (6)转换器和格式化(Converter和Formatter)

              在学习Converter和Formatter之前需要我们先了解<mvc:annotation-driven/>

              和<context:component-scan/>的做用

              <mvc:annotation-driven/>:它告知Spring,我们启用Spring MVC的注解驱

                                                          动。它为我们注册了很多bean,但这里我们主

                                                          要说两个:RequestMappingHandlerMapping和

                                                          RequestMappingHandlerAdapter。第一个是

                                                          HandlerMapping的实现类,它会处理

                                                          @RequestMapping 注解,并将其注册到请求映

                                                          射表中。详细讲解可以查看:

                                                          https://blog.csdn.net/lovesomnus/article/details/49801593

              <context:component-scan/>:是告诉Spring 来扫描指定包下的类,并注册

                                                              被@Component,@Controller,@Service,

                                                              @Repository等注解标记的组件

            (a)Converter

                     Converter是Spring3中引入的一项比较特殊的功能,其实就是一个转换

                     器,可以把一种类型转换为另一种类型。尤其是在web项目中比较常见,

                     可以对接口的入参做校验,把前端的入参的类型转换后为后端可以使用

                     的类型。如常常用来做类型转换、字符串去空、日期格式化等。在

                     Spring3之前进行类型转换都是使用PropertyEditor,使用

                     PropertyEditor的setAsText()方法可以实现String转向特定的类型,但是

                     它的最大的一个缺陷就是只支持String转为其他类型。

                     Spring中的三种类型转换接口分别为:

                     * Converter接口:使用最简单,但是不太灵活;

                     * ConverterFactory接口:使用较复杂,稍微灵活一点;

                     * GenericConverter接口:使用最复杂,也最灵活;

                     但是此次只学习Converter。下面来讲解怎么使用:

                   (i)实现org.springframework.core.convert.converter.Converter接口

                           Converter接口定义:

public class MyDateConverter implements Converter<String,Date> {

    @Override
    public Date convert(String source) {
        SimpleDateFormat sdf = new SimpleDateFormat("yyyy-MM-dd");
        try {
            return sdf.parse(source);
        } catch (ParseException e) {
            e.printStackTrace();
        }
        return null;
}

                           补充一下Converter接口的说明,其定义如下:

 
package org.springframework.core.convert.converter;
 
public interface Converter<S, T> {
    T convert(S var1);
}

                           其中S表示源类型,T表示目标类型,该接口支持泛型。

                   (ii)配置bean

<!-- 日期转换工厂 -->
    <bean id="conversionService" class="org.springframework.context.support.ConversionServiceFactoryBean">
        <property name="converters">
            <list>
                <bean class="com.converter.MyDateConverter">
                    <constructor-arg type="java.lang.String" value="yyyy-MM-dd"></constructor-arg>
                </bean>
            </list>
        </property>
    </bean>

                           注意要给annotation-driven元素的conversion-service属性赋上bean

                           名称:

<mvc:annotation-driven conversion-service="myDateConverter">
</mvc:annotation-driven>

                           注册这个Converter服务,然后对于所有使用了@RequestMapping

                           注解的方法参数,都可以自动将String按规定的格式转换为Date类

                           型。

                           完整的一个配置样例如下:

<?xml version="1.0" encoding="UTF-8"?>
<beans xmlns="http://www.springframework.org/schema/beans"
       xmlns:xsi="http://www.w3.org/2001/XMLSchema-instance"
       xmlns:context="http://www.springframework.org/schema/context"
       xmlns:mvc="http://www.springframework.org/schema/mvc"
       xsi:schemaLocation="http://www.springframework.org/schema/beans http://www.springframework.org/schema/beans/spring-beans.xsd http://www.springframework.org/schema/context http://www.springframework.org/schema/context/spring-context.xsd
        http://www.springframework.org/schema/mvc
           http://www.springframework.org/schema/mvc/spring-mvc-3.0.xsd
        ">
    <context:component-scan base-package="controller"/>
    <context:component-scan base-package="Service"/>
    <!--
     <mvc:annotation-driven>元素注册用于支持基于注解的控制器的请求处理方法的Bean对象。
        详解:https://my.oschina.net/HeliosFly/blog/205343
    -->
    <mvc:annotation-driven conversion-service="conversionService"/>

    <bean id="viewResolver"
          class="org.springframework.web.servlet.view.InternalResourceViewResolver">
        <property name="prefix" value="/WEB-INF/view/"/>
        <property name="suffix" value=".jsp"/>
    </bean>

    <bean id="conversionService" class="org.springframework.context.support.ConversionServiceFactoryBean">
        <property name="converters">
            <list>
                <bean class="converter.MyConverter">
                    <constructor-arg type="java.lang.String" value="MM-dd-yyyy"/>
                </bean>
            </list>
        </property>
    </bean>
</beans>

            (b)Formatter

                     Formatter就像Converter一样,也是将一种类型转换成另一种类型。但

                     是Formatter更适合Web层,而Converter则可以用在任意层种。为了转

                     换Spring MVC应用程序表单种的用户输入,始终应选择Formatter而不

                     是Converter。

                             Formatter的使用方式,通过例子来讲解。

                   (i)首先编写一个实现org.springframework.format.Formatter接口的

                           Java类,该类是将String 转换成Date。  

package app06b.formatter
import org.springframework.format.Formatter;

import java.text.ParseException;
import java.text.SimpleDateFormat;
import java.util.Date;
import java.util.Locale;

public class DateFormatter implements Formatter<Date>{
    private String datePattern;
    private SimpleDateFormat dateFormat;

    public DateFormatter(String datePattern) {
        this.dateFormat = dateFormat;
        dateFormat = new SimpleDateFormat(datePattern);
        dateFormat.setLenient(false);
    }
    public Date parse(String s, Locale locale) throws ParseException {
        try {
            SimpleDateFormat dateFormat = new SimpleDateFormat(datePattern);
            dateFormat.setLenient(false);
            return dateFormat.parse(s);
        } catch (ParseException e) {
            throw new IllegalArgumentException("invalid date format. Please use this pattern\"" + datePattern + "\"");
        }
    }

    public String print(Date date, Locale locale) {
        return dateFormat.format(date);
    }
}

                     这里插入一下对Formatter接口的说明:

 
public interface Formatter<T> extends Printer<T>, Parser<T> {
}
public interface Printer<T> {
    String print(T var1, Locale var2);
}
public interface Parser<T> {
    T parse(String var1, Locale var2) throws ParseException;
}

                     parse方法利用指定的Locale将一个String解析成目标类型。print方法

                     相反,它是返回目标对象的字符串表示法。

                   (ii)配置Formatter

                            为了使用Spring MVC应用程序中使用Formatter,需要在配置文

                            件中添加一个conversionService bean。Bean的类名称必须

                            org.springframework.format.support.

                            FormattingConversionServiceFactoryBean。这个bean可以用一

                            个formatters属性注册Formatter,用一个converters属性注册

                            Converter。下面bean声明注册了上面DateFormatter。

<?xml version="1.0" encoding="UTF-8"?>
<beans xmlns="http://www.springframework.org/schema/beans"
       xmlns:xsi="http://www.w3.org/2001/XMLSchema-instance"
       xmlns:context="http://www.springframework.org/schema/context"
       xmlns:mvc="http://www.springframework.org/schema/mvc"
       xsi:schemaLocation="http://www.springframework.org/schema/beans http://www.springframework.org/schema/beans/spring-beans.xsd http://www.springframework.org/schema/context http://www.springframework.org/schema/context/spring-context.xsd
        http://www.springframework.org/schema/mvc
           http://www.springframework.org/schema/mvc/spring-mvc-3.0.xsd
        ">
    <context:component-scan base-package="controller"/>
    <context:component-scan base-package="Service"/>
    <!--
     <mvc:annotation-driven>元素注册用于支持基于注解的控制器的请求处理方法的Bean对象。
        详解:https://my.oschina.net/HeliosFly/blog/205343
    -->
    <mvc:annotation-driven conversion-service="conversionService"/>

    <bean id="viewResolver"
          class="org.springframework.web.servlet.view.InternalResourceViewResolver">
        <property name="prefix" value="/WEB-INF/view/"/>
        <property name="suffix" value=".jsp"/>
    </bean>    
    <!--需要配置此项来扫描Formatter-->
    <context:component-scan base-package="app06b.formatter"/>
    <bean id="formatterConversionService" 
          class="org.springframework.format.support.FormattingConversionServiceFactoryBean">
        <property name="formatters">
            <set>
                <bean class="formatter.DateFormatter">
                    <constructor-arg type="java.lang.String"
                                     value="MM-dd-yyyy"/>
                </bean>
            </set>
        </property>
    </bean>
</beans>

                            注意,需要为这个Formatter添加component-scan元素和给

                            annotation-driven元素的conversion-service属性赋上bean名称。

     (7)文件上传

              文件上传方式有Servlet上传文件、ApacheCommonsFileUpload上传文件

            (apache)和MultipartFile接口(Spring MVC)。但是无论采用哪一种方

              式上传,前端的写法都一样。文件上传时需要注意两点:一是表单提交

              Form内容enctype必须加上,且内容必须是multipart/form-data,表示二

              进制方式提交二是提交方式必须是post。

              单文件上传:

    <form action="${pageContext.request.contextPath}/fileUpload" method="POST" enctype="multipart/form-data">
        username:<input type="text" name="username" /><br>
        上传文件:<input type="file" name="fileName" /><br>
           <input type="submit" value="文件上传" /><br>
    </form>

              多文件上传(仅限于H5):

    <form action="${pageContext.request.contextPath}/fileUpload" method="POST" enctype="multipart/form-data">
        username:<input type="text" name="username" /><br>
        上传文件:<input type="file" name="fileName" multiple/><br>
           <input type="submit" value="文件上传" /><br>
    </form>

              其中<input type="file" name="fileName" multiple/>等价于如下代码:

 
<input type="file" name="fileName" multiple="multiple"/>
<input type="file" name="fileName" multiple=""/>

            (a)MultipartFile

                     Spring MVC会将上传文件绑定到MultipartFile对象中,该对象提供

                     了获取上传文件内容,文件名等方法。通过transferTo()方法还可以

                     将文件存储到硬件中。

                     MultipartFile常用方法如下:

                     * bye[] getBytes()  :获取文件数据

                     * String getContentType()  :获取文件MIME类型

                     * InputStream getIputStream()  :获取文件流

                     * String getName()  :获取表单中文件组件的名字

                     * String getOriginalFilename()  :获取上传文件的原名

                     * boolean isEmpty()  :是否有上传的文件

                     * void transferTo(File dest)  :将文件保存到一个目标文件中

                     下面通过例子讲解MultipartFile怎么使用(这只是个单文件上传的例子,多文

                     件上传,自行百度)

                    (i)创建一个项目,导入相应的jar包,包括Apache的Commons FileUpload

                            的jar包。

                    (ii)编写web.xml和springmvc-config.xml

                             web.xml


<!-- 配置前端控制器 -->
  <servlet>
      <servlet-name>springmvc</servlet-name>
      <servlet-class>org.springframework.web.servlet.DispatcherServlet</servlet-class>
      <init-param>
          <param-name>contextConfigLocation</param-name>
          <param-value>classpath:springmvc-config.xml</param-value>
      </init-param>
      <load-on-startup>1</load-on-startup>
  </servlet>
  <servlet-mapping>
      <servlet-name>springmvc</servlet-name>
      <url-pattern>/</url-pattern>
  </servlet-mapping>

                             springmvc-config.xml

 
<!-- spring可以自动去扫描base-package下面的包或者子包下面的java类 如果扫描到有spring相关注解的类,则吧这个类注册为spring的bean -->
    <context:component-scan base-package="com.dj.controller" />
    <!-- 配置MultipartResolver -->
    <bean id="multipartResolver" class="org.springframework.web.multipart.commons.CommonsMultipartResolver">
        <!-- 上传文件大小限制,单位为字节-10Mb -->
        <property name="maxUploadSize">
            <value>10485760</value>
        </property>
        <!-- 请求的编码格式 -->
        <property name="defaultEncoding">
            <value>UTF-8</value>
        </property>
        <property name="maxInMemorySize">
            <value>4096</value>
        </property>
    </bean>
    <!-- 默认装配 -->
    <mvc:annotation-driven></mvc:annotation-driven>
    <!-- 视图解析器 -->
    <bean id="viewResolver"
        class="org.springframework.web.servlet.view.InternalResourceViewResolver">
        <!-- 前缀 -->
        <property name="prefix">
            <value>/</value>
        </property>
        <!-- 后缀 -->
        <property name="suffix">
            <value>.jsp</value>
        </property>
    </bean>

                    (iii)编写一个上传文件的实体类

 
package com.test;

public class User implements java.io.Serializable{

    private String username;
    //对应上传文件的file,类型为multipartfile,上传文件会自动绑定到image属性中
    private MultipartFile image;
    public String getUsername() {
        return username;
    }
    public void setUsername(String username) {
        this.username = username;
    }
    public MultipartFile getImage() {
        return image;
    }
    public void setImage(MultipartFile image) {
        this.image = image;
    }
    
}

                    (iv)编写Controller

 
@Controller
public class FileUploadController {

    /**
     * 动态跳转页面
     * @param pagename
     * @return
     */
    @RequestMapping(value="/{pagename}")
    public String toPage(@PathVariable String pagename){
        return pagename;
    }
    
    @RequestMapping(value="regist")
    public String regist(HttpServletRequest request,
            @ModelAttribute User user,Model model) throws Exception, IOException{
        if(!user.getImage().isEmpty()){
            //文件上传路径
            String path = request.getServletContext().getRealPath("/images/");
            //上传文件名
            String filename = user.getImage().getOriginalFilename();
            File filepath = new File(path, filename);
            //判断路径是否存在
            if(!filepath.getParentFile().exists()){
                filepath.getParentFile().mkdirs();
            }
            //将上传文件保存到一个目标文件中
            user.getImage().transferTo(new File(path+File.separator+filename));
            model.addAttribute("user", user);
            return "userinfo";
        }
                return "error";
        
    }
}

                    (v)编写注册页面和显示信息页面

 
<form action="regist" method="post" enctype="multipart/form-data">
    用户名:<input type="text" name="username"/><br>
    请上传头像:<input type="file" name="image"><br>
    <input type="submit" vaue="注册">
</form>

            (c)ApacheCommonsFileUpload

                    对于低于Servlet3.0版本,可以使用该方式上传。

                    有些博客说必须使用POST提交,有些博客说可以使用GET提交,具体哪个

                    对,不知道,以后写代码时统一使用POST提交。

                    具体怎么用看两篇文章:

                    https://blog.csdn.net/qq_24053795/article/details/50608283(这篇使用的是

                    GET提交)

                    https://blog.csdn.net/java_raylu/article/details/73691459(这篇是使用POST

                    提交)

            (b)Servlet上传文件

                     只有Servlet3.0及以上版本,可以使用Servlet上传文件

                     具体查看:https://www.cnblogs.com/xdp-gacl/p/4224960.html

     (8)文件下载

              Spring MVC有提供,用到的时候自行百度吧。

     (9)Spring MVC国际化和本地化

            (a)了解一下Spring MVC的语言解析器,它有三种语言解析器

                    (i)Header resolver:通过解析客户端请求头信息中心的accept-language(该

                                                         项其实是浏览器的设置),来获取用户需要的国际化语

                                                         言。详见=AcceptHeaderLocaleResolver

                    (ii)Cookie resolver:通过解析客户端上Cookie指定的locale,来获取用户需要

                                                         的国际化信息。详见=CookieLocaleResolver

                    (iii)Session resolver:通过解析客户端请求域中的loacle信息,来获取需要的

                                                            国际化信息,并存储在httpSession中。

                                                            详见=SessionLocaleResolver

            (b)具体例子,查看:https://www.cnblogs.com/caoyc/p/5637865.html

     (10)Spring MVC和Spring的线程安全问题

              (a)当Spring MVC是单例时,Controller线程不安全,所以应避免在controller中定

                       义实例变量。

                       解决办法:

                     (i)在Controller中使用ThreadLocal变量

                     (ii)在spring配置文件Controller中声明 scope="prototype",每次都创建新的

                              controller所在在使用spring开发web时要注意

              (b)Spring中Dao和Service都是单例,但是线程安全,因为其使用了

                       ThreadLocal。

                       详细查看:https://blog.csdn.net/liou825/article/details/17363265             

     (11)Spring MVC和Spring整合

            (a)Spring和Spring MVC父子容器

                     虽然springMVC和spring有必然的联系,但是他们的区别也是有的:

                   (i)springmvc和spring都是容器,容器就是管理bean的地方。但springmvc

                           就是管理controller对象的容器,spring就是管理service和dao的容器。

                           所以我们在springmvc的配置文件里配置的扫描路径就是controller的路

                           径,而spring的配置文件里自然配的就是service和dao的路径。

                   (ii)spring容器和springmvc容易的关系是父子容器的关系。spring容器是父

                            容器,springmvc是子容器。在子容器里可以访问父容器里的对象,但

                            是在父容器里不可以访问子容器的对象,说的通俗点就是,在controller

                            里可以访问service对象,但是在service里不可以访问controller对象。

                   (iii)Spring容器是由ServletContext创建;Spring MVC容器是由DispatcherServlet创建

                             创建Spring容器代码:

<!-- 配置spring ioc容器 -->
<context-param>
    <param-name>contextConfigLocation</param-name>
    <param-value>classpath:config/applicationContext.xml</param-value>
</context-param>

                             创建Spring MVC容器代码:

 
<!-- 配置springmvc 的DispatcherServlet -->
    <servlet>
        <servlet-name>dispatcherServlet</servlet-name>
        <servlet-class>org.springframework.web.servlet.DispatcherServlet</servlet-class>
        <init-param>
            <param-name>contextConfigLocation</param-name>
            <param-value>classpath:config/spring-mvc.xml</param-value>
        </init-param>
        <load-on-startup>1</load-on-startup>
    </servlet>

            (b)Spring和Spring MVC整合例子

                   (i)构建环境

                           * 导包,需要如下包:


                           * 构建项目:


                   (ii)spring-mvc.xml

<?xml version="1.0" encoding="UTF-8"?>
<beans xmlns="http://www.springframework.org/schema/beans"
    xmlns:xsi="http://www.w3.org/2001/XMLSchema-instance" xmlns:context="http://www.springframework.org/schema/context"
    xmlns:mvc="http://www.springframework.org/schema/mvc" xmlns:tx="http://www.springframework.org/schema/tx"
    xsi:schemaLocation="http://www.springframework.org/schema/mvc http://www.springframework.org/schema/mvc/spring-mvc-4.1.xsd  
        http://www.springframework.org/schema/beans http://www.springframework.org/schema/beans/spring-beans.xsd  
        http://www.springframework.org/schema/context http://www.springframework.org/schema/context/spring-context-4.1.xsd  
        http://www.springframework.org/schema/tx http://www.springframework.org/schema/tx/spring-tx-4.1.xsd">
 
    <!-- 配置自动扫描包 -->
    <context:component-scan base-package="com.ssh" />
    <mvc:annotation-driven />
 
    <!-- 配置视图解析器 -->
    <bean
        class="org.springframework.web.servlet.view.InternalResourceViewResolver">
        <property name="prefix" value="/pages/"></property>
        <property name="suffix" value=".jsp"></property>
    </bean>
</beans>  

                   (iii)applicationContext.xml

 
<?xml version="1.0" encoding="UTF-8"?>
<beans xmlns="http://www.springframework.org/schema/beans"
    xmlns:xsi="http://www.w3.org/2001/XMLSchema-instance" xmlns:context="http://www.springframework.org/schema/context"
    xmlns:tx="http://www.springframework.org/schema/tx"
    xsi:schemaLocation="http://www.springframework.org/schema/beans http://www.springframework.org/schema/beans/spring-beans.xsd  
        http://www.springframework.org/schema/context http://www.springframework.org/schema/context/spring-context-4.1.xsd  
        http://www.springframework.org/schema/tx http://www.springframework.org/schema/tx/spring-tx-4.1.xsd">
 
    <!-- 配置自动扫描的包 -->
    <context:component-scan base-package="com.ssh">
        <!-- 扫描时跳过 @Controller 注解的JAVA类(控制器) -->
        <context:exclude-filter type="annotation"
            expression="org.springframework.stereotype.Controller" />
    </context:component-scan>
</beans>  

                   (iv)web.xml

 
<?xml version="1.0" encoding="UTF-8"?>
<web-app xmlns:xsi="http://www.w3.org/2001/XMLSchema-instance"
    xmlns="http://java.sun.com/xml/ns/javaee"
    xsi:schemaLocation="http://java.sun.com/xml/ns/javaee http://java.sun.com/xml/ns/javaee/web-app_3_0.xsd"
    id="WebApp_ID" version="3.0">
    <display-name>ssh</display-name>
    <welcome-file-list>
        <welcome-file>index.jsp</welcome-file>
    </welcome-file-list>
 
    <!-- 配置spring ioc容器 -->
    <context-param>
        <param-name>contextConfigLocation</param-name>
        <param-value>classpath:config/applicationContext.xml</param-value>
    </context-param>
 
    <!-- Bootstraps the root web application context before servlet initialization -->
    <listener>
        <listener-class>org.springframework.web.context.ContextLoaderListener</listener-class>
    </listener>
 
    <!-- 配置springmvc 的DispatcherServlet -->
    <servlet>
        <servlet-name>dispatcherServlet</servlet-name>
        <servlet-class>org.springframework.web.servlet.DispatcherServlet</servlet-class>
        <init-param>
            <param-name>contextConfigLocation</param-name>
            <param-value>classpath:config/spring-mvc.xml</param-value>
        </init-param>
        <load-on-startup>1</load-on-startup>
    </servlet>
 
    <!-- Map all requests to the DispatcherServlet for handling -->
    <servlet-mapping>
        <servlet-name>dispatcherServlet</servlet-name>
        <url-pattern>/</url-pattern>
    </servlet-mapping>
 
    <filter>
        <filter-name>CharacterEncodingFilter</filter-name>
        <filter-class>org.springframework.web.filter.CharacterEncodingFilter</filter-class>
        <init-param>
            <param-name>encoding</param-name>
            <param-value>UTF-8</param-value>
        </init-param>
    </filter>
    <filter-mapping>
        <filter-name>CharacterEncodingFilter</filter-name>
        <url-pattern>/*</url-pattern>
    </filter-mapping>
</web-app>

                   (v)代码

                            * UserController

package com.ssh.controller;
 
import javax.servlet.http.HttpServletRequest;
 
import org.springframework.beans.factory.annotation.Autowired;
import org.springframework.stereotype.Controller;
import org.springframework.web.bind.annotation.RequestMapping;
 
import com.ssh.service.UserService;
 
@Controller
@RequestMapping("/user")
public class UserController {
 
    @Autowired
    private UserService userService;
 
    @RequestMapping(value = "save")
    public String save(HttpServletRequest request) {
        String username = request.getParameter("username");
        String password = request.getParameter("password");
        System.out.println(username + " " + password);
        System.out.println("controller save...");
 
        userService.save();
        return "success";
    }
}

                            * UserService:

 
package com.ssh.service;
 
public interface UserService {
    void save();
}

                            * UserServiceImpl:

 
package com.ssh.service;
 
import org.springframework.stereotype.Service;
 
@Service
public class UserServiceImpl implements UserService {
 
    @Override
    public void save() {
        System.out.println("userservice save...");
    }
}

                            * add.jsp

 
<%@ page language="java" contentType="text/html; charset=utf-8"
    pageEncoding="utf-8"%>
<!DOCTYPE html PUBLIC "-//W3C//DTD HTML 4.01 Transitional//EN" "http://www.w3.org/TR/html4/loose.dtd">
<html>
<head>
<meta http-equiv="Content-Type" content="text/html; charset=utf-8">
<title>Insert title here</title>
</head>
<body>
    <h1>添加用户</h1>
    <form action="user/save" method="post">
        用户 <input type="text" name="username" /><br /> 密码 <input type="text"
            name="password" /><br /> <input type="submit" value="添加">
    </form>
 
</body>
</html>
</html>

    3.Spring MVC注解

     (1)@Controller

              org.springframework.stereotype.Controller。用来指示Spring类的实例是一个控

              制器。Spring使用扫描机制来找到应用程序中所有基于注解的控制器类。为了保

              证Spring能找到你的控制器,需要完成两件事情。首先,在Spring MVC的配置

              文件中声明spring-context,如下所示:

<beans
   ...
   xmlns:context="http://www.springframework.org/schema/context"
   ...
>

              其次,需要应用<component-scan/>元素,如下所示:

 
<context:component-scan base-package="xxx.xxx.controller" />

     (2)@RequestMapping注解

              org.springframework.web.bind.annotation.RequestMapping,可以使用

              @RequestMapping注解方法和类。下面是一个使用@RequestMapping注解方

              法的控制器类:

@Controller
public class AppointmentsController {
    @RequestMapping("/bb")
    public String get() {
        return "consumerForm";
    }
 
 
}

              使用@RequestMapping注解的value属性将URI映射到方法上。这样我们就可以

              使用如下URI访问AppointmentsController方法:

              http://domain/context/bb

              下面是一个使用@RequestMapping注解方法的控制器类:

@Controller
@RequestMapping("/aa")
public class AppointmentsController {
    @RequestMapping("/bb")
    public String get() {
        return "consumerForm";
    }
 
 
}

              我们将使用如下URI访问AppointmentsController方法:

              http://domain/context/bb

              因为value是@RequestMapping的默认属性,因此,若只有唯一的属性,则可以

              省略属性名称。换句话说,如下两个标注含义相同。

@RequestMapping("/aa")
@RequestMapping(value="/aa")

              但是超过一个属性就必须写value属性名称,如下两个例子:

              例一:

@Controller
@RequestMapping(value="/aa",method=RequestMethod.POST)
public class AppointmentsController {
    @RequestMapping("/bb")
    public String get() {
        return "consumerForm";
    }
 
 
}

              例二:

 
@Controller
@RequestMapping(value="/aa",method = {RequestMethod.POST, RequestMethod.GET})
public class AppointmentsController {
    @RequestMapping("/bb")
    public String get() {
        return "consumerForm";
    }


     (3)@RequestBody、@ResponseBody、

              @RequestBody

              简介:@RequestBody 注解则是将 HTTP 请求正文插入方法中,使用适合的

                         HttpMessageConverter 将请求体写入某个对象。在使用Spring MVC

                         时,其主要作用是将POST请求中的JSON或XML绑定到Controller方法

                         的参数中(JavaBean)(一般用来处理POST请求中非

                         Content-Type: application/x-www-form-urlencoded的数据)。

                         关于@RequestBody不处理GET请求的说明:

                         其实在一般的情况下,GET请求是不可以用@RequestBody来接收参数

                         的。一般情况指的是请求由浏览器或者类似于POSTMAN这样的测试工

                         具发出,我们都知道,Http请求包含请求头和请求体,如果发出的请求

                         中请求体为空,那么使用@RequestBody注解来获取参数肯定是徒劳的,

                         所以在这种情况下,GET与@ReqestBody配合使用是有问题的。 此段

                         源于博客:https://blog.csdn.net/qq_28411869/article/details/81285810   

                         关于HTTP请求方式和Content-Type说明:

                         * GET,POST请求方式,需要判断content-type是何种数据类型:

                            content-type : multipart/form-data:

                            这种格式使用@RequestBody处理不了。

                            content-type : application/x-www-form-urlencoded:

                            form表单形式提交的数据格式,可以使用@RequestBody,也可以使

                            用其他注解例如@RequestParam, @ModelAttribute进行接收。

                            content-type : 其他数据格式:

                            必须使用@RequestBody进行接收。

                         * PUT请求方式,需要判断content-type是何种数据类型:

                           content-type : application/x-www-form-urlencoded:

                           必须使用@RequestBody

                           content-type : multipart/form-data:

                           @RequestBody处理不了

                           content-type : 其他数据格式: 

                           必须使用@RequestBody进行接收。

              作用:

                       该注解用于读取Request请求的body部分数据,使用系统默认配置的

                       HttpMessageConverter进行解析,把相应的数据绑定到要返回的对象

                       上,然后再把HttpMessageConverter返回的对象数据绑定到controller

                       中方法的参数上。

              注:

                       在一些特殊情况@requestBody也可以用来处理content-type类型为

                       application/x-www-form-urlcoded的内容,只不过这种方式不是很常用,

                       在处理这类请求的时候,@requestBody会将处理结果放到一个

                       MultiValueMap<String,String>中,这种情况一般在特殊情况下才会使用,

                       例如jQuery easyUI的datagrid请求数据的时候需要使用到这种方式、小型

                       项目只创建一个POJO类的话也可以使用这种接受方式。

                       下面的示例,只有示例二、三是常用的,其它不怎么常用,有兴趣可以研

                       究一下。https://blog.csdn.net/qq_34500957/article/details/80523200中提

                       到的一些用法,我的博客中并没有指定。

              示例一,前台传Json,属性绑定到参数上:

                      ajax代码:

 $.ajax({
        url:"/login",
        type:"POST",
        data:'{"userName":"admin","pwd","admin123"}',
        content-type:"application/json charset=utf-8",
        success:function(data){
          alert("request success ! ");
        }
    });

                      Controller代码:

 
@requestMapping("/login")
public void login(@requestBody String userName,@requestBody String pwd){
  System.out.println(userName+" :"+pwd);
}

              示例二,前台传Json,属性绑定到JavaBean:

                      ajax代码:

function loginAction() {

    // 获取用户输入的账号和密码
    var name = $('#count').val();
    var password = $('#password').val();

    $.ajax({
        url : 'account/login.do',
        type : 'post',
        // data对象中的属性名要和服务端控制器的参数名一致 login(name, password)
        data : {
            'name' : name,
            'password' : password
        },
        dataType : 'json',
        success : function(result) {
            if (result.state == 0) {
                // 登录成功,设置cookie并跳转edit.html
                addCookie('userId', result.data.id);
                addCookie('nick', result.data.nick);
                location.href = 'edit.html';
            } else {
                // 登录失败
                var msg = result.message;
                $('#sig_in').next().html(msg);
                $('#sig_in').next().css("color", "red");
            }
        },
        error : function(e) {
            alert("系统异常");
        }
    });
    $('#password').val("");
}

                      Java代码:

 
@RequestMapping("/login.do")
@ResponseBody
public Object login(@RequestBody User loginUuser, HttpSession session) {
   user = userService.checkLogin(loginUser);
   session.setAttribute("user", user);
   return new JsonResult(user);
}

              示例三,前台传Json数组对象,参数绑定到数组

                      前端代码:

<script type="text/javascript">  
    $(document).ready(function(){  
     $.ajax({
         type:'POST',
         url:'<%=path%>/user/ceshi.do',
     dataType:"json",      
     contentType:"application/json",   
     data:JSON.stringify([{id:"1",name:"cehshi1"},{id:"2",name:"ceshi2"}]),
         success:function(){            
     }
    });
</script>

                      Java代码:

 
@RequestMapping(value = "/ceshi", method = {RequestMethod.POST }) 
@ResponseBody
public void ceshi(@RequestBody User[] users){
    for (User user : users) {
    System.out.println(user.getId());
    }
}

              示例四,前台传对象数组,参数绑定到List

                      ajax代码:

var testList=[];
var user={};
user.id=1;
user.name='jack';
testList.push(user);
var user2={};
user2.id=2;
user2.name='tom';
testList.push(user2);
$.ajax({
    // headers必须添加,否则会报415错误
    headers: {
        'Accept': 'application/json',
        'Content-Type': 'application/json'
    },
  type: 'POST',
  dataType: "json", //表示返回值类型,不必须
  data: JSON.stringify(testList),
  url: '/test/postList',
  success: function(){
      alert('success');
  }
  
});

                      Java代码:

 
Controller:

@RequestMapping("/postList")
    @ResponseBody
    public String postList(@RequestBody List<TestL> testL){
        System.out.println(testL);
        return null;
    
 }

JavaBean:

public class TestL {
    private Integer id;
    private String name;
    
    public Integer getId() {
        return id;
    }
    
    public void setId(Integer id) {
        this.id = id;
    }
    
    public String getName() {
        return name;
    }
    
    public void setName(String name) {
        this.name = name;
    }
}

              @RequestParam

              用来处理Content-Type: 为 application/x-www-form-urlencoded编码的内容。

            (Http协议中,如果不指定Content-Type,则默认传递的参数就是

              application/x-www-form-urlencoded类型)。在实际应用中,通常用它来处理GET

              请求,但是@RequestParam是可以处理GET请求和POST请求的(处理POST请求

              没实验过,使用时应该谨慎)。@RequestParam可以接受简单类型的属性,也可

              以接受对象类型。  实质是将Request.getParameter() 中的Key-Value参数Map利用

              Spring的转化机制ConversionService配置,转化成参数接收对象或字段。

              @RequestParam,有三个属性:

              * value:请求参数名(必须配置)

              * required:是否必需,默认为 true,即 请求中必须包含该参数,如果没有包含,

                                 将会抛出异常(可选配置)。

              * defaultValue:默认值,如果设置了该值,required 将自动设为 false,无论你是

                                        否配置了required,配置了什么值,都是 false(可选配置)

               下面开始看些例子:

                      前端代码:

<form action="/gadget/testRequestParam" method="post">    
     参数inputStr:<input type="text" name="inputStr">    
     参数intputInt:<input type="text" name="inputInt">    
</form>  

                      Java代码:

 
@RequestMapping("testRequestParam")    
   public String filesUpload(@RequestParam String inputStr, HttpServletRequest request) {    
    System.out.println(inputStr);  
      
    int inputInt = Integer.valueOf(request.getParameter("inputInt"));  
    System.out.println(inputInt);  
      
    // ......省略  
    return "index";  
   } 

                      可以对传入参数指定参数名:

 
// 下面的对传入参数指定为aa,如果前端不传aa参数名,会报错  
@RequestParam(value="aa") String inputStr  

                      错误信息: 

                      HTTP Status 400 - Required String parameter 'aa' is not present

                      可以通过required=false或者true来要求@RequestParam配置的前端参数是

                      否一定要传:

// required=false表示不传的话,会给参数赋值为null,required=true就是必须要有  
@RequestMapping("testRequestParam")    
    public String filesUpload(@RequestParam(value="aa", required=true) String inputStr, HttpServletRequest request)  

                      如果用@RequestMapping注解的参数是int基本类型,但是required=false,

                      这时如果不传参数值会报错,因为不传值,会赋值为null给int,这个不可以

@RequestMapping("testRequestParam")    
   public String filesUpload(@RequestParam(value="aa", required=true) String inputStr,   
        @RequestParam(value="inputInt", required=false) int inputInt  
        ,HttpServletRequest request) {    
      
    // ......省略  
    return "index";  
}  

                      错误信息:

                      “Consider declaring it as object wrapper for the corresponding primitive type.”

                      解决办法:用Integer替代int。

                      在看一个例子,用于了解参数自动类型转换,重点在该类的注释上面:

/**

* 如果请求参数中的 userId 是纯数字,那么使用 @RequestParam

* 时,可以根据自己的需求将方法参数类型设置为 Long、Integer、

* String,它将自动进行类型转换

*/

@RequestMapping(value="/user/show")

public ModelAndView show(@RequestParam(value="userId",defaultValue="1") Long userId) {

     // 创建 ModelAndView 对象,并设置视图名称

     ModelAndView mv = new ModelAndView("show");

    // 添加模型数据

    mv.addObject("msg", "User ID:" + userId);

    return mv;

}

              @ResponseBody

              @ResponseBody是作用在方法上的,@ResponseBody 表示该方法的返回结果直

              接写入 HTTP response body 中,一般在异步获取数据时使用【也就是AJAX】,

              在使用 @RequestMapping后,返回值通常解析为跳转路径,但是加上

              @ResponseBody 后返回结果不会被解析为跳转路径,而是直接写入

              HTTP response body 中。 比如异步获取 json 数据,加上 @ResponseBody 后,

              会直接返回 json 数据。@RequestBody 将 HTTP 请求正文插入方法中,使用适合

              的 HttpMessageConverter 将请求体写入某个对象。下面是Spring MVC返回JSON

              的例子:

                     例一,返回ModelAndView,其中包含map集

/*
     * 返回ModelAndView类型的结果
     * 检查用户名的合法性,如果用户已经存在,返回false,否则返回true(返回json数据,格式为{"valid",true})
     */
    @RequestMapping(value = "/checkNameExistsMethod2", produces = "application/json;charset=UTF-8") //这里的produces值在不设置的情况下将根据返回结果自动决定
    @ResponseBody
    public ModelAndView checkNameValidMethod2(@RequestParam String name) {
        boolean result = true;
       //...
        Map<String, Boolean> map = new HashMap<>();
        map.put("valid", result);
        return new ModelAndView(new MappingJackson2JsonView(), map);
    }

                     例二,返回String类型的json,这里有两种方式:

                                方式一:使用jackson-databind-x.x.x.jar包中的ObjectMapper将Map型

                                               数据改写为String并返回。


/*
     * 返回String类型的结果
     * 检查用户名的合法性,如果用户已经存在,返回false,否则返回true(返回json数据,格式为{"valid",true})
     */
    @RequestMapping(value = "/checkNameExistsMethod1", produces = "application/json;charset=UTF-8")
    @ResponseBody
    public String checkNameValidMethod1(@RequestParam String name) {
        boolean result = true;
        //...
        Map<String, Boolean> map = new HashMap<>();
        map.put("valid", result);
        ObjectMapper mapper = new ObjectMapper();
        String resultString = "";
        try {
            resultString = mapper.writeValueAsString(map);
        } catch (JsonProcessingException e) {
            e.printStackTrace();
        }
        return resultString;
    }

                          方式二,直接返回字符串,主要key/value值必须使用含有转义字符\的双引

                                        号,单引号无效。

/*
     * 返回String类型的结果
     * 检查用户名的合法性,如果用户已经存在,返回false,否则返回true(返回json数据,格式为{"valid",true})
     */
    @RequestMapping(value = "/checkNameExistsMethod1", produces = "application/json;charset=UTF-8")
    @ResponseBody
    public String checkNameValidMethod1(@RequestParam String name) {
        boolean result = true;
     
        String resultString = "{\"result\":true}"; //注意一定是双引号 "{\"result\":\"success\"}"
      
        return resultString;
    }

                     例三,返回任何预定义class类型的结果:

@RequestMapping(value = "/findEmployeebyName")
    @ResponseBody
    public Employee findEmployeebyName(String name) {
        List<Employee> lstEmployees = employeeService.getAllEmployees();
        for (Employee employee : lstEmployees) {
            if (employee.getName().equals(name))
                return employee;
        }
        return null;
    }

                     例四,使用HttpServletResponse对象的response.getWriter().write(xxx)方法

 
@RequestMapping(value="/hello5.do")
    public void hello(HttpServletResponse response) throws IOException{
        UserInfo u1=new UserInfo();
        u1.setAge(15);
        u1.setUname("你好");
        
        UserInfo u2=new UserInfo();
        u2.setAge(152);
        u2.setUname("你好2");
        Map<String,UserInfo> map=new HashMap<String, UserInfo>();
        map.put("001", u1);
        map.put("002", u2);
        String jsonString = JSON.toJSONString(map);
        response.setCharacterEncoding("utf-8");
        response.getWriter().write(jsonString);
        response.getWriter().close();
        
    }

     (4)@ModelAttribute

              @ModelAttribute使用场景如下:

              * 注释在无返回值方法上,方法上未使用@RequestMapping

              * 注释在有返回值方法上,方法上未使用@RequestMapping

              * 注释在方法上,并且方法上使用了@RequestMapping

              * 注释在方法的参数上

              @ModelAttribute注解作用在方法上或者方法的参数上,表示将被注解的方法的

              返回值或者是被注解的参数作为Model的属性加入到Model中,然后Spring框架

              自会将这个Model传递给ViewResolver。简单的说@ModelAttribute最主要的作

              用是将数据添加到模型对象中,用于视图页面展示时使用。@ModelAttribute等

              价于 model.addAttribute("attributeName", abc); 但是根据@ModelAttribute注释

              的位置不同,和其他注解组合使用,致使含义有所不同

            (a)@ModelAttribute注释在无返回值方法上,方法上未使用@RequestMapping

                     被@ModelAttribute注释的方法会在此controller每个方法执行前被执行

@Controller 
public class HelloWorldController { 
    @ModelAttribute 
    public void populateModel(@RequestParam String abc, Model model) { 
         model.addAttribute("attributeName", abc); 
      } 

    @RequestMapping(value = "/helloWorld") 
    public String helloWorld() { 
       return "helloWorld"; 
        } 
 }

                     上例中会先执行populateModel方法,然后在执行helloWorld方法执行,并

                     参数abc被带到Model中后接着带入helloWorld方法中,当返回视图

                     “helloWorld”后,Model会被带到页面上。

                     当把populateModel方法和helloWorld方法合二为一将如下例(这是我们常

                     用的方法):    

@Controller 
public class HelloWorldController { 
    @RequestMapping(value = "/helloWorld") 
    public String helloWorld(@RequestParam String abc, Model model) { 
       model.addAttribute("attributeName", abc); 
       return "helloWorld"; 
        } 
 }

            (b)注释在有返回值方法上,方法上未使用@RequestMapping       

 
@ModelAttribute 
public Account addAccount(@RequestParam String number) { 
     Account account = accountManager.findAccount(number); 
     return account ;
} 

                     由于model属性的名称没有指定,它由返回类型隐含表示,如这个方法返

                     回Account类型,那么这个model属性的名称是account。这段相当于如下

                     代码:

 model.addAttribute("account", account); 

                     但是这样用很不爽,如果返回值是int,那么上段代码相当于:

                     model.addAttribute("int",value);这时可以使用@ModelAttribute(value=“”)

                     或@ModelAttribute(“”)

                     示例如下:

@ModelAttribute("attributeName") 
public Account addAccount(@RequestParam String number) { 
     Account account = accountManager.findAccount(number); 
     return account ;
} 

                     这时上段代码相当于:model.addAttribute("attributeName",account);

            (c)注释在方法上,并且方法参数上使用了@RequestMapping

                     用@ModelAttribute注解@RequestMapping方法的场景很少会用到,因

                     为这种场景下的返回值就不是视图了而是ModelAttribute的value值,如

                     果不是视图,那么@RequestMapping注解的方法也失去了本身的含义。

            (d)@ModelAttribute注释在方法的参数上

 public String test1(@ModelAttribute("user") UserModel user)

                    它的作用是将该绑定的命令对象以“user”为名称添加到模型对象中供视图页

                    面展示使用。我们此时可以在视图页面使用${user.username}来获取绑定的

                    命令对象的属性。

              关于@ModelAttribute想更细致的了解,可以参考文章:

              https://blog.csdn.net/catoop/article/details/51171108(该文章中可能有些错误)

              https://jingyan.baidu.com/article/a3aad71a158d4bb1fa00967b.html

     (5)@SessionAttribute

              @ModelAttribute注解作用在方法上或者方法的参数上,表示将被注解的方法的

              返回值或者是被注解的参数作为Model的属性加入到Model中,然后Spring框架

              自会将这个Model传递给ViewResolver。Model的生命周期只有一个http请求的

              处理过程,请求处理完后,Model就销毁了。如果想让参数在多个请求间共享,

              那么可以用到要说到的@SessionAttribute注解。

              注:SessionAttribute只能作用在类上。用法,看例子解说:

@Controller
@RequestMapping("sc")
@SessionAttributes("name")
public class SessionController {
    @RequestMapping("session")
    public String sessions(Model model,HttpSession session){
        model.addAttribute("name", "winclpt");
        session.setAttribute("myName", "chke");
        return "session";
}

              上面的代码将Model中的name参数保存到了session中(如果Model中没有

              name参数,而session中存在一个name参数,那么SessionAttribute会讲这个

              参数塞进Model中)

              原理理解:它的做法大概可以理解为将Model中的被注解的attrName属性保存

                                在一个SessionAttributesHandler中,在每个RequestMapping的方

                                法执行后,这个SessionAttributesHandler都会将它自己管理的“属性”

                                从Model中写入到真正的HttpSession;同样,在每个

                                RequestMapping的方法执行前,SessionAttributesHandler会将

                                HttpSession中的被@SessionAttributes注解的属性写入到新的

                                Model中。

              如果想删除session中共享的参数,可以通过SessionStatus.setComplete(),

              这句只会删除通过@SessionAttribute保存到session中的参数。

              SessionAttribute有两个参数:

                String[] value:要保存到session中的参数名称

                Class[] typtes:要保存的参数的类型,和value中顺序要对应上

              可以这样写:@SessionAttributes(types = {User.class,Dept.class},value={“attr1”,”attr2”})

     (6)@AutoWired和@Service

              因该注意使用@Service时需要一个<component-scan/>来扫描依赖基本包

              <context:component-scan base-package="com.Service...."/>

              其它略,这两个标签太熟悉了。

     (7)@DateTimeFormat和@JsonFormat(非Spring标签)

            (a)@DateTimeFormat

                     通过例子来讲解:

                   (i)定义一个pojo,它有一个 java.util.Date 类型的属性 date。   

import java.util.Date;
 
public class DateVo {
    private Date date;
 
    public void setDate(Date date){
        this.date = date;
    }
    public Date getDate(){
        return date;
    }
}

                   (ii)定义一个Controller

 
@RestController
@RequestMapping("/date/")
public class DateController {
 
    @RequestMapping("test")
    public DateVo getDate(DateVo vo){
        System.out.println("date1:"+vo.getDate());
 
        SimpleDateFormat sdf = new SimpleDateFormat("yyyy-MM-dd HH:mm:ss");
        String date = sdf.format(vo.getDate());
        System.out.println("date2:"+date);
 
        DateVo vo2 = new DateVo();
        vo2.setDate(new Date());
        return vo2;
    }
}

                   (iii)访问 /date/test ,并传入参数:2018-08-02 22:05:55。发现不能访

                             问,报异常,错误信息如下:

                          ​

                             这时,就可以使用 Spring 的 @DateTimeFormat注解格式化参数,

                             来解决上述问题。

                   (iv)改造 DateVo:


public class DateVo {
    @DateTimeFormat(pattern="yyyy-MM-dd HH:mm:ss")
    private Date date;
 
    public void setDate(Date date){
        this.date = date;
    }
    public Date getDate(){
        return date;
    }
}

                             再像上面一样访问 /date/test ,并传入参数:2018-08-02 22:05:55,

                             将在控制台上打印:

                             date1:Thu Aug 02 22:05:55 CST 2018

                             date2:2018-08-02 22:05:55

                             可以看到,加入 @DateTimeFormat 注解后参数可以被接收到了,

                             但日期时间的格式还是需要自己再手动转换一下。这是因为

                             @DateTimeFormat 注解的 pattern 属性值指定的日期时间格式并

                             不是将要转换成的日期格式,这个指定的格式是和传入参数的日

                             期格式,假如注解为:

                             @DateTimeFormat(pattern="yyyy/MM/dd HH:mm:ss")

                             则传入的参数应该是这样的:

                             2018/08/02 22:05:55

                             否则会抛出异常。

                             注:可对java.util.Date、java.util.Calendar、java.long.Long

                                    时间类型进行标注。

            (b)出参格式化

                     在上述示例中,调用接口的返回结果为:

                     "date": "2018-08-01T14:25:31.296+0000"

                     这个格式并不是我们想要的,那么如何将其进行格式化?这时就需要

                     用到 jackson 的 @JsonFormat 注解。

                   (i)改造 DateVo:

public class DateVo {
    @DateTimeFormat(pattern="yyyy-MM-dd HH:mm:ss")
    @JsonFormat(
            pattern = "yyyy-MM-dd HH:mm:ss"
    )
    private Date date;
 
    public void setDate(Date date){
        this.date = date;
    }
    public Date getDate(){
        return date;
    }
}

                             继续访问 /date/test ,并传入参数:2018-08-02 22:05:55,可以

                             看到接口返回的结果为:

                             "date": "2018-08-01 14:32:57"

                             虽然时间格式正确了,但实际上当前时间是

                             “2018-08-01 22:32:57” ,早了8个小时。因为,jackson在序列化

                             时间时是按照国际标准时间GMT进行格式化的,而在国内默认时

                             区使用的是CST时区,两者相差8小时。

                             所以,@JsonFormat 注解还要再加一个属性:

@JsonFormat(
    pattern = "yyyy-MM-dd HH:mm:ss",
    timezone = "GMT+8"
)
private Date date;

                   (ii)关于JsonFormat的说明

                            因为 @JsonFormat 注解不是 Spring 自带的注解,所以使用该注

                            解前需要添加 jackson 相关的依赖包。当然,如果是 SpringBoot

                            项目就不需要自己手动添加依赖了,因为在 spring-boot-start-web

                            下已经包含了 jackson 相关依赖。


三  MyBatis

         1. #和$的区别

           (1)区别介绍

                    #{ }:解析为一个 JDBC 预编译语句(prepared statement)的参数标记符。

                    例如,Mapper.xml中如下的 sql 语句:

select * from user where name = #{name};

                    动态解析为:

select * from user where name = ?; 

                    一个 #{ } 被解析为一个参数占位符 ? 。而${ } 仅仅为一个纯碎的 string 替换,在动态 SQL 解析阶段将

                    会进行变量替换。例如,Mapper.xml中如下的 sql:

select * from user where name = ${name};

                    当我们传递的参数为 "Jack" 时,上述 sql 的解析为

select * from user where name = "Jack";

           (2)用法

                  (a)能用#尽量用#


                  (b)表名作为变量时,必须使用 ${ }

                           这是因为,表名是字符串,使用 sql 占位符替换字符串时会带上单引号 '',这会导致 sql 语法错误,

                           例如:

select * from #{tableName} where name = #{name};

                           预编译之后的sql 变为:

select * from ? where name = ?;

                           假设我们传入的参数为 tableName = "user" , name = "Jack",那么在占位符进行变量替换后,sql

                           语句变为:

select * from 'user' where name='Jack';

                          上述 sql 语句是存在语法错误的,表名不能加单引号 ''(注意,反引号 ``是可以的)。

           (1)#

                  (a)#{}表示一个占位符号,通过#{}可以实现preparedStatement向占位符中设置值,自动进行java类型和jdbc类型

                           转换,

                  (b)#{}可以有效防止sql注入。 #{}可以接收简单类型值或pojo属性值。

                  (c)如果parameterType传输单个简单类型值,#{}括号中可以是value或其它名称


posted @ 2019-04-01 17:59  jialanshun  阅读(791)  评论(0编辑  收藏  举报