爱上源码,重学Spring MVC深入
1.1 gradle搭建源码调试环境
1)搭建gradle环境
4个步骤
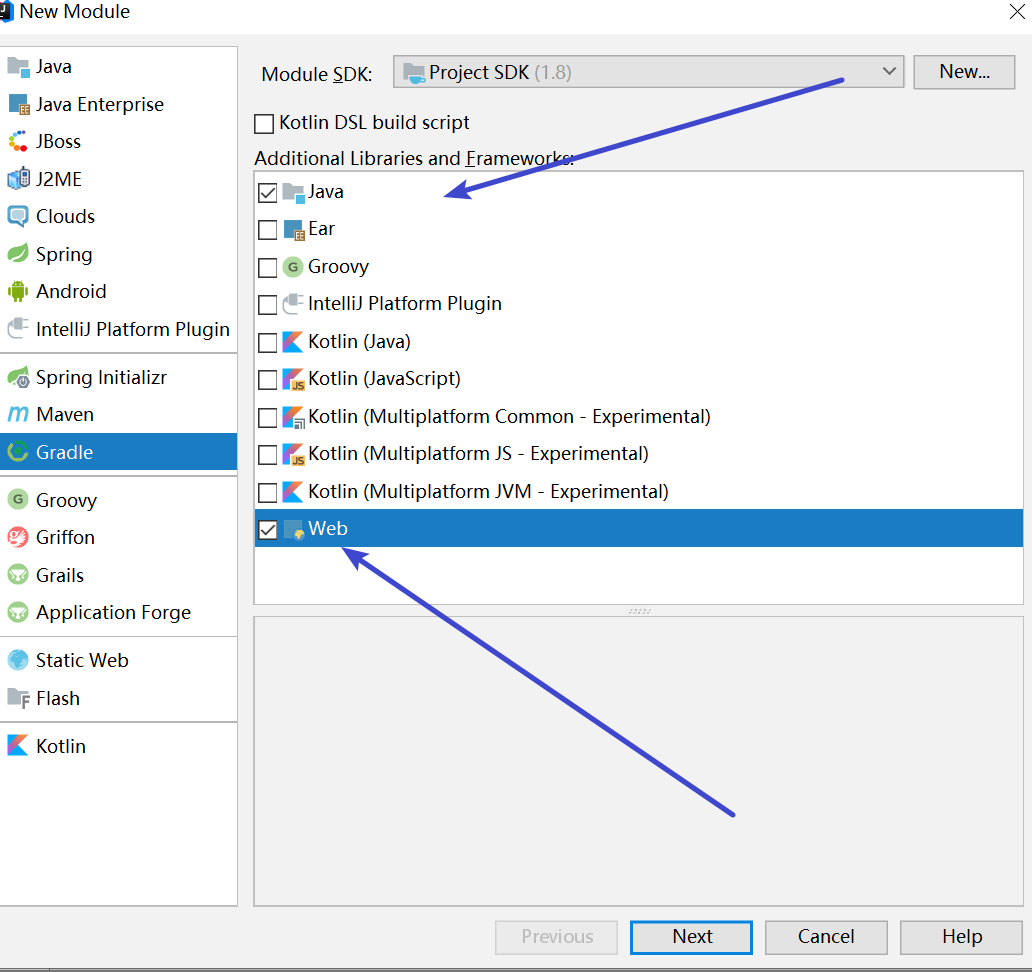
1、File-New-Module
选择java和web
2、填写包信息
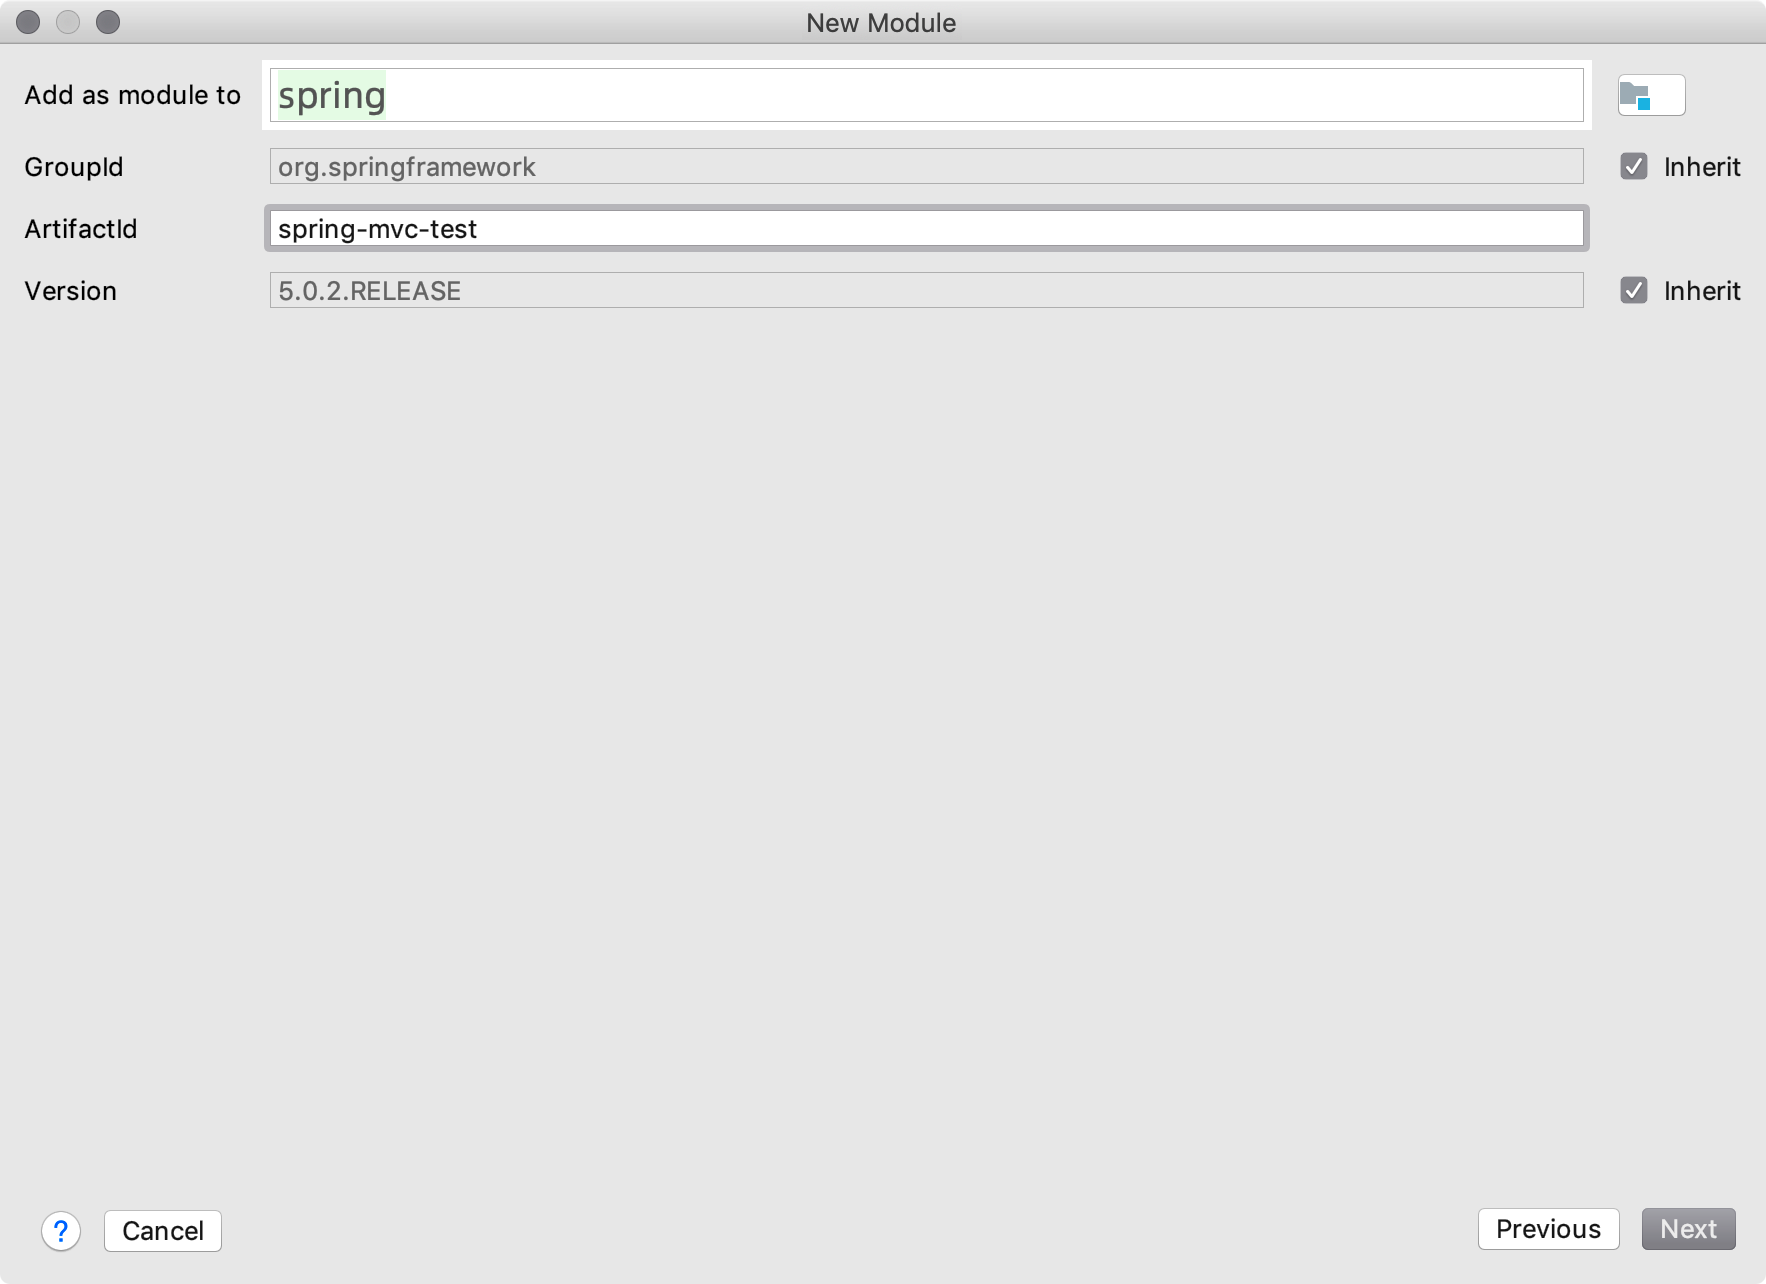
3、存储路径

2)增加起步依赖
依赖的项目,直接复制粘贴上去
1、对spring的依赖
2、对MVC的依赖
3、对Tomcat插件的依赖
build.gradle
group 'com.spring.test' version '5.0.2.RELEASE' apply plugin: 'java' apply plugin: 'war' apply plugin: 'com.bmuschko.tomcat' //tomcat: 插件 // tomcat: 以下配置会在第一次启动时下载插件二进制文件 //在项目根目录中执行gradle tomcatRun buildscript { repositories { jcenter() } dependencies { classpath 'com.bmuschko:gradle-tomcat-plugin:2.5' } } // 配置阿里源 allprojects { repositories { maven{ url 'http://maven.aliyun.com/nexus/content/groups/public/'} } } dependencies { testCompile group: 'org.testng', name: 'testng', version: '6.14.3' runtime 'javax.servlet:jstl:1.1.2' // Servlet容器必需 compile(project(':spring-context')) compile(project(':spring-web')) compile(project(':spring-webmvc')) // tomcat: 将Tomcat运行时库添加到配置tomcat中: (此处为Tomcat9) def tomcatVersion = '9.0.1' tomcat "org.apache.tomcat.embed:tomcat-embed-core:${tomcatVersion}", "org.apache.tomcat.embed:tomcat-embed-logging-juli:9.0.0.M6", "org.apache.tomcat.embed:tomcat-embed-jasper:${tomcatVersion}" } // tomcat: 一些协议设置(注意,这里必须加上,不然会抛tomcat的异常,仅限tomcat9) tomcat { httpProtocol = 'org.apache.coyote.http11.Http11Nio2Protocol' ajpProtocol = 'org.apache.coyote.ajp.AjpNio2Protocol' } // UTF-8 tasks.withType(JavaCompile) { options.encoding = "UTF-8" }
3)MVC代码编写
前提:
增加WEB-INF目录和Web.xml
1、打开File - Proect Structrue
2、选中刚才的mvc项目,展开,选中web gradle , 到右边 点击加号
3、确认路径
spring-mvc-test\src\main\webapp\WEB-INF\web.xml
WEB-INF和xml创建完毕

webapp/WEB-INF/web.xml
<?xml version="1.0" encoding="UTF-8"?> <web-app xmlns="http://xmlns.jcp.org/xml/ns/javaee" xmlns:xsi="http://www.w3.org/2001/XMLSchema-instance" xsi:schemaLocation="http://xmlns.jcp.org/xml/ns/javaee http://xmlns.jcp.org/xml/ns/javaee/web-app_4_0.xsd" version="4.0"> <!-- Spring MVC配置 --> <servlet> <servlet-name>mvc</servlet-name> <servlet-class>org.springframework.web.servlet.DispatcherServlet</servlet-class> <init-param> <param-name>contextConfigLocation</param-name> <param-value>classpath:mvc-servlet.xml</param-value> <!--<param-value>/WEB-INF/mvc-servlet.xml</param-value>--> </init-param> <!-- load-on-startup元素标记容器是否在启动的时候就加载这个servlet(实例化并调用其init()方法) --> <load-on-startup>1</load-on-startup> </servlet> <servlet-mapping> <servlet-name>mvc</servlet-name> <url-pattern>/</url-pattern> </servlet-mapping> </web-app>
resources/mvc-servlet.xml
<beans xmlns="http://www.springframework.org/schema/beans" xmlns:mvc="http://www.springframework.org/schema/mvc" xmlns:context="http://www.springframework.org/schema/context" xmlns:xsi="http://www.w3.org/2001/XMLSchema-instance" xsi:schemaLocation=" http://www.springframework.org/schema/beans http://www.springframework.org/schema/beans/spring-beans.xsd http://www.springframework.org/schema/mvc http://www.springframework.org/schema/mvc/spring-mvc.xsd http://www.springframework.org/schema/context http://www.springframework.org/schema/context/spring-context.xsd"> <!-- 开启注解扫描 --> <context:component-scan base-package="com.spring.mvc.test"/> <!-- 视图解析器对象 --> <bean id="internalResourceViewResolver" class="org.springframework.web.servlet.view.InternalResourceViewResolver"> <property name="prefix" value="/"/> <!--<property name = "prefix" value="/WEB-INF/"></property>--> <property name="suffix" value=".jsp"/> </bean> <!-- 开启SpringMVC框架注解的支持 --> <mvc:annotation-driven/> <!--静态资源(js、image等)的访问--> <mvc:default-servlet-handler/> </beans>
webapp/index.jsp
<%@ page contentType="text/html;charset=UTF-8" language="java" %> <html> <head> <title>SpringMvc源码深入剖析</title> </head> <body> Gradle构建Spring MVC例子.... </body> </html>
MvcController.java
package com.spring.mvc.test; import org.springframework.stereotype.Controller; import org.springframework.web.bind.annotation.RequestMapping; import org.springframework.web.bind.annotation.ResponseBody; import org.springframework.web.servlet.ModelAndView; @Controller public class MvcController { @RequestMapping("/index") public ModelAndView getModeAndView() { //创建一个模型视图对象 ModelAndView mav = new ModelAndView("index"); return mav; } @RequestMapping("/text") @ResponseBody public String text() { return "Text..."; } }
4)启动MVC项目
两种启动方式
方式一:外挂启动
idea环境外面启动(项目根目录下运行 gradle + task name)
| Task Name | Depends On | Type | Description |
|---|---|---|---|
| tomcatRun | - | TomcatRun | 启动Tomcat实例并将Web应用程序部署到该实例。 |
| tomcatRunWar | - | TomcatRunWar | 启动Tomcat实例并将WAR部署 |
| tomcatStop | - | TomcatStop | 停止Tomcat实例 |
| tomcatJasper | - | TomcatJasper | 运行JSP编译器并使用Jasper将JSP页面转换为Java源代码。 |
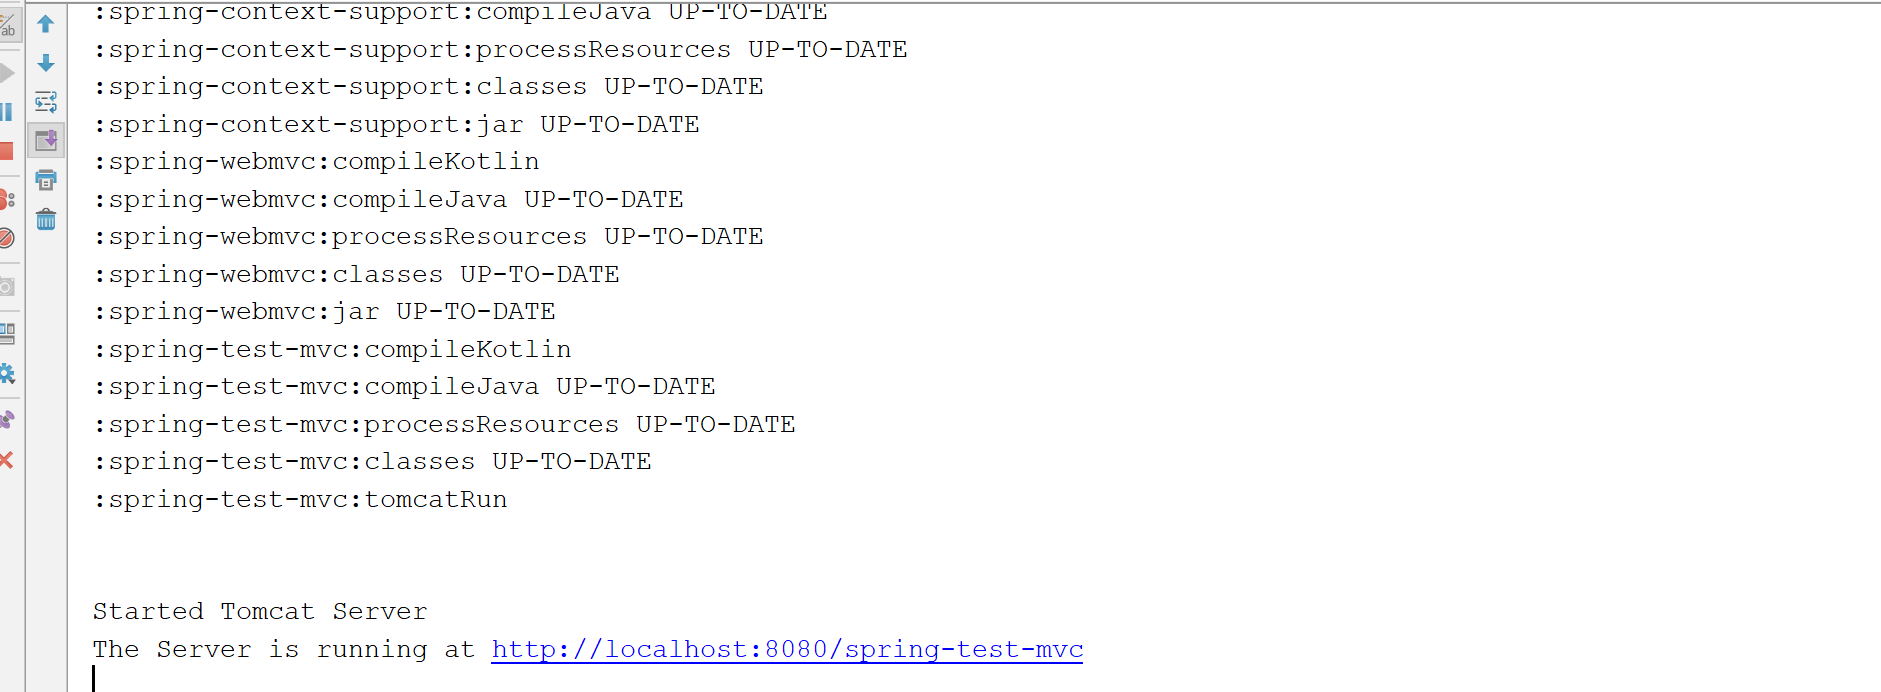
在项目根目录中执行gradle tomcatRun
#动Tomcat实例并将Web应用程序部署到该实例 gradle tomcatRun #停止Tomcat实例 gradle tomcatStop
控制台正常输出

方式二:集成到idea中启动
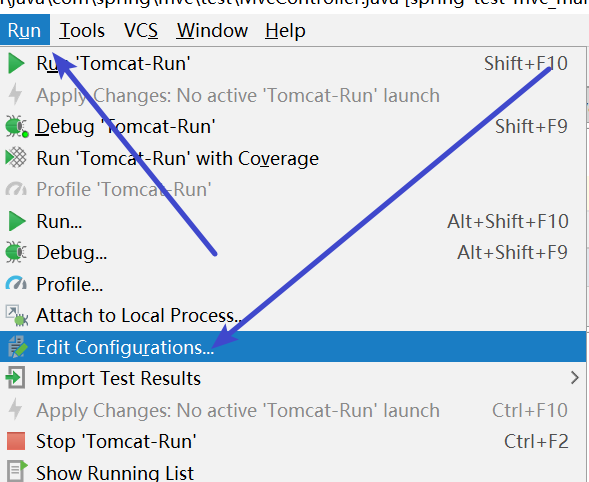
设置
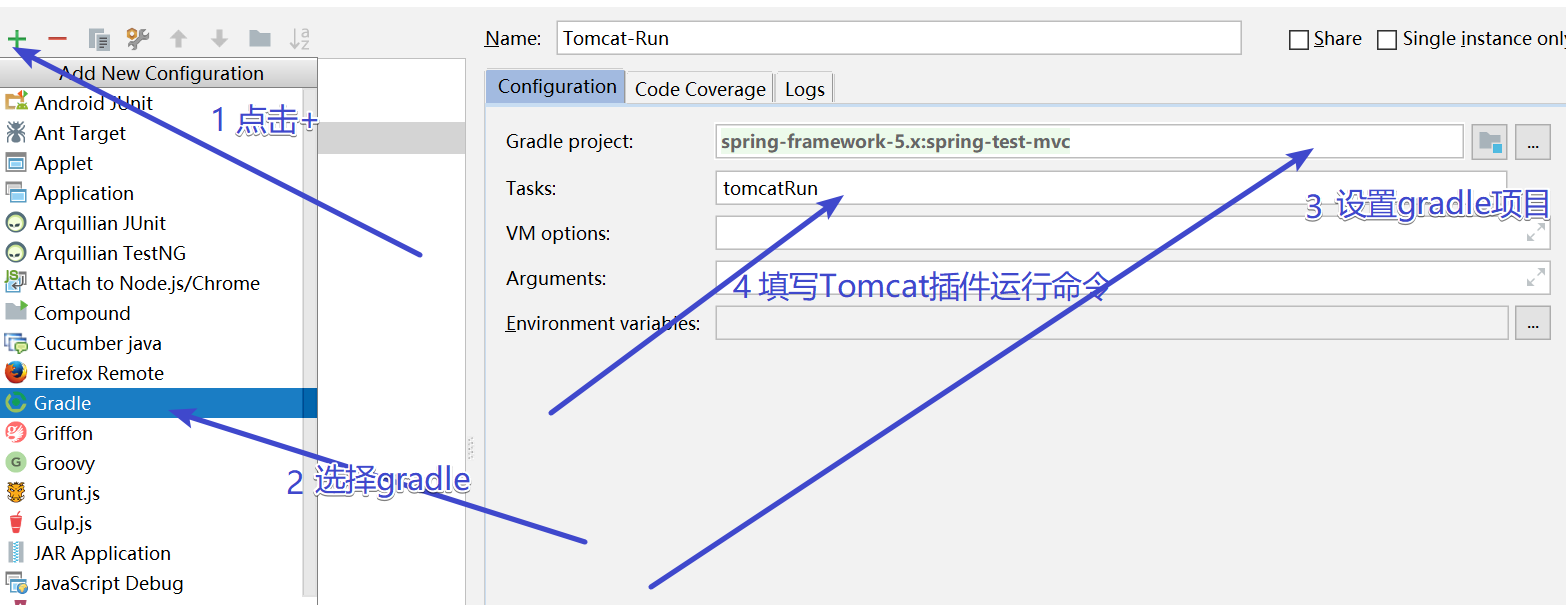
即可点击运行

运行成功
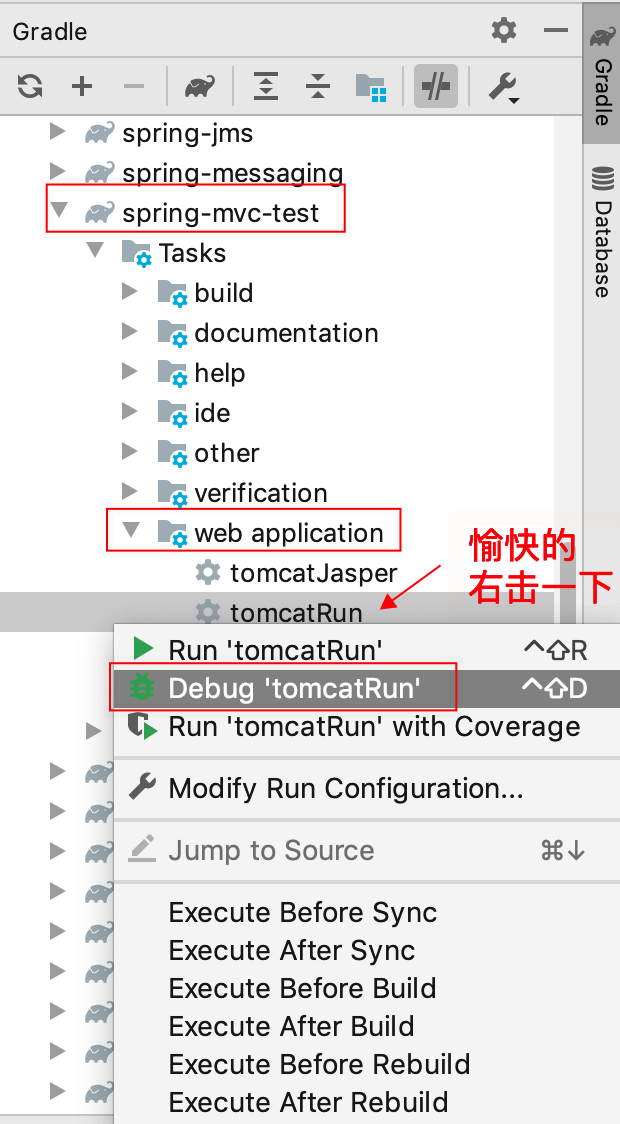
方式三:
idea右边找到gradle的task,直接双击,这个爽~

访问MVC项目
注意:spring-test-mvc是项目的名称
http://localhost:8080/spring-test-mvc/index
效果如下

5)源码调试配置
idea里的调试
简单,debug模式启动tomcat即可
远程调试模式
重要
想要远程debug,需要使用上面的方法二,因为debug启动需要设置gradle的环境变量,
即运行gradle命令的时候插入一些参数命令。
增加debug参数,对外暴露5005端口,即监听5005端口。
-Xrunjdwp:transport=dt_socket,server=y,suspend=n,address=5005
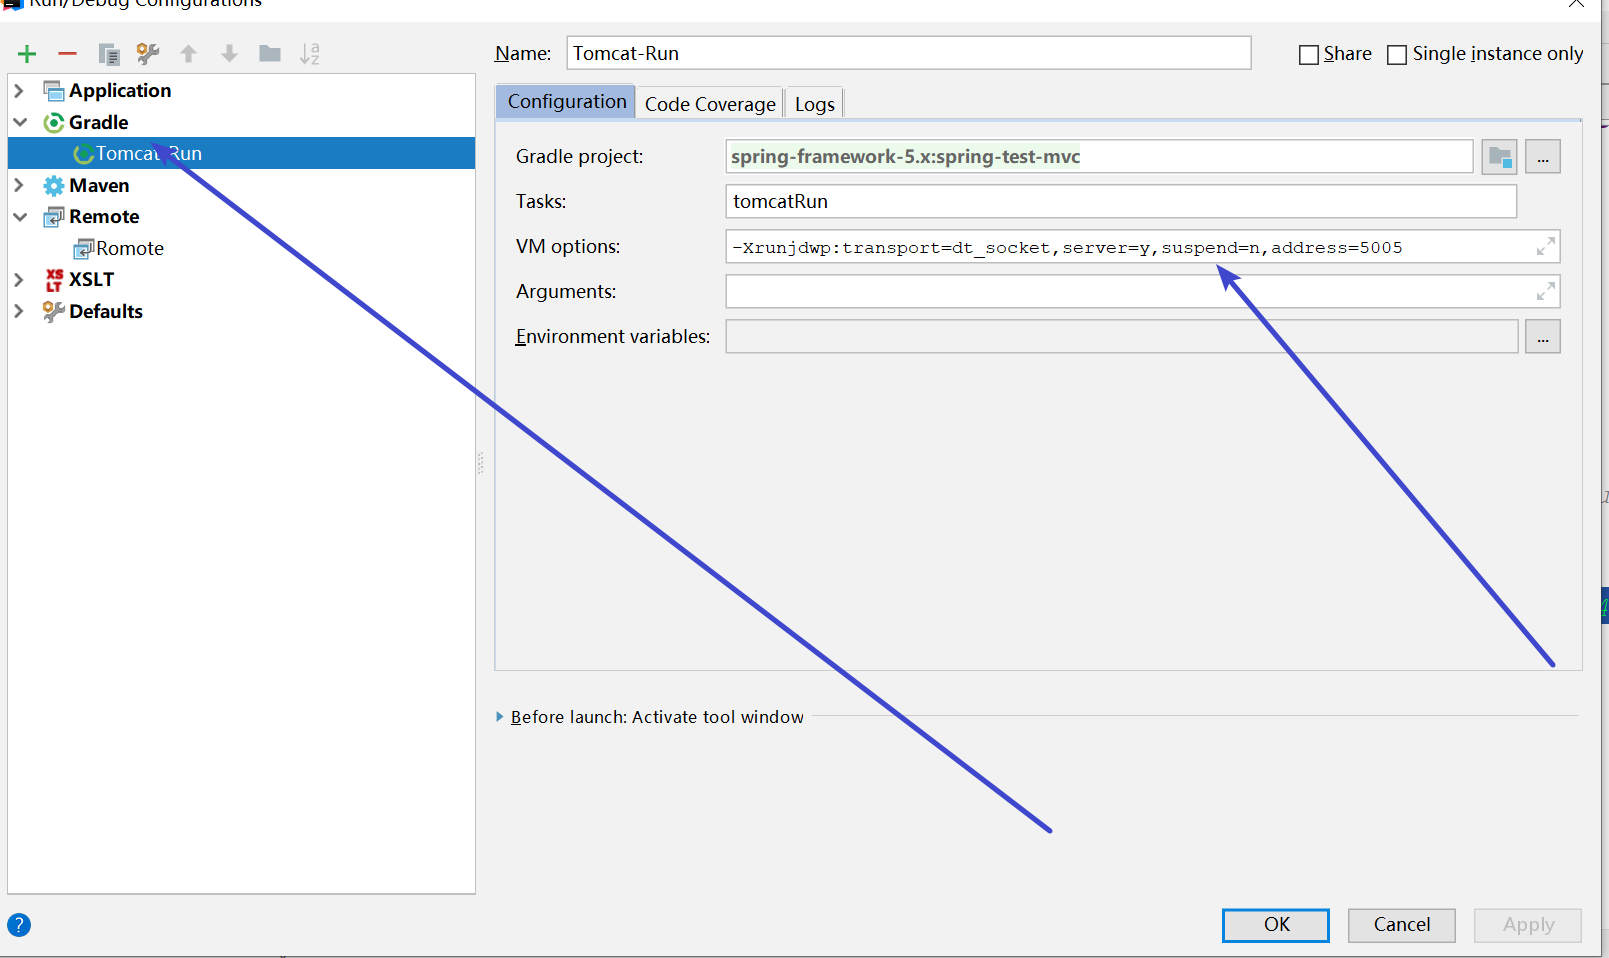
在配置Remote;监听5005端口
点击+号,创建Remote;默认配置即可

最后一步
1、先运行tomcat
2、再运行remote
http://localhost:8080/spring-test-mvc/index
打上断点试试!
包括我们之前ioc里的bean创建等地方,随便打。
1.2 MVC工作原理和继承关系
1)MVC底层工作原理
目标:认识SpringMVC的工作原理(对照源码),如何找到对应的Controller,进行页面渲染的
步骤:11步
源头:http://localhost:8080/spring-test-mvc/index
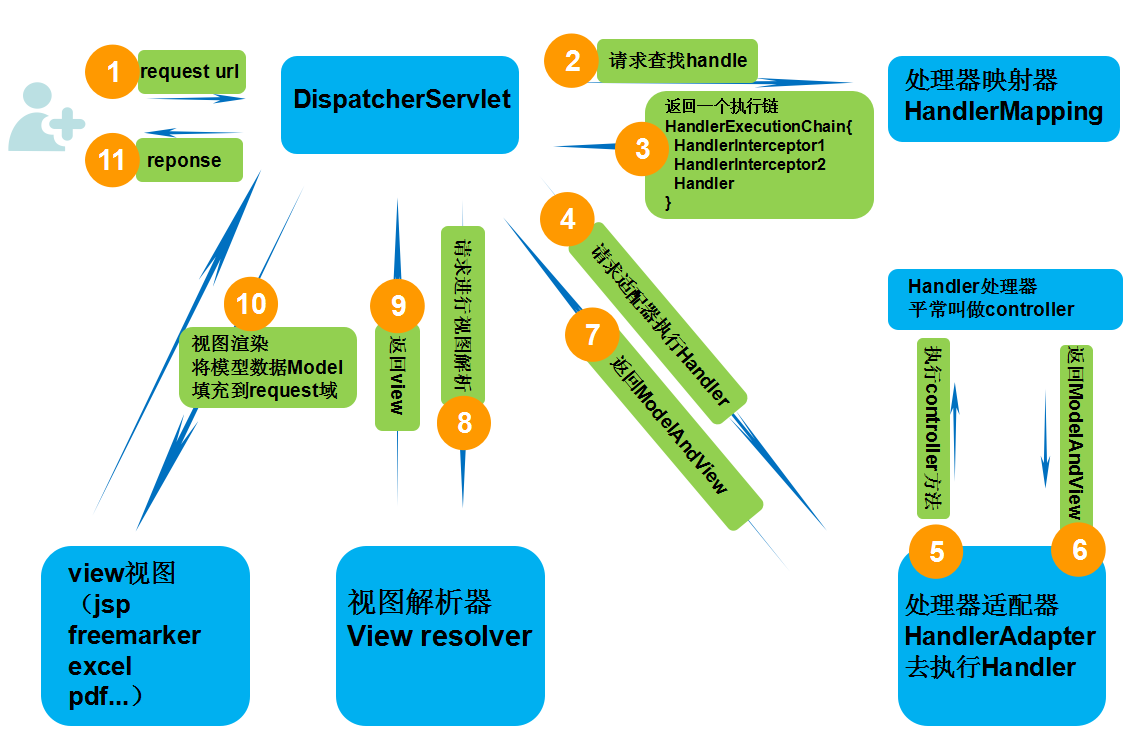
SpringMVC工作原理
1、DispatcherServlet(前端控制器) 是个servlet,负责接收Request 并将Request 转发给对应的处理组件。
2、 HanlerMapping (处理器映射器)是SpringMVC 中完成url 到Controller 映射的组件。DispatcherServlet 从HandlerMapping 查找处理Request 的Controller,
3、HanlerMapping 返回一个执行器链(url 到Controller 映射的组件)给DispatcherServlet
4、DispatcherServlet请求处理器适配器HandlerAdapter
5、处理器适配器HandlerAdapter去访问我们的handler(controller)
6、handler(controller)返回ModelAndView给处理器适配器HandlerAdapter
7、处理器适配器HandlerAdapter返回ModelAndView给DispatcherServlet
8、DispatcherServlet请求ViewResolver视图解析器
9、ViewResolver视图解析器返回view给DispatcherServlet
10、DispatcherServlet请求view做页面解析和渲染
11、view将渲染好的数据返回给DS,DS将渲染好的字符流给client,看到了页面!
2)MVC核心类继承关系
目标:简单认识MVC的继承关系
tips
不要求记住

DispatcherServlet 前端总控制器(webmvc源码)
FrameworkServlet (webmvc源码)
HttpServletBean 是的一个简单扩展类((webmvc源码)
HttpServlet(servlet API , 已经离开了spring mvc的控制范围)
1.3 Spring MVC源码深入剖析
引言: 当前源码讲解思路 1、断点调试 2、流程图对照 3、继承关系对照
1.3.1 MVC启动阶段
注意,这个阶段没法debug,我们从servlet规范去直接看源码
下面的请求阶段,再详细debug请求链路的完整过程
web.xml回顾
<?xml version="1.0" encoding="UTF-8"?> <web-app xmlns="http://xmlns.jcp.org/xml/ns/javaee" xmlns:xsi="http://www.w3.org/2001/XMLSchema-instance" xsi:schemaLocation="http://xmlns.jcp.org/xml/ns/javaee http://xmlns.jcp.org/xml/ns/javaee/web-app_4_0.xsd" version="4.0"> <!-- Spring MVC配置 --> <servlet> <servlet-name>mvc</servlet-name> <servlet-class>org.springframework.web.servlet.DispatcherServlet</servlet-class> <init-param> <param-name>contextConfigLocation</param-name> <param-value>classpath:mvc-servlet.xml</param-value> <!--<param-value>/WEB-INF/mvc-servlet.xml</param-value>--> </init-param> <!-- load-on-startup元素标记容器是否在启动的时候就加载这个servlet(实例化并调用其init()方法) --> <load-on-startup>1</load-on-startup> </servlet> <servlet-mapping> <servlet-name>mvc</servlet-name> <url-pattern>/</url-pattern> </servlet-mapping> <!--初始化Spring icC容器--> <!--<context-param>--> <!--<param-name>contextConfigLocation</param-name>--> <!--默认的路径是/WEB-INF/applicationontext.xml,下面多个xml使用,分割--> <!--<param-value>classpath: applicationContext-ZH.xml</param-value>--> <!--</context-param>--> <!--要使用Spring的IoC容器--> <!--<listener>--> <!--<listener-class>org.springframework.web.context.ContextLoaderListener</listener-class>--> <!--</listener>--> </web-app>
从上面的配置,我们可以看出,web.xml中的DS是一个servlet,那就从java web的servlet规范说起
上面类关系,我们说过,springmvc的范畴里,最顶层的是 HttpServletBean 继承的 标准 HttpServlet
1、ioC Bean初始化
org.springframework.web.servlet.HttpServletBean#init
2、9大组件初始化(ioC)
org.springframework.web.servlet.HttpServletBean#init
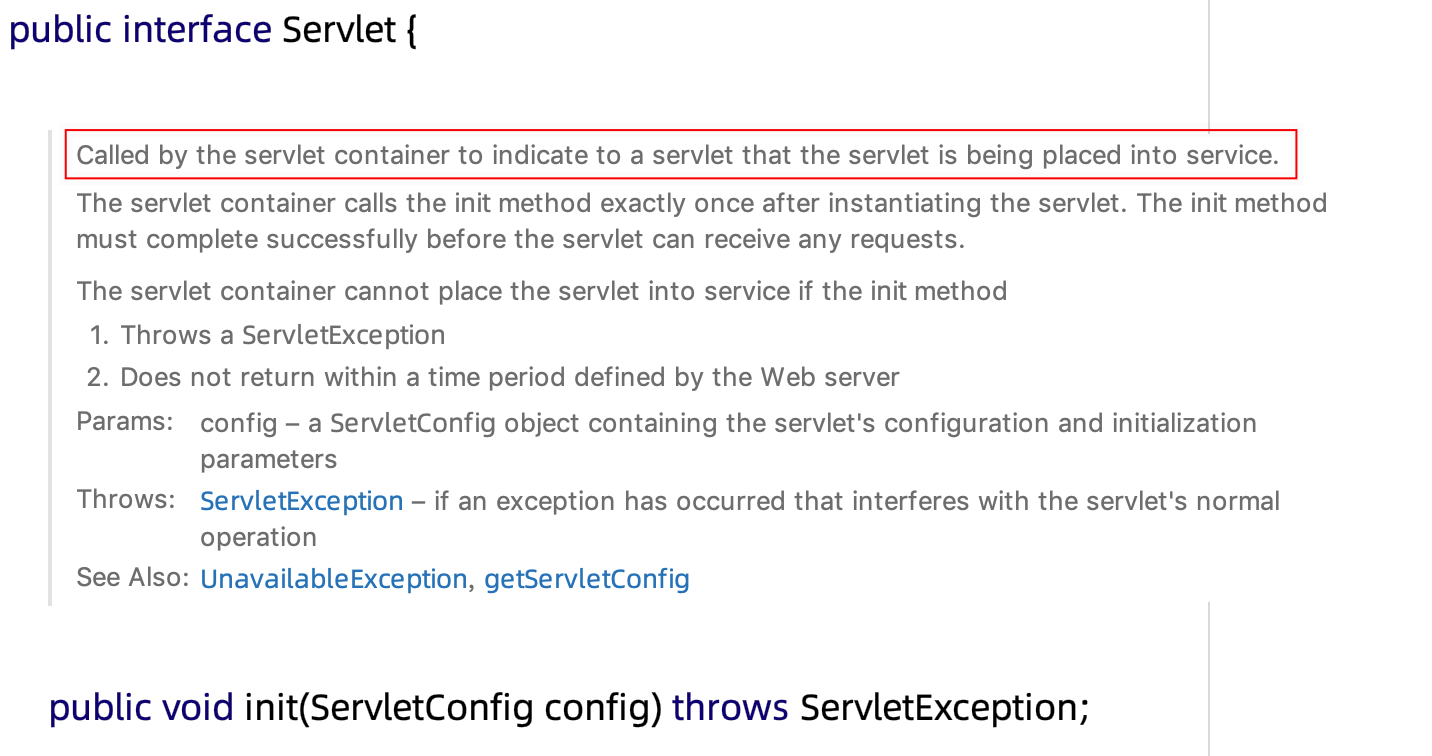
启动:servlet规范,init方法被容器调用
在servlet实例化后,被容器调用一次init方法,所以启动我们找到mvc里的父类从init看起
总结:方法调用关系(伪代码)
HttpServletBean{ init(){ protected initServletBean(); } } FrameworkServlet extends HttpServletBean{ @Override initServletBean(){ initWebApplicationContext(){ WebApplicationContext wac = createWebApplicationContext(rootContext); protected onRefresh(wac); } } } DispatcherServlet extends FrameworkServlet{ onRefresh(wac){ initStrategies(wac){ //多文件上传的组件 initMultipartResolver(context); //初始化本地语言环境 initLocaleResolver(context); //初始化模板处理器 initThemeResolver(context); //初始化处理器映射器 initHandlerMappings(context); //初始化处理器适配器 initHandlerAdapters(context); //初始化异常拦截器 initHandlerExceptionResolvers(context); //初始化视图预处理器 initRequestToViewNameTranslator(context); //初始化视图转换器 initViewResolvers(context); //FlashMap 管理器 initFlashMapManager(context); } } }
1.3.2 MVC请求阶段
需求:我们在浏览器输入http://localhost:8080/spring-test-mvc/index,背后到底做了哪些事情
目标:MVC如何通过一个url就能找到我们的controller,并返回数据
1、断点调试
2、流程图对照
3、继承关系对照
流程图解:
标准Servlet(回顾tomcat源码里,容器最后调的是wrapper的 service 方法)
伪代码
interface Servlet{ service() // 1 , 标准servlet规范的入口 } HttpServlet implements Servlet{ public service(ServletRequest req, ServletResponse res){ //转成 HttpServletRequest protected service(req,res); // 2 } protected service(HttpServletRequest req, HttpServletResponse resp){ if(isGet){ protected doGet() // 4 } } protected void doGet(HttpServletRequest req, HttpServletResponse resp); // 5 } //spring mvc FrameworkServlet extends HttpServlet{ @Override service(){ super.service(); // 3 } protected void doGet(HttpServletRequest req, HttpServletResponse resp){ processRequest(request, response){ protected doService(request, response); // 6 } } } DispatcherServlet extends FrameWorkServlet{ protected doService(request, response); // 7 , here! }
代码查找的路径:
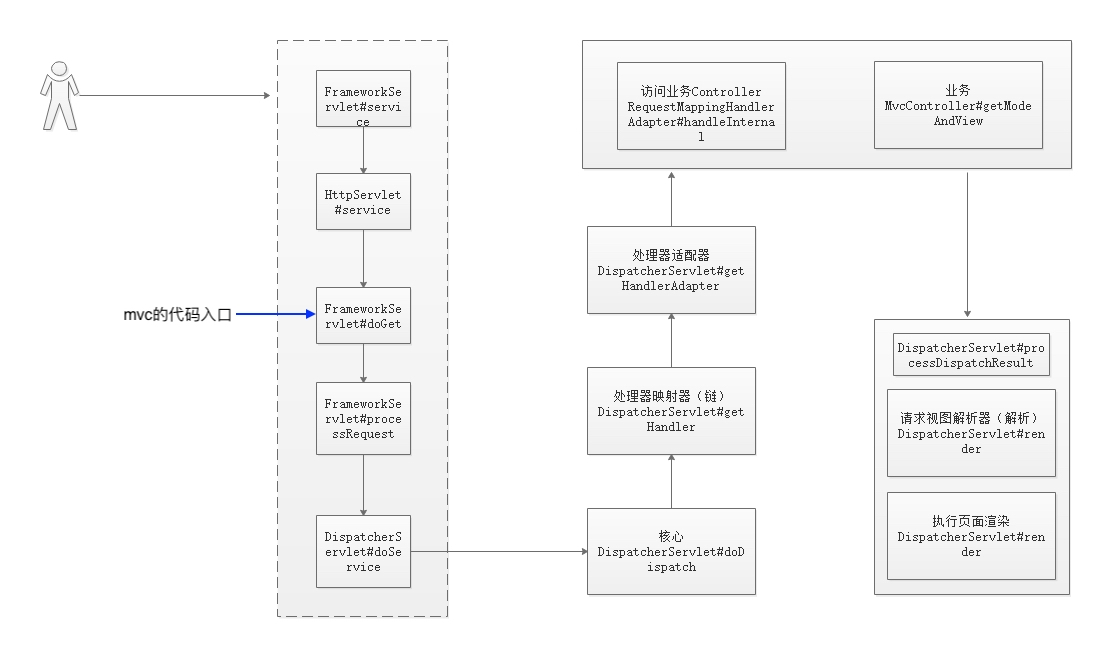
tips:
spring mvc的 FrameworkServlet ,这是我们源码跟踪的入口
项目启动
访问
http://localhost:8080/spring-test-mvc/index
上图的初始化流程在源码中是怎么流转的呢?
入口:开启请求的大门
org.springframework.web.servlet.FrameworkServlet:
java web标准告诉我们,request的get会交给标准 HttpServlet的doGet方法
而这个类FrameworkServlet,是HttpServlet的子类,覆盖了上述的doGet,
所以,请求进入spring的第一入口,就在这里!!!
1)org.springframework.web.servlet.FrameworkServlet#doGet
调用到了org.springframework.web.servlet.FrameworkServlet#doGet
//get请求调用 @Override protected final void doGet(HttpServletRequest request, HttpServletResponse response) throws ServletException, IOException { processRequest(request, response); }
2)org.springframework.web.servlet.FrameworkServlet#processRequest
// 重点关注:doService protected final void processRequest(HttpServletRequest request, HttpServletResponse response) throws ServletException, IOException { long startTime = System.currentTimeMillis(); Throwable failureCause = null; LocaleContext previousLocaleContext = LocaleContextHolder.getLocaleContext(); LocaleContext localeContext = buildLocaleContext(request); RequestAttributes previousAttributes = RequestContextHolder.getRequestAttributes(); ServletRequestAttributes requestAttributes = buildRequestAttributes(request, response, previousAttributes); WebAsyncManager asyncManager = WebAsyncUtils.getAsyncManager(request); asyncManager.registerCallableInterceptor(FrameworkServlet.class.getName(), new RequestBindingInterceptor()); initContextHolders(request, localeContext, requestAttributes); try { //重点查看,跳到DispatcherServlet 类中(子类重写) doService(request, response); } catch (ServletException | IOException ex) { failureCause = ex; throw ex; } catch (Throwable ex) { failureCause = ex; throw new NestedServletException("Request processing failed", ex); } finally { resetContextHolders(request, previousLocaleContext, previousAttributes); if (requestAttributes != null) { requestAttributes.requestCompleted(); } if (logger.isDebugEnabled()) { if (failureCause != null) { this.logger.debug("Could not complete request", failureCause); } else { if (asyncManager.isConcurrentHandlingStarted()) { logger.debug("Leaving response open for concurrent processing"); } else { this.logger.debug("Successfully completed request"); } } } publishRequestHandledEvent(request, response, startTime, failureCause); } }
3)org.springframework.web.servlet.DispatcherServlet#doService
//重写父类 //重点关注 doDispatch(request, response); @Override protected void doService(HttpServletRequest request, HttpServletResponse response) throws Exception { if (logger.isDebugEnabled()) { String resumed = WebAsyncUtils.getAsyncManager(request).hasConcurrentResult() ? " resumed" : ""; logger.debug("DispatcherServlet with name '" + getServletName() + "'" + resumed + " processing " + request.getMethod() + " request for [" + getRequestUri(request) + "]"); } // Keep a snapshot of the request attributes in case of an include, // to be able to restore the original attributes after the include. Map<String, Object> attributesSnapshot = null; if (WebUtils.isIncludeRequest(request)) { attributesSnapshot = new HashMap<>(); Enumeration<?> attrNames = request.getAttributeNames(); while (attrNames.hasMoreElements()) { String attrName = (String) attrNames.nextElement(); if (this.cleanupAfterInclude || attrName.startsWith(DEFAULT_STRATEGIES_PREFIX)) { attributesSnapshot.put(attrName, request.getAttribute(attrName)); } } } // Make framework objects available to handlers and view objects. request.setAttribute(WEB_APPLICATION_CONTEXT_ATTRIBUTE, getWebApplicationContext()); request.setAttribute(LOCALE_RESOLVER_ATTRIBUTE, this.localeResolver); request.setAttribute(THEME_RESOLVER_ATTRIBUTE, this.themeResolver); request.setAttribute(THEME_SOURCE_ATTRIBUTE, getThemeSource()); if (this.flashMapManager != null) { FlashMap inputFlashMap = this.flashMapManager.retrieveAndUpdate(request, response); if (inputFlashMap != null) { request.setAttribute(INPUT_FLASH_MAP_ATTRIBUTE, Collections.unmodifiableMap(inputFlashMap)); } request.setAttribute(OUTPUT_FLASH_MAP_ATTRIBUTE, new FlashMap()); request.setAttribute(FLASH_MAP_MANAGER_ATTRIBUTE, this.flashMapManager); } try { //重点关注 doDispatch(request, response); } finally { if (!WebAsyncUtils.getAsyncManager(request).isConcurrentHandlingStarted()) { // Restore the original attribute snapshot, in case of an include. if (attributesSnapshot != null) { restoreAttributesAfterInclude(request, attributesSnapshot); } } } }
进入核心
4)org.springframework.web.servlet.DispatcherServlet#doDispatch
// Spring MVC的最核心代码 protected void doDispatch(HttpServletRequest request, HttpServletResponse response) throws Exception { HttpServletRequest processedRequest = request; HandlerExecutionChain mappedHandler = null; boolean multipartRequestParsed = false; WebAsyncManager asyncManager = WebAsyncUtils.getAsyncManager(request); try { //创建视图对象 ModelAndView mv = null; Exception dispatchException = null; try { //请求检查,是否文件上传请求(二进制请求) processedRequest = checkMultipart(request); multipartRequestParsed = (processedRequest != request); // 根据当前的请求去拿一个Handler.这个Handler其实就是我们的控制器,进入!!!!! mappedHandler = getHandler(processedRequest); if (mappedHandler == null) { noHandlerFound(processedRequest, response); return; } // 处理器适配器,9大组件初始化 HandlerAdapter ha = getHandlerAdapter(mappedHandler.getHandler()); // Process last-modified header, if supported by the handler. String method = request.getMethod(); //get方法为true boolean isGet = "GET".equals(method); //method为get if (isGet || "HEAD".equals(method)) { long lastModified = ha.getLastModified(request, mappedHandler.getHandler()); if (logger.isDebugEnabled()) { logger.debug("Last-Modified value for [" + getRequestUri(request) + "] is: " + lastModified); } if (new ServletWebRequest(request, response).checkNotModified(lastModified) && isGet) { return; } } if (!mappedHandler.applyPreHandle(processedRequest, response)) { return; } // 执行我们的业务控制器方法,com.spring.mvc.test.MvcController.getModeAndView mv = ha.handle(processedRequest, response, mappedHandler.getHandler()); if (asyncManager.isConcurrentHandlingStarted()) { return; } //视图解析器 applyDefaultViewName(processedRequest, mv); mappedHandler.applyPostHandle(processedRequest, response, mv); } catch (Exception ex) { dispatchException = ex; } catch (Throwable err) { // As of 4.3, we're processing Errors thrown from handler methods as well, // making them available for @ExceptionHandler methods and other scenarios. dispatchException = new NestedServletException("Handler dispatch failed", err); } //视图渲染 processDispatchResult(processedRequest, response, mappedHandler, mv, dispatchException); } catch (Exception ex) { triggerAfterCompletion(processedRequest, response, mappedHandler, ex); } catch (Throwable err) { triggerAfterCompletion(processedRequest, response, mappedHandler, new NestedServletException("Handler processing failed", err)); } finally { if (asyncManager.isConcurrentHandlingStarted()) { // Instead of postHandle and afterCompletion if (mappedHandler != null) { mappedHandler.applyAfterConcurrentHandlingStarted(processedRequest, response); } } else { // Clean up any resources used by a multipart request. if (multipartRequestParsed) { cleanupMultipart(processedRequest); } } } }
5)org.springframework.web.servlet.DispatcherServlet#getHandler
@Nullable protected HandlerExecutionChain getHandler(HttpServletRequest request) throws Exception { //不止一个,比如BeanNameHandlerMapping、SimpleUrlHandlerMapping,还有我们需要的RequestHandlerMapping //在9个组件初始化的时候赋值 if (this.handlerMappings != null) { for (HandlerMapping hm : this.handlerMappings) { if (logger.isTraceEnabled()) { logger.trace( "Testing handler map [" + hm + "] in DispatcherServlet with name '" + getServletName() + "'"); } //这个就是执行器链 HandlerExecutionChain handler = hm.getHandler(request); if (handler != null) { return handler; } } } return null; }
org.springframework.web.servlet.DispatcherServlet#getHandlerAdapter
protected HandlerAdapter getHandlerAdapter(Object handler) throws ServletException { if (this.handlerAdapters != null) { for (HandlerAdapter ha : this.handlerAdapters) { if (logger.isTraceEnabled()) { logger.trace("Testing handler adapter [" + ha + "]"); } if (ha.supports(handler)) { return ha; } } } throw new ServletException("No adapter for handler [" + handler + "]: The DispatcherServlet configuration needs to include a HandlerAdapter that supports this handler"); }
6) 调用业务Controller
// 执行我们的业务控制器方法,com.spring.mvc.test.MvcController.getModeAndView mv = ha.handle(processedRequest, response, mappedHandler.getHandler());
org.springframework.web.servlet.mvc.method.annotation.RequestMappingHandlerAdapter#handleInterna
@Override protected boolean supportsInternal(HandlerMethod handlerMethod) { return true; } @Override protected ModelAndView handleInternal(HttpServletRequest request, HttpServletResponse response, HandlerMethod handlerMethod) throws Exception { ModelAndView mav; checkRequest(request); // Execute invokeHandlerMethod in synchronized block if required. if (this.synchronizeOnSession) { HttpSession session = request.getSession(false); if (session != null) { Object mutex = WebUtils.getSessionMutex(session); synchronized (mutex) { mav = invokeHandlerMethod(request, response, handlerMethod); } } else { // No HttpSession available -> no mutex necessary mav = invokeHandlerMethod(request, response, handlerMethod); } } else { // No synchronization on session demanded at all... mav = invokeHandlerMethod(request, response, handlerMethod); } if (!response.containsHeader(HEADER_CACHE_CONTROL)) { if (getSessionAttributesHandler(handlerMethod).hasSessionAttributes()) { applyCacheSeconds(response, this.cacheSecondsForSessionAttributeHandlers); } else { prepareResponse(response); } } return mav; }
7)org.springframework.web.servlet.DispatcherServlet#processDispatchResult
//1、请求视图解析器,解析成view //2、执行页面渲染 private void processDispatchResult(HttpServletRequest request, HttpServletResponse response, @Nullable HandlerExecutionChain mappedHandler, @Nullable ModelAndView mv, @Nullable Exception exception) throws Exception { boolean errorView = false; //如果异常不为空 if (exception != null) { if (exception instanceof ModelAndViewDefiningException) { logger.debug("ModelAndViewDefiningException encountered", exception); mv = ((ModelAndViewDefiningException) exception).getModelAndView(); } else { Object handler = (mappedHandler != null ? mappedHandler.getHandler() : null); mv = processHandlerException(request, response, handler, exception); errorView = (mv != null); } } //视图渲染,响应视图 if (mv != null && !mv.wasCleared()) { //执行渲染 render(mv, request, response); if (errorView) { WebUtils.clearErrorRequestAttributes(request); } } else { if (logger.isDebugEnabled()) { logger.debug("Null ModelAndView returned to DispatcherServlet with name '" + getServletName() + "': assuming HandlerAdapter completed request handling"); } } if (WebAsyncUtils.getAsyncManager(request).isConcurrentHandlingStarted()) { // Concurrent handling started during a forward return; } if (mappedHandler != null) { mappedHandler.triggerAfterCompletion(request, response, null); } }
本文由
传智教育博学谷教研团队发布。如果本文对您有帮助,欢迎
关注和点赞;如果您有任何建议也可留言评论或私信,您的支持是我坚持创作的动力。转载请注明出处!


【推荐】国内首个AI IDE,深度理解中文开发场景,立即下载体验Trae
【推荐】编程新体验,更懂你的AI,立即体验豆包MarsCode编程助手
【推荐】抖音旗下AI助手豆包,你的智能百科全书,全免费不限次数
【推荐】轻量又高性能的 SSH 工具 IShell:AI 加持,快人一步
· 被坑几百块钱后,我竟然真的恢复了删除的微信聊天记录!
· 没有Manus邀请码?试试免邀请码的MGX或者开源的OpenManus吧
· 【自荐】一款简洁、开源的在线白板工具 Drawnix
· 园子的第一款AI主题卫衣上架——"HELLO! HOW CAN I ASSIST YOU TODAY
· Docker 太简单,K8s 太复杂?w7panel 让容器管理更轻松!