软件工程日报七——checkbox的使用
今天学了checkbox的使用
activity_main.xml文件为
<?xml version="1.0" encoding="utf-8"?>
<LinearLayout xmlns:android="http://schemas.android.com/apk/res/android"
    xmlns:app="http://schemas.android.com/apk/res-auto"
    xmlns:tools="http://schemas.android.com/tools"
    android:layout_width="match_parent"
    android:layout_height="match_parent"
    android:orientation="vertical"
    tools:context=".MainActivity">

   <LinearLayout
       android:layout_width="match_parent"
       android:layout_height="match_parent"
       android:layout_gravity="center"
       android:orientation="horizontal">
       <TextView
           android:layout_width="wrap_content"
           android:layout_height="wrap_content"
           android:text="爱好:">
           </TextView>
<CheckBox
    android:layout_width="wrap_content"
    android:layout_height="wrap_content"
    android:id="@+id/cb1"
    android:text="游泳">

</CheckBox>
    <CheckBox
        android:layout_width="wrap_content"
        android:layout_height="wrap_content"
        android:id="@+id/cb2"
        android:text="旅游">

    </CheckBox>
    <CheckBox
        android:layout_width="wrap_content"
        android:layout_height="wrap_content"
        android:id="@+id/cb3"
        android:text="爬山">

    </CheckBox>
   </LinearLayout>

</LinearLayout>
mainactivity
checkbox的使用有两种情况
一
 package com.example.test;

import androidx.appcompat.app.AppCompatActivity;

import android.os.Bundle;
import android.view.View;
import android.widget.Button;
import android.widget.CheckBox;
import android.widget.CompoundButton;
import android.widget.Toast;

public class MainActivity extends AppCompatActivity {

    private CheckBox cb1,cb2,cb3;

    protected void onCreate(Bundle savedInstanceState)
    {
        super.onCreate(savedInstanceState);
        setContentView(R.layout.activity_main);
        cb1=findViewById(R.id.cb1);
        cb2=findViewById(R.id.cb2);
        cb3=findViewById(R.id.cb3);cb1.setOnCheckedChangeListener(new CompoundButton.OnCheckedChangeListener() {
            @Override
            public void onCheckedChanged(CompoundButton buttonView, boolean isChecked) {

            }
        });
        cb2.setOnCheckedChangeListener(new CompoundButton.OnCheckedChangeListener() {
            @Override
            public void onCheckedChanged(CompoundButton buttonView, boolean isChecked) {

            }
        });
        cb3.setOnCheckedChangeListener(new CompoundButton.OnCheckedChangeListener() {
            @Override
            public void onCheckedChanged(CompoundButton buttonView, boolean isChecked) {

            }
        });
但第一种太麻烦,需要写三个监听器,比较繁琐,于是有了第二种
package com.example.test;

import androidx.appcompat.app.AppCompatActivity;

import android.os.Bundle;
import android.view.View;
import android.widget.Button;
import android.widget.CheckBox;
import android.widget.CompoundButton;
import android.widget.Toast;

public class MainActivity extends AppCompatActivity {

    private CheckBox cb1,cb2,cb3;
    private String msg1,msg2,msg3;
    protected void onCreate(Bundle savedInstanceState)
    {
        super.onCreate(savedInstanceState);
        setContentView(R.layout.activity_main);
        cb1=findViewById(R.id.cb1);
        cb2=findViewById(R.id.cb2);
        cb3=findViewById(R.id.cb3);
        //一个监听器
        CompoundButton.OnCheckedChangeListener occl=new CompoundButton.OnCheckedChangeListener() {
            @Override
            public void onCheckedChanged(CompoundButton buttonView, boolean isChecked) {
                if(buttonView.getId()==R.id.cb1)
                {
                  if(isChecked)
                      {
                         msg1="游泳";
                      }else {
                             msg1=null;
                            }
                }
                if(buttonView.getId()==R.id.cb2)
                {
                    if(isChecked)
                    {
                        msg2="旅游";
                    }else {
                        msg2=null;
                    }
                }
                if(buttonView.getId()==R.id.cb3)
                {
                    if(isChecked)
                    {
                        msg3="爬山";
                    }else {
                        msg3=null;
                    }
                }
                Toast.makeText(MainActivity.this,msg1+msg2+msg3,Toast.LENGTH_SHORT).show();
            }
        };
        cb1.setOnCheckedChangeListener(occl);
        cb2.setOnCheckedChangeListener(occl);
        cb3.setOnCheckedChangeListener(occl);
}
}
第二种写法只需要一个监听器,且可以同时选择多个选择
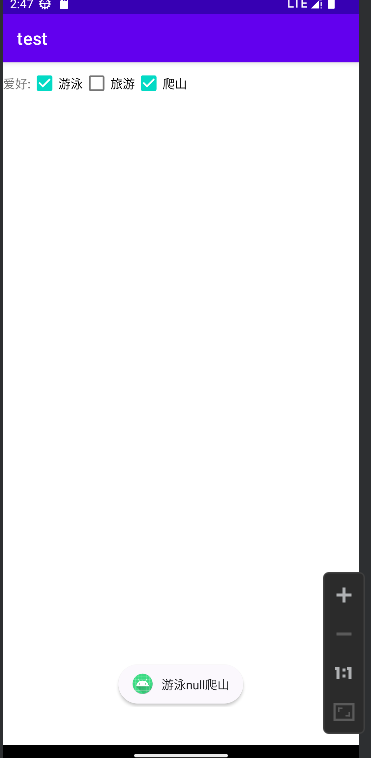
效果如下

通过checkb控件可以选择多个数据


