

Spring学习笔记
Spring:一个java框架,使用java语言开发的,轻量级的,开源的框架,可以在j2se,j2ee项目中使用,
Spring核心技术:IoC(Inversion of Control,控制反转),AOP(Aspect Oriented Programming)
Spring又叫做容器,spring作为容器,可以让spring创建java对象,给属性赋值。
Spring作用:实现解耦合,解决java对象之间的耦合,解决模块之间的耦合。
Spring作为容器适合管理的对象:service对象,dao对象,工具类对象
Spring作为容器不适合管理的对象:实体类,servlet,listener,filter等web中的对象,她们是tomcat创建和管理的。
Spring的地址
官网地址:https://spring.io/
Spring的优点:
Spring 是一个框架,是一个半成品的软件。有 20 个模块组成。它是一个容器管理对象, 容器是装东西的,Spring 容器不装文本,数字。装的是对象。Spring 是存储对象的容器。
(1) 轻量,
Spring 框架使用的 jar 都比较小,一般在 1M 以下或者几百 kb。Spring 核心功能的所需 的 jar 总共在 3M 左右。 Spring 框架运行占用的资源少,运行效率高。不依赖其他 jar
(2) 针对接口编程,解耦合
Spring 提供了 Ioc 控制反转,由容器管理对象,对象的依赖关系。原来在程序代码中的 对象创建方式,现在由容器完成。对象之间的依赖解耦合。 Spring 是于 2003 年兴起的一个轻量级的 Java 开发框架,它是为了解决企业应用开发 的复杂性而创建的。Spring 的核心是控制反转(IoC)和面向切面编程(AOP)。Spring 是可 以在 Java SE/EE 中使用的轻量级开源框架。
(3) AOP 编程的支持
通过 Spring 提供的 AOP 功能,方便进行面向切面的编程,许多不容易用传统 OOP 实现 的功能可以通过 AOP 轻松应付 在 Spring 中,开发人员可以从繁杂的事务管理代码中解脱出来,通过声明式方式灵活地 进行事务的管理,提高开发效率和质量。
(4) 方便集成各种优秀框架
Spring 不排斥各种优秀的开源框架,相反 Spring 可以降低各种框架的使用难度,Spring 提供了对各种优秀框架(如 Struts,Hibernate、MyBatis)等的直接支持。简化框架的使用。 Spring 像插线板一样,其他框架是插头,可以容易的组合到一起。需要使用哪个框架,就把 这个插头放入插线板。不需要可以轻易的移除。
IoC控制反转
2.1概念
控制反转(IoC,Inversion of Control),是一个概念,是一种思想。指将传统上由程序代 码直接操控的对象调用权交给容器,通过容器来实现对象的装配和管理。控制反转就是对对 象控制权的转移,从程序代码本身反转到了外部容器。通过容器实现对象的创建,属性赋值, 依赖的管理。
IoC 是一个概念,是一种思想,其实现方式多种多样。当前比较流行的实现方式是依赖 注入。应用广泛。
IoC把创建对象的过程交给Spring进行管理
1.IoC分为控制和反转:
控制:对象创建,属性赋值,对象生命周期管理
反转:把开发人员管理对象的权限转移给了代码之外的容器实现,由容器完成对象的管理。
正转:开发人员在代码中,使用new构造方法创建对象,开发人员掌握了对象的创建,属性赋值,对象从开始到销毁的全过程,开发人员有对对象全部控制。
通过容器,可以使用容器中的对象(容器已经创建了对象,对象属性赋值了,对象也组装好了)。
2.IoC的技术实现:
DI(依赖注入):Dependency Injection,是IoC的一种技术实现,程序只需要提供要使用的对象的名称就可以了,对象如何创建,如何从容器中查找,获取都由容器内部自己实现。
3.Spring框架使用的DI实现IoC
通过spring框架,只需要提供要使用的对象名词就可以了,从容器中获取名称对应的对象,Spring底层使用的是反射机制,通过反射创建对象,属性
2.1.2
1.IOC思想基于IOC容器完成,IOC容器底层就是对象工厂
2.Spring提供IOC容器实现两种方式:(两个接口)
1)BeanFactory:IOC容器基本实现,是Spring内部的使用接口,不提供开发人员进行使用,其在加载配置文件时候不会创建对象,在获取对象(使用)才去创建对象
2)ApplicationContext:BeanFactory接口的子接口,提供更多更强大的功能,一般由开发人员使用,并且在加载配置文件的时候就会创建对象。
2.2Spring的配置文件
2.3spring容器创建对象的特点
1.容器对象ApplicationContext:接口
通过ApplicationContext对象,获取要使用的其他Java对象,执行getBean(“<bean>的id”)
2.Spring默认的是调用类的无参数构造方法,创建对象。
3.spring读取配置文件,一次创建好所有的java对象,都放到map中。
2.4获取容器中定义的对象信息
//获取配置文件中定义的对象个数
int num=cxt.getBeanDefinitionCount();
//获取配置文件中所有对象的名称
String names[]=cxt.getBeanDefinitionNames();
2.5DI:给属性赋值
spring调用类的无参构造方法,创建对象,对象创建后给属性赋值
给属性赋值可以使用
1)xml配置文件中的标签和属性;
2)使用注解
DI分类:1.set注入,也叫作设值注入;2.构造注入
2.5.1基于xml的DI
在xml配置文件中使用标签和属性,完成对象创建,属性赋值
1)set注入,也叫作设值注入
概念:spring调用类中的set方法,在set方法中可以完成属性赋值,推荐使用。
    <!--
        DI:给属性赋值
        简单类型:java中的基本数据类型和String
        1.set注入:spring调用类的set方法,通过set方法完成属性赋值
            简单类型的set注入
            语法:<bean id="xxx" class="yyyy">
                        <property name="属性名" value="简单类型属性值"/>
                        ....
                 </bean>
    -->
    <bean id="myStudent" class="com.hao.jh01.Student">
        <!--赋值的时候会自动调用类中的set方法,比如name=“age”,调用setAge方法-->
        <property name="age" value="10"/><!--执行了setAge=10-->
        <property name="name" value="张三"/><!--执行了setName="张三"-->
    </bean>
       <!--
            2.set注入:
            引用类类型的set注入:
             语法:<bean id="xxx" class="yyyy">
                        <property name="属性名" ref="bean的id"/>
                        ....
                 </bean>
    -->
    <bean id="myStudent" class="com.hao.jh02.Student">
        <property name="age" value="10"/><!--执行了setAge=10-->
        <property name="name" value="张三"/><!--执行了setName="张三"-->
        <property name="school" ref="mySchool"/>
    </bean>
    <bean id="mySchool" class="com.hao.jh02.School">
        <property name="name" value="新乡学院"/>
        <property name="address" value="红旗区"/>
    </bean>
给属性注入空值的方法:
    <bean id="myStudent" class="com.hao.jh02.Student">
        <property name="age" value="10"/><!--执行了setAge=10-->
        <property name="name"><!--表示给name注入null值,输出为null-->
            <null/>
        </property>
    </bean>
属性值包含特殊符号的时候
1)使用xml实体符号进行转义
<;相当于<
>;相当于>
2)把带有特殊符号的内容写到CDATA
<property name="name"><!--表示给name注入<<南京>>,输出<<南京>>-->
            <value><![CDATA[<<南京>>]]></value>
        </property>
2)构造注入
构造注入:spring调用类中的有参构造方法,在创建对象的同时,给属性赋值。
使用name属性赋值:
    <!--
        构造注入:Spring调用类的有参数构造方法,创建对象同时给属性赋值
        语法:
            <bean id="xxx" class="yyy">
                <constructor-arg>:表示一个构造方法的形参
                标签有属性: name:构造方法的形参名
                           index:构造方法的参数位置
                           value:简单类型的形参值
                           ref:引用类型的形参值
            <bean>
    -->
    <bean id="myStudent" class="com.hao.jh03.Student">
        <constructor-arg name="age" value="11"/>
        <constructor-arg name="name" value="张三"/>
        <constructor-arg name="school" ref="mySchool"/>
    </bean>
    <bean id="mySchool" class="com.hao.jh03.School">
        <property name="name" value="新乡学院"/>
        <property name="address" value="红旗区"/>
    </bean>
使用index属性赋值
    <!--构造注入,使用index,参数的位置,构造方法参数从左到右的位置依次是0,1,2-->
    <bean id="myStudent02" class="com.hao.jh03.Student">
        <constructor-arg index="0" value="12"/>
        <constructor-arg index="1" value="李四"/>
        <constructor-arg index="2" ref="mySchool"/>
    </bean>
    <!--省略index,如果省略的话,属性顺序一定要与类属性顺序一致-->
    <bean id="myStudent03" class="com.hao.jh03.Student">
        <constructor-arg  value="12"/>
        <constructor-arg  value="李四"/>
        <constructor-arg  ref="mySchool"/>
    </bean>
    <bean id="mySchool" class="com.hao.jh03.School">
        <property name="name" value="新乡学院"/>
        <property name="address" value="红旗区"/>
    </bean>
3)引用类型的自动注入
概念:spring可以根据某些规则给引用类型完成赋值,只对引用类型有效
规则有两个分别为byName和byType
①:byName(按名称注入):java类中引用类型属性名称和spring容器中bean的id名称一样的,且数据类型也是一样的,这些bean能够赋值给引用类型。
相关代码:
<!--
        引用类型自动注入:spring根据byName,byType规则给引用类型赋值
        1.byName(按名称注入):java类中引用类型的属性名称和spring容器中的bean的id名称一样,且数据类型一样,这样的bean能够赋值给引用类型
        语法:
            <bean id="xxx" class="yy" autowire="byName">
                简单属性赋值
            </bean>
    -->

    <bean id="myStudent" class="com.hao.jh04.Student" autowire="byName">
        <property name="age" value="10"/>
        <property name="name" value="张三"/>
        <!--
        <property name="school" ref="mySchool"/>
        -->
    </bean>
    <bean id="school" class="com.hao.jh04.School">
        <property name="name" value="新乡"/>
        <property name="address" value="红旗区"/>
    </bean>
②:byType(按类型注入):java类中引用类型的数据类型和spring容器中的bean的class值是同源关系的,这样的bean赋值给引用类型。
    <!--

        2.byType(按类型注入):java类中引用类型的数据类型和bean的class是同源的,这些的bean能够赋值给引用类型。

            同源关系:
              1.java中引用类型的数据类型和bean的class值是一样的。
              2.java中引用类型的数据类型和bean的class值是父子类关系的。
              3.java中引用类型的数据类型和bean的class值是接口和实现类关系的。
            语法:
            <bean id="xxx" class="yy" autowire="byType">
                简单属性赋值
            </bean>
            注意:在xml配置文件中,符合条件的对象只能有一个,多余一个会报错。
    -->

    <bean id="myStudent" class="com.hao.jh05.Student" autowire="byType">
        <property name="age" value="10"/>
        <property name="name" value="张三"/>
        <!--
        <property name="school" ref="mySchool"/>
        -->
    </bean>
    <bean id="mySchool" class="com.hao.jh05.School">
        <property name="name" value="新乡"/>
        <property name="address" value="红旗区"/>
    </bean>
4)在项目中使用多个spring配置文件
分多个配置文件的方式:1)按照功能模块分,一个模块一个配置文件,2)按类的功能分,数据库操作相关的类在一个文件,service类在一个配置文件,配置redis,事务等等的一个配置文件。
spring管理多个配置文件,常用的是包含关系的配置文件,项目中有一个总的文件,里面有一个import标签包含其他的多个配置文件
语法:
总的文件(xml)
<import resource="其他的文件的路径1"/>
<import resource="其他的文件的路径2"/>
关键字“classpath:" :表示类路径,也就是类文件(class)所在的目录。spring到类路径中加载文件
什么时候使用classpath:在一个文件中要使用其他的文件,需要使用classpath。
包含关系的配置文件,可以使用通配符(*:表示任意字符)注意:总的文件名称,不能包含在通配符范围内。
5)注入集合类型的属性(注入简单类型)
package com.hao.collectType;

import java.lang.reflect.Array;
import java.util.Arrays;
import java.util.List;
import java.util.Map;
import java.util.Set;

public class Student {
    private String[] course;
    private List<String> list;
    private Map<String,String> map;
    private Set<String> set;

    public void setSet(Set<String> set) {
        this.set = set;
    }

    public void setCourse(String[] course) {
        this.course = course;
    }

    public void setList(List<String> list) {
        this.list = list;
    }

    public void setMap(Map<String, String> map) {
        this.map = map;
    }
    public void test(){
        System.out.println(Arrays.toString(course));
        System.out.println(list);
        System.out.println(map);
        System.out.println(set);
    }
}
配置文件:
<?xml version="1.0" encoding="UTF-8"?>
<beans xmlns="http://www.springframework.org/schema/beans"
       xmlns:xsi="http://www.w3.org/2001/XMLSchema-instance"
       xsi:schemaLocation="http://www.springframework.org/schema/beans http://www.springframework.org/schema/beans/spring-beans.xsd">

    <bean id="student" class="com.hao.collectType.Student">
        <property name="course">
            <array>
                <value>java课程</value>
                <value>MySql课程</value>
            </array>
        </property>
        <property name="list">
            <list>
                <value>张三</value>
                <value>李四</value>
            </list>
        </property>
        <property name="map">
            <map>
                <entry key="1" value="中国"></entry>
                <entry key="2" value="美国"></entry>
            </map>
        </property>
        <property name="set">
            <set>
                <value>MySql</value>
                <value>PHP</value>
            </set>
        </property>
    </bean>
</beans>
6)注入集合类型的属性(注入对象类型)
实体类:
package com.hao.collectType;

public class Course {
    private String cname;
    public void setCname(String cname){
        this.cname=cname;
    }

    @Override
    public String toString() {
        return "Course{" +
                "cname='" + cname + '\'' +
                '}';
    }
}
package com.hao.collectType;

import java.lang.reflect.Array;
import java.util.Arrays;
import java.util.List;
import java.util.Map;
import java.util.Set;

public class Student {

    private List<Course> courseList;

    public void setCourseList(List<Course> courseList){
        this.courseList=courseList;
    }

    public void test(){
        System.out.println(courseList);
    }
}
配置文件
<?xml version="1.0" encoding="UTF-8"?>
<beans xmlns="http://www.springframework.org/schema/beans"
       xmlns:xsi="http://www.w3.org/2001/XMLSchema-instance"
       xsi:schemaLocation="http://www.springframework.org/schema/beans http://www.springframework.org/schema/beans/spring-beans.xsd">

    <bean id="student" class="com.hao.collectType.Student">
        <property name="courseList">
            <list>
                <ref bean="course01"></ref>
                <ref bean="course02"></ref>
            </list>
        </property>
    </bean>
    <bean id="course01" class="com.hao.collectType.Course">
        <property name="cname" value="语文"/>
    </bean>
    <bean id="course02" class="com.hao.collectType.Course">
        <property name="cname" value="数学" />
    </bean>

</beans>
测试:
public class MyTest {
    @Test
    public void test001(){
        String config="applicationContext.xml";
        ApplicationContext applicationContext=new ClassPathXmlApplicationContext(config);
        Student student=applicationContext.getBean("student", Student.class);
        student.test();
    }
}
2.5.2基于注解的DI
基于注解的DI:使用spring提供的注解,完成java对象创建,属性赋值。
注解使用的核心步骤:
1.在源代码中加入注解,例如@Component
2.在spring的配置文件,加入组件扫描器的标签。
@Component
@Component:表示创建对象,对象放到容器中,作用是<bean>
属性:value,表示对象名称,也就是bean的id属性值
位置:在类的上面,表示创建此类的对象
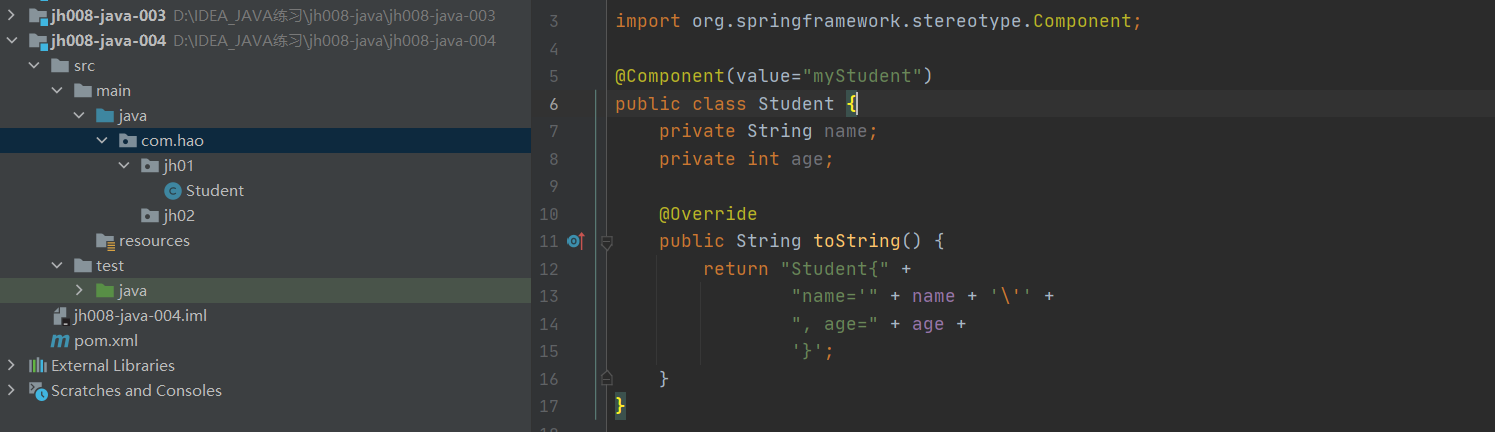
@Component(value=“myStudent”)(value可以省略)等同于
<bean id="myStudent" class="com.hao.jh01.Student"/>
其中如果只写@Component的话,会被框架自动赋一个值,这个值为类名首字母小写。
配置文件:
<?xml version="1.0" encoding="UTF-8"?>
<beans xmlns="http://www.springframework.org/schema/beans"
       xmlns:xsi="http://www.w3.org/2001/XMLSchema-instance"
       xmlns:context="http://www.springframework.org/schema/context"
       xsi:schemaLocation="http://www.springframework.org/schema/beans http://www.springframework.org/schema/beans/spring-beans.xsd http://www.springframework.org/schema/context https://www.springframework.org/schema/context/spring-context.xsd">

    <!--声明组件扫描器,使用注解必须加入这个语句
        component-scan:翻译过来是组件扫描器,组件是java对象
        属性:base-package 注解在你的项目中的包名,
             框架会扫描这个包和子包中的所有类,找类中的所有注解
             遇到注解后,按照注解表示的功能,去创建对象,给属性赋值。
    -->
    <context:component-scan base-package="com.hao.jh01"></context:component-scan>
</beans>
和@Component功能相同的创建对象的注解
1)@Repository:放在dao接口的实现类上面,表示创建dao对象,持久层对象,能访问数据库
2)@Service:放在业务层接口的实现类上面,表示创建业务层对象,业务层对象有业务的功能
3)@Controller:放在控制器类的上面,表示创建控制器对象。属于表示层对象,控制器对象能接受请求,把请求的处理结果显示给用户。
这四个注解都能创建对象,但是@Repository,@Service,@Controller有角色说明,表示对象是分层的,对象是属于不同层的,具有额外功能。
扫描多个包的三种方式:
<!--第一种:使用多次组件扫描器-->
<context:component-scan base-package="com.hao.jh01"/>
<context:component-scan base-package="com.hao.jh02"/>
<!--第二种:使用分隔符(;或者,)指定多个包-->
<context:component-scan base-package="com.hao.jh01;com.hao.jh02"/>
<!--第三种:指定父包-->
<context:component-scan base-package="com.hao"/>
@Value
package com.hao.jh02;

import org.springframework.beans.factory.annotation.Value;
import org.springframework.stereotype.Component;

@Component("myStudent")
public class Student {
    /**
    * 简单类型属性赋值:@Value
    * @Value:简单属性赋值属性
     *      属性:value简单类型属性值
     *      位置:1)在属性定义的上面,无需set方法,推荐使用
     *          2)在set方法的上面
    */
    @Value(value="zhangsan")
    private String name;
    @Value(value = "11")
    private int age;

    public Student() {
        System.out.println("Student类的无参构造被调用了");
    }

    @Override
    public String toString() {
        return "Student{" +
                "name='" + name + '\'' +
                ", age=" + age +
                '}';
    }
}
@AutoWired 引用类型(注入对象属性):使用注解方式进行属性注入
引用类型:@AutoWired:spring框架提供的,给引用类型赋值的,使用自动注入原理,支持byName,byType。默认是byType。
它可以对类成员变量、方法及构造函数进行标注,完成自动装配的工作
@Autowired属性:required:boolean类型的属性,默认为true
true:spring在启动的时候,创建容器对象的时候,会检查引用类型是否赋值成功,如果赋值失败,终止程序执行,并报错
false:如果引用类型赋值失败,程序正常执行,不报错,引用类型的值为null
@Autowired使用位置:1)在属性定义的上面,无需set方法,推荐使用
2)在set方法的上面。
示例:
//UserDao
package com.hao.dao;

public interface UserDao {
    public void add();
}
//UserDao实现类
package com.hao.dao.impl;

import com.hao.dao.UserDao;
import org.springframework.stereotype.Repository;

@Repository(value = "userDao")
public class UserDaoImpl implements UserDao {
    @Override
    public void add() {
        System.out.println("UserDaoImpl add..........");
    }
}
//UserService
package com.hao.service;

import com.hao.dao.UserDao;
import org.springframework.beans.factory.annotation.Autowired;
import org.springframework.stereotype.Service;

@Service(value="userService")
public class UserService {
    @Autowired//根据类型进行注入,找到UserDao类进行注入
    private UserDao userDao;
    public void add(){
        System.out.println("UserDao add......");
        userDao.add();
    }
}
<!--配置文件-->
<?xml version="1.0" encoding="UTF-8"?>
<beans xmlns="http://www.springframework.org/schema/beans"
       xmlns:xsi="http://www.w3.org/2001/XMLSchema-instance"
       xmlns:context="http://www.springframework.org/schema/context"
       xsi:schemaLocation="http://www.springframework.org/schema/beans
       http://www.springframework.org/schema/beans/spring-beans.xsd
       http://www.springframework.org/schema/context
       https://www.springframework.org/schema/context/spring-context.xsd">


    <context:component-scan base-package="com.hao"></context:component-scan>
</beans>
//测试文件
    @Test
    public void test002(){
        String config="applicationContext.xml";
        ApplicationContext applicationContext=new ClassPathXmlApplicationContext(config);
        UserService userService=applicationContext.getBean("userService", UserService.class);
        userService.add();
    }
@Qualifier:根据名称进行注入
@Qualifier注解的使用,和@Autowired一起使用
当一个接口有多个实现类的时候,只使用@Autowired注解可能编译器不知道注入哪个实现类,因此会导致编译失败,在@Autowired下面使用@Qualifier的话这可以避免此问题
<!--配置文件-->
<?xml version="1.0" encoding="UTF-8"?>
<beans xmlns="http://www.springframework.org/schema/beans"
       xmlns:xsi="http://www.w3.org/2001/XMLSchema-instance"
       xmlns:context="http://www.springframework.org/schema/context"
       xsi:schemaLocation="http://www.springframework.org/schema/beans
       http://www.springframework.org/schema/beans/spring-beans.xsd
       http://www.springframework.org/schema/context
       https://www.springframework.org/schema/context/spring-context.xsd">


    <context:component-scan base-package="com.hao"></context:component-scan>
</beans>
//Dao接口
package com.hao.dao;

public interface UserDao {
    public void add();
}
//Dao接口实现类UserDaoImple01
package com.hao.dao.impl;

import com.hao.dao.UserDao;
import org.springframework.stereotype.Repository;

@Repository(value = "userDaoImpl01")
public class UserDaoImpl01 implements UserDao {
    @Override
    public void add() {
        System.out.println("UserDaoImpl01 add..........");
    }
}
//Dao接口实现类UserDaoImpl02
package com.hao.dao.impl;

import com.hao.dao.UserDao;
import org.springframework.stereotype.Repository;

@Repository(value="userDaoImpl02")
public class UserDaoImpl02 implements UserDao {
    @Override
    public void add() {
        System.out.println("UserDaoImpl02 add............");
    }
}
//UserService
package com.hao.service;

import com.hao.dao.UserDao;
import org.springframework.beans.factory.annotation.Autowired;
import org.springframework.beans.factory.annotation.Qualifier;
import org.springframework.stereotype.Service;

@Service(value="userService")
public class UserService {
    @Autowired
    @Qualifier(value="userDaoImpl02")
    private UserDao userDao;
    public void add(){
        System.out.println("UserDao add......");
        userDao.add();
    }
}
//测试文件
    @Test
    public void test002(){
        String config="applicationContext.xml";
        ApplicationContext applicationContext=new ClassPathXmlApplicationContext(config);
        UserService userService=applicationContext.getBean("userService", UserService.class);
        userService.add();
    }
@Resource 引用类型(注入对象类型属性)
@Resource:来自jdk中,给引用类型赋值的,支持byName,byType,默认是byName,spring支持这个注解的使用。
使用位置:1)在属性定义的上面,无需set方法,推荐使用
2)在set方法的上面。
@Rrsource先使用byName赋值,如果赋值失败,再使用byType。
package com.hao.service;

import com.hao.dao.UserDao;
import org.springframework.stereotype.Service;

import javax.annotation.Resource;

@Service(value="userService")
public class UserService {
	//根据名称进行注入  @Resource(name="userDao")
    @Resource  //根据类型进行注入
    private UserDao userDao;
    public void add(){
        System.out.println("UserDao add......");
        userDao.add();
    }
}
2.6工厂bean
1.Spring有两种类型bean,一种普通bean,另外一种工厂bean(FactoryBean)
2.普通bean:在配置文件中定义的bean类型是什么类则返回什么类型
applicationContext.getBean("id")//返回自己定义的类
3.工厂bean:在配置文件定义bean类型可以和返回类型不一样。
2.7bean的作用域
1.在Spring里面,设置创建bean实例是单实例还是多实例。
2.在Spring里面,默认情况下,bean是单实例对象。
3.如何设置单实例还是多实例
1)在spring配置文件bean标签里面有属性(scope)用于设置单实例或者多实例。
2)scope属性值
第一个值 默认值,singleton,表示的是单实例对象
第二个值 prototype,表示的是多实例对象。
3)singleton与prototype的区别
第一:singleton是单实例,prototype是多实例
第二:设置scope值是singleton的时候,加载Spring配置文件时候就会创建单实例对象。
设置scope值是prototype的时候,不是在加载Spring配置文件时候创建对象,在调用getBean方法时候创建多实例对象。
bean的生命周期
生命周期:从对象创建到对象销毁的过程。
bean生命周期:
1)通过构造器床架bean实例(无参数构造)
2)为bean的属性设置值和对其他bean引用(调用set方法)
3)调用bean的初始化方法(需要进行配置)
4)bean此时可以使用了(获取到了对象)
5)当容器关闭的时候,调用bean的销毁的方法(需要进行配置销毁的方法)
AOP面向切面编程
3.1 增加功能,导致的问题
在源代码中,业务方法中增加的功能
1)源代码可能改动的比较多
2)重复代码比较多
3)代码难以维护
3.2AOP概念
AOP(Aspect Orient Programming):面向切面编程,不修改源代码进行功能增强。
Aspect:表示切面,给业务方法增加的功能,叫做切面,切面一般都是非业务功能,而且切面功能一般都是可以复用的。例如:日志功能,事务功能,权限检查,参数检查,统计信息等等。
怎么理解面向切面编程:以切面为核心设计开发你的应用
1)设计项目时,找出切面的功能,
2)安排切面的执行时间,执行的位置
AOP底层原理
1.AOP底层使用动态代理,其中有两种情况的动态代理
第一种:有接口的情况下,使用JDK动态代理
创建接口实现类代理对象,增强类的方法
第二种:没有接口情况,使用CGLIB动态代理。
创建子类的代理对象,增强类的方法。
3.3AOP的作用
1)让切面功能复用
2)让开发人员专注业务逻辑,提高开发效率。
3)实现业务功能和其他非业务功能解耦合。
4)给存在的业务方法,增加功能,不用修改原来的代码。
3.3AOP中的术语
1)Aspect:切面,给业务方法增加的功能,把通知(Advice)应用到切入点的过程
2)JoinPoint:连接点,连接切面的业务方法,在这个业务方法执行时,会同时执行切面的功能。类中哪些方法可以被增强,这些被增强的方法就是连接点。
3)Pointcut:切入点,是一个或者多个连接点集合。表示这些方法执行时,都能增加切面的功能。表示切面执行的位置。实际被真正增强的方法,就被称为切入点。
4)target:目标对象,给哪个对象增加切面的功能,哪个对象就是目标对象。
5)Advice:通知(增强),表示切面的执行时间,表示的是在目标方法之前执行切面,还是在目标方法之后执行切面。实际被增强的逻辑部分,称为通知
AOP中重要的三个要素:Aspect,Pointcut,Advice,这个概念的理解是:在Advice的时间,在Pointcut的位置,执行Aspect。
AOP是一个动态的思想,在程序运行期间,创建代理(ServiceProxy),使用代理执行方法时,增加切面的功能,这个代理对象存在于内存中。
3.4 什么时候使用AOP
要给某些方法增加一些相同的功能,并且源代码不能修改或者难以修改的时候。给业务方法增加非业务功能时也可以使用AOP。
3.5 AOP技术思想的实现
使用框架AOP,实现AOP的框架有很多,有名的有两个
1)Spring:Spring框架实现AOP思想中的部分功能,Spring框架实现AOP的操作比较繁琐,
2)Aspectj:独立的框架,专门是AOP,属于Eclipse。Spring框架一般都是基于AspectJ实现AOP操作。
3.6使用AspectJ框架实现AOP
AspectJ:AspectJ不是Spring的组成部分,它是一个基于Java语言的AOP框架。一般把AspectJ和Spring框架一起使用,进行AOP操作。
AspectJ框架可以使用注解(实际开发中推荐使用)和xml配置文件两种方式实现AOP
3.6.1基于注解方式实现AOP
AspectJ表示切面执行时间,用的通知(Advice),这个通知可以使用注解表示,
一共有五个注解,表示切面的五个执行时间,这些注解叫做通知注解:
@Before:前置注解
@AfterReturning:后置注解(如果程序有异常,不会执行)
@Around:环绕通知
@AfterThrowing:异常通知
@After:最终通知 (有没有异常都会执行)
如果要使用这些注解,要在pom.xml中加入依赖
	<dependency>
      <groupId>org.springframework</groupId>
      <artifactId>spring-aspects</artifactId>
      <version>5.3.12</version>
    </dependency>
相关代码:
<!--配置文件-->
<?xml version="1.0" encoding="UTF-8"?>
<beans xmlns="http://www.springframework.org/schema/beans"
       xmlns:xsi="http://www.w3.org/2001/XMLSchema-instance"
       xmlns:context="http://www.springframework.org/schema/context"
       xmlns:aop="http://www.springframework.org/schema/aop"
       xsi:schemaLocation="http://www.springframework.org/schema/beans http://www.springframework.org/schema/beans/spring-beans.xsd http://www.springframework.org/schema/context https://www.springframework.org/schema/context/spring-context.xsd http://www.springframework.org/schema/aop https://www.springframework.org/schema/aop/spring-aop.xsd">

    <context:component-scan base-package="com.hao.user"></context:component-scan>
    <aop:aspectj-autoproxy></aop:aspectj-autoproxy>
</beans>
//被增强的类
package com.hao.user;

import org.springframework.stereotype.Component;

@Component(value="user")
public class User {
    public void add(){
        System.out.println("User add.........");
    }
}
//增强User类的类
package com.hao.user;

import org.aspectj.lang.ProceedingJoinPoint;
import org.aspectj.lang.annotation.Around;
import org.aspectj.lang.annotation.Aspect;
import org.aspectj.lang.annotation.Before;
import org.springframework.stereotype.Component;

@Component(value="userProxy")
@Aspect
public class UserProxy {
    @Before(value="execution(* com.hao.user.User.add(..))")
    public void before(){
        System.out.println("User的增强功能,在User类的Add方法之前执行");
    }

    @Around(value="execution(* com.hao.user.User.add(..))")
    public void around(ProceedingJoinPoint proceedingJoinPoint)throws Throwable{
        System.out.println("User类的功能增强,在User类的add方法执行前后都会执行");
        proceedingJoinPoint.proceed();//执行被增强的方法
        System.out.println("之后执行");
    }
}
//测试类
    @Test
    public void test001(){
        String config="applicationContext.xml";
        ApplicationContext applicationContext=new ClassPathXmlApplicationContext(config);
        User user=applicationContext.getBean("user", User.class);
        user.add();
    }
相同切入点的抽取
    @Pointcut(value="execution(* com.hao.user.User.add(..))")
    public void pointcut(){}

    @Around(value="pointcut()")
    public void around(ProceedingJoinPoint proceedingJoinPoint)throws Throwable{
        System.out.println("User类的功能增强,在User类的add方法执行前后都会执行");
        proceedingJoinPoint.proceed();//执行被增强的方法
        System.out.println("之后执行");
    }
当有多个增强类对同一个方法进行增强时,可以设置增强类优先级
1)在增强类上面添加注解@Order(数字类型值),数字类型值越小优先级越高。
3.6.2 Pointcut 切面执行的位置
切入点表达式作用:可以知道对哪个类里面的那个方法进行增强。
Pointcut:表示切面执行的位置,使用AspectJ中切入点表达式
切入点表达式语法:execution(访问权限 方法返回值 方法声明(参数) 异常类型)
execution([权限修饰符] [返回类型] [类全路径] [方法名称] (参数列表))
举例1:对com.hao.dao.UserDao类里面的add进行增强
execution(* com.hao.dao.UserDao.add(..))
*表示权限类型:public private等等.....
其中返回类型可以省略不写
com.hao.dao.UserDao.add(..)表示方法声明,其中..表示参数列表
举例二:对com.hao.dao.UserDao类里面的所有方法进行增强
execution(* com.hao.dao.UserDao.*(..))
第一个*表示权限类型,第二个*表示UserDao类中的所有方法
举例三:对com.hao.dao包里面的所有类所有的的方法进行增强
execution(* com.hao.dao.*.*(..))
3.6.3 @AfterReturning:后置通知
属性:value 切入点表达式
returning 自定义的变量,表示目标方法的返回值的
自定义变量名称必须和通知方法的形参名一样。
位置:在方法的上面
特点:
1.在目标方法之后执行的
2.能获取到目标方法的执行结果
3.不会影响目标方法的执行。
JdbcTemplate
JdbcTemplate:Spring框架对JDBC进行封装,使用JdbcTemplate方便实现对数据库的操作。
准备工作:
1,引入相关的依赖
<dependency>
      <groupId>org.springframework</groupId>
      <artifactId>spring-context</artifactId>
      <version>5.3.10</version>
    </dependency>

    <!-- https://mvnrepository.com/artifact/org.springframework/spring-jdbc -->
    <dependency>
      <groupId>org.springframework</groupId>
      <artifactId>spring-jdbc</artifactId>
      <version>5.3.12</version>
    </dependency>
    <dependency>
      <groupId>mysql</groupId>
      <artifactId>mysql-connector-java</artifactId>
      <version>8.0.26</version>
    </dependency>
    <!-- https://mvnrepository.com/artifact/org.springframework/spring-orm -->
    <dependency>
      <groupId>org.springframework</groupId>
      <artifactId>spring-orm</artifactId>
      <version>5.3.12</version>
    </dependency>
    <!-- https://mvnrepository.com/artifact/org.springframework/spring-tx -->
    <dependency>
      <groupId>org.springframework</groupId>
      <artifactId>spring-tx</artifactId>
      <version>5.3.12</version>
    </dependency>
    <dependency>
      <groupId>com.alibaba</groupId>
      <artifactId>druid</artifactId>
      <version>1.2.8</version>
    </dependency>
2.在Spring配置文件配置数据库连接池
    <bean id="dataSource" class="com.alibaba.druid.pool.DruidDataSource" destroy-method="close">
        <property name="driverClassName" value="com.mysql.cj.jdbc.Driver"/>
        <property name="url" value="jdbc:mysql://localhost:3306/springdb"/>
        <property name="username" value="root"/>
        <property name="password" value="123456"/>
    </bean>
3.配置JdbcTemplate,注入DataSource
    <bean id="jdbcTemplate" class="org.springframework.jdbc.core.JdbcTemplate">
        <property name="dataSource" ref="dataSource"/>
    </bean>
4.创建service类,创建dao类,在dao注入jdbcTemplate对象。
Spring整合MyBatis
将 MyBatis 与 Spring 进行整合,主要解决的问题就是将 SqlSessionFactory 对象交由 Spring 来管理。所以,该整合,只需要将 SqlSessionFactory 的对象生成器 SqlSessionFactoryBean 注 册在 Spring 容器中,再将其注入给 Dao 的实现类即可完成整合。 实现 Spring 与 MyBatis 的整合常用的方式:扫描的 Mapper 动态代理
实现步骤:
1.使用的mysql库,使用学生表
student2(id int 主键列,自动增长,
name varchar(80),
age int);
 create table student2(
    -> id int(11) primary key not null auto_increment,
    -> name varchar(20) default null,
    -> age int(5) default null
    -> )engine=innodb,character set=utf8;
2.创建maven项目
3.加入依赖gav
spring依赖,mybatis依赖,mysql依赖
mybatis-spring依赖(mybatis网站上提供的,用来在spring项目中,创建mybatis对象)
spring有关的依赖
注意:mybatis和spring整合的时候,事务是默认自动提交的。
<dependency>
      <groupId>junit</groupId>
      <artifactId>junit</artifactId>
      <version>4.11</version>
      <scope>test</scope>
    </dependency>

    <!--Spring依赖-->
    <dependency>
      <groupId>org.springframework</groupId>
      <artifactId>spring-context</artifactId>
      <version>5.2.5.RELEASE</version>
    </dependency>
    <!--Spring事务依赖-->
    <dependency>
      <groupId>org.springframework</groupId>
      <artifactId>spring-tx</artifactId>
      <version>5.2.5.RELEASE</version>
    </dependency>
    <!--Spring事务依赖-->
    <dependency>
      <groupId>org.springframework</groupId>
      <artifactId>spring-jdbc</artifactId>
      <version>5.2.5.RELEASE</version>
    </dependency>
    <!--mybatis依赖-->
    <dependency>
      <groupId>org.mybatis</groupId>
      <artifactId>mybatis</artifactId>
      <version>3.5.1</version>
    </dependency>
    <!--Spring和Mybatis集成依赖-->
    <dependency>
      <groupId>org.mybatis</groupId>
      <artifactId>mybatis-spring</artifactId>
      <version>1.3.1</version>
    </dependency>
    <!--MySQL驱动-->
    <dependency>
      <groupId>mysql</groupId>
      <artifactId>mysql-connector-java</artifactId>
      <version>5.1.9</version>
    </dependency>
    <!--阿里的连接池,德鲁伊-->
    <dependency>
      <groupId>com.alibaba</groupId>
      <artifactId>druid</artifactId>
      <version>1.1.12</version>
    </dependency>
加入的相关插件,防止idea不编译.xml文件
	<resources>
      <resource>
        <directory>src/main/java</directory><!--所在的目录-->
        <includes><!--包括目录下的.properties,.xml 文件都会扫描到-->
          <include>**/*.properties</include>
          <include>**/*.xml</include>
        </includes>
        <filtering>false</filtering>
      </resource>
    </resources>
4.创建实体类Student
package com.hao.entity;

public class Student {
    private Integer id;
    private String name;
    private Integer age;

    @Override
    public String toString() {
        return "Student{" +
                "id=" + id +
                ", name='" + name + '\'' +
                ", age=" + age +
                '}';
    }

    public Integer getId() {
        return id;
    }

    public void setId(Integer id) {
        this.id = id;
    }

    public String getName() {
        return name;
    }

    public void setName(String name) {
        this.name = name;
    }

    public Integer getAge() {
        return age;
    }

    public void setAge(Integer age) {
        this.age = age;
    }
}
5.创建dao接口和mapper文件写sql语句
package com.hao.dao;

import com.hao.entity.Student;
import org.springframework.stereotype.Repository;

import java.util.List;

public interface StudentDao {
    int insertStudent(Student student);
    List<Student> selectStudents();
}
StudentDao接口实现类:
<?xml version="1.0" encoding="UTF-8" ?>
<!DOCTYPE mapper
        PUBLIC "-//mybatis.org//DTD Mapper 3.0//EN"
        "http://mybatis.org/dtd/mybatis-3-mapper.dtd">
<mapper namespace="com.hao.dao.StudentDao">
    <insert id="insertStudent">
        insert into student2(name,age) values(#{name},#{age})
    </insert>

    <select id="selectStudents" resultType="com.hao.entity.Student">
        select * form student2
    </select>

</mapper>
6.写mybatis主配置文件
<?xml version="1.0" encoding="UTF-8" ?>
<!DOCTYPE configuration
        PUBLIC "-//mybatis.org//DTD Config 3.0//EN"
        "http://mybatis.org/dtd/mybatis-3-config.dtd">
<configuration>
    <!--
    <settings>
        <setting name="logImpl" value="STDOUT_LOGGING" />
    </settings>
    -->

    <typeAliases>
        <package name="com.hao.entity"/>
    </typeAliases>

    <mappers>
        <mapper resource="com/hao/dao/StudentDao.xml"/>
    </mappers>
</configuration>
7.创建service接口和他的实现类
package com.hao.service;

import com.hao.entity.Student;

import java.util.List;

public interface StudentService {
    public int addStudent(Student student);
    public List<Student> queryStudent();
}
实现类:
package com.hao.service.impl;

import com.hao.dao.StudentDao;
import com.hao.entity.Student;
import com.hao.service.StudentService;

import java.util.List;

public class StudentServiceImpl implements StudentService {
    private StudentDao studentDao;

    public void setStudentDao(StudentDao studentDao) {
        this.studentDao = studentDao;
    }

    @Override
    public int addStudent(Student student) {
        int rows=studentDao.insertStudent(student);
        return rows;
    }

    @Override
    public List<Student> queryStudent() {
        List<Student> students=studentDao.selectStudents();
        return students;
    }
}
8.创建Spring配置文件
1)声明数据源DataSource,使用的阿里的Druid连接池
2)声明SqlSessionFactoryBean类,在这个类内部创建的是SqlSessionFactory对象。
3)声明MapperScannerConfiguration类,在内部创建dao代理对象,创建的对象都放在spring容器中。
4)声明Service对象,把3)中的到赋值给service属性
<?xml version="1.0" encoding="UTF-8"?>
<beans xmlns="http://www.springframework.org/schema/beans"
       xmlns:xsi="http://www.w3.org/2001/XMLSchema-instance"
       xsi:schemaLocation="http://www.springframework.org/schema/beans http://www.springframework.org/schema/beans/spring-beans.xsd">

    <!--声明数据源DataSource-->
    <bean id="myDataSource" class="com.alibaba.druid.pool.DruidDataSource" init-method="init" destroy-method="close">
        <property name="url" value="jdbc:mysql://localhost:3306/springdb"></property>
        <property name="username" value="root"/>
        <property name="password" value="123456"/>
    </bean>
    <!--声明SqlSessionFactoryBean,在这个类的内部创建SqlSessionFactory-->
    <!--其中factory就是创建的SqlSessionFactory对象的名字-->
    <bean id="factory" class="org.mybatis.spring.SqlSessionFactoryBean">
        <!--指定数据源-->
        <property name="dataSource" ref="myDataSource"/>
        <!--指定mybatis的主配置文件
            Resources可以直接使用value属性赋值
        -->
        <property name="configLocation" value="classpath:mybatis.xml"/>
    </bean>

    <!--声明MapperScanConfigurer
        MapperScannerConfigurer作用:循环basePackage所表示的包,把包中每个接口都找到,调用sqlSession.getMapper
        把每个dao接口都创建出dao对象,dao代理对象放在容器中。
    -->
    <!--创建dao的代理-->
    <bean class="org.mybatis.spring.mapper.MapperScannerConfigurer">
        <!--指定SqlSessionFactory对象的名称-->
        <property name="sqlSessionFactoryBeanName" value="factory"/>
        <!--指定基本包,dao接口所在的包名-->
        <property name="basePackage" value="com.hao.dao"/>
    </bean>
    <bean id="studentService" class="com.hao.service.impl.StudentServiceImpl">
        <property name="studentDao" ref="studentDao"/>
    </bean>
</beans>
9.测试dao访问数据库
package com.hao;

import com.hao.dao.StudentDao;
import com.hao.entity.Student;
import com.hao.service.StudentService;
import org.junit.Test;
import org.springframework.context.ApplicationContext;
import org.springframework.context.support.ClassPathXmlApplicationContext;

public class MyTest {
    @Test
    public void test001(){
        String config="applicationContext.xml";
        ApplicationContext applicationContext=new ClassPathXmlApplicationContext(config);
        StudentDao studentDao=applicationContext.getBean("studentDao", StudentDao.class);
        Student student=new Student();
        student.setName("张三");
        student.setAge(18);
        studentDao.insertStudent(student);
    }
    @Test
    public void test002(){
        String config="applicationContext.xml";
        ApplicationContext applicationContext=new ClassPathXmlApplicationContext(config);
        StudentService studentService=applicationContext.getBean("studentService", StudentService.class);
        Student student=new Student();
        student.setName("李四");
        student.setAge(18);
        studentService.addStudent(student);
    }
}
事务
事务概念:事务是数据库操作最基本单元,逻辑上一组操作,要么都成功,要么都失败,如果有一个失败所有操作都失败。
典型场景:银行转账。
事务的四个特性(ACID):原子性,一致性,隔离性,持久性。
事务操作:Spring事务管理介绍
1.事务添加到javaee三层结构里面的Service层(业务逻辑层)
三层结构:表示层,业务逻辑层,数据访问层。
2.在Spring进行事务管理操作
1)有两种方式:编程式事务管理和声明式事务管理(常使用的)
3.声明式事务管理
1)基于注解方式(使用,方便简单)
2)基于xml配置文件方式
4.在Spring进行声明式事务管理,底层使用AOP
5.Spring事务管理API,提供了一个接口代表事务管理器,这个接口针对不同的框架提供不同的实现类
PlatformTransactionManager接口
1)实现类为DataSourceTransactionManager,用于配置mybatis和jdbc数据源的事务管理器。
2)实现类为HibernateTransactionManager,用于配置Hibernate的事务管理器。
通过注解方式实现声明式事务管理
1.在spring配置文件配置事务管理器
  <!--创建事务管理器-->
	<bean id="transactionManager" class="org.springframework.jdbc.datasource.DataSourceTransactionManager">
        <!--注入数据源-->
        <property name="dataSource" ref="dataSource"/>
    </bean>
2.在spring配置文件,开启事务注解
<tx:annotation-driven transaction-manager="transactionManager"></tx:annotation-driven>
3.在service类上面(获取service类黎明方法上面)添加事务注解
1)@Transactional,这个注解可以添加到类上面,也可以添加到方法上面
2)如果把这个注解添加到类上面,这个类里面所有的方法都添加事务。
3)如果把这个注解添加方法上面,就是为这个方法添加事务。
声明式事务管理参数配置
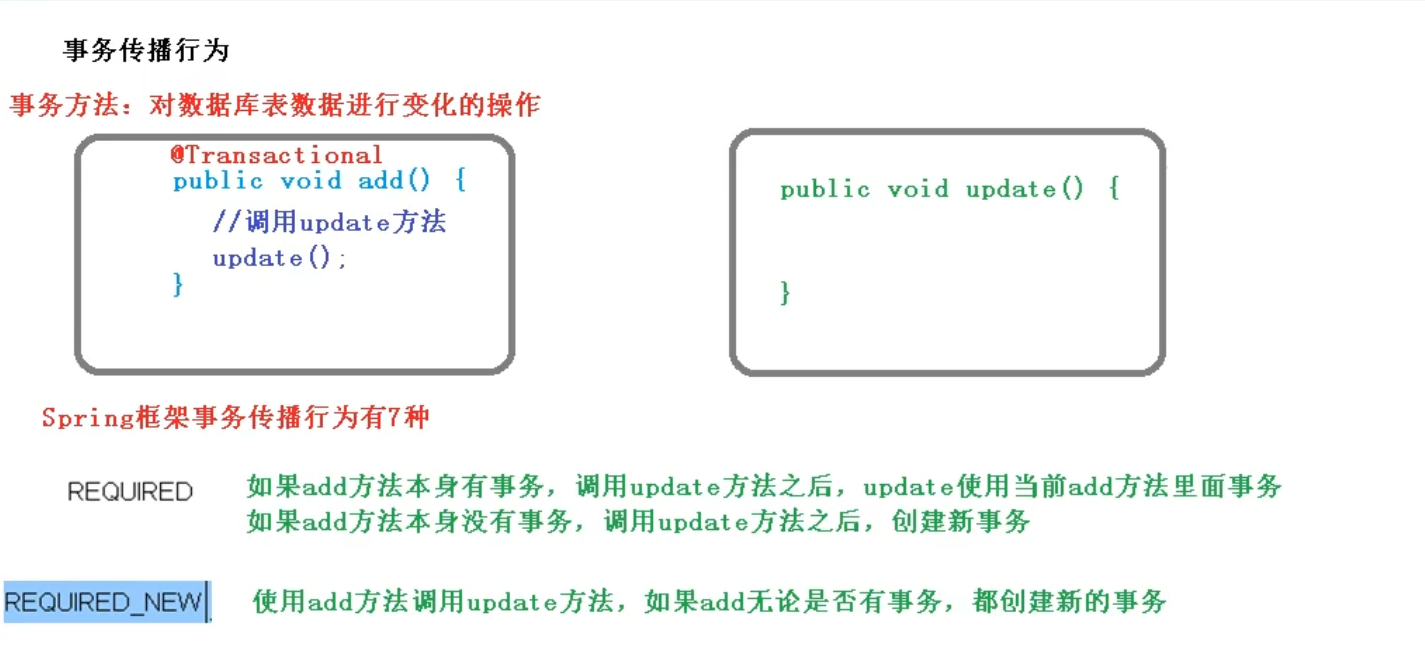
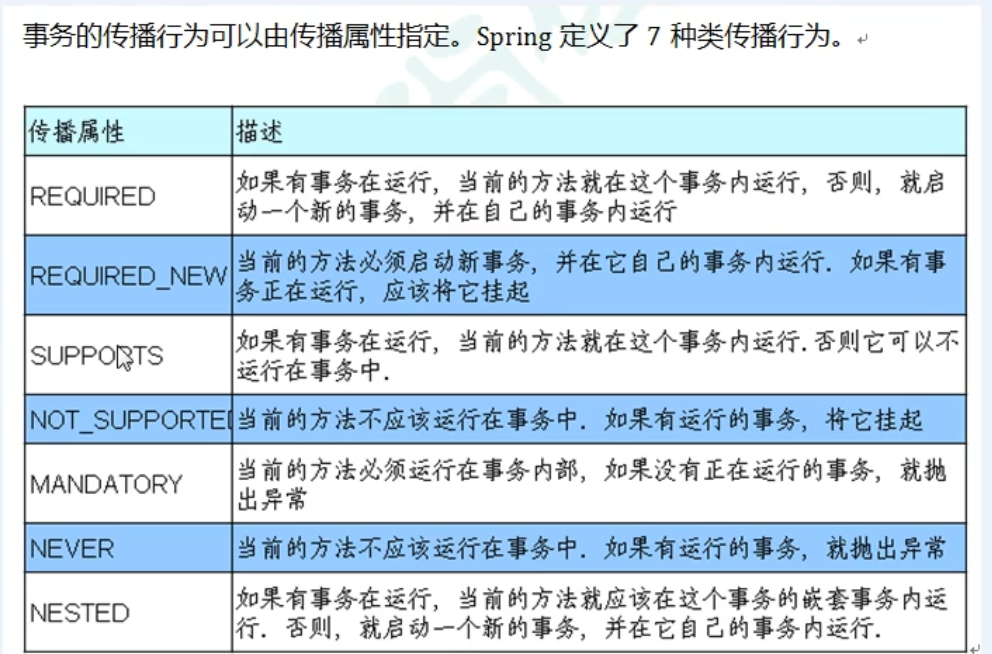
1.在service类上面添加注解@Transactional,在这个注解里面可以配置事务相关参数。
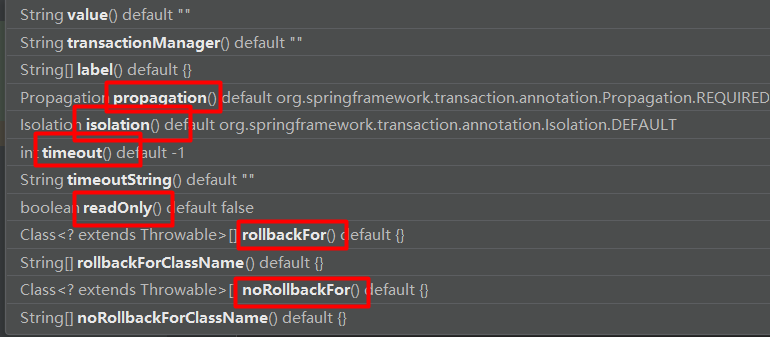
propagation:事务传播行为,默认为REQUIRED
多事务方法直接进行调用,这个过程中事务是如何进行管理的。
事务方法:对数据库表中数据进行变化的操作。
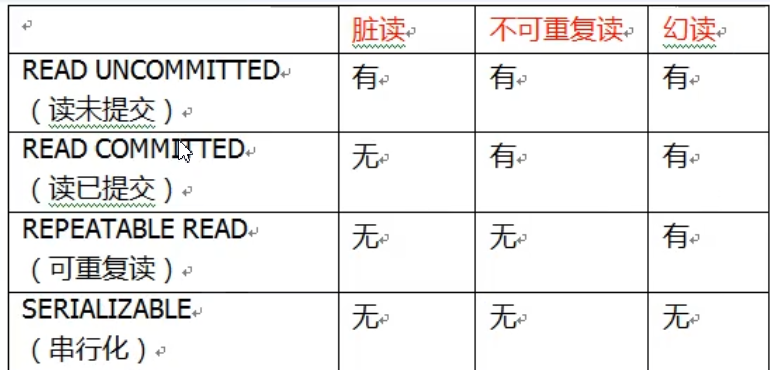
isolation:事务隔离级别,系统默认的隔离级别是:REPEATABLE READ(可重复读)
1)事务有一种特性为隔离性,多事务操作之间不会产生影响。不考虑隔离性会产生很多问题。
2)产生的问题为:脏读,不可重复读,虚(幻)读
脏读:一个未提交的事务读取到另一个未提交事务的数据。
不可重复读:一个未提交事务读取到了另一个已提交事务修改的数据。
虚读:一个未提交事务读取到了另一个已经提交的事务添加的数据。
3)通过设置事务隔离性,解决读问题
timeout:超时时间
1)事务需要在一定时间内进行提交,如果不提交进行回滚
2)默认值是-1(即不超时),设置时间以秒为单位进行计算。
readOnly:是否只读,默认为false
1)读:查询操作,写:添加修改删除操作
2)readOnly默认值false,表示可以查询,可以进行添加修改删除操作
rollbackFor:回滚
设置出现哪些异常进行事务回滚
noRollbackFor:不回滚
设置出现哪些异常不进行事务回滚。
通过XML方式声明事务管理
1.在Spring配置文件中进行配置
第一步:配置事务管理器
第二步:配置通知
第三步:配置切入点和切面。
我的第一个Spring项目
1.新建maven项目
2.加入依赖,修改pom.xml
spring-context:spring依赖
junit:单元测试
3.开发人员定义类:接口和实现类
类也可以没有接口。
接口和实现类定义方法和没有Spring时的定义方式一样。
4.创建spring的配置文件,
作用:声明对象,把对象交给spring创建和管理。
使用<bean>表示对象声明,一个bean表示一个java对象。
5.使用容器中的对象
创建一个表示spring容器的对象,ApplicationContext
String config="beans.xml";//spring的配置文件
ApplicationContext cxt=new ClassPathXmlApplicationContext(config);//创建容器
/*
    注意:容器一旦被创建,bean文件里面的所有对象就会被立刻创建出来。
    此种方式优点:
        获取对象的速度快,因为对象已经被创建好了
    缺点:
        占内存
    在创建容器(ApplicationContext)对象时,会把配置文件中的所有对象都创建出来(spring默认规则),即使两个对象的路径一样,只是id名不一样也会被都创建出来。
*/
Spring创建对象,默认是调用类的无参构造方法。
从容器中根据名称获取对象,使用getBean(“对象名称”)
