UML作业第二次:类图中类的表示
一、学习小结:
类之间的关系通过下面的符号定义 :
| Type | Symbol | Drawing |
| Extension | <|-- |
 |
| Composition | *-- |
 |
| Aggregation | o-- |
 |
使用.. 来代替 -- 可以得到点 线.
在这些规则下,也可以绘制下列图形
@startuml
Class01 <|-- Class02
Class03 *-- Class04
Class05 o-- Class06
Class07 .. Class08
Class09 -- Class10
@enduml

@startuml
Class11 <|.. Class12
Class13 --> Class14
Class15 ..> Class16
Class17 ..|> Class18
Class19 <--* Class20
@enduml

@startuml
Class21 #-- Class22
Class23 x-- Class24
Class25 }-- Class26
Class27 +-- Class28
Class29 ^-- Class30
@enduml

关系上的标识
在关系之间使用标签来说明时, 使用 :后接 标签文字。
对元素的说明,你可以在每一边使用 "" 来说明.
@startuml

Class01 "1" *-- "many" Class02 : contains

Class03 o-- Class04 : aggregation

Class05 --> "1" Class06

@enduml

在标签的开始或结束位置添加< 或 >以表明是哪个对象作用到哪个对象上。
@startuml
class Car

Driver - Car : drives >
Car *- Wheel : have 4 >
Car -- Person : < owns

@enduml

添加方法
为了声明域或者方法,你可以使用 后接域名或方法名。
系统检查是否有括号来判断是方法还是域。
@startuml
Object <|-- ArrayList

Object : equals()
ArrayList : Object[] elementData
ArrayList : size()

@enduml

也可以使用{} 把域或者方法括起来
注意,这种语法对于类型/名字的顺序是非常灵活的。
@startuml
class Dummy {
  String data
  void methods()
}

class Flight {
   flightNumber : Integer
   departureTime : Date
}
@enduml

You can use {field} and {method} modifiers to override default behaviour of the parser about fields and methods.
@startuml
class Dummy {
  {field} A field (despite parentheses)
  {method} Some method
}

@enduml

定义可访问性
一旦你定义了域或者方法,你可以定义 相应条目的可访问性质。
| Character | Icon for field | Icon for method | Visibility |
- |
 |
 |
private |
# |
 |
 |
protected |
~ |
 |
 |
package private |
+ |
 |
 |
public |
@startuml

class Dummy {
 -field1
 #field2
 ~method1()
 +method2()
}

@enduml

你可以采用以下命令停用这些特性 skinparam classAttributeIconSize 0 :
@startuml
skinparam classAttributeIconSize 0
class Dummy {
 -field1
 #field2
 ~method1()
 +method2()
}

@enduml

抽象与静态
通过修饰符{static}或者{abstract},可以定义静态或者抽象的方法或者属性。
这些修饰符可以写在行的开始或者结束。也可以使用{classifier}这个修饰符来代替{static}.
@startuml
class Dummy {
  {static} String id
  {abstract} void methods()
}
@enduml

高级类体
PlantUML默认自动将方法和属性重新分组,你可以自己定义分隔符来重排方法和属性,下面的分隔符都是可用的:--..==__.
还可以在分隔符中添加标题:
@startuml
class Foo1 {
  You can use
  several lines
  ..
  as you want
  and group
  ==
  things together.
  __
  You can have as many groups
  as you want
  --
  End of class
}

class User {
  .. Simple Getter ..
  + getName()
  + getAddress()
  .. Some setter ..
  + setName()
  __ private data __
  int age
  -- encrypted --
  String password
}

@enduml

备注和模板
模板通过类关键字("<<"和">>")来定义
你可以使用note left of , note right of , note top of , note bottom of这些关键字来添加备注。
你还可以在类的声明末尾使用note left, note right,note top, note bottom来添加备注。
此外,单独用note这个关键字也是可以的,使用 .. 符号可以作出一条连接它与其它对象的虚线。
@startuml
class Object << general >>
Object <|--- ArrayList

note top of Object : In java, every class\nextends this one.

note "This is a floating note" as N1
note "This note is connected\nto several objects." as N2
Object .. N2
N2 .. ArrayList

class Foo
note left: On last defined class

@enduml

更多注释
可以在注释中使用部分html标签:
<b><u><i><s>,<del>,<strike><font color="#AAAAAA">or<font color="colorName"><color:#AAAAAA>or<color:colorName><size:nn>to change font size<img src="file">or<img:file>: the file must be accessible by the filesystem
你也可以在注释中展示多行。
你也可以在定义的class之后直接使用 note left, note right, note top, note bottom 来定义注释。
@startuml

class Foo
note left: On last defined class

note top of Object
  In java, <size:18>every</size> <u>class</u>
  <b>extends</b>
  <i>this</i> one.
end note

note as N1
  This note is <u>also</u>
  <b><color:royalBlue>on several</color>
  <s>words</s> lines
  And this is hosted by <img:sourceforge.jpg>
end note

@enduml

链接的注释
在定义链接之后,你可以用 note on link 给链接添加注释
如果想要改变注释相对于标签的位置,你也可以用 note left on link, note right on link, note bottom on link。(对应位置分别在label的左边,右边,下边)
@startuml

class Dummy
Dummy --> Foo : A link
note on link #red: note that is red

Dummy --> Foo2 : Another link
note right on link #blue
	this is my note on right link
	and in blue
end note

@enduml

抽象类和接口
用关键字abstract或abstract class来定义抽象类。抽象类用斜体显示。 也可以使用interface, annotation 和 enum关键字。
@startuml

abstract class AbstractList
abstract AbstractCollection
interface List
interface Collection

List <|-- AbstractList
Collection <|-- AbstractCollection

Collection <|- List
AbstractCollection <|- AbstractList
AbstractList <|-- ArrayList

class ArrayList {
  Object[] elementData
  size()
}

enum TimeUnit {
  DAYS
  HOURS
  MINUTES
}

annotation SuppressWarnings

@enduml

使用非字母字符
如果你想在类(或者枚举)的显示中使用非字母符号,你可以:
- 在类的定义中使用
as关键字 - 在类名旁边加上
""
@startuml
class "This is my class" as class1
class class2 as "It works this way too"

class2 *-- "foo/dummy" : use
@enduml

隐藏属性、函数等
通过使用命令“hide/show”,你可以用参数表示类的显示方式。
基础命令是: hide empty members. 这个命令会隐藏空白的方法和属性。
除 empty members 外,你可以用:
empty fields或者empty attributes空属性,empty methods空函数,fields或attributes隐藏字段或属性,即使是被定义了methods隐藏方法,即使是被定义了members隐藏字段 和 方法,即使是被定义了circle类名前带圈的,stereotype原型。
同样可以使用 hide 或 show 关键词,对以下内容进行设置:
class所有类,interface所有接口,enum所有枚举,<<foo1>>实现 foo1 的类,- 一个既定的类名。
你可以使用 show/hide 命令来定义相关规则和例外。
@startuml

class Dummy1 {
  +myMethods()
}

class Dummy2 {
  +hiddenMethod()
}

class Dummy3 <<Serializable>> {
	String name
}

hide members
hide <<Serializable>> circle
show Dummy1 methods
show <<Serializable>> fields

@enduml

隐藏类
你也可以使用 show/hide 命令来隐藏类
如果你定义了一个大的!included 文件,且想在文件包含之后隐藏部分类,该功能会很有帮助。
@startuml

class Foo1
class Foo2

Foo2 *-- Foo1

hide Foo2

@enduml

泛型(generics)
你可以用 < 和 > 来定义类的泛型。
@startuml

class Foo<? extends Element> {
  int size()
}
Foo *- Element

@enduml

It is possible to disable this drawing using skinparam genericDisplay old command.
指定标记(Spot)
通常标记字符 (C, I, E or A) 用于标记 类(classes), 接口(interface), 枚举(enum)和 抽象类(abstract classes).
但是当你想定义原型时,可以增加对应的单个字符及颜色,来定义自己的标记(spot),就像下面一样:
@startuml

class System << (S,#FF7700) Singleton >>
class Date << (D,orchid) >>
@enduml

包
你可以通过关键词 package 声明包,同时可选的来声明对应的背景色(通过使用html色彩代码或名称)。
注意:包可以被定义为嵌套。
@startuml

package "Classic Collections" #DDDDDD {
  Object <|-- ArrayList
}

package net.sourceforge.plantuml {
  Object <|-- Demo1
  Demo1 *- Demo2
}

@enduml

包样式
包可以定义不同的样式。
你可以通过以下的命令来设置默认样式 : skinparam packageStyle,或者对包使用对应的模板:
@startuml
scale 750 width
package foo1 <<Node>> {
  class Class1
}

package foo2 <<Rectangle>> {
  class Class2
}

package foo3 <<Folder>> {
  class Class3
}

package foo4 <<Frame>> {
  class Class4
}

package foo5 <<Cloud>> {
  class Class5
}

package foo6 <<Database>> {
  class Class6
}

@enduml

你也可以参考下面的示例来定义包之间的连线:
@startuml

skinparam packageStyle rectangle

package foo1.foo2 {
}

package foo1.foo2.foo3 {
  class Object
}

foo1.foo2 +-- foo1.foo2.foo3

@enduml

命名空间(Namespaces)
In packages, the name of a class is the unique identifier of this class. It means that you cannot have two classes with the very same name in different packages.
In that case, you should use namespaces instead of packages.
You can refer to classes from other namespaces by fully qualify them. Classes from the default namespace are qualified with a starting dot.
Note that you don't have to explicitly create namespace : a fully qualified class is automatically put in the right namespace.
@startuml

class BaseClass

namespace net.dummy #DDDDDD {
	.BaseClass <|-- Person
	Meeting o-- Person

	.BaseClass <|- Meeting
}

namespace net.foo {
  net.dummy.Person  <|- Person
  .BaseClass <|-- Person

  net.dummy.Meeting o-- Person
}

BaseClass <|-- net.unused.Person

@enduml

自动创建命名空间
使用命令 set namespaceSeparator ??? 你可以自定义命名空间分隔符(为 “.” 以外的字符).
@startuml

set namespaceSeparator ::
class X1::X2::foo {
  some info
}

@enduml

禁止自动创建包则可以使用 set namespaceSeparator none.
@startuml

set namespaceSeparator none
class X1.X2.foo {
  some info
}

@enduml

棒棒糖 接口
需要定义棒棒糖样式的接口时可以遵循以下语法:
bar ()- foobar ()-- foofoo -() bar
@startuml
class foo
bar ()- foo
@enduml

改变箭头方向
类之间默认采用两个破折号 -- 显示出垂直 方向的线. 要得到水平方向的可以像这样使用单破折号 (或者点):
@startuml
Room o- Student
Room *-- Chair
@enduml

你也可以通过改变倒置链接来改变方向
@startuml
Student -o Room
Chair --* Room
@enduml

也可通过在箭头内部使用关键字, 例如left, right, up 或者 down,来改变方向
@startuml
foo -left-> dummyLeft
foo -right-> dummyRight
foo -up-> dummyUp
foo -down-> dummyDown
@enduml

You can shorten the arrow by using only the first character of the direction (for example, -d- instead of -down-) or the two first characters (-do-).
Please note that you should not abuse this functionality : Graphviz gives usually good results without tweaking.
“关系”类
你可以在定义了两个类之间的关系后定义一个 关系类 association class 例如:
@startuml
class Student {
  Name
}
Student "0..*" - "1..*" Course
(Student, Course) .. Enrollment

class Enrollment {
  drop()
  cancel()
}
@enduml

也可以用另一种方式:
@startuml
class Student {
  Name
}
Student "0..*" -- "1..*" Course
(Student, Course) . Enrollment

class Enrollment {
  drop()
  cancel()
}
@enduml

皮肤参数
用skinparam改变字体和颜色。
可以在如下场景中使用:
@startuml

skinparam class {
	BackgroundColor PaleGreen
	ArrowColor SeaGreen
	BorderColor SpringGreen
}
skinparam stereotypeCBackgroundColor YellowGreen

Class01 "1" *-- "many" Class02 : contains

Class03 o-- Class04 : aggregation

@enduml

Skinned Stereotypes
You can define specific color and fonts for stereotyped classes.
@startuml

skinparam class {
	BackgroundColor PaleGreen
	ArrowColor SeaGreen
	BorderColor SpringGreen
	BackgroundColor<<Foo>> Wheat
	BorderColor<<Foo>> Tomato
}
skinparam stereotypeCBackgroundColor YellowGreen
skinparam stereotypeCBackgroundColor<< Foo >> DimGray

Class01 <<Foo>>
Class03 <<Foo>>
Class01 "1" *-- "many" Class02 : contains

Class03 o-- Class04 : aggregation

@enduml

Color gradient
It's possible to declare individual color for classes or note using the # notation.
You can use either standard color name or RGB code.
You can also use color gradient in background, with the following syntax: two colors names separated either by:
|,/,\,- or
-
depending the direction of the gradient.
For example, you could have:
@startuml

skinparam backgroundcolor AntiqueWhite/Gold
skinparam classBackgroundColor Wheat|CornflowerBlue

class Foo #red-green
note left of Foo #blue\9932CC
  this is my
  note on this class
end note

package example #GreenYellow/LightGoldenRodYellow {
  class Dummy
}

@enduml

Help on layout
Sometimes, the default layout is not perfect...
You can use together keyword to group some classes together : the layout engine will try to group them (as if they were in the same package).
You can also use hidden links to force the layout.
@startuml

class Bar1
class Bar2
together {
  class Together1
  class Together2
  class Together3
}
Together1 - Together2
Together2 - Together3
Together2 -[hidden]--> Bar1
Bar1 -[hidden]> Bar2


@enduml

拆分大文件
有些情况下,会有一些很大的图片文件。
可以用 page (hpages)x(vpages) 这个命令把生成的图片文件拆分成若干个文件。
hpages 用来表示水平方向页面数, and vpages 用来表示垂直方面页面数。
你也可以使用特定的皮肤设定来给分页添加边框(见例子)
@startuml
' Split into 4 pages
page 2x2
skinparam pageMargin 10
skinparam pageExternalColor gray
skinparam pageBorderColor black

class BaseClass

namespace net.dummy #DDDDDD {
	.BaseClass <|-- Person
	Meeting o-- Person

	.BaseClass <|- Meeting

}

namespace net.foo {
  net.dummy.Person  <|- Person
  .BaseClass <|-- Person

  net.dummy.Meeting o-- Person
}

BaseClass <|-- net.unused.Person
@enduml

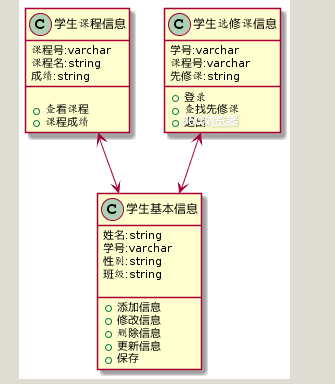
二、以“学生”类为例,分析属性和方法
属性:
学生基本信息:学号,姓名,性别 , 班级 ,
学生课程信息:课程号 , 课程名 , 成绩 ,
学生选修课信息:学号,课程号,先修课。
@startuml
class 学生基本信息 {
姓名:string
学号:varchar
性别:string
班级:string
__
+添加信息
+修改信息
+删除信息
+更新信息
+保存
}
class 学生课程信息{
课程号:varchar
课程名:string
成绩:string
__
+查看课程
+课程成绩
}
class 学生选修课信息 {
学号:varchar
课程号:varchar
先修课:string
__
+登录
+查找先修课
+退出
}
学生课程信息 <--> 学生基本信息
学生选修课信息 <--> 学生基本信息
@enduml