第一章 监控系统入门
一、监控系统概述
1.什么是监控?
服务器监控是实时掌握服务器工作状态,并在需要时可以随时调用监控记录进行查看。
网站监控是通过软件或者网站监控服务提供商对网站进行监控以及数据的获取从而达到网站的排错和数据的分析。

监控系统是整个运维环节,乃至整个产品生命周期中最重要的一环,事前及时预警发现故障,事后提供翔实的数据用于追查定位问题。
2.为什么要做监控?
#1.生活中:
1)超市监控:防内外偷

2)交通监控:测速,违章

#2.企业中:
1)系统的监控:实际上是对系统不间断的实时监控
2)实时反馈系统当前状态:我们监控某个硬件、或者某个系统,都是需要能实时看到当前系统的状态,是正常、异常、或者故障。
3)保证服务可靠性安全性:我们监控的目的就是要保证系统、服务、业务正常运行
4)保证业务持续稳定运行:如果我们的监控做得很完善,即使出现故障,能第一时间接收到故障报警,在第一时间处理解决,从而保证业务持续性的稳定运行。(往往,第一时间知道业务宕机的都是用户)
3.监控怎么来实现?
1.CACTI(网络监控)

2.NAGIOS(系统监控)

3.ZABBIX(分布式监控)

4.open-falcon(小米监控产品)

5.普罗米修斯(监控docker,K8S)

6.lepus天兔(数据库监控)
二、常用监控软件对比
其实,在 Prometheus 之前,市面已经出现了很多的监控系统,如 Zabbix、Open-Falcon、Nagios 等。那么 Prometheus 和这些监控系统有啥异同呢?我们先简单回顾一下这些监控系统。
1.zabbix
Zabbix 是一款企业级的分布式开源监控方案。它由 Alexei Vladishev 创建,由 Zabbix SIA 在持续开发和支持。Zabbix 能够监控网络参数,服务器健康和软件完整性。它提供通知机制,允许用户配置告警,从而快速反馈问题。基于存储的数据,Zabbix 提供报表和数据可视化,并且支持主动轮询和被动捕获。它的所有报告、统计信息和配置参数都可以通过 Web 页面访问。

Zabbix 核心组件主要是 Agent 和 Server。其中 Agent 主要负责采集数据并通过主动或者被动的方式将采集数据发送到 Server/Proxy。除此之外,为了扩展监控项,Agent 还支持执行自定义脚本。Server 主要负责接收 Agent 发送的监控信息,并进行汇总存储、触发告警等。

Zabbix Server 将收集的监控数据存储到 Zabbix Database 中。Zabbix Database 支持常用的关系型数据库,如MySQL、PostgreSQL、Oracle 等(默认是 MySQL),并提供 Zabbix Web 页面(PHP 编写)数据查询。由于使用了关系型数据存储时序数据,Zabbix在监控大规模集群时常常在数据存储方面捉襟见肘。所以从 4.2 版本后 Zabbix开始支持 TimescaleDB 时序数据库,不过目前成熟度还不高。

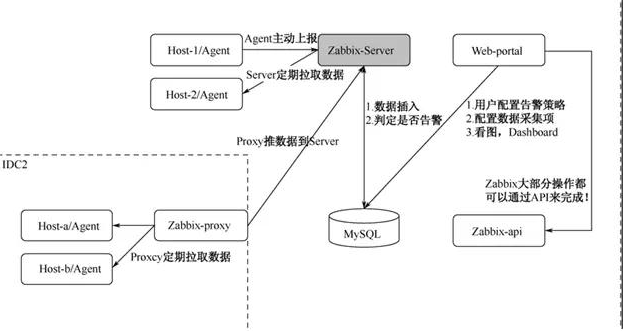
Zabbix 由 Server,Agent,Proxy(可选项)组成:
	Agent 负责收集数据,并且传输给 Server。
	Server 负责接受 Agent 的数据,进行保存或者告警。
	Proxy 负责代理 Server 收集 Agent 传输的数据,并且转发给 Server。Proxy 是安装在被监控的服务器上的,用来和 Server 端进行通信,从而传输数据。

Zabbix 的数据采集,主要有两种模式:Server 主动拉取数据和 Agent 主动上报数据。以 Server 拉取数据为例,用户在 Web-portal 中,设置需要监控的机器,配置监控项,告警策略。Zabbix-Server 会根据策略主动获取 Agent 的数据,然后存储到 MySQL 中。

同时根据用户配置的策略,判定是否需要告警。用户可以在 Web 端,以图表的形式,查看各种指标的历史趋势。
在 Zabbix 中,将 Server 主动拉取数据的方式称之为 Active Check。这种方式配置起来较为方便,但是会对 ZabbixServer 的性能存在影响。

所以在生产环境中,一般会选择主动推送数据到 Zabbix-Server 的方式,称之为 Trapper。即用户可以定时生成数据,再按照 Zabbix 定义的数据格式,批量发送给 Zabbix-Server,这样可以大大提高 Server的处理能力。

Proxy,作为可选项,起到收集 Agent 数据并且转发到 Server 的作用。当 Server 和 Agent 不在一个网络内,就需要使用 Proxy 做远程监控,特别是远程网络有防火墙的时候。同时它也可以分担 Server 的压力,降低 Server 处理连接数的开销。

随着云计算,弹性计算,容器器技术,SaaS等IT形态的出现,Zabbix已经无法覆盖这些监控,或者只能通过兼容的方式实现对其监控,如在一个主机上去监控这些对象,而这些对象则变成了主机的某个指标。
2.open-falcon
Open-Falcon 是小米开源的企业级监控工具,用 Go 语言开发而成。这是一款灵活、可扩展并且高性能的监控方案, 包括小米、滴滴、美团等在内的互联网公司都在使用它。它的主要组件包括:
1.Falcon-agent:
这是用 Go 语言开发的 Daemon 程序,运行在每台 Linux 服务器上,用于采集主机上的各种指标数 据,主要包括 CPU、内存、磁盘、文件系统、内核参数、Socket 连接等,目前已经支持 200 多项监控指标。并且, Agent 支持用户自定义的监控脚本。

2.Hearthbeat server:
简称 HBS 心跳服务。每个 Agent 都会周期性地通过 RPC 方式将自己的状态上报给 HBS,主 要包括主机名、主机 IP、Agent 版本和插件版本,Agent 还会从 HBS 获取自己需要执行的采集任务和自定义插件。

3.Transfer:
负责接收 Agent 发送的监控数据,并对数据进行整理,在过滤后通过一致性 Hash 算法发送到 Judge 或 者 Graph。

4.Graph:
这是基于 RRD 的数据上报、归档、存储组件。Graph 在收到数据以后,会以 rrdtool 的数据归档方式来存 储,同时提供 RPC 方式的监控查询接口。

5.Judge 告警模块:
Transfer 转发到 Judge 的数据会触发用户设定的告警规则,如果满足,则会触发邮件、微信或者 回调接口。这里为了避免重复告警引入了 Redis 暂存告警,从而完成告警的合并和抑制。

6.Dashboard:
这是面向用户的监控数据查询和告警配置界面。
3.nagios

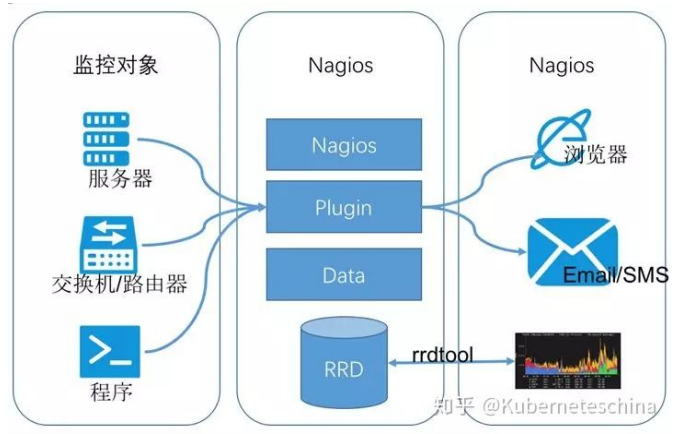
Nagios 原名为 NetSaint,由 Ethan Galstad 开发并维护。Nagios 是一个老牌监控工具,由 C 语言编写而成,主要针对主机监控(CPU、内存、磁盘等)和网络监控(SMTP、POP3、HTTP 和 NNTP 等),当然也支持用户自定义的监控脚本。

它还支持一种更加通用和安全的采集方式:NREP(Nagios Remote Plugin Executor)。它会先在远端启动一个NREP 守护进程,用于在远端主机上运行检测命令,在 Nagios 服务端用 check nrep 的 plugin 插件通过 SSL 对接到NREP 守护进程执行相应的监控行为。相比 SSH 远程执行命令的方式,这种方式更加安全。
4.Prometheus(普罗米修斯)
随着这几年云环境的发展,Prometheus 被广泛地认可。它的本质是时间序列数据库,而 Zabbix 采用 MySQL 进行数据存储。

从上面我们对时间序列数据库的分析来看,Prometheus 能够很好地支持大量数据的写入。它采用拉的模式(Pull)从应用中拉取数据,并通过 Alert 模块实现监控预警。据说单机可以消费百万级时间序列。

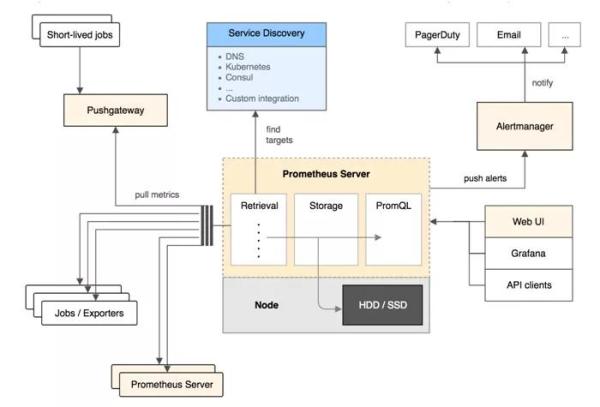
一起来看看 Prometheus 的几大组件:
1.Prometheus Server,用于收集和存储时间序列数据,负责监控数据的获取,存储以及查询。

2.监控目标配置,Prometheus Server 可以通过静态配置管理监控目标,也可以配合 Service Discovery(K8s,DNS,Consul)实现动态管理监控目标。

3.监控目标存储,Prometheus Server 本身就是一个时序数据库,将采集到的监控数据按照时间序列存储在本地磁盘中。

4.监控数据查询,Prometheus Server 对外提供了自定义的 PromQL 语言,实现对数据的查询以及分析。

5.Client Library,客户端库。为需要监控的服务生成相应的 Metrics 并暴露给 Prometheus Server。

6.当 Prometheus Server 来 Pull 时,直接返回实时状态的 Metrics。通常会和 Job 一起合作。

7.Push Gateway,主要用于短期的 Jobs。由于这类 Jobs 存在时间较短,可能在 Prometheus 来 Pull 之前就消失了。为此,这些 Jobs 可以直接向 Prometheus Server 端推送它们的 Metrics。

8.Exporters,第三方服务接口。将 Metrics(数据集合)发送给 Prometheus。

9.Exporter 将监控数据采集的端点,通过 HTTP 的形式暴露给 Prometheus Server,使其通过 Endpoint 端点获取监控数据。

10.Alertmanager,从 Prometheus Server 端接收到 Alerts 后,会对数据进行处理。例如:去重,分组,然后根据规则,发出报警。

11.Web UI,Prometheus Server 内置的 Express Browser UI,通过 PromQL 实现数据的查询以及可视化。

说完了 Prometheus 的组件,再来看看 Prometheus 的架构:
Prometheus Server 定期从 Jobs/Exporters 中拉 Metrics。同时也可以接收来自 Pushgateway 发过来的 Metrics。

Prometheus Server 将接受到的数据存储在本地时序数据库,并运行已定义好的 alert.rules(告警规则),一旦满足告警规则就会向 Alertmanager 推送警报

Alertmanager 根据配置文件,对接收到的警报进行处理,例如:发出邮件告警,或者借助第三方组件进行告警。

WebUI/Grafana/APIclients,可以借助 PromQL 对监控数据进行查询。
5.综合对比

综合对比如上面的表格,
从开发语言上看,为了应对高并发和快速迭代的需求,监控系统的开发语言已经慢慢从 C语言转移到 Go。不得不说,Go 凭借简洁的语法和优雅的并发,在 Java 占据业务开发、C 占领底层开发的情况下,准确定位中间件开发需求,在当前开源中间件产品中被广泛应用。

从系统成熟度上看,Zabbix 和 Nagios 都是老牌的监控系统:Nagios 是在 1999 年出现的,Zabbix 是在 1998 年出现的,系统功能比较稳定,成熟度较高。而 Prometheus 和 Open-Falcon 都是最近几年才诞生的,虽然功能还在不断迭代更新,但站在巨人的肩膀之上,在架构设计上借鉴了很多老牌监控系统的经验。

从系统扩展性方面看,Zabbix 和 Open-Falcon 都可以自定义各种监控脚本,并且 Zabbix 不仅可以做到主动推送,还可以做到被动拉取。Prometheus 则定义了一套监控数据规范,并通过各种 exporter 扩展系统采集能力。

从数据存储方面来看,Zabbix 采用关系数据库保存,这极大限制了 Zabbix 的采集性能;Nagios 和 Open-Falcon 都采用RDD 数据存储,Open-Falcon 还加入了一致性 hash 算法分片数据,并且可以对接到 OpenTSDB;而Prometheus 则自研了一套高性能的时序数据库,在 V3 版本可以达到每秒千万级别的数据存储,通过对接第三方时序数据库扩展历史数据的存储。

从配置复杂度上看,Prometheus 只有一个核心 server 组件,一条命令便可以启动。相比而言,其他系统配置相对麻烦,尤其是 Open-Falcon。从社区活跃度上看,目前 Zabbix 和 Nagios 的社区活跃度比较低,尤其是 Nagios;Open-Falcon 虽然也比较活跃,但基本都是国内公司在参与;Prometheus 在这方面占据绝对优势,社区活跃度最高,并且受到 CNCF 的支持,后
期的发展值得期待。

从容器支持角度看,由于 Zabbix 和 Nagios 出现得比较早,当时容器还没有诞生,它们对容器的支持自然比较差;Open-Falcon 虽然提供了容器的监控,但支持力度有限;Prometheus 的动态发现机制,不仅可以支持 Swarm 原生集群,还支持 Kubernetes 容器集群的监控,是目前容器监控最好解决方案;Zabbix 在传统监控系统中,尤其是在
服务器相关监控方面,占据绝对优势;而 Nagios 则在网络监控方面有广泛应用。伴随着容器的发展,Prometheus已开始成为主导及容器监控方面的标配,并且在未来可见的时间内将被广泛应用。
三、面试常见问题
你们公司监控是如何做的?

监控软件我们使用的是zabbix,我们监控在不同的维度
1.硬件层面
如果说到硬件,肯定要先说物理服务器用的什么型号?
物理服务器,选型,Dell R710 720 730 ...
IDRAC自带一个远程管理卡,安装上一个软件包之后,就可以监控,如果不使用dell的idrac那就使用zabbix的IPMI接口监控硬件

1)CPU温度,
2)风扇转速,
3)磁盘是否损坏,
4)CMOS电池电量
5)内存是否损坏
6) ...
2.系统层面
1)CPU:使用率、负载
2)内存:使用率
3)磁盘:使用率,IO
4)进程
5)TCP状态
6)系统负载
7) ...
3.网络层面
1)网络设备:路由器,交换机
2)网卡入口流量
3)网卡出口流量
4)带宽的峰值
5)...
使用zabbix的snmp方式监控
4.应用层面
当然了最基本的就是各个服务的进程,端口号
一些特殊程序我们还需要额外监控:

1)MySQL:主从复制是否有延迟(zabbix监控模板)
2)redis:主从复制是否有延迟
监控思路:zabbix没有固定模板,可以在主库中set一个key为时间戳,然后从库会同步这个时间戳(动态),写脚本时时获取这两个时间戳,做对比。
3)NFS:磁盘挂载状况
4)tomcat:JVM监控,老年代、新生代、永久带、full-gc、垃圾回收
5)rsync的同步情况,MD5校验文件是否被篡改
6)...
5.业务层面
1)URL的监控
2)API的监控
3)nginx的状态码
4)tomcat的exception
5)请求时间
6)响应时间
7)加载时间
8)渲染时间
9)...
四、单机监控命令了解
1.CPU监控命令
1) w
[root@jindada ~]$ w
 15:23:20 up 25 days, 23:52,  1 user,  load average: 0.00, 0.02, 0.05
USER     TTY      FROM             LOGIN@   IDLE   JCPU   PCPU WHAT
jh       pts/0    139.226.12.44    15:23    0.00s  0.04s  0.02s sshd: jh [priv]
2)top
[root@redis02 ~]# top
top - 12:31:10 up 1 day,  8:11,  1 user,  load average: 0.00, 0.01, 0.05
Tasks: 100 total,   1 running,  99 sleeping,   0 stopped,   0 zombie
%Cpu(s):  0.0 us,  0.3 sy,  0.0 ni, 99.7 id,  0.0 wa,  0.0 hi,  0.0 si,  0.0 st
KiB Mem :  2030148 total,  1457796 free,   190464 used,   381888 buff/cache
KiB Swap:  1048572 total,  1048572 free,        0 used.  1652944 avail Mem
3)htop
[root@redis02 ~]# htop
 CPU[|                                                                0.7%]   Tasks: 27, 38 thr; 1 running
4)glances
[root@redis02 ~]# glances
redis02 (CentOS Linux 7.5.1804 64bit / Linux 3.10.0-862.el7.x86_64)                                                                                                                                                       Uptime: 1 day, 8:12:51

CPU  [||                                                                         2.9%]   CPU       2.9%  nice:     0.0%                    MEM     13.1%  active:     310M                    SWAP      0.0%                    LOAD    1-core
MEM  [||||||||||                                                                13.1%]   user:     1.9%  irq:      0.0%                    total:  1.94G  inactive:   145M                    total:   1024M                    1 min:    0.14
SWAP [                                                                           0.0%]   system:   1.0%  iowait:   0.0%                    used:    260M  buffers:   2.03M                    used:        0                    5 min:    0.09
                                                                                         idle:    97.1%  steal:    0.0%                    free:   1.68G  cached:     319M                    free:    1024M                    15 min:   0.07
5)uptime
[root@jindada ~]$ uptime
 15:27:44 up 25 days, 23:56,  1 user,  load average: 0.00, 0.01, 0.05
不管用什么命令监控,查看CPU,我们都必须了解,系统的用户态和内和态。
%Cpu(s):  0.0 us,  0.0 sy,  0.0 ni,100.0 id,  0.0 wa,  0.0 hi,  0.0 si,  0.0 st

us: 用户态     跟用户的操作有关35%
sy: 内和态     跟内核的处理有关65%
id: CPU空闲
当我们执行一个命令的时候,很快能出来结果,但是有多少人知道,这个很快,他都占用了哪些时间呢?
[root@jindada ~]$ time ls
pass.txt  wordpress

real	0m0.002s	真实执行时间
user	0m0.001s	用户执行时间
sys	0m0.001s		系统执行时间
2.内存监控命令
1)free
[root@jindada ~]$ free -m
              total        used        free      shared  buff/cache   available
Mem:           1837         751         426           0         660         930
Swap:             0           0           0
[root@jindada ~]$ free -h
              total        used        free      shared  buff/cache   available
Mem:           1.8G        751M        426M        472K        660M        930M
Swap:            0B          0B          0B
2)top
[root@redis01 ~]# top

top - 15:33:23 up 26 days, 2 min,  1 user,  load average: 0.00, 0.01, 0.05
Tasks:  82 total,   1 running,  81 sleeping,   0 stopped,   0 zombie
%Cpu(s):  0.3 us,  0.3 sy,  0.0 ni, 99.3 id,  0.0 wa,  0.0 hi,  0.0 si,  0.0 st
KiB Mem :  1882016 total,   435980 free,   769832 used,   676204 buff/cache
KiB Swap:        0 total,        0 free,        0 used.   952508 avail Mem
3)glances
[root@redis01 ~]# yum -y install  glances
[root@redis01 ~]# glances

jindada                                                     Uptime: 26 days, 0:03:41

CPU  [  2.6%]   CPU       2.6%    MEM     50.2%    SWAP      0.0%    LOAD    1-core
MEM  [ 50.2%]   user:     1.6%    total:  1.79G    total:       0    1 min:    0.29
SWAP [  0.0%]   system:   1.0%    used:    923M    used:        0    5 min:    0.09
                idle:    96.1%    free:    915M    free:        0    15 min:   0.07
4)htop

5)如何查看单个进程占用内存?
#进程占用内存公式
pmem = VmRSS / MemTotal * 100
process mem = 虚拟内存 / 总内存 * 100
6)python脚本
[root@redis02 ~]# cat mem.py
#!/usr/bin/env python
# _*_ coding:UTF-8 _*_
# 收集程序所占用的物理内存大小,占所有物理内存的比例
# Python: 2.7.6

import sys
import os
from subprocess import Popen,PIPE

def get_pid(program):
    '获取目标程序的PID列表'
    p = Popen(['pidof',program],stdout=PIPE,stderr=PIPE)
    pids,stderrput = p.communicate()
#     pids = p.stdout.read()  #这种方法也是可以的
#     这里也可以对stderrput来进行判断
    if pids:
        return pids.split()
    else:
        raise ValueError

def mem_calc(pids):
    '计算PIDs占用的内存大小'
    mem_total = 0
    for pid in pids:
        os.chdir('/proc/%s' % pid)
        with open('status') as fd:
            for line in fd:
                if line.startswith('VmRSS'):
                    mem = line.strip().split()[1]
                    mem_total += int(mem)
                    break
    return mem_total


def mem_percent(mem):
    '计算程序内存占用物理内存的百分比'
    with open('/proc/meminfo') as fd:
        for line in fd:
            if line.startswith('MemTotal'):
                total = line.strip().split()[1]
        percent = (float(mem)/int(total)) * 100
    return percent


def main():
    try:
        program = sys.argv[1]
        pids = get_pid(program)
    except IndexError as e:
        sys.exit('%s need a Program name ' % __file__)
    except ValueError as e:
        sys.exit('%s not a Process Name or not Start' % program )
    mem_total = mem_calc(pids)
    percent = mem_percent(mem_total)
    return program,mem_total,percent

if __name__ == '__main__':
    program,mem_total,mem_percent=main()
    print('进程名称:%s\n物理内存为:%s\n百分比为:%.2f%%'% (program,mem_total,mem_percent))
3.磁盘监控命令
1)df
[root@redis01 ~]# df -h
Filesystem      Size  Used Avail Use% Mounted on
/dev/sda3        98G  2.2G   96G   3% /
devtmpfs        980M     0  980M   0% /dev
tmpfs           991M     0  991M   0% /dev/shm
tmpfs           991M   42M  949M   5% /run
tmpfs           991M     0  991M   0% /sys/fs/cgroup
/dev/sda1       497M  120M  378M  25% /boot
tmpfs           199M     0  199M   0% /run/user/0

[root@redis01 ~]# df -i
Filesystem       Inodes IUsed    IFree IUse% Mounted on
/dev/sda3      51123712 64711 51059001    1% /
devtmpfs         250786   373   250413    1% /dev
tmpfs            253511     1   253510    1% /dev/shm
tmpfs            253511   696   252815    1% /run
tmpfs            253511    16   253495    1% /sys/fs/cgroup
/dev/sda1        256000   326   255674    1% /boot
tmpfs            253511     1   253510    1% /run/user/0
2)iotop
[root@redis01 ~]# yum -y install  iotop
[root@redis01 ~]# iotop
Total DISK READ :	0.00 B/s | Total DISK WRITE :       0.00 B/s
Actual DISK READ:	0.00 B/s | Actual DISK WRITE:       0.00 B/s
   TID  PRIO  USER     DISK READ  DISK WRITE  SWAPIN     IO>    COMMAND
 56720 be/4 root        0.00 B/s    0.00 B/s  0.00 %  0.02 % [kworker/0:1]
     1 be/4 root        0.00 B/s    0.00 B/s  0.00 %  0.00 % systemd --s~erialize 22
     2 be/4 root        0.00 B/s    0.00 B/s  0.00 %  0.00 % [kthreadd]
3)iostat
#以兆为单位,每秒执行一次,执行10
[root@redis01 ~]# iostat -dm 1 10
Linux 3.10.0-957.el7.x86_64 (redis01) 	01/06/2021 	_x86_64_	(1 CPU)

Device:            tps    MB_read/s    MB_wrtn/s    MB_read    MB_wrtn
scd0              0.00         0.00         0.00          1          0
sda               0.23         0.00         0.00        236       1425
4)dstat
[root@redis01 ~]# yum -y install  dstat
[root@redis01 ~]# dstat -cdngy
----total-cpu-usage---- -dsk/total- -net/total- ---paging-- ---system--
usr sys idl wai hiq siq| read  writ| recv  send|  in   out | int   csw
  0   0 100   0   0   0| 819B 4916B|   0     0 |   0     0 |  93   155
  0   0 100   0   0   0|   0     0 | 317B  842B|   0     0 |  97   160
  0   1  99   0   0   0|   0     0 |  60B  362B|   0     0 | 101   159
  0   0 100   0   0   0|   0     0 |  60B  362B|   0     0 |  91   148
  0   1  99   0   0   0|   0     0 | 106B  422B|   0     0 | 111   161
  1   0  99   0   0   0|   0     0 |  60B  362B|   0     0 |  98   158
  0   0 100   0   0   0|   0     0 |  60B  362B|   0     0 | 102   158
  0   1  99   0   0   0|   0   611k|  60B  362B|   0     0 | 118   153
  0   0 100   0   0   0|   0     0 |  60B  362B|   0
5)glances
[root@redis01 ~]# yum -y install glances
[root@redis01 ~]# glances
redis01                                                     Uptime: 3 days, 12:30:15

CPU  [  6.0%]   CPU       6.0%    MEM     19.1%    SWAP      0.0%    LOAD    1-core
MEM  [ 19.1%]   user:     4.4%    total:  1.93G    total:   2.00G    1 min:    0.00
SWAP [  0.0%]   system:   2.2%    used:    379M    used:        0    5 min:    0.06
                idle:    93.1%    free:   1.56G    free:    2.00G    15 min:   0.06

NETWORK     Rx/s   Tx/s   TASKS  98 (121 thr), 4 run, 94 slp, 0 oth
eth0        144b    2Kb
eth1          0b     0b     CPU%  MEM%   PID USER        NI S Command
lo            0b     0b      6.2   0.8 56804 root         0 R /usr/bin/python /usr/b
                             0.0   0.1  6141 dbus         0 S /usr/bin/dbus-daemon -
DISK I/O     R/s    W/s      0.0   0.0     3 root         0 S ksoftirqd/0
sda            0      0      0.0   0.0 56719 root         0 S kworker/0:0
sda1           0      0      0.0   0.0    44 root       -20 S kaluad
sda2           0      0      0.0   0.0    33 root       -20 S crypto
sda3           0      0      0.0   0.0    18 root       -20 S bioset
sr0            0      0      0.0   0.0    13 root         0 S kdevtmpfs
4.网络监控命令
1)glances
[root@redis01 ~]# yum -y install glances
[root@redis01 ~]# glances
redis01                                                     Uptime: 3 days, 12:30:15

CPU  [  6.0%]   CPU       6.0%    MEM     19.1%    SWAP      0.0%    LOAD    1-core
MEM  [ 19.1%]   user:     4.4%    total:  1.93G    total:   2.00G    1 min:    0.00
SWAP [  0.0%]   system:   2.2%    used:    379M    used:        0    5 min:    0.06
                idle:    93.1%    free:   1.56G    free:    2.00G    15 min:   0.06

NETWORK     Rx/s   Tx/s   TASKS  98 (121 thr), 4 run, 94 slp, 0 oth
eth0        144b    2Kb
eth1          0b     0b     CPU%  MEM%   PID USER        NI S Command
lo            0b     0b      6.2   0.8 56804 root         0 R /usr/bin/python /usr/b
                             0.0   0.1  6141 dbus         0 S /usr/bin/dbus-daemon -
2)iftop
[root@redis01 ~]# yum -y install  iftop
[root@redis01 ~]# iftop
interface: eth0
IP address is: 10.0.0.81
MAC address is: 00:0c:29:6a:9c:2c
                12.5Kb           25.0Kb           37.5Kb           50.0Kb     62.5Kb
└───────────────┴────────────────┴────────────────┴────────────────┴────────────────
redis01:ssh                  => 10.0.0.1:55825               1.17Kb  1.36Kb  1.64Kb
                             <=                               184b    221b    245b
redis01:ntp                  => 120.25.115.20:ntp               0b      0b     68b
                             <=                                 0b      0b     68b
redis01:43772                => public1.alidns.com:domain       0b      0b     27b
                             <=                                 0b      0b     47b
redis01:33360                => public1.alidns.com:domain	0b	0b     15b
                             <=                                 0b	0b     32b
redis01:41541                => public1.alidns.com:domain	0b	0b     15b
                             <=                                 0b	0b     32b
redis01:40310                => public1.alidns.com:domain	0b	0b     15b
                             <=                                 0b	0b     22b
redis01:39559                => public1.alidns.com:domain	0b	0b     16b
                             <=                                 0b	0b     16b

────────────────────────────────────────────────────────────────────────────────────
TX:             cum:   8.07KB   peak:	3.84Kb      rates:   1.17Kb  1.36Kb  1.79Kb
RX:                    2.03KB           1.70Kb                184b    221b    462b
TOTAL:                 10.1KB           4.20Kb               1.35Kb  1.57Kb  2.2

按P键可以看到与什么服务在交互
#Mb 与 MB的区别
#百兆带宽:100Mb
#实际:100Mbps / 8 = 12MB
3)nethogs
#该命令可以查看某个进程所使用的流量
[root@redis01 ~]# yum -y install  nethogs
[root@redis01 ~]# nethogs
Ethernet link detected
                      Ethernet link detected
                                            Waiting for first packet to arrive (see sourceforge.net bug 1019381)
NetHogs version 0.8.5

    PID USER     PROGRAM                        DEV        SENT      RECEIVED
  56634 root     sshd: root@pts/0               eth0        0.147	0.059 KB/sec
      ? root     unknown TCP                                0.000	0.000 KB/sec
4)ifconfig
[root@redis01 ~]# ifconfig
eth0: flags=4163<UP,BROADCAST,RUNNING,MULTICAST>  mtu 1500
        inet 10.0.0.81  netmask 255.255.255.0  broadcast 10.0.0.255
        inet6 fe80::20c:29ff:fe6a:9c2c  prefixlen 64  scopeid 0x20<link>
        ether 00:0c:29:6a:9c:2c  txqueuelen 1000  (Ethernet)
        RX packets 161066  bytes 181148804 (172.7 MiB)
        RX errors 0  dropped 0  overruns 0  frame 0
        TX packets 67296  bytes 5449229 (5.1 MiB)
        TX errors 0  dropped 0 overruns 0  carrier 0  collisions 0

eth1: flags=4163<UP,BROADCAST,RUNNING,MULTICAST>  mtu 1500
        inet 172.16.1.81  netmask 255.255.255.0  broadcast 172.16.1.255
        inet6 fe80::20c:29ff:fe6a:9c36  prefixlen 64  scopeid 0x20<link>
        ether 00:0c:29:6a:9c:36  txqueuelen 1000  (Ethernet)
        RX packets 0  bytes 0 (0.0 B)
        RX errors 0  dropped 0  overruns 0  frame 0
        TX packets 28  bytes 2032 (1.9 KiB)
        TX errors 0  dropped 0 overruns 0  carrier 0  collisions 0

lo: flags=73<UP,LOOPBACK,RUNNING>  mtu 65536
        inet 127.0.0.1  netmask 255.0.0.0
        inet6 ::1  prefixlen 128  scopeid 0x10<host>
        loop  txqueuelen 1000  (Local Loopback)
        RX packets 113  bytes 61984 (60.5 KiB)
        RX errors 0  dropped 0  overruns 0  frame 0
        TX packets 113  bytes 61984 (60.5 KiB)
        TX errors 0  dropped 0 overruns 0  carrier 0  collisions 0
5)route
[root@redis01 ~]# route
Kernel IP routing table
Destination     Gateway         Genmask         Flags Metric Ref    Use Iface
default         gateway         0.0.0.0         UG    0      0        0 eth0
10.0.0.0        0.0.0.0         255.255.255.0   U     0      0        0 eth0
link-local      0.0.0.0         255.255.0.0     U     1002   0        0 eth0
link-local      0.0.0.0         255.255.0.0     U     1003   0        0 eth1
172.16.1.0      0.0.0.0         255.255.255.0   U     0      0        0 eth1
5.TCP11种状态监控命令
1)netstat
[root@driver-zeng ~]# netstat -an
Active Internet connections (servers and established)
Proto Recv-Q Send-Q Local Address           Foreign Address         State
tcp        0      0 0.0.0.0:443             0.0.0.0:*               LISTEN
tcp        0      0 0.0.0.0:873             0.0.0.0:*               LISTEN
tcp        0      0 127.0.0.1:3306          0.0.0.0:*               LISTEN
tcp        0      0 0.0.0.0:80              0.0.0.0:*               LISTEN
tcp        0      0 0.0.0.0:52022           0.0.0.0:*               LISTEN
tcp        0      0 172.24.156.150:59936    100.100.30.25:80        ESTABLISHED
tcp        0      0 172.24.156.150:52022    139.226.172.217:54116   ESTABLISHED
tcp6       0      0 :::873                  :::*                    LISTEN
udp        0      0 172.17.0.1:123          0.0.0.0:*
udp        0      0 172.18.0.1:123          0.0.0.0:*
udp        0      0 172.24.156.150:123      0.0.0.0:*
udp        0      0 127.0.0.1:123           0.0.0.0:*
udp        0      0 0.0.0.0:123             0.0.0.0:*
udp6       0      0 :::123                  :::*

[root@driver-zeng ~]# netstat -an|awk '/^tcp/ {print $NF}'|sort|uniq -c
      4 ESTABLISHED
      6 LISTEN

[root@driver-zeng ~]# netstat -an|awk '/^tcp/ {++state[$NF]} END {for(key in state) print key," \t" ,state[key]}'
LISTEN       6
ESTABLISHED      4
2)ss
[root@driver-zeng ~]# ss -n|awk '{print $2}'|sort|uniq -c
     42 ESTAB
      1 State
五、生产场景需求
1.需求
如何每1分钟监控当前系统的内存使用状态,如果可用低于100MB则发送邮件。同时打印当前还剩余多少内存
2.思路
1.如何获取内存的状态信息 free -m
2.如何获取内存的可用状态 free -m|awk '/Mem/{print $NF}'
3.如何进行数字的比对,高于100MB不处理,低于100MB,发送邮件。
4.如何每分钟执行
3.编写shell脚本
[root@redis01 ~]# vim free.sh
#!/bin/bash

while true;do
  free_av=$(free -m|awk '/^Mem/{print $NF}')
  Hostname=$(hostname)_$(hostname -I|awk '{print $2}')
  Date=$(date +%F-%H:%M)

  if [ $free_av -gt 100 ];then
    echo "$Date: ${Hostname},内存高于100MB,还有${free_av}MB内存可用"
  else
    echo "$Date: ${Hostname},内存低于100MB,还有${free_av}MB内存可用" | mail -s "Space use warning"  974089352@qq.com
  fi
      sleep 2
done


[root@redis01 ~]# sh free.sh
2021-01-06-16:15: redis01_172.16.1.81,内存高于100MB,还有1600MB内存可用
2021-01-06-16:15: redis01_172.16.1.81,内存高于100MB,还有1600MB内存可用
2021-01-06-16:15: redis01_172.16.1.81,内存高于100MB,还有1600MB内存可用
2021-01-06-16:15: redis01_172.16.1.81,内存高于100MB,还有1600MB内存可用
2021-01-06-16:15: redis01_172.16.1.81,内存高于100MB,还有1600MB内存可用
六、系统的oom
随着时间的推移,用户不断增多,服务消耗的内存越来越多,当系统内存不足的时候,可能会导致系统产生oom(out of memory)
1.思路
1.当系统内存不足时就会大量使用swap(虚拟内存)
2.当系统大量使用swap的时候,系统会特别卡
注意:有时可能内存还有剩余300M或者500M,但是swap依然被使用
2.解决方法
[root@redis02 ~]# dd < /dev/zero > /dev/null bs=2000M

[root@redis02 ~]# tail -f /var/log/messages
Out of memory: Kill process 29957 (dd) score 366 or sacrifice child
Killed process 29957 (dd) total-vm:2532680kB, anon-rss:1416508kB, filers:0kB

#清除所有缓存
[root@redis02 ~]# sync; echo 3 > /proc/sys/vm/drop_caches
七、使用脚本监控nginx
前面的课程中,我们学习了使用脚本+定时任务的方法自动备份并将检查结果,发到指定邮箱,那么这里,我也可以使用脚本+定时任务的方法,进行监控,并使用邮件报警

#!/bin/bash
nginx_process=`ps -ef|grep -c [n]ginx`
if [ $nginx_process -lt 2 ];then
    echo "目前nginx进程数是:$nginx_process"|mail -s "完犊子nginx挂了" 133411023@qq.com
fi


