一、SSH远程服务概述
SSH是一个安全协议,在进行数据传输时,会对数据包进行加密处理,加密后在进行数据传输。确保了数据传输安全。那SSH服务主要功能有哪些呢?
1)提供远程连接的服务
linux远程连接: ssh  telnet
windows的远程连接:  RDP (remote desktop)、向日葵、teamviewer

2)对传输数据进行加密
二、SSH和Telnet
1.使用telnet连接服务器
#安装telnet服务
[root@NFS ~]# yum install -y telnet-server

#启动
[root@NFS ~]# systemctl start telnet.socket

#telnet只支持普通用户登录,创建用户
[root@NFS ~]# useradd lhd
[root@NFS ~]# echo 123 | passwd --stdin lhd
Changing password for user lhd.
passwd: all authentication tokens updated successfully.

#连接测试
[c:\~]$ telnet 10.0.0.31 23
Connecting to 10.0.0.31:23...
Connection established.
To escape to local shell, press 'Ctrl+Alt+]'.

Kernel 3.10.0-957.el7.x86_64 on an x86_64
NFS login: lhd
Password: 123
[lhd@NFS ~]$ su -

#筛选去重命令
[root@NFS ~]# echo "vviimm  //eettcc//ssyyssccoonnffiigg//nneettwwoorrkk--ssccrriippttss//iiffccffgg--eetthh00" | sed -nr 's#(.)(.)#\1#gp'
vim /etc/sysconfig/network-scripts/ifcfg-eth0
2.ssh和telnet两者区别
1)telnet:
不能使用root用户登录,只能使用普通用户
数据包没有进行加密,传输都是明文的

2)ssh:
可以使用任意用户登录
数据传输都是加密的
三、ssh相关命令
1.ssh客户端和服务端
SSH有客户端与服务端,我们将这种模式称为C/S架构,ssh客户端支持Windows、Linux、Mac等平台。
在ssh客户端中包含 ssh|slogin远程登陆、scp远程拷贝、sftp文件传输、ssh-copy-id秘钥分发等应用程序。
2.ssh命令
[root@web01 ~]# ssh root@172.16.1.31 -p 22

#命令拆分
ssh 			#命令
root			#系统用户(如果不写,就使用当前服务器的当前用户)
@				#分隔符
172.16.1.31		 #远程主机的IP
-p 				#指定端口(终端不支持)
22				#端口(默认22)

-o StrictHostKeyChecking=no		#首次访问时不验证身份
3.xshell连接不上虚拟机怎么办?
#1.查网络
ping ip
tcping ip port

#2.查端口
telnet
tcping ip port

#3.检查网卡是否启动
ip a

#4.虚拟网络编辑器
查看子网IP和网关

#5.查看windows虚拟网卡
vmnat8

#6.防火墙
四、SSH验证方式
1.方式一:基于用户名密码远程连接
#1.需要知道服务器的IP,端口,系统用户,用户密码才能链接远程主机
[root@NFS ~]# ssh root@172.16.1.7 -p 2222
root@172.16.1.7's password:
Last login: Tue Aug 18 00:44:33 2020 from 10.0.0.1
[root@web01 ~]#

#2.设置密码
1)复杂的密码(容易忘记)
2)简单的密码(容易被破解)
3)每台机器密码都不一样
4)密码是动态的
5)密码三个月一变
6)密码错误三次,锁定用户
7)密码肯定是没有规律的
2.方式二:基于密钥的远程连接
默认情况下,通过ssh客户端命令登陆远程服务器,需要提供远程系统上的帐号与密码,但为了降低密码泄露的机率和提高登陆的方便性,建议使用密钥验证方式。

1)生成密钥对
[root@web01 ~]# ssh-keygen
Generating public/private rsa key pair.
Enter file in which to save the key (/root/.ssh/id_rsa):
Enter passphrase (empty for no passphrase):
Enter same passphrase again:
Your identification has been saved in /root/.ssh/id_rsa.
Your public key has been saved in /root/.ssh/id_rsa.pub.
The key fingerprint is:
SHA256:n618dqJXK1Z1mvHcv31VadZTBwni3gXEghWSp9+HTj4 root@web01
The key's randomart image is:
+---[RSA 2048]----+
|        .++++..o |
|        ooo.... o|
|         o..  . =|
|        .. . ..==|
|        S.....oB=|
|         ..o+ * =|
|          o+.+ .o|
|         . .E o +|
|          +* = .+|
+----[SHA256]-----+

2)将公钥发送至免密登录的服务器
#方式一:手动复制

[root@web01 ~]# cat .ssh/id_rsa.pub 		#查看公钥
ssh-rsa AAAAB3NzaC1yc2EAAAADAQABAAABAQDbOLFAuHJy6xtGOBFIWALpyWNyR3ixgULtv9uVMELre1iVv6S/fBT3YqKR6naX1y1oyhWBD6njMhXDANuG9OQ/ABTHrgOJrF5JMY1AS9jI5DrMaIdfoBXcmck6RuID5yddlLiA6VdeHI8ndtth7bu6Ed50otviNbzF7NG7chX9oGbju6uGMY12pb0BKCtJaJ9qycGJOZCi8OyrIycJBexsiC+DYOwvXjmtdRtf7KNBnHSDDEIsywQNku1/WXUE0l4CMoZ/zjgO19fdxfdbCT4qAWTz0r9CDUzhEFIVZgz73KLahy+IXIhNupHXf0VcrS3h11rWDUrOeIw2oIZHEPz3 root@web01

#将公钥写到要连接的机器
[root@NFS ~]# vim .ssh/authorized_keys
ssh-rsa AAAAB3NzaC1yc2EAAAADAQABAAABAQDbOLFAuHJy6xtGOBFIWALpyWNyR3ixgULtv9uVMELre1iVv6S/fBT3YqKR6naX1y1oyhWBD6njMhXDANuG9OQ/ABTHrgOJrF5JMY1AS9jI5DrMaIdfoBXcmck6RuID5yddlLiA6VdeHI8ndtth7bu6Ed50otviNbzF7NG7chX9oGbju6uGMY12pb0BKCtJaJ9qycGJOZCi8OyrIycJBexsiC+DYOwvXjmtdRtf7KNBnHSDDEIsywQNku1/WXUE0l4CMoZ/zjgO19fdxfdbCT4qAWTz0r9CDUzhEFIVZgz73KLahy+IXIhNupHXf0VcrS3h11rWDUrOeIw2oIZHEPz3 root@web01

#授权
[root@NFS ~]# chmod 600 .ssh/authorized_keys

#连接测试
[root@web01 ~]# ssh 172.16.1.31
Last failed login: Tue Aug 18 00:51:38 CST 2020 from 10.0.0.1 on ssh:notty
There was 1 failed login attempt since the last successful login.
Last login: Mon Aug 17 23:39:28 2020 from 172.16.1.7

#方式二:命令推送公钥
[root@web01 ~]# ssh-copy-id -i .ssh/id_rsa.pub root@172.16.1.41			#命令推送公钥
/usr/bin/ssh-copy-id: INFO: Source of key(s) to be installed: ".ssh/id_rsa.pub"
The authenticity of host '172.16.1.41 (172.16.1.41)' can't be established.
ECDSA key fingerprint is SHA256:mOtCaBS+53EDW9mKoXVj4v5Q1E1fYB0DexMHr/WzTc4.
ECDSA key fingerprint is MD5:75:12:f6:05:4c:5d:66:6f:21:0d:8e:0f:fc:bb:36:d6.
Are you sure you want to continue connecting (yes/no)? yes
/usr/bin/ssh-copy-id: INFO: attempting to log in with the new key(s), to filter out any that are already installed
/usr/bin/ssh-copy-id: INFO: 1 key(s) remain to be installed -- if you are prompted now it is to install the new keys
root@172.16.1.41's password:

Number of key(s) added: 1

Now try logging into the machine, with:   "ssh 'root@172.16.1.41'"
and check to make sure that only the key(s) you wanted were added.

#连接测试
[root@web01 ~]# ssh 172.16.1.41
Last login: Mon Aug 17 23:32:44 2020 from 10.0.0.1
五、SSH免密登录案例一
1.需求
1.恢复快照
2.m01连接web01,backup,NFS做免密登录
3.连接的用户是名字的缩写
2.环境准备
| 主机 |
角色 |
IP |
| m01 |
免密登录 |
10.0.0.61 |
| backup |
备份服务器 |
10.0.0.41 |
| NFS |
NFS服务器 |
10.0.0.31 |
| web01 |
web服务器 |
10.0.0.7 |
3.创建统一用户
[root@m01 ~]# useradd jh
[root@m01 ~]# passwd  jh
Changing password for user jh.
New password:
BAD PASSWORD: The password is a palindrome
Retype new password:
passwd: all authentication tokens updated successfully.

[root@web01 ~]# useradd jh
[root@文web01 ~]# passwd  jh
Changing password for user jh.
New password:
BAD PASSWORD: The password is a palindrome
Retype new password:
passwd: all authentication tokens updated successfully.

[root@NFS ~]# useradd jh
[root@NFS ~]# passwd  jh
Changing password for user jh.
New password:
BAD PASSWORD: The password is a palindrome
Retype new password:
passwd: all authentication tokens updated successfully.

[root@backup ~]# useradd jh
[root@backup ~]# passwd  jh
Changing password for user jh.
New password:
BAD PASSWORD: The password is a palindrome
Retype new password:
passwd: all authentication tokens updated successfully.
4.m01配置backup免密登录
1.切换用户
[root@m01 ~]# su - jh

2.生成验证树
[jh@m01 ~]$ ssh-keygen
Generating public/private rsa key pair.
Enter file in which to save the key (/home/jh/.ssh/id_rsa):
Enter passphrase (empty for no passphrase):
Enter same passphrase again:
Your identification has been saved in /home/jh/.ssh/id_rsa.
Your public key has been saved in /home/jh/.ssh/id_rsa.pub.
The key fingerprint is:
SHA256:Km6/mnGgGEZs5tc1sU9Qf6mzTyMZo5LCPRduDgEQIXw jh@m01
The key's randomart image is:
+---[RSA 2048]----+
|.. +o  o..       |
|...E.   + .   .  |
| =.  . + . . o   |
|=   . o +   o    |
|.o ... .So =     |
|.o......+ o *    |
|. . ooo* = + o   |
|   ..=. B   + .  |
|   .+oo. .   .   |
+----[SHA256]-----+

3.命令推送密钥
[jh@m01 ~]$ ssh-copy-id  -i .ssh/id_rsa.pub  jh@10.0.0.41
/bin/ssh-copy-id: INFO: Source of key(s) to be installed: ".ssh/id_rsa.pub"
/bin/ssh-copy-id: INFO: attempting to log in with the new key(s), to filter out any that are already installed
/bin/ssh-copy-id: INFO: 1 key(s) remain to be installed -- if you are prompted now it is to install the new keys
jh@10.0.0.41's password:

Number of key(s) added: 1

Now try logging into the machine, with:   "ssh 'jh@10.0.0.41'"
and check to make sure that only the key(s) you wanted were added.
5.m01配置NFS免密登录
1.命令推送密钥
[jh@m01 ~]$ ssh-copy-id  -i .ssh/id_rsa.pub  jh@10.0.0.31
/bin/ssh-copy-id: INFO: Source of key(s) to be installed: ".ssh/id_rsa.pub"
The authenticity of host '10.0.0.31 (10.0.0.31)' can't be established.
ECDSA key fingerprint is SHA256:g6buQ4QMSFl+5MMAh8dTCmLtkIfdT8sgRFYc6uCzV3c.
ECDSA key fingerprint is MD5:5f:d7:ad:07:e8:fe:d2:49:ec:79:2f:d4:91:59:c5:03.
Are you sure you want to continue connecting (yes/no)? yes
/bin/ssh-copy-id: INFO: attempting to log in with the new key(s), to filter out any that are already installed
/bin/ssh-copy-id: INFO: 1 key(s) remain to be installed -- if you are prompted now it is to install the new keys
jh@10.0.0.31's password:

Number of key(s) added: 1

Now try logging into the machine, with:   "ssh 'jh@10.0.0.31'"
and check to make sure that only the key(s) you wanted were added.
6.m01配置web01免密登录
1.命令推送密钥
[jh@m01 ~]$ ssh-copy-id  -i .ssh/id_rsa.pub  jh@10.0.0.7
/bin/ssh-copy-id: INFO: Source of key(s) to be installed: ".ssh/id_rsa.pub"
The authenticity of host '10.0.0.7 (10.0.0.7)' can't be established.
ECDSA key fingerprint is SHA256:g6buQ4QMSFl+5MMAh8dTCmLtkIfdT8sgRFYc6uCzV3c.
ECDSA key fingerprint is MD5:5f:d7:ad:07:e8:fe:d2:49:ec:79:2f:d4:91:59:c5:03.
Are you sure you want to continue connecting (yes/no)? yes
/bin/ssh-copy-id: INFO: attempting to log in with the new key(s), to filter out any that are already installed
/bin/ssh-copy-id: INFO: 1 key(s) remain to be installed -- if you are prompted now it is to install the new keys
jh@10.0.0.7's password:

Number of key(s) added: 1

Now try logging into the machine, with:   "ssh 'jh@10.0.0.7'"
and check to make sure that only the key(s) you wanted were added.
7.测试
1.m01免密登录web01测试连接
[jh@m01 ~]$ ssh jh@10.0.0.7
Last login: Mon Aug 17 19:28:43 2020 from 10.0.0.61
[jh@web01 ~]$ logout
Connection to 10.0.0.7 closed.

2.m01免密登录NFS测试连接
[jh@m01 ~]$ ssh jh@10.0.0.31
Last login: Mon Aug 17 19:25:58 2020 from 10.0.0.61
[jh@NFS ~]$ logout
Connection to 10.0.0.31 closed.

3.m01免密登录backup测试连接
[jh@m01 ~]$ ssh jh@10.0.0.41
Last login: Mon Aug 17 19:24:11 2020 from 10.0.0.61
[jh@backup ~]$ logout
Connection to 10.0.0.41 closed.

4.退出登录
[jh@m01 ~]$
六、SSH免密登录案例二
1.方式一:手动输入密码

2.基于密钥的方式
#生成密钥对
[root@m01 ~]# ssh-keygen

#推送密钥对
1)手动方式
#管理端
[root@m01 ~]# cat .ssh/id_rsa.pub
#被管理端
[root@web01 ~]# vim .ssh/authorized_keys
[root@web01 ~]# chmod 700 .ssh/
[root@web01 ~]# chmod 600 .ssh/authorized_keys

2)命令方式:
#管理端
[root@m01 ~]# ssh-copy-id root@172.16.1.31
[root@m01 ~]# ssh-copy-id root@172.16.1.41

3)巡检脚本
#1.巡检脚本
[root@m01 ~]# vim xunjian.sh
#!/bin/bash
ip='
7
31
41
'
for i in `echo $ip`;do
     echo "###############172.16.1.$i##############"
     ssh root@172.16.1.$i "$1"
done

#2.巡检脚本
[root@m01 ~]# cat all.sh
#!/usr/bin/bash
[ $# -ne 1 ] && echo "请输入执行的命令" && exit 1

for i in 31 41
do
    echo "#########172.16.1.$i#####"
    ssh root@172.16.1.$i "$1"
done
七、SSH免密场景
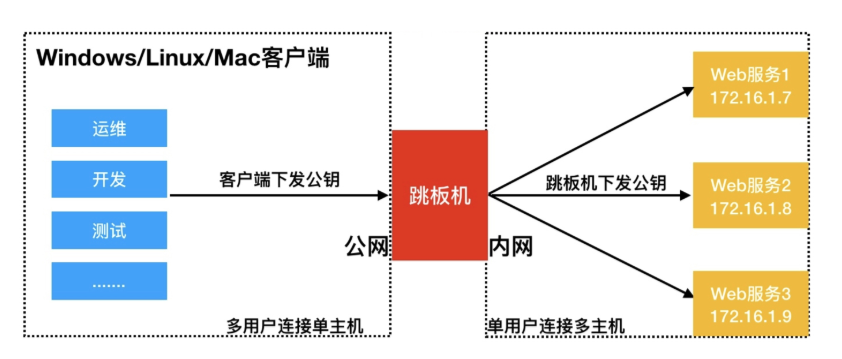
1.场景介绍
实践场景,用户通过Windows/MAC/Linux客户端连接跳板机免密码登录,跳板机连接后端无外网的Linux主机实现免密登录,架构图如下。
实践多用户登陆一台服务器无密码
实践单用户登陆多台服务器免密码
2.windows使用xshell免密登陆服务器
1.xshell --> 工具 --> 新建用户密钥生成向导
2.下一步 --> 生成公钥对
3.下一步 --> 密钥信息(给密钥起名字,加密码)
4.xshell --> 工具 --> 查看密钥用户管理者
5.密钥属性 --> 公钥
6.将公钥复制到服务器的.ssh目录下的authorized_keys文件
7.授权文件
3.跳板机脚本
#!/bin/bash
#jumpserver
lb01=10.0.0.5
lb02=10.0.0.6
web01=10.0.0.7
web02=10.0.0.8
web03=10.0.0.9
nfs=10.0.0.31
backup=10.0.0.41
db01=10.0.0.51
m01=10.0.0.61
zabbix=10.0.0.71

menu(){
        cat <<-EOF
        +-------------------------+
        |     1) lb01             |
        |     2) lb02             |
        |     3) web01            |
        |     4) web02            |
        |     5) web03            |
        |     6) nfs              |
        |     7) backup           |
        |     8) db01             |
        |     9) m01              |
        |     10) zabbix          |
        |     h) help             |
        +-------------------------+
EOF
}
#菜单函数
menu

#连接函数
connect(){
  ping -c 1 -w 1 $1 &>/dev/null
  if [ $? -eq 0 ];then
    ssh root@$1
  else
    echo -e "\033[5;4;40;31m 别连了,我的哥,$2:$1机器都没开!!!\033[0m"
  fi
}

#控制不让输入ctrl+c,z
trap "" HUP INT TSTP
while true
do
    read -p "请输入要连接的主机编号:" num
    case $num in
            1|lb01)
              connect $lb01 lb01
                    ;;
            2|lb02)
              connect $lb02 lb02
                    ;;
            3|web01)
              connect $web01 web01
                    ;;
            4|web02)
              connect $web02 web02
                    ;;
            5|web03)
                  connect $web03 web03
                    ;;
            6|nfs)
              connect $nfs nfs
                    ;;
            7|backup)
                  connect $backup backup
                    ;;
            8|db01)
                   connect $db01 db01
                    ;;
            9|m01)
                    connect $m01 m01
                    ;;
            10|zabbix)
                    connect $zabbix zabbix
                    ;;
            h|help)
                    clear
                    menu
                    ;;
            close)
                    break
                    ;;
    esac
done
八、免交互expect
1.安装expect
[root@m01 ~]# yum install -y expect

2.编写脚本
[root@m01 ~]# vim xunjian.exp
#!/usr/bin/expect
set ip 10.0.0.31
set pass 1
set timeout 30
spawn ssh root@$ip
expect {
        "(yes/no)" {send "yes\r"; exp_continue}
        "password:" {send "$pass\r"}
}
expect "root@*"  {send "df -h\r"}
expect "root@*"  {send "exit\r"}
expect eof
九、免交互sshpass[扩展]
1.安装
[root@m01 ~]# yum install -y sshpass

2.命令参数
[root@m01 ~]# sshpass -p 1 ssh root@10.0.0.31
[option]
-p:指定密码
-f:从文件中取密码
-e:从环境变量中取密码
-P:设置密码提示

#当连接不上时,可能是因为没有主机信息文件,则加入ssh免交互参数
[root@m01 ~]# sshpass -p 1 ssh -o StrictHostKeyChecking=no root@10.0.0.31
十、ssh安全优化
1.优化内容
SSH作为远程连接服务,通常我们需要考虑到该服务的安全,所以需要对该服务进行安全方面的配置。
1.更改远程连接登陆的端口
2.禁止ROOT管理员直接登录
3.密码认证方式改为密钥认证
4.重要服务不使用公网IP地址
5.使用防火墙限制来源IP地址
2.配置
[root@m01 ~]# vim /etc/ssh/sshd_config
#修改ssh端口
Port 2222
#禁止使用root登录服务器
PermitRootLogin no
#禁止使用密码登录服务器
PasswordAuthentication no
# 禁止ssh进行dns反向解析,影响ssh连接效率参数
UseDNS                  no
# 禁止GSS认证,减少连接时产生的延迟
GSSAPIAuthentication    no
