python实现决策树算法
最近看完了《机器学习实战》和天池直播课堂中的决策树算法,觉得意犹未尽,特别是信息熵部分理解并不透彻,于是又把西瓜书中的决策树看了,略有感悟,希望与大家分享一下,下面我按照自己的理解,尽量用通俗的语言总结记录下决策树算法。
1.决策树介绍
举个通俗的栗子来解释一下什么是决策树,想象一个女孩的母亲要给这个女孩介绍男朋友:
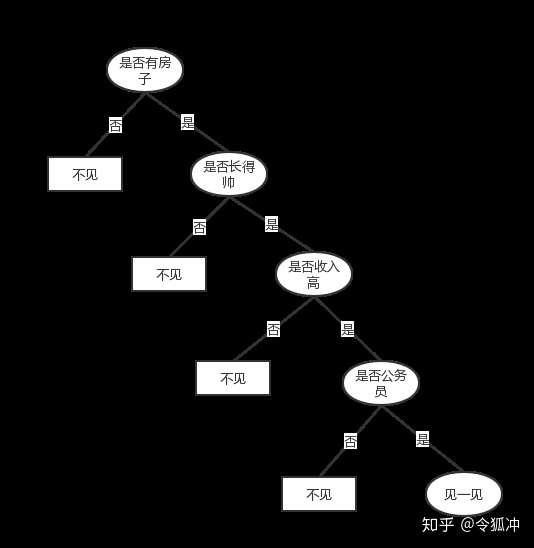
女儿:有没有房子?母亲:有。
女儿:长的帅不帅?母亲:挺帅的。
女儿:收入高不? 母亲:不算很高,中等情况。
女儿:是公务员不?母亲:是,在税务局上班呢。
女儿:那好,我去见见。
这个女孩的决策过程就是典型的分类树决策。相当于通过是否有房、长相、收入和是否公务员对将男人分为两个类别:见和不见。下面我们通过流程图把女儿的决策树判断过程展现出来:

通过这个例子,大家已经对决策树算法有个基本了解了吧,这也是决策树算法的一大优势——数据形式非常容易理解。
2.用python构造决策树基本流程
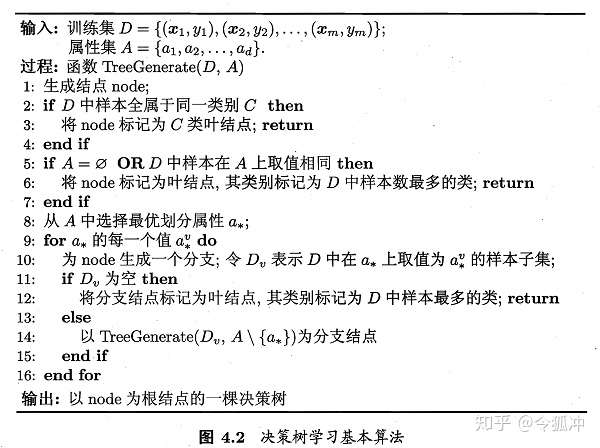
下图是西瓜书中的决策树学习基本算法,接下来我们将根据这个算法流程用python代码自己写一棵决策树。

在构造决策树时,要解决的第一个问题就是,当前数据集哪个特征在划分数据分类时起决定性作用。在前面相亲的例子中,女孩为何第一个问题是“是否有房子”呢,因为是否有房子这个特征能够提供的“信息量”很大,划分选择就是找提供“信息量”最大的特征,学术上叫信息增益。
3.划分选择(按照信息增益)
什么是信息增益呢,官方介绍请参考西瓜书哈,个人认为就是一个信息提纯的过程,比如一堆黄豆和一堆红豆混在一起,这时候信息的纯度是很低的,如果我们把红豆挑出来了分成两堆,那这时候纯度就高了。这就是一个信息增益的过程,衡量信息纯度的标准,就是信息熵。
信息熵是度量样本集合纯度最常用的一种指标,我的个人理解是对一个事件进行编码,所需要的平均码长就是信息熵,纯度越高,需要的平均代码就越短,信息熵越低。
当前样本集合D中第k类样本所占的比例为pk(k=1,2,...,n),则D的信息熵定义为
Ent(D)的值越小,则D的纯度越高。
3.1计算信息熵Ent
import pandas as pd
import numpy as np
from matplotlib import pyplot as plt
%matplotlib inline

#计算给定数据集的香浓熵
from math import log

def Ent(dataset):
    n = len(dataset)
    label_counts = {}
    for item in dataset:
        label_current = item[-1]
        if label_current not in label_counts.keys():
            label_counts[label_current] = 0
        label_counts[label_current] += 1
    ent = 0.0
    for key in label_counts:
        prob = label_counts[key]/n
        ent -= prob * log(prob,2)
    return ent

#测试我们编写的香浓熵计算函数
data = pd.read_csv('datalab/2891/xigua.csv', encoding='gbk')
Ent(data.iloc[:,-1])
[out]0.9975025463691153
3.2计算信息增益Gain
假定离散属性a有V个可能取值,则会产生V个分支节点,考虑样本数的不同赋予权重|D^v|/|D|,则可以计算出属性a对样本集D进行划分所获得的信息增益为
#按照权重计算各分支的信息熵
def sum_weight(grouped,total_len):
    weight = len(grouped)/total_len
    return weight * Ent(grouped.iloc[:,-1])

#根据公式计算信息增益
def Gain(column, data):
    lenth = len(data)
    ent_sum = data.groupby(column).apply(lambda x:sum_weight(x,lenth)).sum()
    ent_D = Ent(data.iloc[:,-1])
    return ent_D - ent_sum

#计算按照属性'色泽'的信息增益
Gain('色泽', data)
[out]0.10812516526536531
4.使用递归构造决策树
这里我们使用字典存储决策树的结构,如相亲例子中的决策树为(就做两层)
{'是否有房子':{'是':{'是否长得帅':{'是':'见一见'},'否':'不见'},'否':'不见'}}
因为我工作中pandas用得比较多,所以表格数据处理部分用的是pandas
# 计算获取最大的信息增益的feature,输入data是一个dataframe,返回是一个字符串
def get_max_gain(data):
    max_gain = 0
    cols = data.columns[:-1]
    for col in cols:
        gain = Gain(col,data)
        if gain > max_gain:
            max_gain = gain
            max_label = col
    return max_label

#获取data中最多的类别作为节点分类,输入一个series,返回一个索引值,为字符串
def get_most_label(label_list):
    return label_list.value_counts().idxmax()

# 创建决策树,传入的是一个dataframe,最后一列为label
def TreeGenerate(data):
    feature = data.columns[:-1]
    label_list = data.iloc[:, -1]
    #如果样本全属于同一类别C,将此节点标记为C类叶节点
    if len(pd.unique(label_list)) == 1:
        return label_list.values[0]
    #如果待划分的属性集A为空,或者样本在属性A上取值相同,则把该节点作为叶节点,并标记为样本数最多的分类
    elif len(feature)==0 or len(data.loc[:,feature].drop_duplicates())==1:
        return get_most_label(label_list)
    #从A中选择最优划分属性
    best_attr = get_max_gain(data)
    tree = {best_attr: {}}
    #对于最优划分属性的每个属性值,生成一个分支
    for attr,gb_data in data.groupby(by=best_attr):
        if len(gb_data) == 0:
            tree[best_attr][attr] = get_most_label(label_list)
        else:
            #在data中去掉已划分的属性
            new_data = gb_data.drop(best_attr,axis=1)
            #递归构造决策树
            tree[best_attr][attr] = TreeGenerate(new_data)
    return tree

#得到经过训练后的决策树
mytree = TreeGenerate(data)
mytree
[out]{'纹理': {'模糊': '否',
  '清晰': {'根蒂': {'硬挺': '否',
    '稍蜷': {'色泽': {'乌黑': {'触感': {'硬滑': '是', '软粘': '否'}}, '青绿': '是'}},
    '蜷缩': '是'}},
  '稍糊': {'触感': {'硬滑': '否', '软粘': '是'}}}}
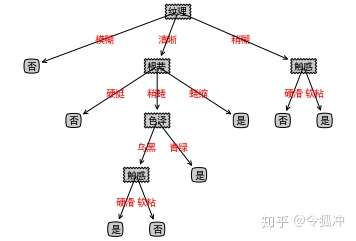
5.使用matplotlib绘制树形图
这里我们参考《机器学习实战》书中代码
#为了matplotlib中文正常显示,指定字体为SimHei
plt.rcParams['font.sans-serif']=['SimHei']
plt.rcParams['font.family']='sans-serif'

# 获取树的叶子节点数目
def get_num_leafs(decision_tree):
    num_leafs = 0
    first_str = next(iter(decision_tree))
    second_dict = decision_tree[first_str]
    for k in second_dict.keys():
        if isinstance(second_dict[k], dict):
            num_leafs += get_num_leafs(second_dict[k])
        else:
            num_leafs += 1
    return num_leafs

# 获取树的深度
def get_tree_depth(decision_tree):
    max_depth = 0
    first_str = next(iter(decision_tree))
    second_dict = decision_tree[first_str]
    for k in second_dict.keys():
        if isinstance(second_dict[k], dict):
            this_depth = 1 + get_tree_depth(second_dict[k])
        else:
            this_depth = 1
        if this_depth > max_depth:
            max_depth = this_depth
    return max_depth

# 绘制节点
def plot_node(node_txt, center_pt, parent_pt, node_type):
    arrow_args = dict(arrowstyle='<-')
    create_plot.ax1.annotate(node_txt, xy=parent_pt,  xycoords='axes fraction', xytext=center_pt, textcoords='axes fraction', va="center", ha="center", bbox=node_type,arrowprops=arrow_args)

# 标注划分属性
def plot_mid_text(cntr_pt, parent_pt, txt_str):
    x_mid = (parent_pt[0] - cntr_pt[0]) / 2.0 + cntr_pt[0]
    y_mid = (parent_pt[1] - cntr_pt[1]) / 2.0 + cntr_pt[1]
    create_plot.ax1.text(x_mid, y_mid, txt_str, va="center", ha="center", color='red')

# 绘制决策树
def plot_tree(decision_tree, parent_pt, node_txt):
    d_node = dict(boxstyle="sawtooth", fc="0.8")
    leaf_node = dict(boxstyle="round4", fc='0.8')
    num_leafs = get_num_leafs(decision_tree)
    first_str = next(iter(decision_tree))
    cntr_pt = (plot_tree.xoff + (1.0 +float(num_leafs))/2.0/plot_tree.totalW, plot_tree.yoff)
    plot_mid_text(cntr_pt, parent_pt, node_txt)
    plot_node(first_str, cntr_pt, parent_pt, d_node)
    second_dict = decision_tree[first_str]
    plot_tree.yoff = plot_tree.yoff - 1.0/plot_tree.totalD
    for k in second_dict.keys():
        if isinstance(second_dict[k], dict):
            plot_tree(second_dict[k], cntr_pt, k)
        else:
            plot_tree.xoff = plot_tree.xoff + 1.0/plot_tree.totalW
            plot_node(second_dict[k], (plot_tree.xoff, plot_tree.yoff), cntr_pt, leaf_node)
            plot_mid_text((plot_tree.xoff, plot_tree.yoff), cntr_pt, k)
    plot_tree.yoff = plot_tree.yoff + 1.0/plot_tree.totalD

def create_plot(dtree):
    fig = plt.figure(1, facecolor='white')
    fig.clf()
    axprops = dict(xticks=[], yticks=[])
    create_plot.ax1 = plt.subplot(111, frameon=False, **axprops)
    plot_tree.totalW = float(get_num_leafs(dtree))
    plot_tree.totalD = float(get_tree_depth(dtree))
    plot_tree.xoff = -0.5/plot_tree.totalW
    plot_tree.yoff = 1.0
    plot_tree(dtree, (0.5, 1.0), '')
    plt.show()

create_plot(mytree)

6.使用自己构造的决策树对西瓜数据集进行分析
#使用递归函数进行分类
def tree_predict(tree, data):
  feature = list(tree.keys())[0]
  label = data[feature]
  next_tree = tree[feature][label]
  if type(next_tree) == str:
    return next_tree
  else:
    return tree_predict(next_tree, data)

from sklearn.metrics import accuracy_score
from sklearn.model_selection import train_test_split

#切割训练集和测试集
X_train, X_test, y_train, y_test = train_test_split(data.iloc[:,:-1], data.iloc[:,-1], test_size = 0.2, random_state=1)
train = pd.concat([X_train,X_test],axis=1)

from sklearn.metrics import accuracy_score
from sklearn.model_selection import train_test_split

#切割训练集和测试集
X_train, X_test, y_train, y_test = train_test_split(data.iloc[:,:-1], data.iloc[:,-1], test_size = 0.2, random_state=1)
train = pd.concat([X_train,y_train],axis=1)

#训练模型
decition_tree = TreeGenerate(train)

#预测并计算准确率
y_predict = X_test.apply(lambda x:tree_predict(decition_tree, x),axis=1)
score = accuracy_score(y_test,y_predict)
score
[out]0.75
更多Python视频、源码、资料加群683380553免费获取
转自:https://zhuanlan.zhihu.com/p/43819989
未完待续
目前我们仅仅是用python构建了一棵简单的决策树,后续可以继续尝试根据基尼指数进行数据划分的决策树算法,并进行预剪枝、后剪枝处理;连续值、缺失值的处理。
本文来自博客园,作者:I'm_江河湖海,转载请注明原文链接:https://www.cnblogs.com/jhhh/p/16766873.html


【推荐】国内首个AI IDE,深度理解中文开发场景,立即下载体验Trae
【推荐】编程新体验,更懂你的AI,立即体验豆包MarsCode编程助手
【推荐】抖音旗下AI助手豆包,你的智能百科全书,全免费不限次数
【推荐】轻量又高性能的 SSH 工具 IShell:AI 加持,快人一步
· DeepSeek 开源周回顾「GitHub 热点速览」
· 物流快递公司核心技术能力-地址解析分单基础技术分享
· .NET 10首个预览版发布:重大改进与新特性概览!
· AI与.NET技术实操系列(二):开始使用ML.NET
· 单线程的Redis速度为什么快?